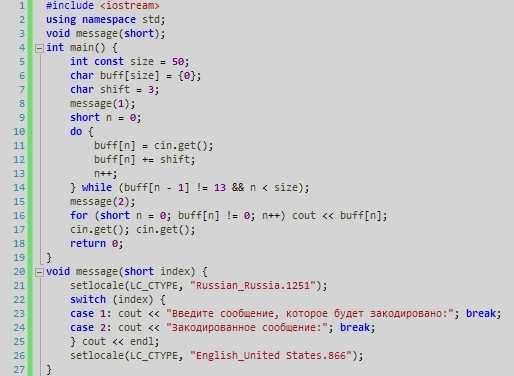
6: Проверка файлов
Последний сценарий проверяет сценарии перед их выполнением. В этом смысле он похож на verifydetach, но у него есть дополнительная функция – он может запускать сценарии, которые были проверены. Он принимает имя скрипта в качестве аргумента и затем проверяет подпись этого файла. Если проверка прошла успешно, скрипт отправит сообщение на консоль и запустит проверенный скрипт. В случае сбоя процесса проверки сценарий отправит сообщение об ошибке на консоль и прервет выполнение файла.
Создайте файл verifyfile.py:
Сначала импортируйте библиотеки и определите рабочие каталоги:
Чтобы скрипт работал, необходимо сохранить имя файла, который нужно проверить и запустить. Для этого создайте новую переменную script_to_run:
Эта переменная принимает первый аргумент и сохраняет его во вновь созданной переменной. Затем скрипт откроет файл отделенной подписи, сверит файл в script_to_run со своей подписью, а затем выполнит его, если тот пройдет проверку:
В результате скрипт будет выглядеть так:
Итак, все скрипты готовы. Но на данный момент их можно запускать только из текущей папки. Давайте изменим это.
Download the latest release
The latest stable release is available here:
- pycrypto-2.6.1.tar.gz
- pycrypto-2.6.1.tar.gz.asc
- ChangeLog
The latest experimental release is available here:
- pycrypto-2.7a1.tar.gz
- pycrypto-2.7a1.tar.gz.asc
- ChangeLog
SHA256 sums:
f2ce1e989b272cfcb677616763e0a2e7ec659effa67a88aa92b3a65528f60a3c *pycrypto-2.6.1.tar.gz
c2ab0516cc55321e6543ae75e2aa6f6e56e97432870f32a7799f3b89f467dc1b *pycrypto-2.6.1.tar.gz.asc

ee4013e297e6a5da5c9f49a3e38dc8a5c62ae816377aa766c9e87474197be3b9 *pycrypto-2.7a1.tar.gz
726c2711133ca210c3bc1c9f75c9d638a6235cacef8f8129fb61879e2f336e1a *pycrypto-2.7a1.tar.gz.asc
Crypto.Util.Padding module
This module provides minimal support for adding and removing standard padding
from data. Example:
>>> from Crypto.Util.Padding import pad, unpad
>>> from Crypto.Cipher import AES
>>> from Crypto.Random import get_random_bytes
>>>
>>> data = b'Unaligned'   # 9 bytes
>>> key = get_random_bytes(32)
>>> iv = get_random_bytes(16)
>>>
>>> cipher1 = AES.new(key, AES.MODE_CBC, iv)
>>> ct = cipher1.encrypt(pad(data, 16))
>>>
>>> cipher2 = AES.new(key, AES.MODE_CBC, iv)
>>> pt = unpad(cipher2.decrypt(ct), 16)
>>> assert(data == pt)
- (data_to_pad, block_size, style=’pkcs7′)
-
Apply standard padding.
Parameters: - data_to_pad (byte string) – The data that needs to be padded.
-
block_size (integer) – The block boundary to use for padding. The output length is guaranteed
to be a multiple of . - style (string) – Padding algorithm. It can be ‘pkcs7’ (default), ‘iso7816’ or ‘x923’.
Returns: the original data with the appropriate padding added at the end.
Return type: byte string
File Encryption with AES
We have three issues to consider when encrypting files using AES. We explain them in detail below.
First step is to create the encryption cipher.
aes = AES.new(key, AES.MODE_CBC, iv)
6.1. Write the Size of the File
First we have to write the size of the file being encrypted to the output. This is required to remove any padding applied to the data while encrypting (check code below).
Determine the size of the file.
fsz = os.path.getsize(infile)
Open the output file and write the size of the file. We use the struct package for the purpose.
with open(encfile, 'w') as fout:
    fout.write(struct.pack('<Q', fsz))
6.2. Save the Initialization Vector
As explained above, the receiver needs the initialization vector. Write the initialization vector to the output, again in clear text.
fout.write(iv)
6.3. Adjust Last Block
The third issue is that AES encryption requires that each block being written be a multiple of 16 bytes in size. So we read, encrypt and write the data in chunks. The chunk size is required to be a multiple of 16.
sz = 2048
This means the last block written might require some padding applied to it. This is the reason why the file size needs to be stored in the output.
Here is the complete write code.
    with open(infile) as fin:
        while True:
            data = fin.read(sz)
            n = len(data)
            if n == 0:
                break
            elif n % 16 != 0:
                data += ' ' * (16 - n % 16) # <- padded with spaces
            encd = aes.encrypt(data)
            fout.write(encd)
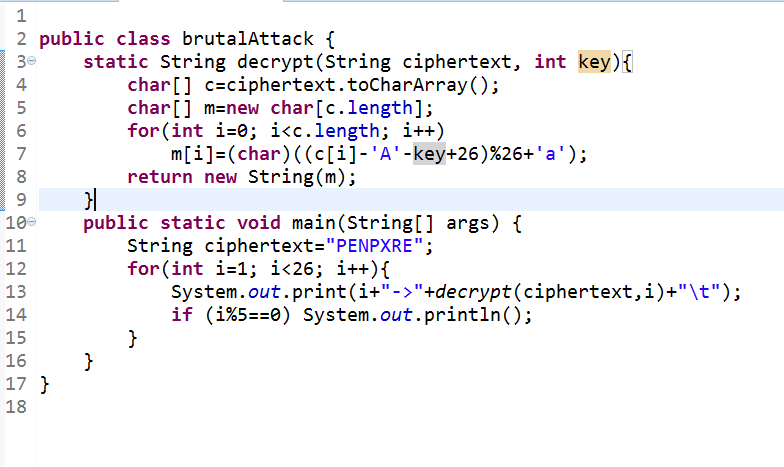
Обратный шифр
2.1 Пример:
Давайте рассмотрим следующие примеры открытого текста и обратного шифра
-
Каждый навык, приобретенный в кибербезопасности, усердно выиграл. Он включает в себя широкий массив предварительных условий (даже) для начала.
-
EdRtarts Teg OT Setisiuqererp Fo Yarra A Sedulcni теперь Drah Si YtiRuces Reyc Ni Deriuqca Lliks Yreve.
С заявлением (1), кто-то может читать и понять это ясно. Как насчет высказывания 2 – это абсолютный гибберский, или так похоже на это. Однако криптаналитик может быть в состоянии расшифровать концепцию заявления (2).
В приведенных выше примерах заявление (1) является простой текстом, а оператор (2) является обратным выбором шифров. Таким образом, криптография определяется как искусство манипулирования или скремблирования простого текста в зашифрованное текст.
2.2 Основы Python
Python это интерпретирован , высокий уровень , общего назначения Язык программирования Отказ Создано Гвидо Ван Россом И впервые выпущено в 1991 году, философия дизайна Python подчеркивает Читаемость кода С его заметным использованием Значительный пробел Отказ Его языковые конструкции и Объектно-ориентированные Подход Цель, чтобы помочь программистам написать четкое, логический код для небольших и масштабных проектов.
# Printing a "Hello World!"
print("Hello world!")

# Declaration of strings is shown below:
variable_name_string = "Variable content string"
print(variable_name_string)

# He lists of python can be declared as compound data types, separated by commas and enclosed within square brackets ([]).
list =
tinylist =
print(list)
print(tinylist)

# Python dictionary is a type of hash table. A dictionary key can be almost any data type of Python, which are usually numbers or strings.
thisdict = {
  "brand": "Ford",
  "model": "Mustang",
  "year": 1964
}
print(thisdict)
print(thisdict) # Note the difference

# Printing the values
for x in thisdict:
  print(x)

# Printing the keys
for x in thisdict:
  print(thisdict)

# Printing keys + values
for x, y in thisdict.items():
  print(x, y)

# adding a key and its value
thisdict = "red"
print(thisdict)

# removing the first item (here it's brand)
thisdict.popitem()
print(thisdict)

# The del keyword removes the item with the specified key name
del thisdict
print(thisdict)
2.3 Кодирование программы обратного шифра:
(Создание подходящего алгоритма для этого случая) -> шифр шифра.
message = 'This is program to explain reverse cipher.'
translated = '' #cipher text is stored in this variable
i = len(message) - 1

while i >= 0:
   translated = translated + message
   i = i - 1
print("The cipher text is : ", translated)
Crypto.Protocol.Chaffing
Winnowing and chaffing is a technique for enhancing privacy without requiring
strong encryption. In short, the technique takes a set of authenticated
message blocks (the wheat) and adds a number of chaff blocks which have
randomly chosen data and MAC fields. This means that to an adversary, the
chaff blocks look as valid as the wheat blocks, and so the authentication
would have to be performed on every block. By tailoring the number of chaff
blocks added to the message, the sender can make breaking the message
computationally infeasible. There are many other interesting properties of
the winnow/chaff technique.
For example, say Alice is sending a message to Bob. She packetizes the
message and performs an all-or-nothing transformation on the packets. Then
she authenticates each packet with a message authentication code (MAC). The
MAC is a hash of the data packet, and there is a secret key which she must
share with Bob (key distribution is an exercise left to the reader). She then
adds a serial number to each packet, and sends the packets to Bob.
Bob receives the packets, and using the shared secret authentication key,
authenticates the MACs for each packet. Those packets that have bad MACs are
simply discarded. The remainder are sorted by serial number, and passed
through the reverse all-or-nothing transform. The transform means that an
eavesdropper (say Eve) must acquire all the packets before any of the data can
be read. If even one packet is missing, the data is useless.
There’s one twist: by adding chaff packets, Alice and Bob can make Eve’s job
much harder, since Eve now has to break the shared secret key, or try every
combination of wheat and chaff packet to read any of the message. The cool
thing is that Bob doesn’t need to add any additional code; the chaff packets
are already filtered out because their MACs don’t match (in all likelihood —
since the data and MACs for the chaff packets are randomly chosen it is
possible, but very unlikely that a chaff MAC will match the chaff data). And
Alice need not even be the party adding the chaff! She could be completely
unaware that a third party, say Charles, is adding chaff packets to her
messages as they are transmitted.
Chaff(factor=1.0, blocksper=1):
Class implementing the chaff adding algorithm.
factor is the number of message blocks
to add chaff to, expressed as a percentage between 0.0 and 1.0; the default value is 1.0.
blocksper is the number of chaff blocks to include for each block
being chaffed, and defaults to 1. The default settings
add one chaff block to every
message block. By changing the defaults, you can adjust how
computationally difficult it could be for an adversary to
brute-force crack the message. The difficulty is expressed as:
pow(blocksper, int(factor * number-of-blocks))
For ease of implementation, when factor < 1.0, only the first
int(factor*number-of-blocks) message blocks are chaffed.
Chaff instances have the following methods:
chaff(blocks):
Add chaff to message blocks. blocks is a list of 3-tuples of the
form (serial-number, data, MAC).
Шифровка файла
Теперь у нас в распоряжении есть и приватный и публичный ключи, так что мы можем зашифровать кое-какие данные и вписать их в файл. Вот достаточно простой пример:
Python
from Crypto.PublicKey import RSA
from Crypto.Random import get_random_bytes
from Crypto.Cipher import AES, PKCS1_OAEP
with open(‘encrypted_data.bin’, ‘wb’) as out_file:
recipient_key = RSA.import_key(
open(‘my_rsa_public.pem’).read()
)
session_key = get_random_bytes(16)
cipher_rsa = PKCS1_OAEP.new(recipient_key)
out_file.write(cipher_rsa.encrypt(session_key))
cipher_aes = AES.new(session_key, AES.MODE_EAX)
data = b’blah blah blah Python blah blah’
ciphertext, tag = cipher_aes.encrypt_and_digest(data)
out_file.write(cipher_aes.nonce)
out_file.write(tag)
out_file.write(ciphertext)
|
1 2 3 4 5 6 7 8 9 10 11 12 13 14 15 16 17 18 19 20 21 22 |
fromCrypto.PublicKey importRSA fromCrypto.Randomimportget_random_bytes fromCrypto.Cipher importAES,PKCS1_OAEP withopen(‘encrypted_data.bin’,’wb’)asout_file recipient_key=RSA.import_key( open(‘my_rsa_public.pem’).read() ) session_key=get_random_bytes(16) cipher_rsa=PKCS1_OAEP.new(recipient_key) out_file.write(cipher_rsa.encrypt(session_key)) cipher_aes=AES.new(session_key,AES.MODE_EAX) data=b’blah blah blah Python blah blah’ ciphertext,tag=cipher_aes.encrypt_and_digest(data) out_file.write(cipher_aes.nonce) out_file.write(tag) out_file.write(ciphertext) |
Первые три строки покрывают наши импорты из PyCryptodome. Далее мы открываем файл для записи. Далее, мы импортируем наш публичный ключ в переменной и создаем 16-битный ключ сессии. Для этого примера мы будем использовать гибридный метод шифрования, так что мы используем PKCS#1 OAEP (Optimal asymmetric encryption padding). Это позволяет нам записывать данные произвольной длинны в файл. Далее, мы создаем наш шифр AES, создаем кое-какие данные и шифруем их. Это дает нам зашифрованный текст и MAC. Наконец, мы выписываем nonce, MAC (или тег), а также зашифрованный текст. К слову, nonce – это произвольное число, которое используется только в криптографических связях. Обычно это случайные или псевдослучайные числа. Для AES, оно должно быть минимум 16 байтов в ширину. Вы вольны попытаться открыть зашифрованный файл в своем текстовом редакторе. Вы увидите только какое-то безобразие. Теперь попробуем расшифровать наши данные:
Python
from Crypto.PublicKey import RSA
from Crypto.Cipher import AES, PKCS1_OAEP
code = ‘nooneknows’
with open(‘encrypted_data.bin’, ‘rb’) as fobj:
private_key = RSA.import_key(
open(‘my_rsa_key.pem’).read(),
passphrase=code
)
enc_session_key, nonce, tag, ciphertext =
cipher_rsa = PKCS1_OAEP.new(private_key)
session_key = cipher_rsa.decrypt(enc_session_key)
cipher_aes = AES.new(session_key, AES.MODE_EAX, nonce)
data = cipher_aes.decrypt_and_verify(ciphertext, tag)
print(data)
|
1 2 3 4 5 6 7 8 9 10 11 12 13 14 15 16 17 18 19 20 21 22 23 |
fromCrypto.PublicKey importRSA fromCrypto.Cipher importAES,PKCS1_OAEP code=’nooneknows’ withopen(‘encrypted_data.bin’,’rb’)asfobj private_key=RSA.import_key( open(‘my_rsa_key.pem’).read(), passphrase=code ) enc_session_key,nonce,tag,ciphertext= fobj.read(x)forxin(private_key.size_in_bytes(),16,16,-1) cipher_rsa=PKCS1_OAEP.new(private_key) session_key=cipher_rsa.decrypt(enc_session_key) cipher_aes=AES.new(session_key,AES.MODE_EAX,nonce) data=cipher_aes.decrypt_and_verify(ciphertext,tag) print(data) |
Если вы разобрались с предыдущим примером, то этот код должен быть весьма простым для разбора. В данном случае, мы открываем наш зашифрованный файл для чтения в бинарном режиме. Далее, мы импортируем наш приватный ключ
Обратите внимание на то, что когда вы импортируете приватный ключ, вы должны передать ему код доступа. В противном случае возникнет ошибка
Далее мы считываем наш файл. Вы заметите, что сначала мы считываем приватный ключ, затем 16 байтов для nonce, за которыми следуют 16 байтов, которые являются тегом, и наконец, остальную часть файла, который и является нашими данными. Далее нам нужно расшифровать наш ключ сессии, пересоздать наш ключ AES и расшифровать данные. Вы можете использовать PyCryptodome в намного более широком ряде случаев. Однако, нам нужно идти дальше и посмотреть, что еще мы можем сделать для наших криптографических нужд в Python.
Adding Block Encryption Algorithms
The required constant definitions are as follows:
#define MODULE_NAME AES        /* Name of algorithm */
#define BLOCK_SIZE 16          /* Size of encryption block */
#define KEY_SIZE 0             /* Size of key in bytes (0 if not fixed size) */
The C structure must be named block_state:
typedef struct {
     ... whatever state variables you need ...
} block_state;
There are three functions that need to be written: to initialize the
algorithm’s state, and to encrypt and decrypt a single block.
- void block_init(block_state *self, unsigned char *key, int keylen);
- void block_encrypt(block_state *self, unsigned char *in, unsigned char *out);
- void block_decrypt(block_state *self, unsigned char *in, unsigned char *out);
2: Установка Python-GnuPG и подпись файлов
Установив ключи, вы можете установить модуль python-gnupg, который действует как оболочка для GnuPG и обеспечивает взаимодействие между GnuPG и Python 3. Используя этот модуль, вы сможете создавать сценарии Python, которые выполняют следующие действия:
- Создавать отдельные подписи для файлов (это повысит безопасность процесса подписи, отделив подписи от файлов).
- Шифровать файлы.
- Расшифровывать файлы.
- Проверять отдельные подписи и скрипты.
Сначала мы создадим сценарии и тестовые файлы, а затем перейдем к тестированию сценариев для этих файлов.
Для начала давайте установим модуль python-gnupg вместе с пакетом fs, который позволит вам открывать, читать и изменять тестовые файлы. Обновите индекс пакетов и установите новые пакеты с помощью pip:
Установив эти пакеты, вы можете создать необходимые скрипты и файлы.
Для хранения скриптов и тестовых файлов создайте в домашнем каталоге новый каталог python-test:
Перейдите в него:
Создайте три тестовых файла:
Чтобы создать отдельные подписи для этих тестовых файлов, создайте скрипт signdetach.py, который охватывает все файлы в каталоге, где он выполняется. Подпись действует как метка времени и удостоверяет подлинность документа.
Отдельные подписи будут храниться в новой папке signatures/, которая будет создана при запуске скрипта.
Откройте новый файл signdetach.py, используя nano или другой текстовый редактор:
Сначала импортируйте все необходимые модули для скрипта. К ним относятся пакеты os и fs, которые включают навигацию по файлам, и gnupg:
Теперь определите каталог, где GnuPG сможет найти ключи шифрования. GnuPG по умолчанию хранит свои ключи в .gnupg, поэтому укажите здесь имя вашего пользователя (обязательно замените 8host именем вашего пользователя):
Далее создайте переменную home_fs для хранения текущего расположения каталога в виде объекта файла. Это позволит сценарию работать в каталоге, в котором он выполняется:
На данный момент скрипт выглядит так:
Этот блок конфигурации является базовым шаблоном, который вы будете использовать и в других сценариях в этом мануале.
Затем добавьте такой код, чтобы проверить, существует ли папка signatures/, и создать ее, если ее нет:
Создайте пустой массив для хранения имен файлов, а затем просканируйте текущий каталог, добавляя все имена файлов в массив files_dir:
Следующее, что сделает скрипт, это создаст отдельные подписи для файлов. Прохождение массива files_dir создаст подпись для каждого файла, используя первый закрытый ключ в вашем наборе ключей. Чтобы получить доступ к закрытому ключу, нужно разблокировать его с помощью установленной вами парольной фразы. Замените «my passphrase» той фразой, которую вы использовали, когда генерировали пару ключей (по мануалу Шифрование и подпись сообщений с помощью GPG):
После выполнения скрипта все подписи будут помещены в папку signatures/. В результате скрипт будет выглядеть так:
Теперь можно приступать к шифрования файлов.
Examples
In these examples, I will use the CFB mode to show that the input data can be encrypted and then decrypted to give the original input data.
In each example I will generate a new key that will be used in the session; as described before, you will need to generate a key yourself and save it for encryption and decryption since encryption and decryption most likely won’t be done in the same session (you can’t rely on to get your key back).
File Example Proof
In this proofm I will demonstrate how to encrypt and decrypt a file. This example will be a bit different from the examples above as I will be reading and writing to and from files using a buffer. This allows me to encrypt much larger files without the whole file having to be loaded into memory.
Crypto.Util.number module
- (x, y)
-
Greatest Common Denominator of and .
- (s)
-
Convert a byte string to a long integer (big endian).
In Python 3.2+, use the native method instead:
>>> int.from_bytes(s, 'big')
For instance:
>>> int.from_bytes(b'P', 'big')
80
This is (essentially) the inverse of .
- (n, d)
-
Return ceil(n/d), that is, the smallest integer r such that r*d >= n
- (N, randfunc=None)
-
Return a random N-bit prime number.
N must be an integer larger than 1.
If randfunc is omitted, then is used. -
- (N, randfunc=None)
-
Return a random number at most N bits long.
If is omitted, then is used.
Deprecated since version 3.0: This function is for internal use only and may be renamed or removed in
the future. Use instead.
- (N, randfunc=None)
-
Return a random number with exactly N-bits,
i.e. a random number between 2**(N-1) and (2**N)-1.If is omitted, then is used.
Deprecated since version 3.0: This function is for internal use only and may be renamed or removed in
the future.
- (a, b, randfunc=None)
-
Return a random number n so that a <= n < b.
If is omitted, then is used.
Deprecated since version 3.0: This function is for internal use only and may be renamed or removed in
the future. Use instead.
- (N, e=0, false_positive_prob=1e-06, randfunc=None)
-
Return a random strong N-bit prime number.
In this context, p is a strong prime if p-1 and p+1 have at
least one large prime factor.Parameters: -
N (integer) – the exact length of the strong prime.
It must be a multiple of 128 and > 512. -
e (integer) – if provided, the returned prime (minus 1)
will be coprime to e and thus suitable for RSA where
e is the public exponent. -
false_positive_prob (float) – The statistical probability for the result not to be actually a
prime. It defaults to 10-6.
Note that the real probability of a false-positive is far less. This is
just the mathematically provable limit. -
randfunc (callable) – A function that takes a parameter N and that returns
a random byte string of such length.
If omitted, is used.
Returns: The new strong prime.
Deprecated since version 3.0: This function is for internal use only and may be renamed or removed in
the future. -
N (integer) – the exact length of the strong prime.
- (u, v)
-
The inverse of mod .
- (N, false_positive_prob=1e-06, randfunc=None)
-
Test if a number N is a prime.
Parameters: -
false_positive_prob (float) – The statistical probability for the result not to be actually a
prime. It defaults to 10-6.
Note that the real probability of a false-positive is far less.
This is just the mathematically provable limit. -
randfunc (callable) – A function that takes a parameter N and that returns
a random byte string of such length.
If omitted, is used.
Returns: True is the input is indeed prime.
-
false_positive_prob (float) – The statistical probability for the result not to be actually a
- (n, blocksize=0)
-
Convert a positive integer to a byte string using big endian encoding.
If is absent or zero, the byte string will
be of minimal length.Otherwise, the length of the byte string is guaranteed to be a multiple
of . If necessary, zeroes () are added at the left.Note
In Python 3, if you are sure that can fit into
bytes, you can simply use the native method instead:>>> n.to_bytes(blocksize, 'big')
For instance:
>>> n = 80
>>> n.to_bytes(2, 'big')
b'\x00P'
However, and unlike this function,
an exception is raised if does not fit.
- (N)
-
Returns the size of the number N in bits.
Пакет cryptography
Пакет cryptography нацелен на то, чтобы быть «криптографом для людей», равно как и библиотека является «HTTP для людей». Суть в том, что вам нужно разработать простые криптографические рецепты которые и безопасны, и простые в использовании. Если нужно, вы можете перейти к низкоуровневым криптографическим примитивам, для которых требуется лишь знать, что вы делаете, в противном случае вы создадите что-то явно бесполезное в контексте защиты. Если вы работаете в Python 3.5 Windows, вы можете установить этот пакет при помощи pip следующим образом:
Python
pip install cryptography
| 1 | pip install cryptography |
Вы увидите, что cryptography установится совместно с несколькими зависимостями. Предположим, что с установкой все прошло чисто, и мы можем зашифровать какой-нибудь текст. Давайте используем для этого модуль Fernet.
Модуль Fernet реализует простую в использовании схему аутентификации, которая использует симметричный алгоритм шифрования, который гарантирует, что каждое зашифрованное в нем сообщение не может быть использовано или прочитано без определенного вами ключа. Модуль Fernet также поддерживает ключ ротации через MultiFernet. Давайте взглянем на простой пример:
Python
from cryptography.fernet import Fernet
cipher_key = Fernet.generate_key()
print(cipher_key) # APM1JDVgT8WDGOWBgQv6EIhvxl4vDYvUnVdg-Vjdt0o=
|
1 2 3 4 |
fromcryptography.fernet importFernet cipher_key=Fernet.generate_key() print(cipher_key)# APM1JDVgT8WDGOWBgQv6EIhvxl4vDYvUnVdg-Vjdt0o= |
Python
from cryptography.fernet import Fernet
cipher = Fernet(cipher_key)
text = b’My super secret message’
encrypted_text = cipher.encrypt(text)
print(encrypted_text)
# (b’gAAAAABXOnV86aeUGADA6mTe9xEL92y_m0_TlC9vcqaF6NzHqRKkjEqh4d21PInEP3C9HuiUkS9f’
# b’6bdHsSlRiCNWbSkPuRd_62zfEv3eaZjJvLAm3omnya8=’)
|
1 2 3 4 5 6 7 8 9 10 |
fromcryptography.fernet importFernet cipher=Fernet(cipher_key) text=b’My super secret message’ encrypted_text=cipher.encrypt(text) print(encrypted_text) |
Python
decrypted_text = cipher.decrypt(encrypted_text)
print(decrypted_text) # ‘My super secret message’
|
1 2 |
decrypted_text=cipher.decrypt(encrypted_text) print(decrypted_text)# ‘My super secret message’ |
Для начала, нам нужно импортировать Fernet. Затем мы генерируем ключ. Мы выводим ключ, чтобы увидеть, как он выглядит. Как вы видите, это случайна строка байтов. Если хотите, вы можете попробовать запустить метод generate_key несколько раз. Результат каждый раз новый. Далее мы создаем экземпляр нашего шифра Fernet при помощи нашего ключа. Теперь у нас есть шифр, который мы можем использовать для шифрования и расшифровки нашего сообщения. Следующий шаг, это создание сообщения, достойного шифровки, с последующей его шифровкой при помощи метода encrypt. Я пошел вперед и вывел наш зашифрованный текст так, чтобы вы увидели что вы больше не можете его читать. Для расшифровки нашего супер-засекреченного сообщения, мы просто вызовем метод decrypt в нашем шифре и передадим зашифрованный текст. В результате мы получим текстовую байтовую строку нашего сообщения.
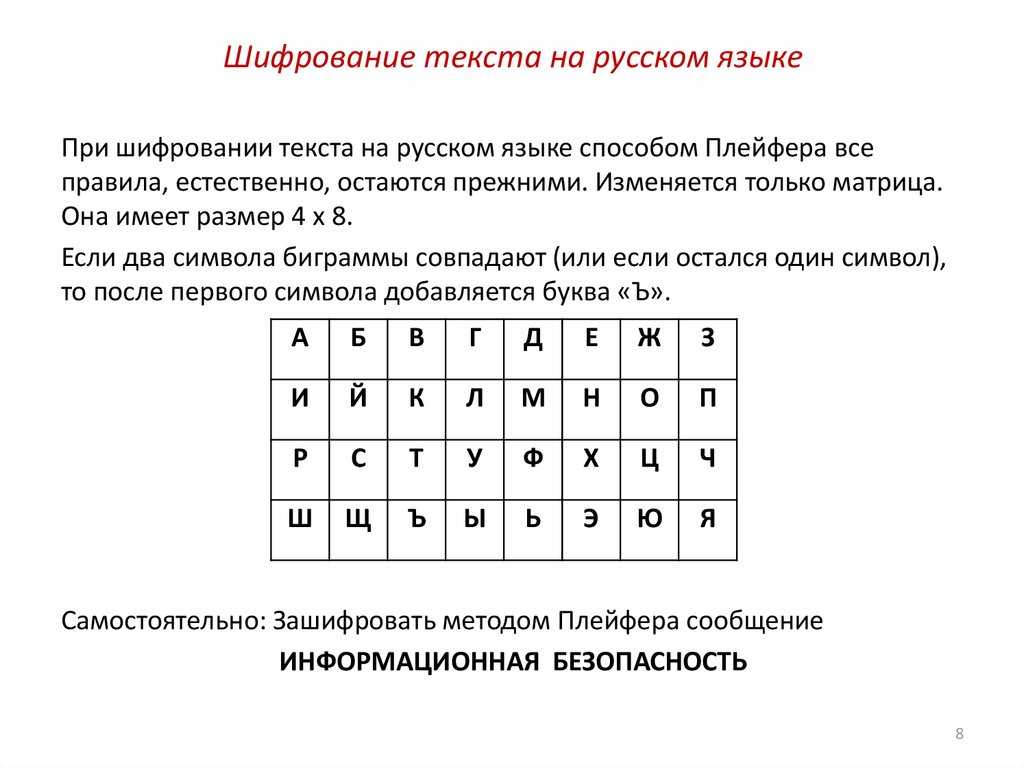
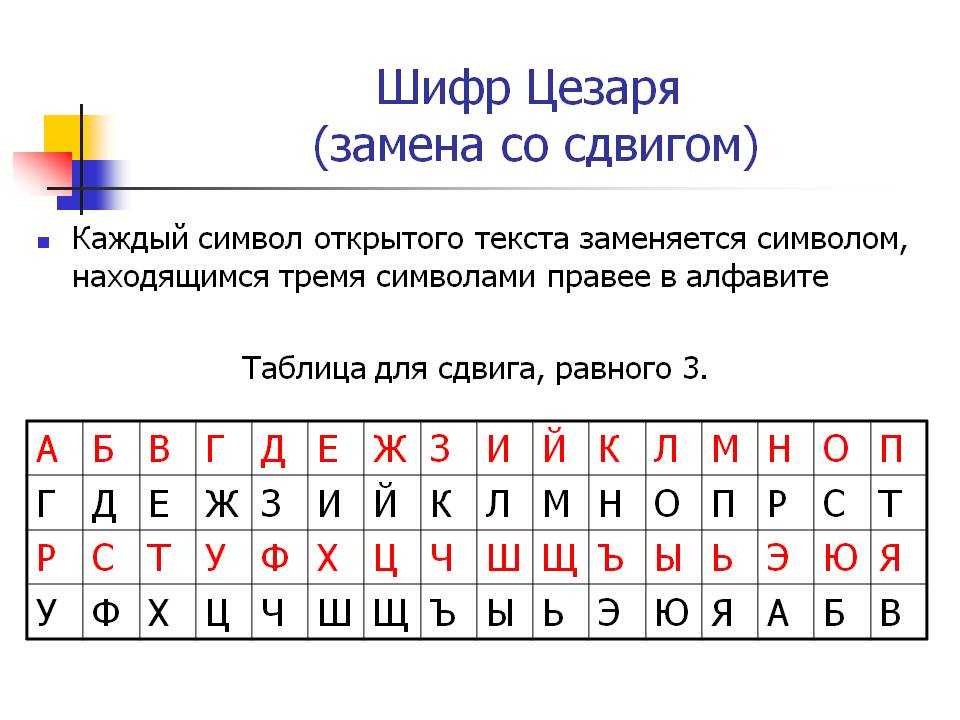
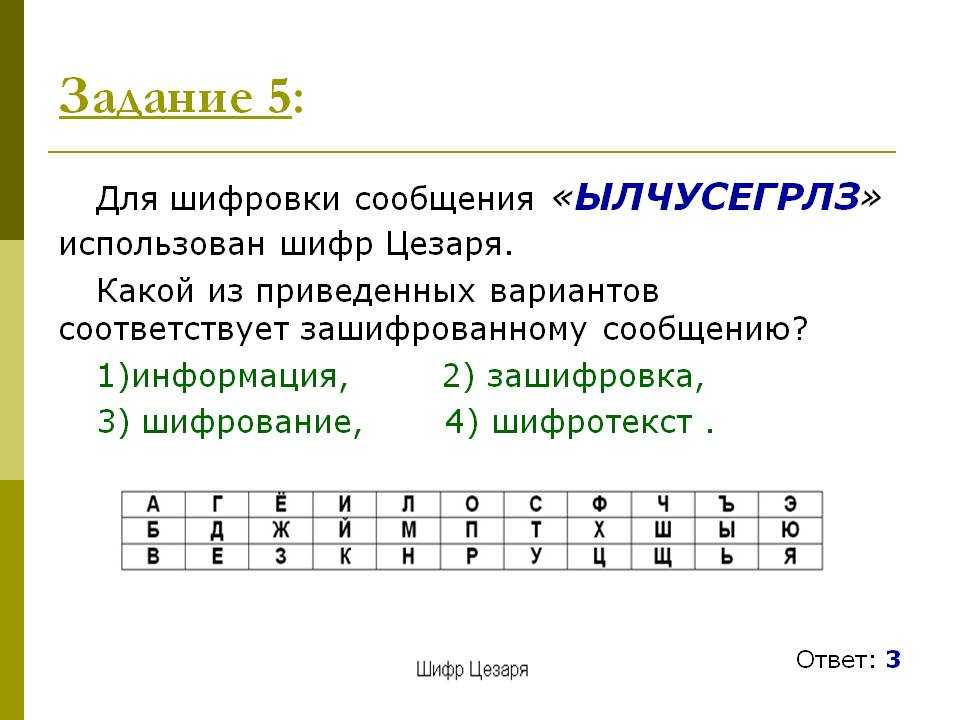
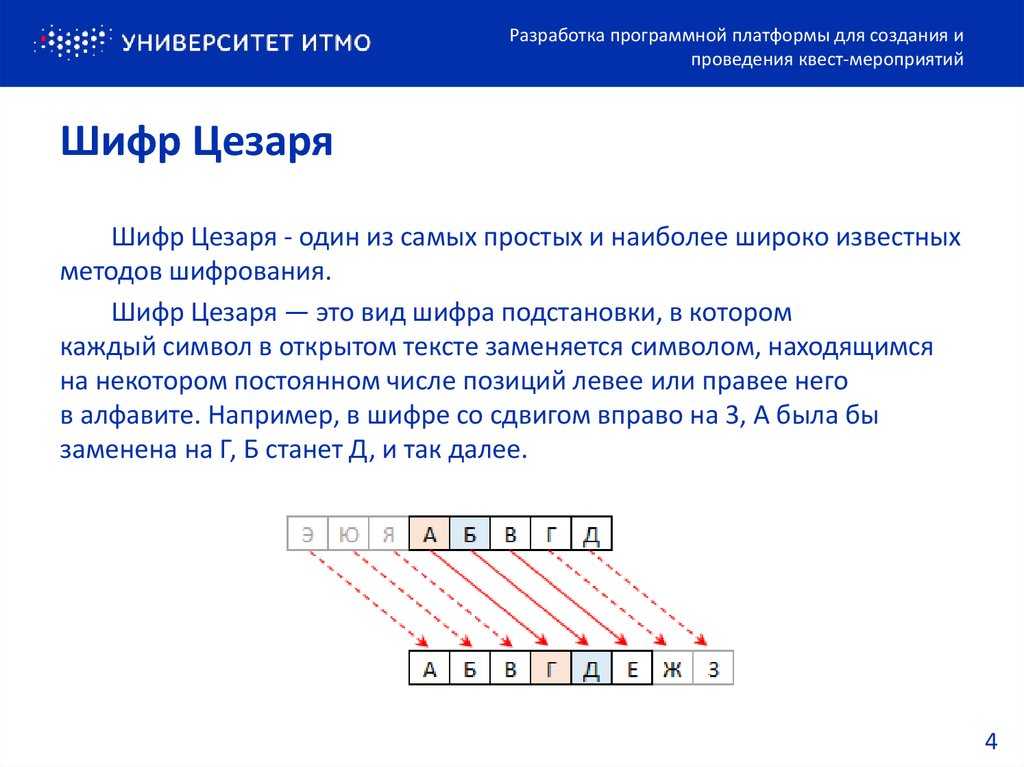
Шифрование
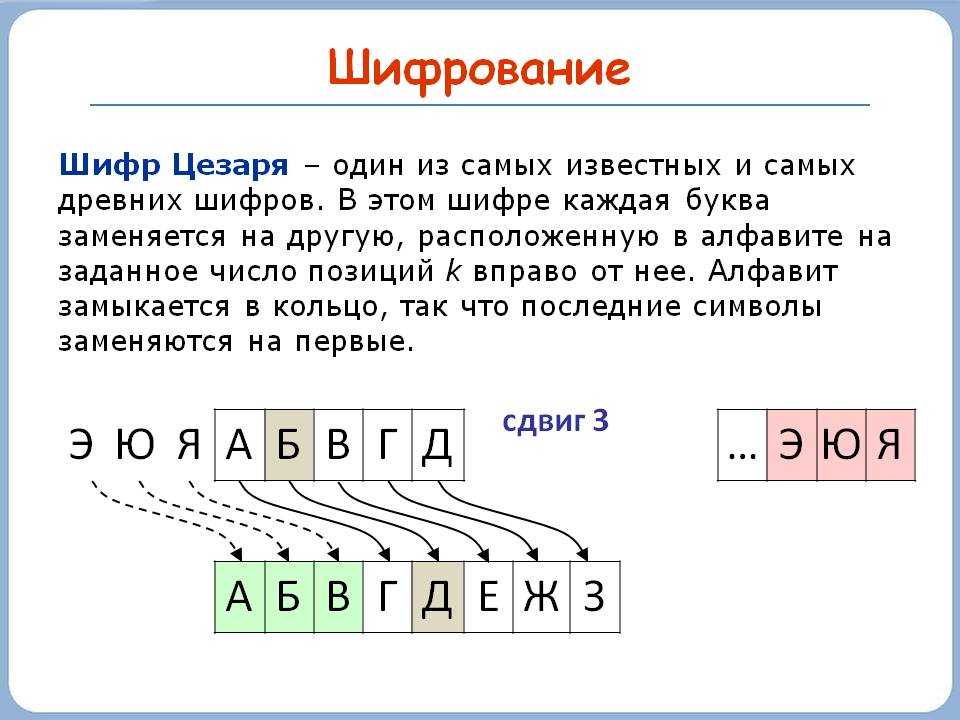
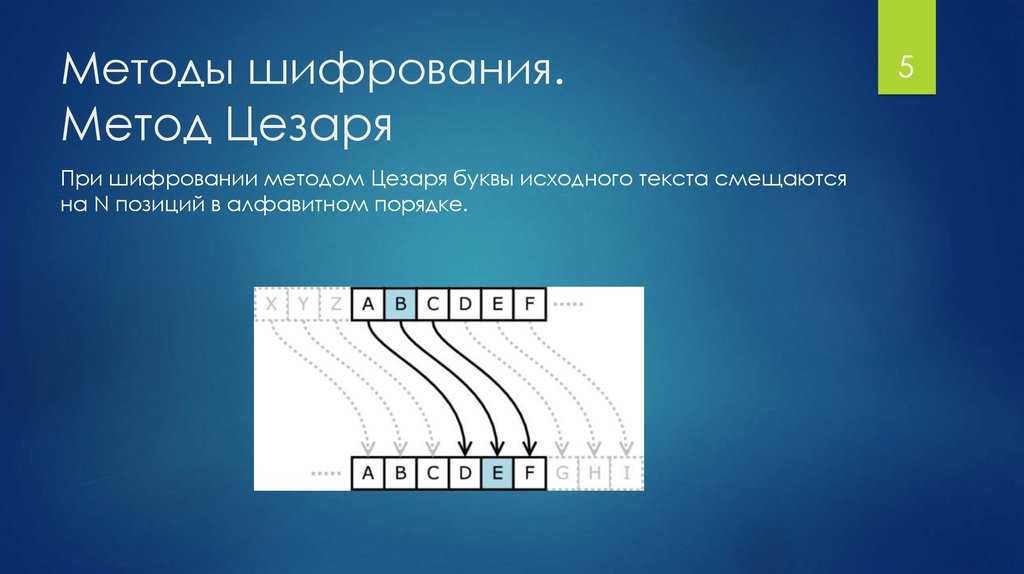
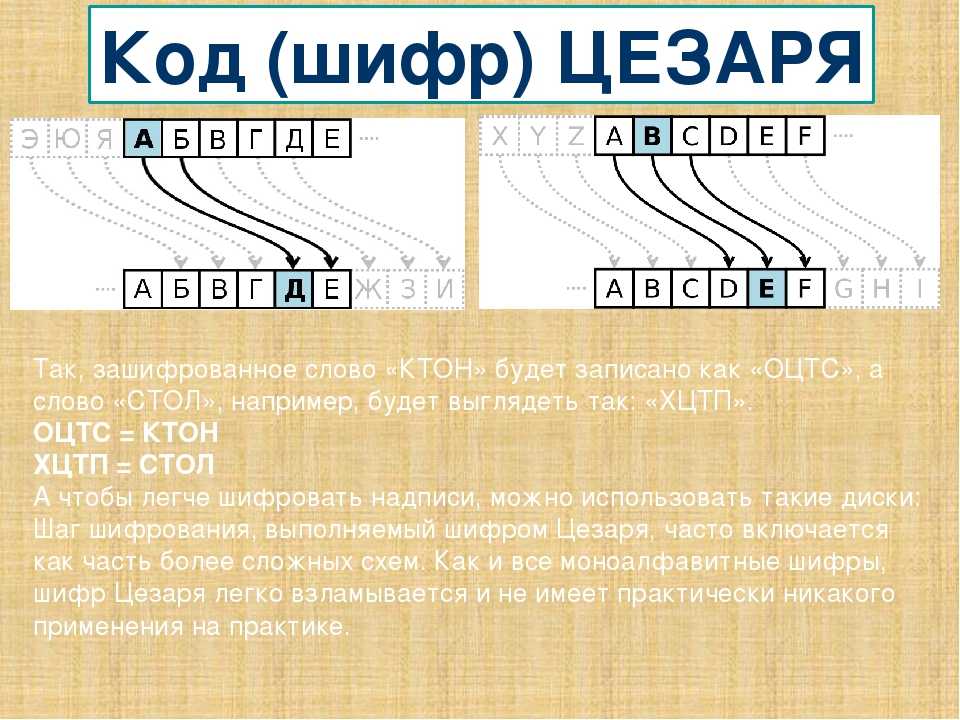
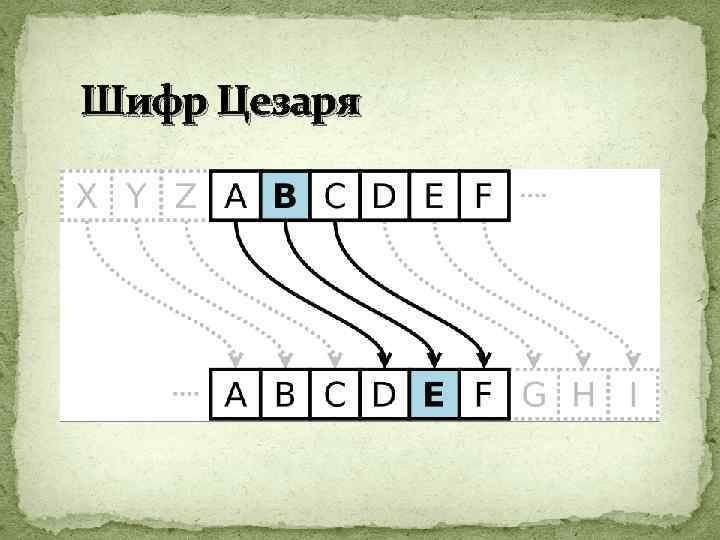
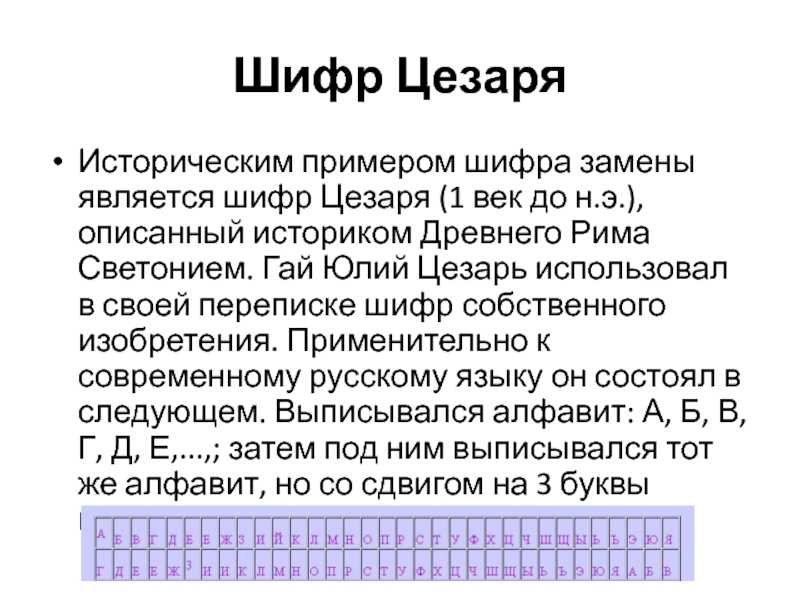
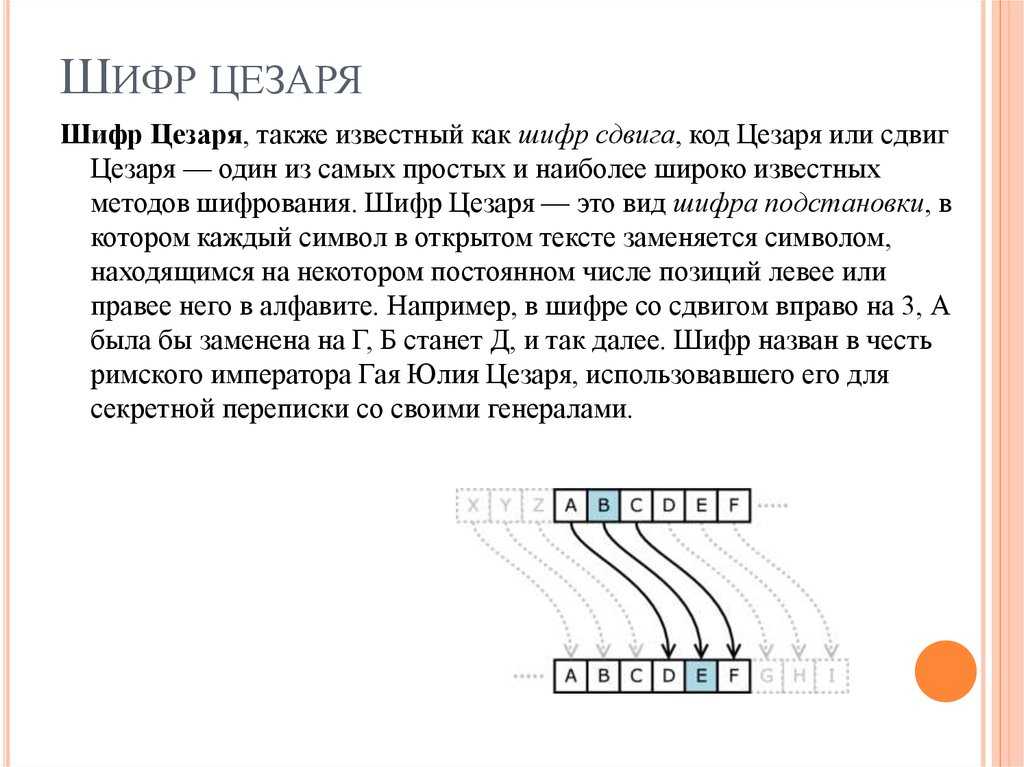
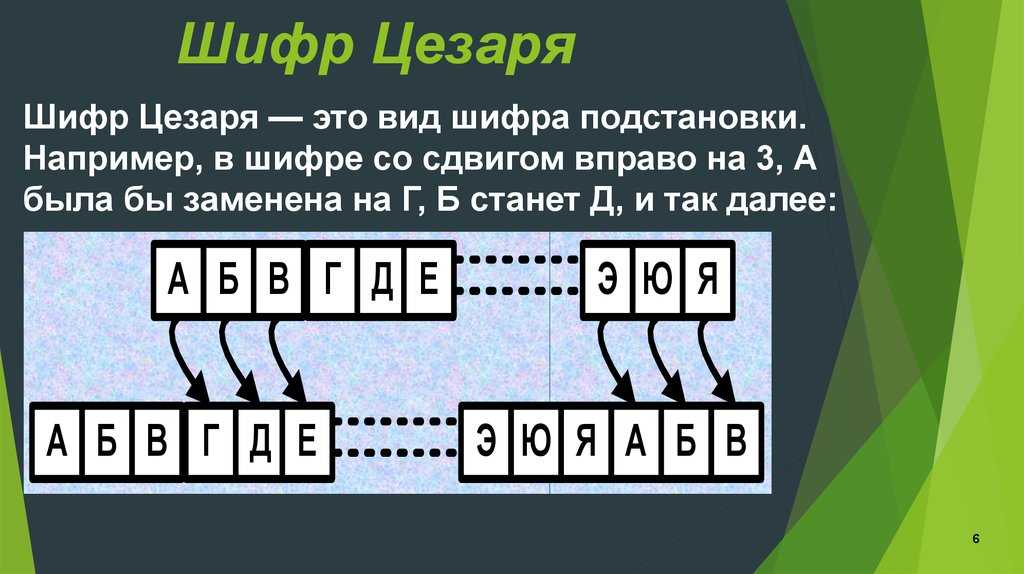
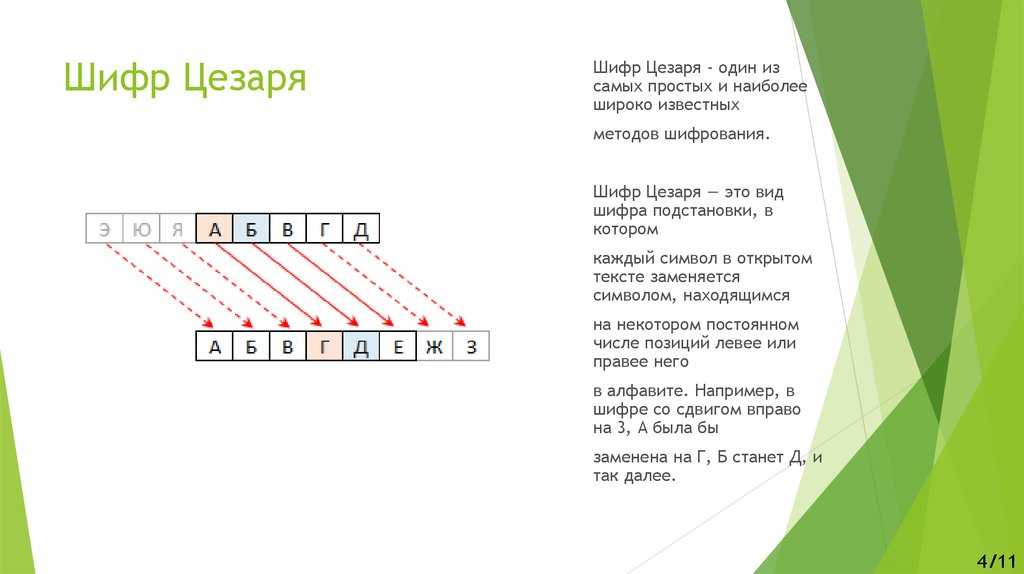
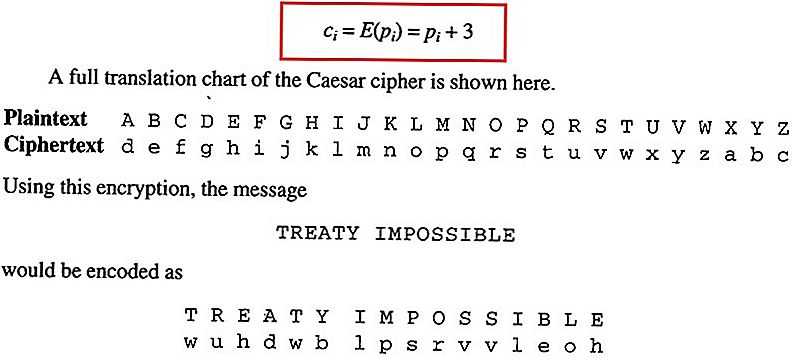
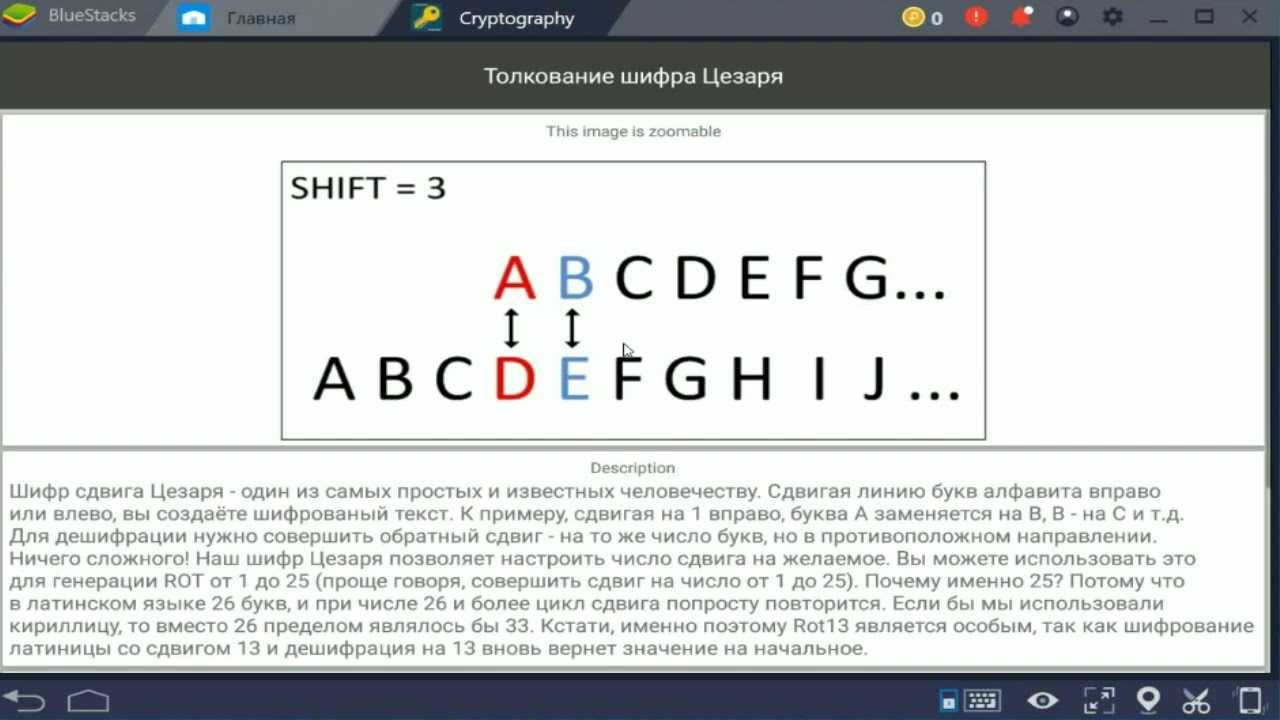
Шифр Цезаря
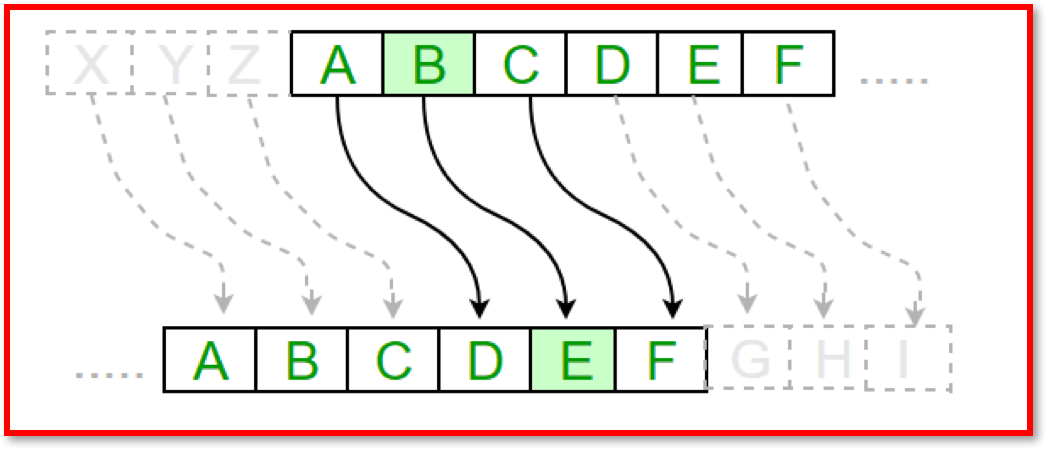
Шифр Цезаря — это вид шифра подстановки, в котором каждый символ в открытом тексте заменяется символом, находящимся на некотором постоянном числе позиций левее или правее него в алфавите. Например, в шифре со сдвигом вправо на 3, A была бы заменена на D, B станет E, и так далее.
Повторить шифр можно в занятии
Формула для кодирования символа:
symbol_encoded = ((((symbol) - first + key) % size) + first)
Шифр пар
Алфавит случайным образом записывают в 2 строки, и шифрование текста происходит заменой буквы на соседнюю ей по вертикали.
Например:
'v', 'q', 'f', 's', 'p', 'u', 'n', 'a', 'm', 'j', 'c', 'k', 'h'
'l', 'r', 'o', 'e', 'x', 'd', 'z', 'g', 'b', 'w', 't', 'i', 'y'

In hello
Out ysvvf
Шифр Виженера
На алфавите длиной N вводят операцию добавления (циклического сдвига) букв.
Пронумеровав буквы, добавляем их по модулю N (для англ. алфавита N=26).
Выбираем слово-ключ (пускай pass) и подписываем его под сообщением сколько нужно раз:
Python Cryptography Toolkit (pycrypto)
This is a collection of both secure hash functions (such as SHA256 and
RIPEMD160), and various encryption algorithms (AES, DES, RSA, ElGamal,
etc.). The package is structured to make adding new modules easy.
This section is essentially complete, and the software interface will
almost certainly not change in an incompatible way in the future; all
that remains to be done is to fix any bugs that show up. If you
encounter a bug, please report it in the Launchpad bug tracker at
An example usage of the SHA256 module is:
>>> from Crypto.Hash import SHA256
>>> hash = SHA256.new()
>>> hash.update('message')
>>> hash.digest()
'\xabS\n\x13\xe4Y\x14\x98+y\xf9\xb7\xe3\xfb\xa9\x94\xcf\xd1\xf3\xfb"\xf7\x1c\xea\x1a\xfb\xf0+F\x0cm\x1d'
An example usage of an encryption algorithm (AES, in this case) is:
>>> from Crypto.Cipher import AES
>>> obj = AES.new('This is a key123', AES.MODE_CBC, 'This is an IV456')
>>> message = "The answer is no"
>>> ciphertext = obj.encrypt(message)
>>> ciphertext
'\xd6\x83\x8dd!VT\x92\xaa`A\x05\xe0\x9b\x8b\xf1'
>>> obj2 = AES.new('This is a key123', AES.MODE_CBC, 'This is an IV456')
>>> obj2.decrypt(ciphertext)
'The answer is no'
One possible application of the modules is writing secure
administration tools. Another application is in writing daemons and
servers. Clients and servers can encrypt the data being exchanged and
mutually authenticate themselves; daemons can encrypt private data for
added security. Python also provides a pleasant framework for
prototyping and experimentation with cryptographic algorithms; thanks
to its arbitrary-length integers, public key algorithms are easily
implemented.
As of PyCrypto 2.1.0, PyCrypto provides an easy-to-use random number
generator:
>>> from Crypto import Random
>>> rndfile = Random.new()
>>> rndfile.read(16)
'\xf7.\x838{\x85\xa0\xd3>#}\xc6\xc2jJU'
A stronger version of Python’s standard “random” module is also
provided:
>>> from Crypto.Random import random
>>> random.choice()
'bears'
Installation
PyCrypto is written and tested using Python version 2.1 through 3.3. Python
1.5.2 is not supported.
The modules are packaged using the Distutils, so you can simply run
“python setup.py build” to build the package, and “python setup.py
install” to install it.
If the setup.py script crashes with a DistutilsPlatformError
complaining that the file /usr/lib/python2.2/config/Makefile doesn’t
exist, this means that the files needed for compiling new Python
modules aren’t installed on your system. Red Hat users often run into
this because they don’t have the python2-devel RPM installed. The fix
is to simply install the requisite RPM. On Debian/Ubuntu, you need the
python-dev package.
It is possible to test a single sub-package or a single module only, for instance
when you investigate why certain tests fail and don’t want to run the whole
suite each time. Use “python setup.py test –module=name”, where ‘name’
is either a sub-package (Cipher, PublicKey, etc) or a module (Cipher.DES,
PublicKey.RSA, etc).
To further cut test coverage, pass also the option “–skip-slow-tests”.
To install the package under the site-packages directory of
your Python installation, run “python setup.py install”.
If you have any comments, corrections, or improvements for this
package, please report them to our mailing list, accessible via the
PyCrypto website:
Расшифровка текстовой строки
После шифрования строки с помощью метода шифрования хорька расшифруйте текст обратно в исходную форму. Успешное дешифрование гарантирует, что получатель может без проблем расшифровать информацию и получить к ней доступ.
Следовательно, для беспрепятственного дешифрования модули Fernet также обеспечивают простую функцию дешифрования. Добавление этих двух строк в ваш файл python плавно расшифрует одно и то же сообщение до его исходной формы.
decrypted_message=fernet.decrypt(encrypted_message).decode()

print(‘расшифрованная строка текста:’, decrypted_message )
В приведенных выше строках кода используется тот же экземпляр Fernet, который использует ключ, сохраненный в памяти программы, для дешифрования. Функция fernet.decrypt() возвращает закодированную строку после расшифровки, как она была закодирована до шифрования. Теперь функция декодирования возвращает закодированную строку в исходную форму.
Decrypting File Using AES
Now we need to reverse the above process to decrypt the file using AES.
First, open the encrypted file and read the file size and the initialization vector. The IV is required for creating the cipher.
with open(encfile) as fin:
    fsz = struct.unpack('<Q', fin.read(struct.calcsize('<Q')))
    iv = fin.read(16)
Next create the cipher using the key and the IV. We assume the key has been communicated using some other secure channel.
aes = AES.new(key, AES.MODE_CBC, iv)
We also write the decrypted data to a “verification file”, so we can check the results of the encryption and decryption by comparing with the original file.
    with open(verfile, 'w') as fout:
        while True:
            data = fin.read(sz)
            n = len(data)
            if n == 0:
                break
            decd = aes.decrypt(data)
            n = len(decd)
            if fsz > n:
                fout.write(decd)
            else:
                fout.write(decd) # <- remove padding on last block
            fsz -= n
Note that when the last block is read and decrypted, we need to remove the padding (if any has been applied). This is where we need the original file size.