Wrapping Up!
Jenkins has a lot of potential in it. With the integration of various plugins and configuration of different platforms like LambdaTest integration with Jenkins; It provides different environments to create a build and facilitates various applications of continuous integration and continuous deployment.
However, setting up the environment variables is a crucial step in every use case provided by Jenkins. These variables maintain a lot of information required for a successful setup. These are accessed and injected in freestyle projects and pipelines to fulfil essential requirements of the build process and the test process. With Jenkins, we aim to create a robust product or software with excellent test resistance and performance. Thus, ensure that the required Jenkins environment variables are set and can be accessed wherever and whenever necessary.
Also, don’t forget to leave your comments, and if you have any query or question, shoot up to the LambdaTest community and get it resolved.
Till then, Happy Testing!
Praveen Mishra
Praveen is a Computer Science Engineer by degree, and a Digital Marketer by heart who works at LambdaTest. A social media maven, who is eager to learn & share about everything new & trendy in the tech domain.
Используем специальный плагин Ansible для всего сделанного выше
Снова идём в список плагинов в Manage Jenkins и ищем Ansible в списке Available плагинов.
Устанавливаем его.
При установке ставим галочку «Restart Jenkins», после установки Jenkins перезагрузится.
Теперь можно переписать пайплайн:
Вместо оборачивания в credentials, мы передали строчку в Id и вызвали специальный модуль, делающий за нас работу. Это сравнимо с использованием, например command или shell в Ansible, когда можно использовать специальный модуль, упрощающий и контролирующий работу, вместо «голых» вызовов консоли.
Плагин умеет больше, чем простой запуск плейбука, сильно упрощает пайплайны и саму жизнь.
Prototyping in the Script Console
In my Docker image-based environment, I can make breaking changes in the Script Console without much consequence. As I develop a file, I’ll paste snippets in the Script Console and click Run, verifying that the script is doing what I expect it to do, using the web UI to cross-reference.
Once my little bit of groovy is working as expected, I’ll commit it and move onto the next item.
![]()
Jenkins Config menu
Now once you are done with initialization , you can use crumb token and send your request to jenkins api to check for installed plugin or install new plugins
![]()
Crumb token example
getting crumb token
checking for installed plugins
Next you need to create a seed Job to get your Jenkins ready to create multiple pipelines in a click of a Button , you can configure your seed job and write script using Job-Dsl . in ansible you can create a template to create your seed job xml and push it to jenkins using jenkins API , below is a an Example seed job config xml
<?xml version='1.0' encoding='UTF-8'?><project> <actions/> <description></description> <keepDependencies>false</keepDependencies> <properties/> <scm class="hudson.scm.NullSCM"/> <canRoam>true</canRoam> <disabled>false</disabled> <blockBuildWhenDownstreamBuilding>false</blockBuildWhenDownstreamBuilding> <blockBuildWhenUpstreamBuilding>false</blockBuildWhenUpstreamBuilding> <triggers/> <concurrentBuild>false</concurrentBuild> <builders> <javaposse.jobdsl.plugin.ExecuteDslScripts plugin="job-dsl@1.66"> <scriptText>{{ lookup('template', 'jobs.groovy.j2') }} </scriptText> <usingScriptText>true</usingScriptText> <sandbox>false</sandbox> <ignoreExisting>false</ignoreExisting> <ignoreMissingFiles>false</ignoreMissingFiles> <failOnMissingPlugin>false</failOnMissingPlugin> <unstableOnDeprecation>false</unstableOnDeprecation> <removedJobAction>DELETE</removedJobAction> <removedViewAction>DELETE</removedViewAction> <removedConfigFilesAction>IGNORE</removedConfigFilesAction> <lookupStrategy>JENKINS_ROOT</lookupStrategy> </javaposse.jobdsl.plugin.ExecuteDslScripts> </builders> <publishers/> <buildWrappers/></project>
In above script jobs.groovy.j2 is DSL script which have information about how the pipelines to be created.
Now your Jenkins is ready to rock , hope you liked the article , if you need the my Ansible code do let me know in the comments
Использование агента docker
Переходим к настройке нашего задания или создаем новое и приводим Groovy-код к такому виду:
pipeline {
agent { docker { image ‘python:latest’ } }
stages {
stage(‘Подготовка’) {
steps {
sh «python —version»
}
}
stage(‘Сборка’) {
steps {
echo ‘Выполняем команды для сборки’
}
}
stage(‘Тестирование’) {
steps {
echo ‘Тестируем нашу сборку’
}
}
stage(‘Развертывание’) {
steps {
echo ‘Переносим код в рабочую среду или создаем артефакт’
}
}
}
}
* обратите внимание, мы изменили агента на docker с указанием образа, в котором будет выполняться обработка — в данном примере, с помощью python (последней версии). Также мы добавили этап Подготовка, в котором просто выведем на экран версию python
Первый запуск будет выполняться долго, так как необходимо будет загрузить образ. В конечном итоге, мы должны получить, примерно, следующую картину:
![]()
Для подробного просмотра хода процесса (или решения проблем в случае их возникновения), кликаем по стрелке справа от названия задания и переходим к сборке:
![]()
Переходим к консоли:
Если задание выполнено успешно, среди логов мы должны увидеть версию используемого в контейнере Docker python:
Reading Jenkins Environment Variables
In this section, we will see how you can read your Jenkins environment variables list. Let’s take it one step at a time-
- To access the Jenkins environment variables in a pipeline, you can use the env object, eg. env.BUILD_NUMBER will give the current build number of a pipeline. The reference to Jenkins pipeline environment variables is made by surrounding it by ${} in the following way: ${env.BUILD_NUMBER}
- You can also use the short version, which is BUILD_NUMBER. But this variant is quite confusing for some users. The script to read the build number via environment variables is :
pipeline{
agent any
stages{
stage(«Env Build Number»){
steps{
echo «The build number is ${env.BUILD_NUMBER}»
echo «You can also use \${BUILD_NUMBER} -> ${BUILD_NUMBER}»
}
}
}
}
|
1 |
pipeline{ agentany stages{ stage(«Env Build Number»){ steps{ echo»The build number is ${env.BUILD_NUMBER}» echo»You can also use \${BUILD_NUMBER} -> ${BUILD_NUMBER}» } } } } |
The console output of the build processed via the above script is :
![]()
Minimal Jenkins configuration
If you’ve selected the recommended plugins during installation of Jenkins you’re all set. If you opted to install none, you need to do the following.
-
Go to Manage Jenkins > Manage Plugins
-
On the Available tab and select the following plugins (use the filter box on the top right):
- Pipeline
- Git plugin
-
Click Install without restart
-
Go back to Manage Plugins. On the Updates tab, select all and click Download now and install after restart
This will update the default plugins, install several new plugins and create a new job type called Pipeline. After Jenkins is finished restarting you are good to go.
Viewing Jenkins Environment Variables List
Jenkins exposes the crucial characteristics of components using environment variables. Thus, a set of these variables are already defined by Jenkins. This includes information about the job and the specific build that is running. Some of the most commonly used variables are :
The Jenkins environment variables list can be viewed using two different ways.
1. Via env-vars.html :
The environment variables can be viewed on an HTML page. You have to open the page on your Jenkins controller server. The steps to view the jenkins environment variables list are :
- At the address bar of chrome, type .
- The ${YOUR_JENKINS_HOST} itself is an environment variable defining the Jenkins host address/Jenkins URL(that would be ).
- And env-vars.html is the HTML file consisting of the list of all Jenkins environment variables.
- The page looks like this :
![]()
2. Via Windows batch script/shell command :
You can also list all the environment variables by writing the shell command in the groovy script of the Jenkins pipeline. The steps to do the same are :
- Create a new pipeline in Jenkins, named ‘envvars’.
- In the Pipeline Script, type the following groovy script.
pipeline{
agent any
stages{
stage(«Env Variables»){
steps{
bat ‘set’
}
}
}
}
|
1 |
pipeline{ agentany stages{ stage(«Env Variables»){ steps{ bat‘set’ } } } } |
The windows batch command used here is “set”. This command lists all the Jenkins pipeline environment variables in logs.
For Linux/Unix, you can use the shell command “printenv”, as :sh ‘printenv’ .
This can be viewed as :
![]()
Iterating with Docker
In an example source tree, imagine I have with my Groovy scripts, I rely heavily on the Docker image and will typically use a command like the following to run a local instance of Jenkins with my Groovy scripts:
docker run --rm -ti -p 8080:8080 \ -v $PWD/init.groovy.d:/var/jenkins_home/init.groovy.d \ -v $PWD/jenkins-tmp:/var/jenkins_home \ -e JAVA_OPTS=-Djenkins.install.runSetupWizard=false \ jenkins/jenkins:lts-alpine
This will map my current directory’s into the approprate path inside the container. I also map in so I can inspect files after runnign Jenkins, and finally I disable the new installation “Setup Wizard” making iteration easy.
Whenever I’m satisfied that my scripts are doing the right thing, I’ll stop the container, and restart it so it loads my script like any other “pristine” Jenkins.
Запускаем Playbook с Github
Для изначального тестирования я создам очень простой плейбук:
Он располагается в github по адресу https://github.com/Nortsx/jenkinsansiblebook
Важно: перед началом работы склонируйте его в свой репозиторий, чтобы не зависеть от оригинала
Модифицируем пайплайн:
Я скачиваю плейбук его через ssh, а не http.
Запускаем Pipeline и смотрим на результаты билда:
Jenkins провалился на первом этапе, не смог скачать исходники с Git, потому что не смог установить соединение с Github. Ответ на вопрос «как это пофиксить?» в тексте ошибки. Мы увидим эту ошибку, если соединимся по ssh с локальным ssh-agent, но при этом сервера нет в known_hosts. Добавим сервер Github для Jenkins.
Логинимся на машину с Jenkins, от лица пользователя Jenkins, если вы не переставляли пользователя для Jenkins и запускаем ssh github.com. На вопрос «Do you want to add gihutb.com to known hosts» жмем Y. Первая ошибка больше не будет мешать.
Запускаем пайплайн второй раз:
Ошибка в stderr поменялась на Permission Denied — для подключения по ssh к Github нужен ключ, который Github знает. Добавим этот ключ.


Убеждаемся, что плагин Credentials установлен: Dashboard → Manage Jenkins → Manage Plugins, если нет, то установим его.
Генерируем ключ для Github и добавляем его в аккаунт.
Запустим команду на машине с linux
После ответа на вопросы об имени ключа (укажите другое имя кроме id_rsa, если ваш стандартный ключ уже используется, поскольку его можно случайно перезаписать), защита паролем (выбираем «no») вы получите пару приватный/публичный ключ. Публичный ключ имеет расширение .pub после имени, приватный ключ его не имеет.
Важно! Старайтесь не светить свой приватный ключ, особенно если он используется где то для доступа к защищенным репозиториям, это вопрос безопасности. После генерации ключей идем на github.com, кликаем на иконку профиля справа, Settings→SSH and GPG keys и попадаем на страницу добавления ssh ключей профиля
После генерации ключей идем на github.com, кликаем на иконку профиля справа, Settings→SSH and GPG keys и попадаем на страницу добавления ssh ключей профиля.
Жмякаем New SSH Key
Копируем ПУБЛИЧНУЮ часть ключа и называем его произвольным именем
В Dashboard → Manage Jenkins → Credentials нажимаем на Global и Add Credentials.
В открывшемся окне выбираем SSH Username with private key и заполняем данные.
ID — идентификатор, уникальный для каждого credential, по которому вызывают их из пайплайна. Username — имя для вашего профиля Github. Private key → нажмите Enter Directly → Add и скопируйте значение из сгенерированного Приватного ключа.
После добавления ключ в списке Credentials.
Время использовать ключ в пайплайне:
Запускаем пайплайн и смотрим на вывод:
Сработало!
Посмотреть результаты запусков по шагам можно, нажав кнопку Pipeline Steps.
Она покажет аргументы запуска и позволит по клику на мониторчике изолированно посмотреть вывод по конкретному шагу, что может быть удобно для отладки.
Например вывод только запуска нашего Ansible playbook:
Переходим к следующей части.
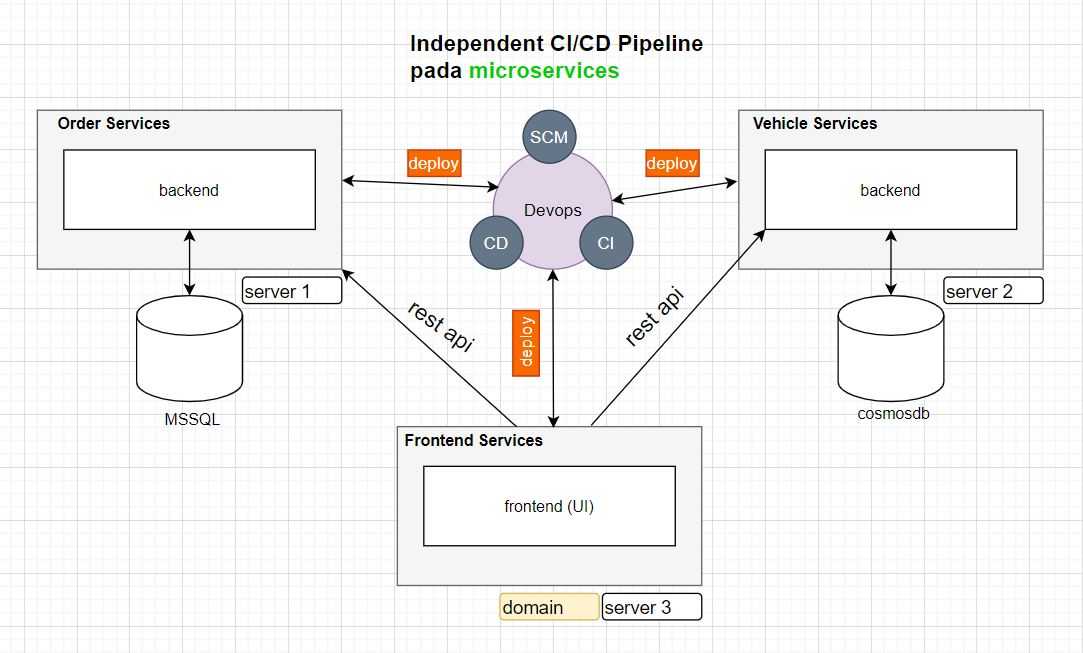
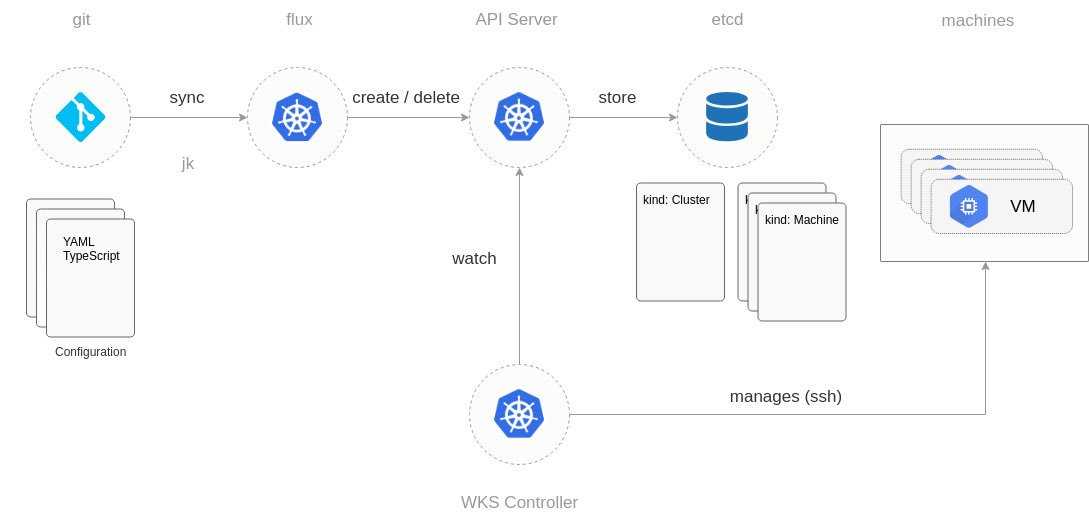
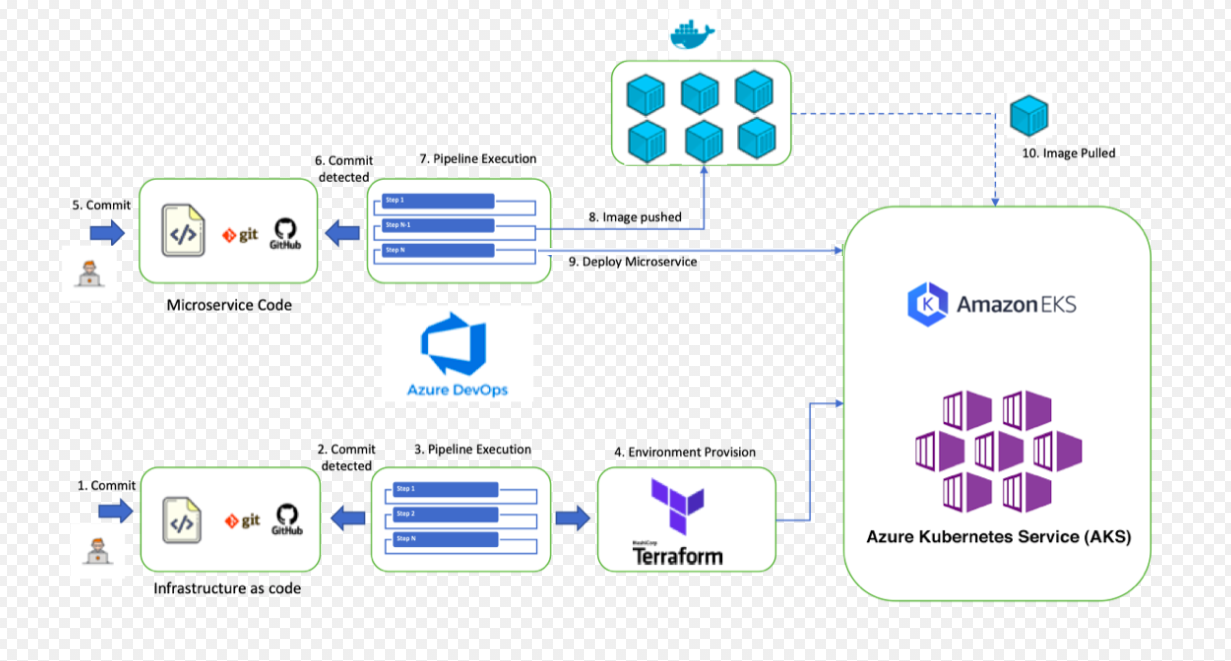
Example Pipeline Flow
Now that the tools and the architecture of this lab are well known, let’s explore the CI/CD pipeline flow built for this lab. Note that the purpose of this pipeline is for demonstration only and may lack steps that a real-world CI/CD process might have.
Observe the figure below:
Figure 2 — The pipeline flow
The implementation details of this pipeline can be seen in this repository.
The process starts by pulling the application source code from Github. The next thing to do is to update the project version according to the build number (e.g. my-fantastic-app-1.0.0-123). This way, we have a fingerprint of this build during deployment. Later, can be used as a metric and process control. After updating the project’s version, Jenkins starts building the source code using Maven.
After a successful compilation, the pipeline will perform unit tests. If nothing goes wrong during the unit tests, the pipeline flow initiates the integration tests. In this case, the test framework creates all the infrastructure needed for the tests: an in-memory database with test data and a small web server to deploy the application. The integration tests are considered a success when all requests were validated against the application deployed in the test environment.
The output from unit and integration tests is a coverage report, which will be one of the artifacts used by Sonar server to generate quality metrics. The other one is the application source code. If the quality gate defined in the Sonar server is not met, the pipeline flow will fail.
If everything went fine, the flow stops its execution and waits for approval. The Jenkins server provides an interface for someone with the right permissions to manually promote the build. Figure 3 illustrates this process.
Figure 3 — Approval step example
After the approval, the pipeline continues to execute the flow and goes on to the next step, which is to upload the compiled artifact to the Nexus repository. Then we have a new application snapshot ready to be deployed.
Now it’s time for Ansible to shine. The pipeline flow just sets the required parameters like the compiled artifact URL and the target host to execute the Ansible Playbook afterward. The Playbook is used to automate all target host configuration. In this lab, we’ll use it to install Java and to prepare the environment to receive the Spring Boot Application as a service. The Playbook is going to install the application as a service and will poll its HTTP port until it receives a valid response to make sure the deployment was successful.
How to Generate Jenkins Pipeline Scripts?
It is possible to generate Jenkins pipeline scripts?
Yes! you can generate most of the pipeline scripts from Jenkins. Here is how it works.
Jenkins has its own pipeline script generator. You can access the generator on path.
You can also get the syntax generator path from your pipeline job configuration as shown below.
![]()
Snippet Generator
Snippet generator is used for generating all the scripts that are using inside the stages.
Here is how the generator looks. You can select the required option from the steps dropdown, fill in the required details and generate the script to use in your pipeline.
![]()
Declarative Directive Generator
You can use the directive generator to generate all other options in the pipeline. For example, options, parameters, triggers, etc.
Here is an example of generating the agent block.
![]()
Обработка в Docker
Jenkins может выполнять задание внутри Docker. Таким образом, мы можем использовать контейнеры с настроенной средой, необходимой для тестирования и сборки кода и получения необходимых артефактов.
Рассмотрим настройку сервера для возможности использовать Docker и пример кода на Groovy.
Подготовка системы
Мы должны выполнит ряд действий:
- Установку плагина для работы Jenkins с Docker.
- Установку сервиса Docker в системе.
- Настройку привилегий.
1. Начнем с установки плагина. На главной странице Jenkins переходим в настройки:
![]()
Кликаем по разделу Управление плагинами:
![]()
Среди списка плагинов находим «Docker Pipeline» и отмечаем его для установки:
![]()
Переходим к установке:
![]()
… и доживаемся ее окончания.
2. Подключаемся к консоли по SSH и выполняем Установку Docker.
3. Чтобы можно было подключиться к Docker из Jenkins, необходимо, чтобы пользователь jenkins входил в группу docker — для этого выполняем команду:
usermod -a -G docker jenkins
После необходимо перезапустить дженкинс:
systemctl restart jenkins
Среда готова для работы с контейнерами.
Deploying to Wildfly using the Gradle Cargo Plugin
The simple variant that builds the WAR and deploys it to a remote Wildfly:
Gradle build configuration
This configuration deploys to a remote Wildfly (or JBoss EAP 7) server. It needs to download two dependencies so you need to configure both and .


Capturing Wildfly’s server.log
Sometimes the deployment task fails but the Jenkins console contains no hints on what went wrong. And even if the deployement was successful, you may want to look in Wildfly’s . The following method archives the last 1.000 lines:
Then you can do this, which always captures the log:
Or this, which only captures it on error:
For example:
What are Jenkins Pipeline Environment Variables?
While writing the script for a Jenkins pipeline, some dynamic values are to be injected and used. These are especially useful to avoid hardcoding every value into the pipeline. For this dynamic integration, Jenkins set environment variables.
Jenkins environment variable is a global variable, exposed via env variable and used in Jenkins pipelines and anywhere into Jenkinsfile. Any value stored as the environment variable in the env variable is of string type.
The Jenkins pipeline environment variables facilitate the benefits like :
- Injection of sensitive data at runtime to avoid the hardcoding into the pipeline.
- Addition of job parameters available only at runtime, but not at design time.
- Boolean values set in environment variables help certain toggle stages in a pipeline via a parameter that describes a specific subset of tests you want to run.
- Providing IDs of credentials defined in Jenkins.
![]()
In the Jenkins pipeline, there are a lot of helpful environment variables that can be accessed and maintained during build execution; some of the most useful ones are :
- env: env is used to access the Jenkins pipeline environment variables in groovy code as env.VARNAME or simply as VARNAME. The env prefix also accesses the environment variables provided in the Jenkins pipeline.
- currentBuild: As the name suggests, it addresses the currently running build of the Jenkins pipeline.
- params: All the parameters provided for a successful build from a read-only map with various typed variables. These can be accessed via params.
- docker: This is to provide convenient access to Docker – related functions in a Groovy script of Jenkins pipeline.
To ease building the pipeline, Jenkins has provided us with a Jenkins environment variables list. This list contains some of the most used variables. Let’s start by browsing through the list of environment variables.
List the environment variables without running the shell
The env object is of type
class org.jenkinsci.plugins.workflow.cps.EnvActionImpl.
examples/jenkins/list_environment_internally.Jenkinsfile
pipeline {
   agent none
   environment {
       color = 'blue'
   }
   stages {
       stage('example') {
            agent { label 'master' }
            steps {
               script {
                   def fields = env.getEnvironment()
                   fields.each {
                        key, value -> println("${key} = ${value}");
                    }

                    println(env.PATH)
               }
            }
        }
    }
}
We use the getEnvironment method that returns a hudson.EnvVars object.
This is a Groovy map so we can already use the each method to go over the keys and values.
This however only seem to list the internal variables of Jenkins and for example PATH was not
in the list even though we can access it as env.PATH.
How to list the environment variables available to Jenkins Pipeline
examples/jenkins/list_environment.Jenkinsfile
pipeline {
   agent none
   environment {
       color = "blue"
   }
   stages {
       stage('first') {
            agent { label 'master' }
            steps {
               sh "printenv | sort"
            }
        }
    }
}
In this example we list the environment variables using the printenv command of Unix/Linux
which we pipe through the Unix sort command so we’ll see the environment variables in a sorted list.
We invoke it using the sh command of the Jenkins Pipeline.
Before we do that we set a new variable called «color» in the environment section of the Jenkins Pipeline.
On Unix/Linux:
sh('printenv | sort')
On Windows you could run:
bat('set')
The output will looks something like this:
BUILD_DISPLAY_NAME=#18
BUILD_ID=18
BUILD_NUMBER=18
BUILD_TAG=jenkins-list_environment_variables-18
BUILD_URL=http://localhost:8080/job/list_environment_variables/18/
DBUS_SESSION_BUS_ADDRESS=unix:path=/run/user/110/bus
EXECUTOR_NUMBER=1
HOME=/var/lib/jenkins
HUDSON_COOKIE=40cd788e-91bd-4ebd-86c9-c10333fa27a9
HUDSON_HOME=/var/lib/jenkins
HUDSON_SERVER_COOKIE=912830efeb6e2316
HUDSON_URL=http://localhost:8080/
JENKINS_HOME=/var/lib/jenkins
JENKINS_NODE_COOKIE=dbf878e6-0ae5-4ffe-a32c-aa7876f975ce
JENKINS_SERVER_COOKIE=durable-f6e3ca8e5d2310d4d5695d128db1ea2f
JENKINS_URL=http://localhost:8080/
JOB_BASE_NAME=list_environment_variables
JOB_DISPLAY_URL=http://localhost:8080/job/list_environment_variables/display/redirect
JOB_NAME=list_environment_variables
JOB_URL=http://localhost:8080/job/list_environment_variables/
LANG=C.UTF-8
LOGNAME=jenkins
MAIL=/var/mail/jenkins
NODE_LABELS=master
NODE_NAME=master
PATH=/usr/local/bin:/usr/bin:/bin:/usr/local/games:/usr/games:/snap/bin
PWD=/var/lib/jenkins/workspace/list_environment_variables
RUN_CHANGES_DISPLAY_URL=http://localhost:8080/job/list_environment_variables/18/display/redirect?page=changes
RUN_DISPLAY_URL=http://localhost:8080/job/list_environment_variables/18/display/redirect
SHELL=/bin/bash
SHLVL=1
STAGE_NAME=example
USER=jenkins
WORKSPACE=/var/lib/jenkins/workspace/list_environment_variables
XDG_DATA_DIRS=/usr/local/share:/usr/share:/var/lib/snapd/desktop
XDG_RUNTIME_DIR=/run/user/110
XDG_SESSION_ID=c1
_=/usr/bin/daemon
color=blue
Capturing bat Command Output in the Environment Variable
You can capture the output of a shell command or batch command as a Jenkins environment variable and use it in later stages of the pipeline. For that you need to use the exact given syntax – bat(script: ‘cmd’, returnStdout:true). This is to force the bat command to return the output to be captured and stored in an environment variable. The steps to store the output into a Jenkins environment variable are:
- Here, we have taken the dir command, and we will capture its output in an environment variable named LS.
- We have used a script block to save the output in LS, and then we have accessed the same variable and displayed the saved content.
- The groovy script that works for the same is :
pipeline {
agent any
stages {
stage(«capturing output in Environment Variables») {
steps {
script {
env.LS = bat(script:’dir’, returnStdout: true).trim()
// if you access environment variable in the batch command
echo $LS
}
}
}
}
|
1 |
pipeline{ agentany stages{ stage(«capturing output in Environment Variables»){ steps{ script{ env.LS=bat(script’dir’,returnStdouttrue).trim() // if you access environment variable in the batch command echo$LS } } } } |
The trim() method is used to avoid the new line character present in the batch output. It also removes the whitespaces from the beginning and the end of the captured output.
The console output of a successful build for the pipeline which captures bat output in an environment variable is :
![]()
In Linux/Unix, you can capture the output from the shell command to the Jenkins environment variable. As the shell commands are different, the syntax will be changed. This will be sh(script:’ls -lah’, returnStdout: true).trim().
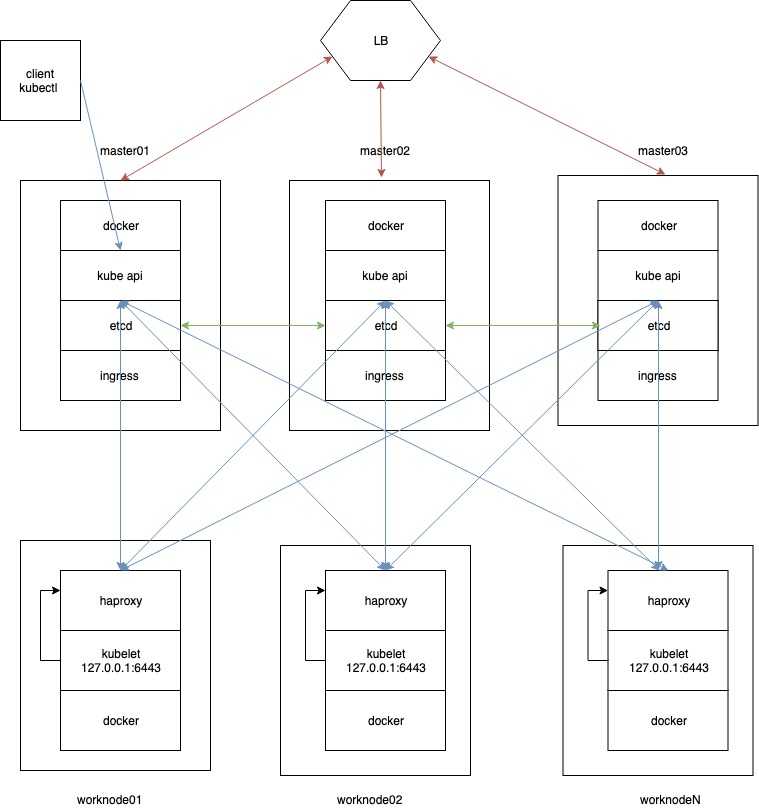
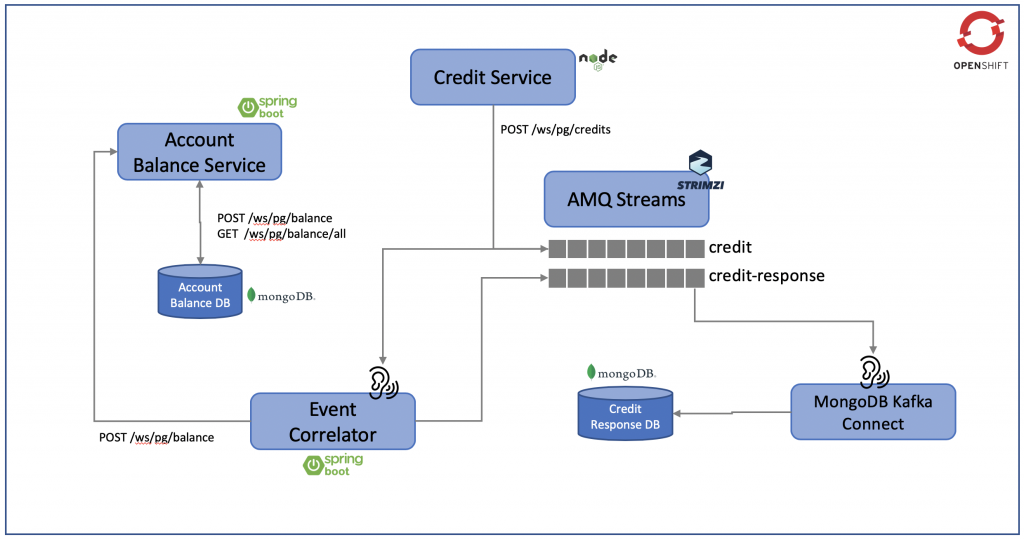
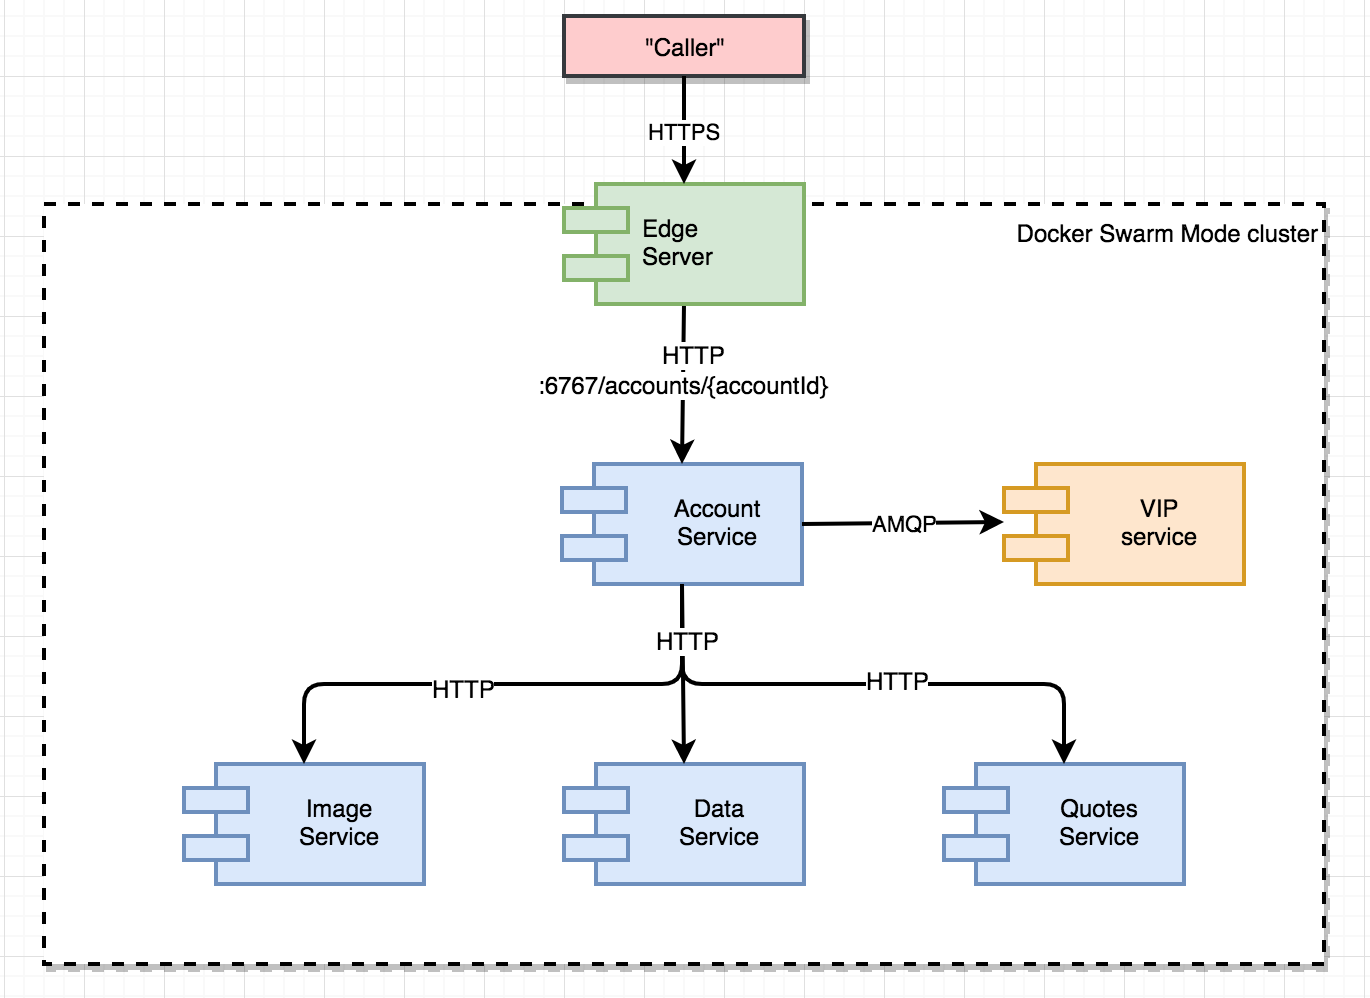
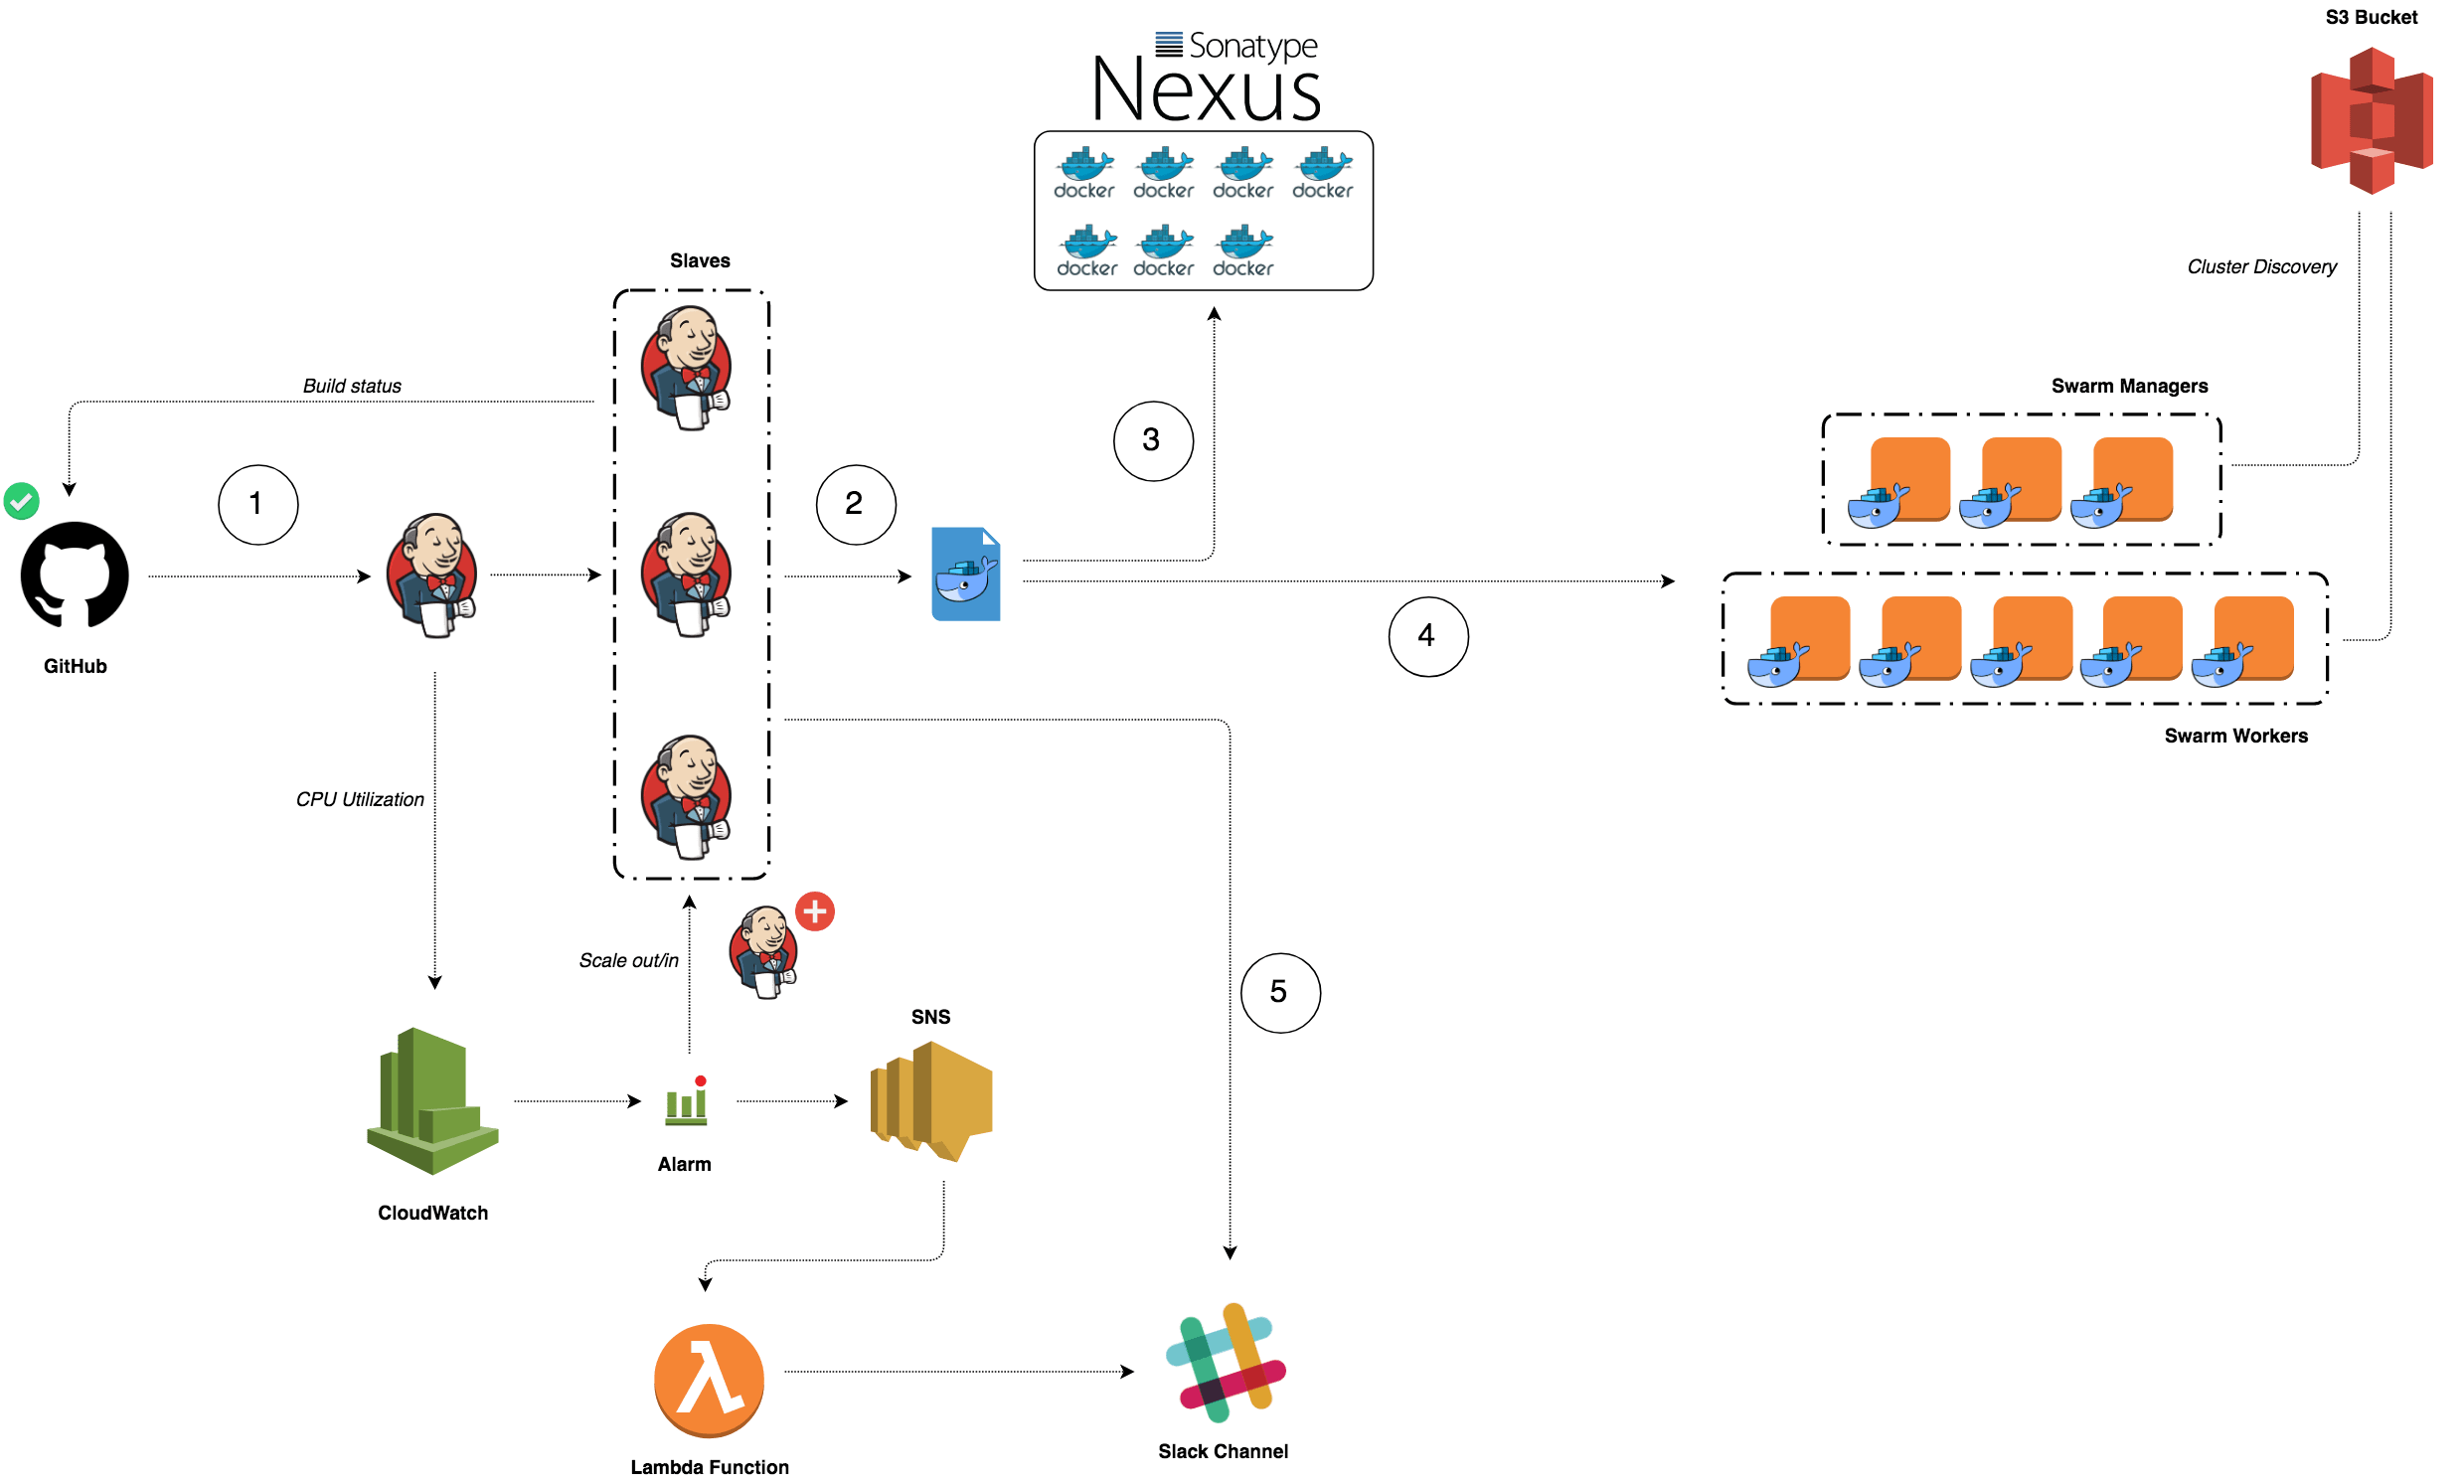
The infrastructure architecture
Figure 1 illustrates the overall architecture for this lab. It has some elements of ALM (Application Lifecycle Management) to emulate a real-world scenario and apply our CI/CD demo pipeline flow.
![]()
Figure 1 — Infrastructure architecture components overview
Figure 1 illustrates the following architectural elements:
-
Github is where our project is hosted and where Jenkins will poll for changes to start the pipeline flow.
-
SonarSource is our source code analysis server. If anything goes wrong during the analysis (e.g. not enough unit tests), the flow is interrupted. This step is important to guarantee the source code quality index.
-
Nexus is the artifact repository. After a successful compilation, unit tests and quality analyses, the binaries are uploaded into it. Later those binaries will be downloaded by Ansible during the application deployment.
-
The Ansible Playbook, which is a YAML file integrated in the application source code, deploys the Spring Boot App on to a CentOS machine.
-
Jenkins is our CI/CD process orchestrator. It is responsible to put all the pieces together, resulting in the application successfully deployed in the target machine.
To put this infrastructure together, we built an Ansible Playbook using roles from the Ansible Galaxy community. More about this Playbook is discussed further in this article. If you are new to Ansible, check this article about how to get started. Spoiler alert: Ansible Galaxy will be your primary source to learn Ansible.
The environment for the virtual machines in this lab was managed by Vagrant with libvirt. Details about how this was done could be seen in the project Vagrant ALM at Github.
Loading scripts
The Pipeline DSL allows you to load other scripts, enabling sharing of build logic. Optionally the script can return a reference to itself, allowing you to store the script in a variable for later use.
-
Configure the job and change the script to the following. The created script is executed immediately after loading.
-
Configure the job and change the script to the following. The created script defines a method. The statement gives a reference to the Groovy Script Object to the caller, which can invoke it at any time.
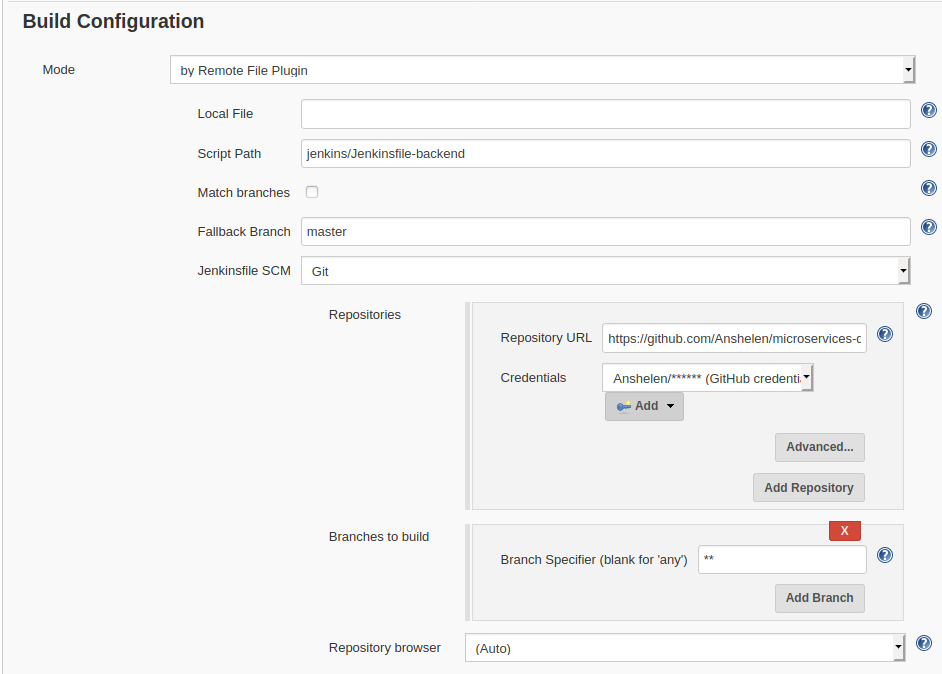
Loading a script from another Git repository
This requires the Pipeline Remote File Loader plugin. The example assumes you have a repository somewhere that contains a file, which you want to download to your Jenkins workspace.
-
Go to Manage Jenkins > Manage Plugins and install (without restart)
-
Configure a Pipeline job and set the Pipeline script to the following:
Multibranch Pipeline
A Multibranch Pipeline is a job type that scans all branches in a given repository for a Jenkinsfile. It automatically creates jobs for each branch inside a folder and executes Jenkinsfile for each job. This is useful in common branching workflows such as Git Flow which has naming conventions for branches, such as the prefix for feature-branches.
-
Go to Manage Jenkins > Manage Plugins and install the plugin (without restart)
-
Click New Item, name it , select Multibranch Pipeline as the type and click OK
-
At Branch Sources click Add source, Git
- Project Repository: https://bitbucket.org/your-account/your-repo.git
- Set credentials if this is not a public repository
-
Click Save
The plugin will automatically scan the repository for branches and create jobs; refresh the page if necessary to reveal them. After creating the jobs they will be automatically executed.
When one of the jobs fails, this could again be a script call signature that should be whitelisted. Go to /scriptApproval/ again to approvie the signature.
Use the Ansible plugin
Step 1) For Jenkins Pipeline we need to install the Ansible plugin.
Go to Manage Jenkins > Manage Plugins >Available > search Ansible.
![]()
If you are already installed Ansible Plugin on your Jenkins It will display in the Installed section.
Now we can see the Invoke Ansible Playbook option in the Build Environment section but we need to configure Ansible path for Jenkins.
Now let’s configure Ansible on our Jenkins.
Go to Manage Jenkins > Global Tool Configuration > It will display Ansible on the list.
![]()
Now let’s Create New project to execute Ansible playbook.
Step 2) Goto Jenkins Home > New Item > Create New Freestyle Project.
![]()
We create a new freestyle project now lets configure our project.
Goto source code management section and add your code repository here you are free to use any of the source code management platforms like Github, Gitlab and also Bit bucket.
![]()
Now let’s configure ansible plugin.
Goto Build section and select Invoke Ansible Playbook. Once you select that option it will display ansible-playbook configuration option like below.
![]()
Let see all option provided by Ansible Plugin.
- Ansible Installation: It will display all Ansible installation list that we are configured in Global Tool Configuration > Ansible.
- Playbook path: We have to provide the Absolute or Relative path of our Ansible-playbook file.
- Inventory: It gives 3 options to configure our host file.
- Host subset: If we want to filter a specific set of the host from the provided Host file.
- Credentials: Configure added host’s username and password.
- Vault Credentials: IF you are using ansible vault then configure that credentials.
- become: If you want to set a specific user for ansible-playbook execution select and add the name of that user.
- sudo: If you need to use a sudo user(root) then select this and add the name of that user.
In advance View.
![]()
- Tags to run: If you are using tag base script then Jenkins will run only specified tag.
- Tags to skip: If you are using tag base script then Jenkins will skip the specified tag.
- Task to start at: If you are using tag base script then Jenkins will start execution with the specified task.
- Number of parallel processes: Specified number of tasks that can run parallel.
- Disable the host SSH key check: Disable the validation of the host’s SSH server keys.
- Unbuffered stdout: Skip standard output buffering for the ansible process. The ansible output is directly rendered into the Jenkins console. This option can be useful for long-running operations.
- Colorized stdout: Check this box to allow ansible to render ANSI color codes in the Jenkins console.
- Extra Variables: Want to add some variable for ansible-playbook execution.
- Additional parameters: Any additional parameters to pass to the ansible command.
We have successfully integrated an ansible-playbook in Jenkins, Now Click on . It will execute ansible-playbook successfully.
Thank you for reading, if you have anything to add please send a response or add a note!
Установка плагина
При установке Jenkins система по умолчанию предлагает установить плагин pipeline. Вероятно, в нашей системе он есть. Но если плагин не установлен, переходим на стартовой странице веб-интерфейса Jenkins в раздел Настроить Jenkins:
![]()
Кликаем по Управление плагинами:
![]()
Переходим на вкладку Доступные и ищем нужный нам плагин по слову «pipeline». Мы получим большое количество результатов — нам нужен плагин с названием «Pipeline»:
![]()
Внизу экрана нажимаем Install without restart:
![]()
Мы увидим полный список компонентов, которые нужно будет установить для плагина — дожидаемся окончания процесса (мы должны увидеть «Успешно» или «Success»):
![]()
* в процессе установки плагина могут появиться сообщения об ошибках. Проблемы могут быть связаны с расхождением версий зависимых компонентов или необходимостью перезагрузки. Так или иначе, просматриваем такие сообщения и самостоятельно пытаемся в них разобраться.
После завершения установки, можно вернуться на главную страницу, кликнув по одноименной ссылке:
![]()
Наша система готова для создания конвейера.
Запускаем Ansible и выводим его версию
Начнем с очень простой задачи — запустим Ansible в пайплайне и выведем его версию в консоль билда.
Пайплайны в Jenkins задаются очень простым путем: пишется Stage, аналогично стейджу в Gitlab, а внутри него перечисляются Steps. Все системы CI/CD основаны на одном принципе, дьявол именно в деталях.
Напишем свой Stage, назовем его Deploy и вызовем там версию Ansible.
Сохраняем пайплайн, выходим в главное окно проекта и нажимаем Build Now.
Если у вас на машине уже установлен Ansible, все пройдет успешно. Первый пайплайн готов.
Заглянем ему под капот
Нажмем на #1 внизу в Build history. Каждый пайплайн создает history, которую можно ограничить настройками билда, чтобы предотвратить засорение диска логами и артефактами сборки. По умолчанию ничего не удаляем, я рекомендую на период настройки пайплайнов не удалять билды, чтобы вернуться на любой шаг и посмотреть необходимую информацию.
Жмем на Console Output чтобы посмотреть вывод:
Видим пользователя, активировавшего билд, и настройки его ограничений. Внутри Jenkins по умолчанию вы очень ограничены во взаимодействии с системой, потому что можете убить ноду с Jenkins неправильным пайплайном.
Дальше — шаги пайплайна подсвеченные серым, а вывод консоли черным цветом. После отображения папки, где был запущен пайплайн, выводятся результаты работы нашей sh команды, которая покажет версию Ansible в привычном виде, как если бы мы запустили ее из консоли.
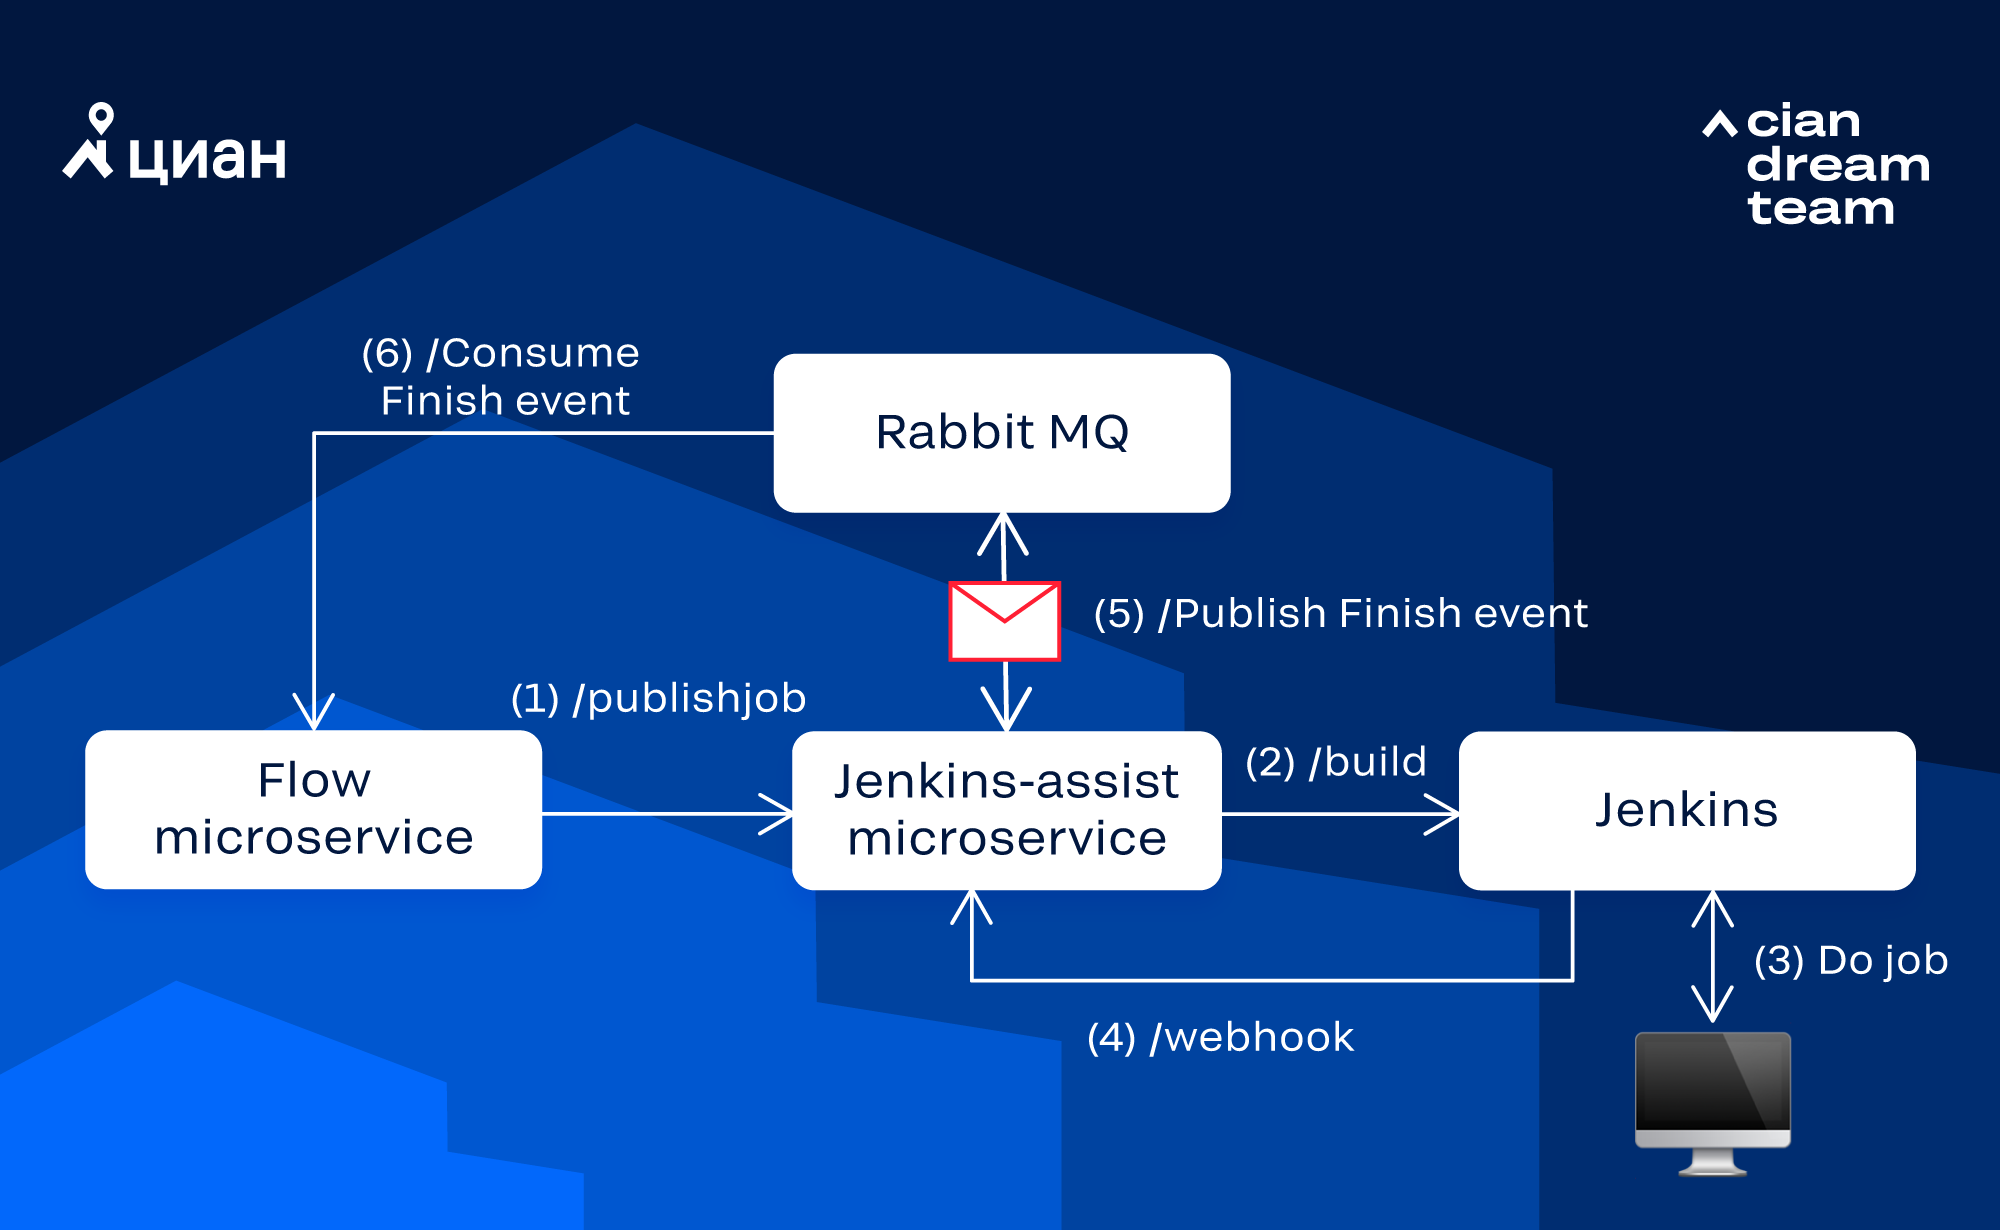
Итог
Мы перенесли логику перезапусков упавших тестов из тестового проекта на уровень выше — на CI. Таким образом сделали механизм перезапуска универсальным, более гибким и независимым от стека, на котором написаны автотесты.
Раньше наши тесты дожимались безусловно, по несколько раз, с неизменным количеством параллельных потоков. При перегрузке тестового стенда, некорректных настройках тестового окружения либо каких-то других проблемах — красные тесты перезапускались фиксированное число раз без шансов дожаться. В худшем случае прогоны могли длиться часами. Добавив условия fail fast, мы сократили это время.
При падении тестов инженер, ответственный за приемку, в некоторых ситуациях вручную стартовал джобу перезапуска, выполняя прогон с меньшим числом потоков. На это тоже уходило время. Добавив в условия пайплайна уменьшение числа потоков на перезапуске, мы сократили и это время.
Какой профит мы получили:
-
уменьшили time-to-market тестируемых изменений,
-
сократили длительность аренды тестового стенда под приемочное тестирование,
-
увеличили пропускную способность очереди приемочного тестирования,
-
не завязаны на тестовый фреймворк («под капотом» может быть что угодно — дожатия будут работать),
-
поделились знаниями об использовании Jenkins Pipeline.
Примеры кода выложены на GitHub. Если будут вопросы, задавайте — обязательно отвечу.


