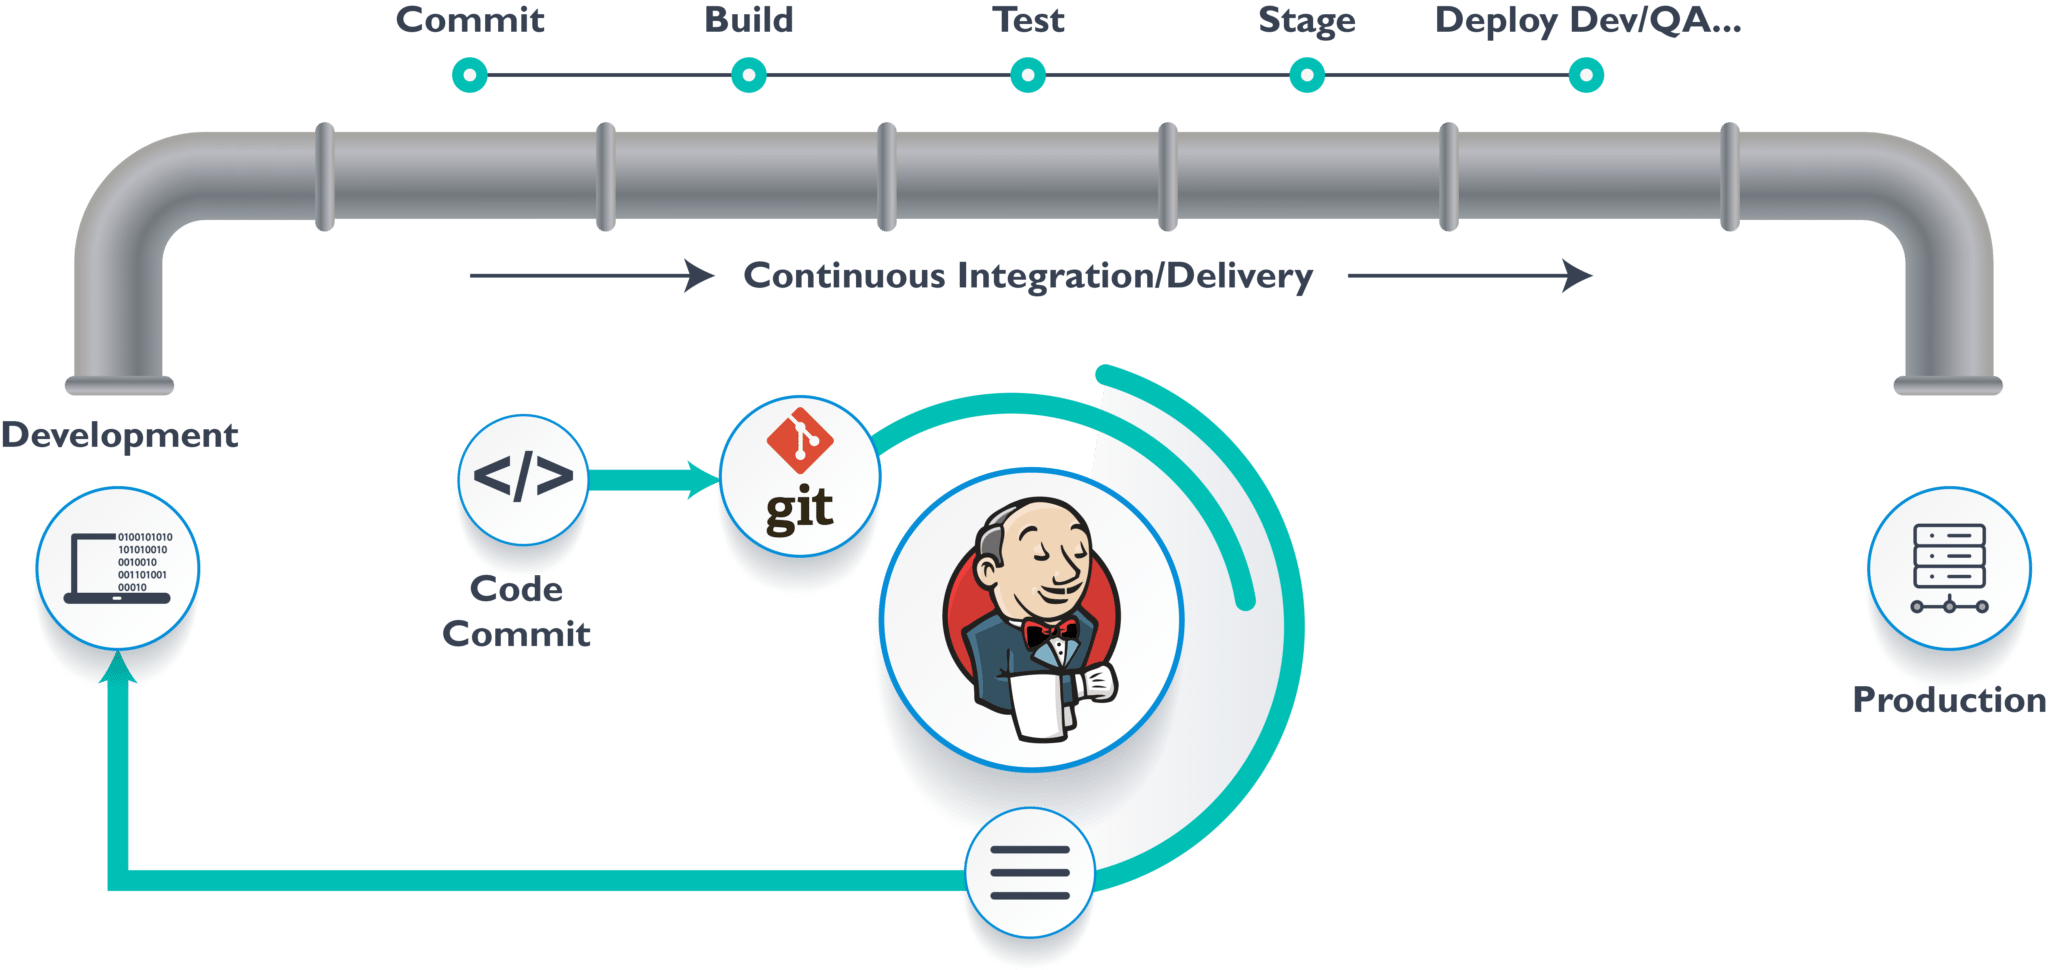
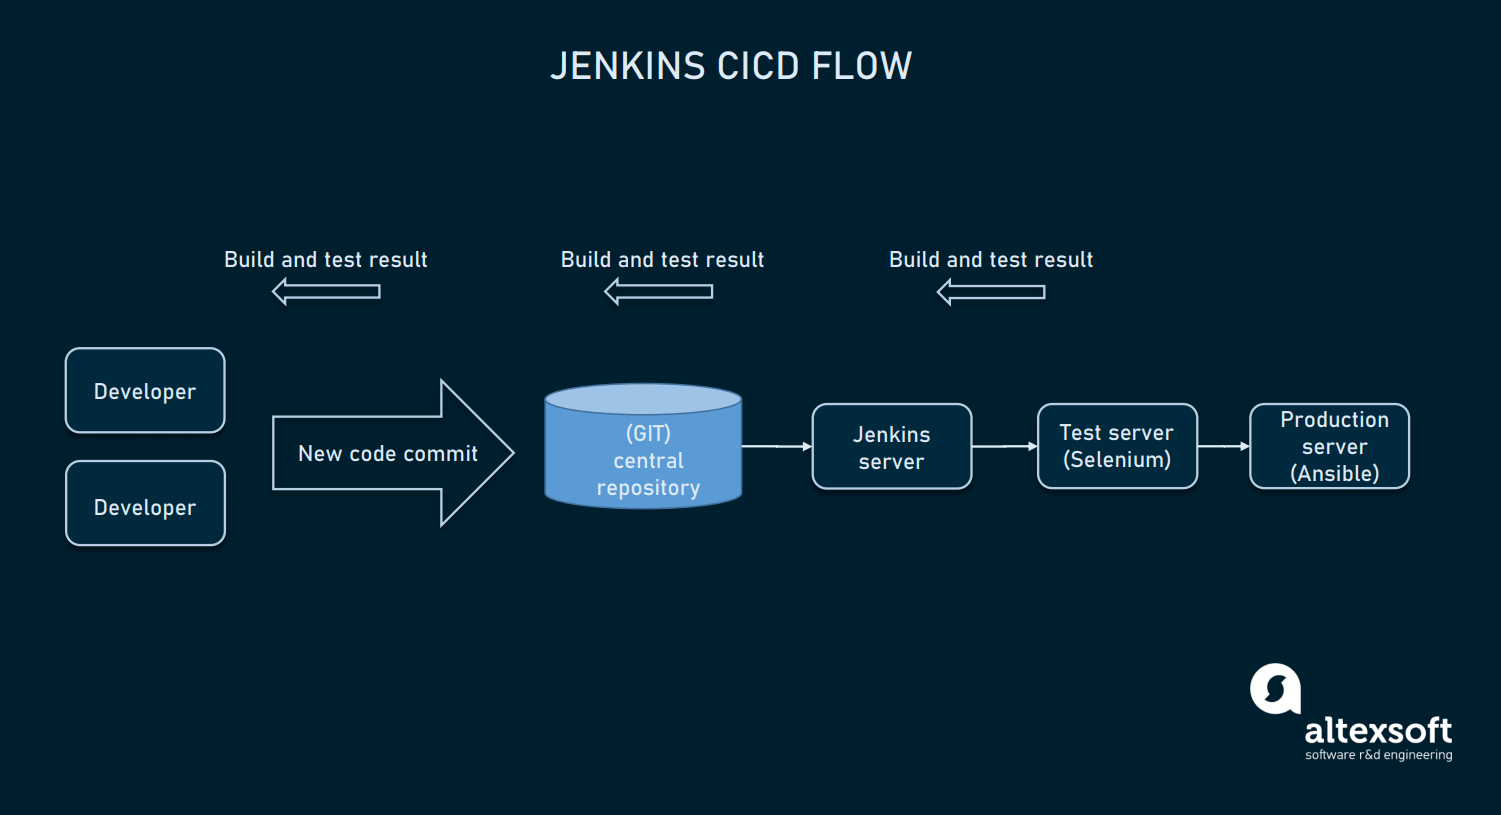
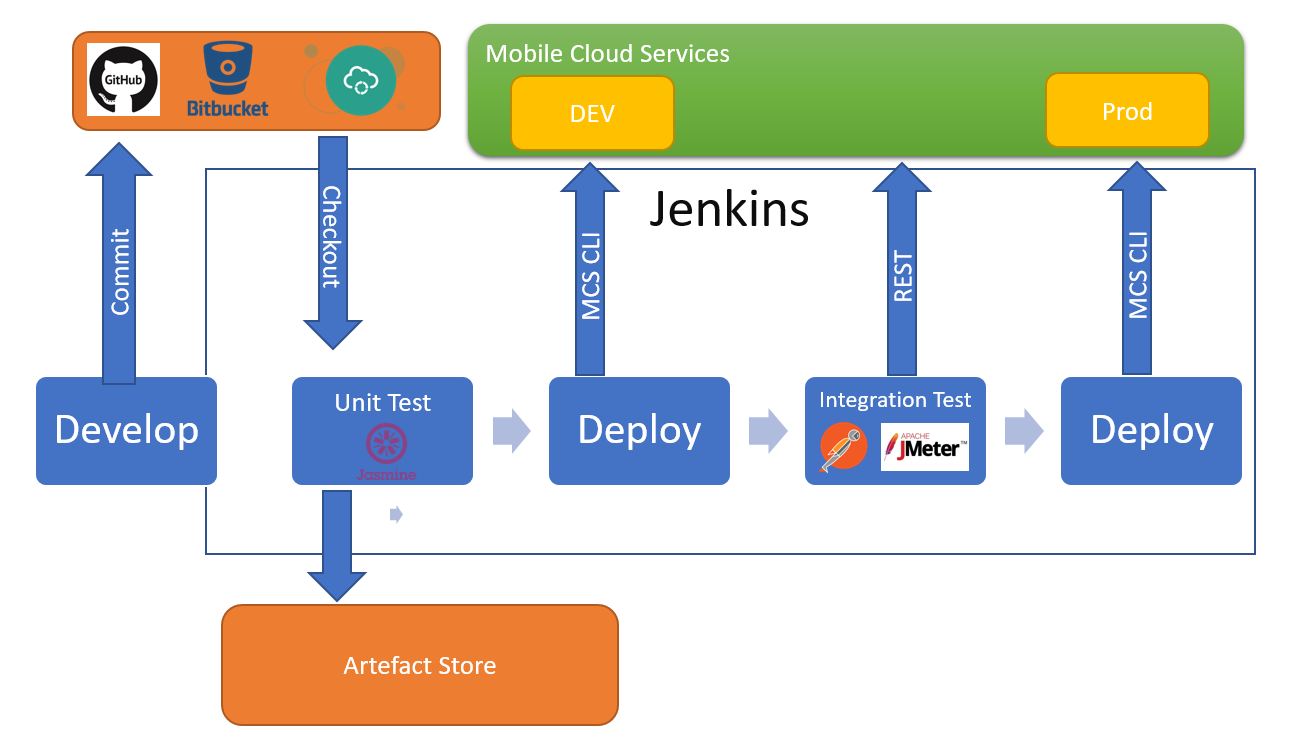
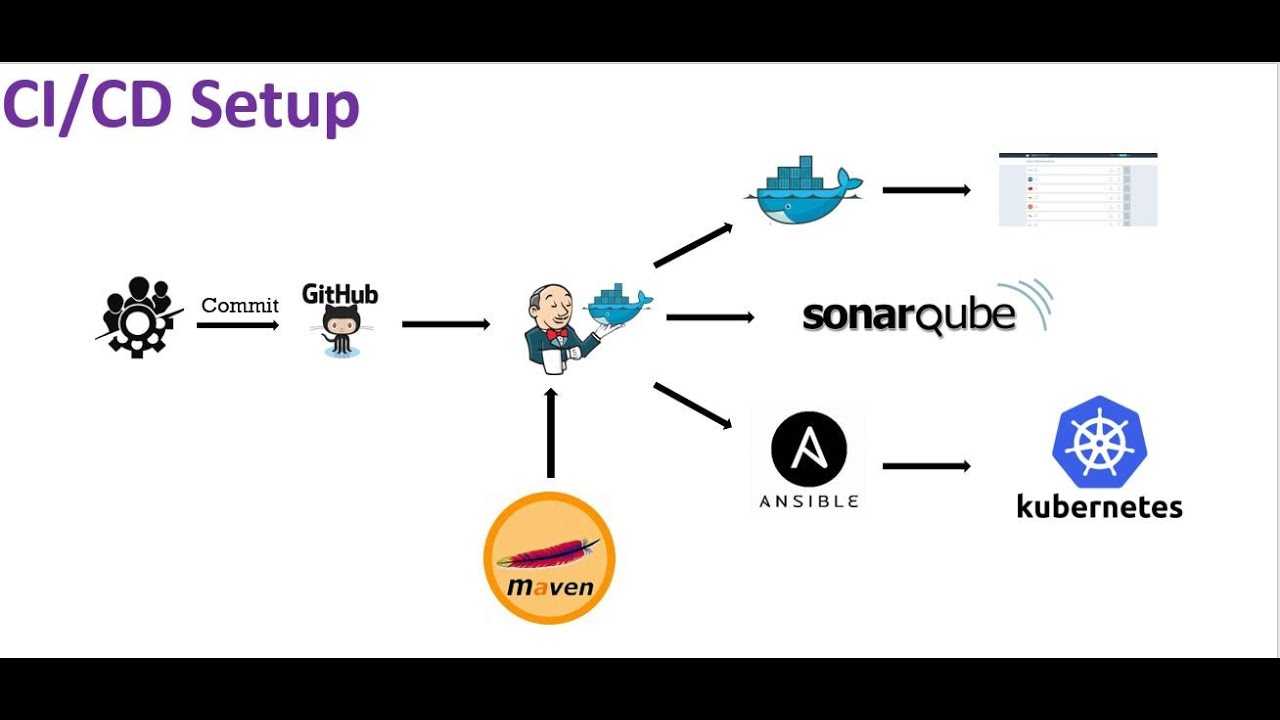
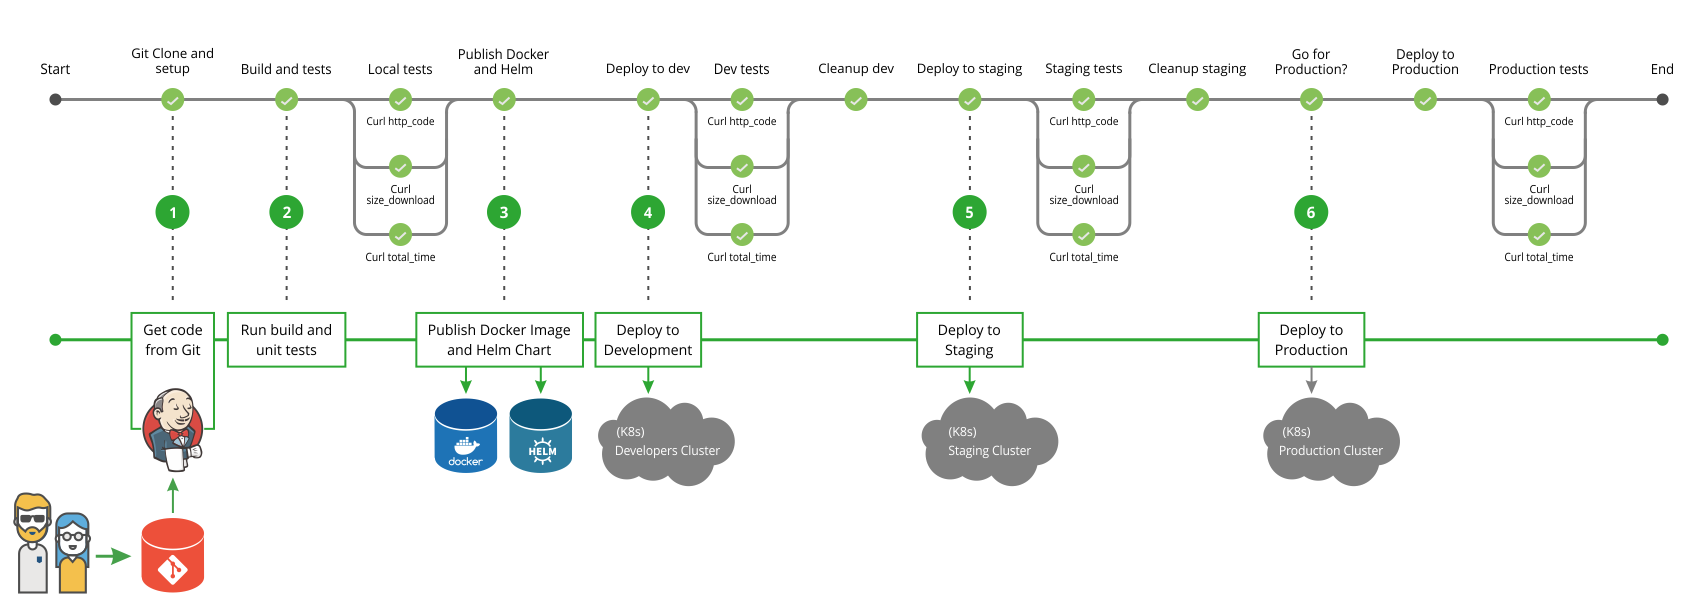
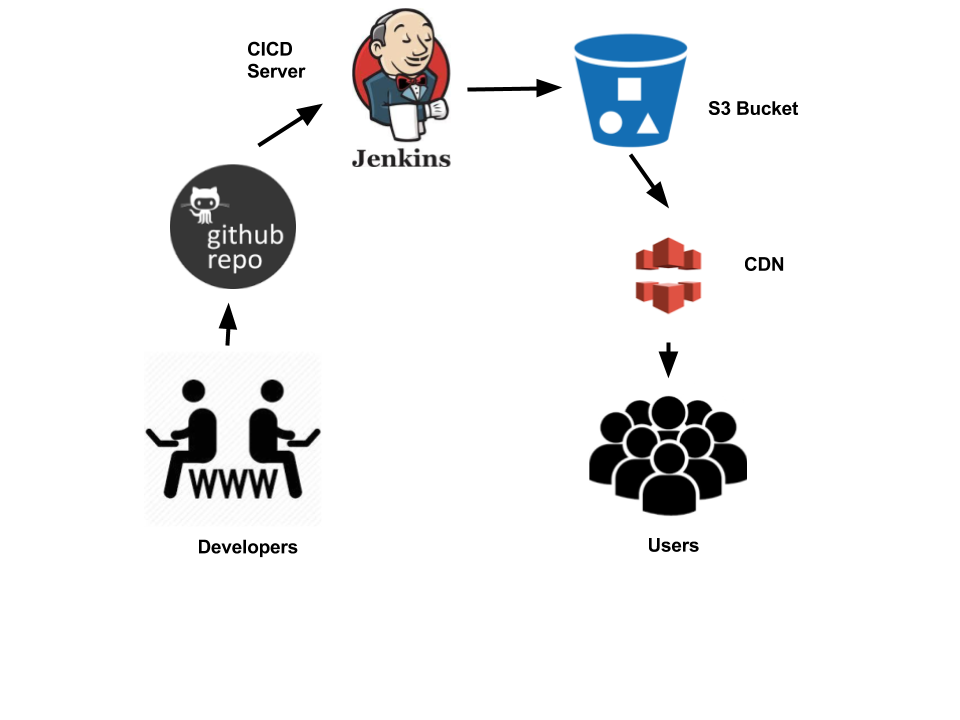
Example Pipeline Flow
Now that the tools and the architecture of this lab are well known, let’s explore the CI/CD pipeline flow built for this lab. Note that the purpose of this pipeline is for demonstration only and may lack steps that a real-world CI/CD process might have.
Observe the figure below:
![]()
Figure 2 — The pipeline flow
The implementation details of this pipeline can be seen in this repository.
The process starts by pulling the application source code from Github. The next thing to do is to update the project version according to the build number (e.g. my-fantastic-app-1.0.0-123). This way, we have a fingerprint of this build during deployment. Later, can be used as a metric and process control. After updating the project’s version, Jenkins starts building the source code using Maven.
After a successful compilation, the pipeline will perform unit tests. If nothing goes wrong during the unit tests, the pipeline flow initiates the integration tests. In this case, the test framework creates all the infrastructure needed for the tests: an in-memory database with test data and a small web server to deploy the application. The integration tests are considered a success when all requests were validated against the application deployed in the test environment.
The output from unit and integration tests is a coverage report, which will be one of the artifacts used by Sonar server to generate quality metrics. The other one is the application source code. If the quality gate defined in the Sonar server is not met, the pipeline flow will fail.
If everything went fine, the flow stops its execution and waits for approval. The Jenkins server provides an interface for someone with the right permissions to manually promote the build. Figure 3 illustrates this process.
![]()
Figure 3 — Approval step example
After the approval, the pipeline continues to execute the flow and goes on to the next step, which is to upload the compiled artifact to the Nexus repository. Then we have a new application snapshot ready to be deployed.
Now it’s time for Ansible to shine. The pipeline flow just sets the required parameters like the compiled artifact URL and the target host to execute the Ansible Playbook afterward. The Playbook is used to automate all target host configuration. In this lab, we’ll use it to install Java and to prepare the environment to receive the Spring Boot Application as a service. The Playbook is going to install the application as a service and will poll its HTTP port until it receives a valid response to make sure the deployment was successful.
Role argument validation
Beginning with version 2.11, you may choose to enable role argument validation based on an argument
specification. This specification is defined in the file (or with the
file extension). When this argument specification is defined, a new task is inserted at the beginning of role execution
that will validate the parameters supplied for the role against the specification. If the parameters fail
validation, the role will fail execution.
Note
Ansible also supports role specifications defined in the role file, as well. However,
any role that defines the specs within this file will not work on versions below 2.11. For this reason,
we recommend using the file to maintain backward compatibility.
Note
When role argument validation is used on a role that has defined ,
then validation on those dependencies will run before the dependent role, even if argument validation fails
for the dependent role.
The role argument specification must be defined in a top-level block within the
role file. All fields are lower-case.
- entry-point-name
-
-
The name of the role entry point.
-
This should be in the case of an unspecified entry point.
-
This will be the base name of the tasks file to execute, with no or file extension.
- short_description
-
-
A short, one-line description of the entry point.
-
The is displayed by .
-
- description
- author
-
-
Name of the entry point authors.
-
Use a multi-line list if there is more than one author.
-
- options
-
-
Options are often called “parameters” or “arguments”. This section defines those options.
-
For each role option (argument), you may include:
- option-name
- description
- type
-
-
The data type of the option. See for allowed values for . Default is .
-
If an option is of type , should be specified.
-
- required
-
-
Only needed if .
-
If missing, the option is not required.
-
- default
-
-
If is false/missing, may be specified (assumed ‘null’ if missing).
-
Ensure that the default value in the docs matches the default value in the code. The actual
default for the role variable will always come from . -
The default field must not be listed as part of the description, unless it requires additional information or conditions.
-
If the option is a boolean value, you can use any of the boolean values recognized by Ansible:
(such as true/false or yes/no). Choose the one that reads better in the context of the option. -
-
- choices
-
-
List of option values.
-
Should be absent if empty.
-
- elements
- options
-
-
Ansible + Python
After previous stage you have self-documented version-independent script. A developer’s dream. What can be improved?
First of all they are still a bit coupled with python dependencies. If you are going to use these python scripts as a company standard — you have to force everybody to install conda in order to be able to run these scripts.
Second — you still need a central storage for such scripts. The unique source of truth, where fix for ideally any problem can be found.
To solve both issues you need to use Ansible and have single repository for it’s scripts (in huge companies you should prefer per-department repository).
Every problem, which can be solved with scripts turns into the role. Each role has it’s Readme, where problem and solution are described. Root’s readme points to each role’s readme with a small comment of a problem it solves.
## Problem Sometimes we have a pikes of a high load. During this load our slaves can loose master and some transactions won't be processed. ## Solution Such missed transactions are saved by slaves in a special queue. This role gets these transactions, asks bank's confirmation for each and processes the results. ## Run ansible-playbook resolve_transactions.yaml -i inventory/prod/hosts.ini -extra-vars "-i='primary' -b='my_bank'"
It doesn’t replace your Python scripts, as plain ansible scripts are harder to debug and develop. Instead of it all python scripts go into files or templates inside the role and are called as a part of the play.
The minimal scenario usually contains conda creation and deps installation, as well as running script itself (for simplicity this role assumes conda is installed).
--- - block: - name: "Copy requirements.txt" copy: src: "requirements.txt" dest: "/tmp/` role_name `/" - name: "Copy python executable" template: src: "transaction.py.j2" dest: "/tmp/` role_name `/transaction.py" - name: "Create Conda Env for ` python_version `" shell: "conda create -p /tmp/` role_name `/` conda_env ` --copy -y python=` python_version `" - name: "Run my script" shell: "source activate /tmp/` role_name `/` conda_env ` && ` item `" with_items: - pip install -r /tmp/` role_name `/requirements.txt - "python /tmp/` role_name `/transaction.py --issuer=` issuer ` --bank=` bank ` --slack=` slack `" args: executable: /bin/bash always: - name: "Clean up" file: state: absent path: "/tmp/` role_name `/"
Here you can benefit from ansible variable system:
Group variables are stored per environment, as well as global variables, which are symlinks to all.
Each role can also has it’s specific variables, which are overridden by ansible input to the script.
Now you can transfer the first line support to another department, just pointing them to a single repository with full documentation and scripts. All they need to know is how to run ansible.
Inventory setup examples
See also , which shows inventory along with playbooks and other Ansible artifacts.
If you need to manage multiple environments it’s sometimes prudent to
have only hosts of a single environment defined per inventory. This
way, it is harder to, for instance, accidentally change the state of
nodes inside the “test” environment when you actually wanted to update
some “staging” servers.
For the example mentioned above you could have an
file:
db01.test.example.com
db02.test.example.com


app01.test.example.com
app02.test.example.com
app03.test.example.com
That file only includes hosts that are part of the “test”
environment. Define the “staging” machines in another file
called :
db01.staging.example.com
db02.staging.example.com


app01.staging.example.com
app02.staging.example.com
app03.staging.example.com
To apply a playbook called
to all the app servers in the test environment, use the
following command:
ansible-playbook -i inventory_test -l appservers site.yml
In the previous section you already saw an example for using groups in
order to cluster hosts that have the same function. This allows you,
for instance, to define firewall rules inside a playbook or role
affecting only database servers:
- hosts dbservers
  tasks
  - name Allow access from 10.0.0.1
    ansible.builtin.iptables
      chain INPUT
      jump ACCEPT
      source 10.0.0.1
Other tasks might be focused on where a certain host is located. Let’s
say that and are
located in DC1 while is in DC2:
db01.test.example.com
app01.test.example.com


db02.test.example.com
In practice, you might even end up mixing all these setups as you
might need to, on one day, update all nodes in a specific data center
while, on another day, update all the application servers no matter
their location.
See also
-
Pulling inventory from dynamic or static sources
-
Pulling inventory from dynamic sources, such as cloud providers
-
Examples of basic commands
-
Learning Ansible’s configuration, deployment, and orchestration language.
- Mailing List
-
Questions? Help? Ideas? Stop by the list on Google Groups
-
How to join Ansible chat channels
Ansible Playbook :
Playbooks in Ansible define a series of actions to run and address particular sets of servers. A playbook is like a recipe or an instructions manual which tells Ansible what to do when it connects to each machine.
Playbooks are written in YAML, which simplistically could be viewed as XML but human-readable. When I started using Ansible I’d never looked at YAML, but within hours I was able to write powerful playbooks.
Here some great examples that help you to write powerful playbooks.
This is the example of ansible-playbook to configure Jenkins.
we create one inventory file that defines the list of hosts and authentication settings for each server.
The inventory file can be in one of many formats, depending on the inventory plugins you have.
192.168.46.131 ansible_ssh_user=root ansible-ssh-pass=reverse -----OR--------SampleApp-Server hosts 192.168.46.131
Now we have to create a playbook file that defines a set of tasks or instructions that perform step by step and install all components that we need to install with Jenkins.
The above code is demo code do some change as per your need and try to set up your new tools according to your requirement.
Run this command to execute your playbook,
ansible-playbook -i hosts -vvv Playbook-jenkins.yml
Yur can user or or according to your log requirement, it just for logging purposes.
At the end of the playbook, it displays Admin password like this
![]()
Copy this password `stdout_lines` paste on Jenkins administrator password field.
When it returns Success goto your web browser and enter the URL
http://<server-IP>:<Selected port>(Here default port is 8080)#In my case http://192.168.46.131:8080
It will redirect to this screen.
![]()
For more detail please follow my previous article in which I explain Jenkins installation guide.
Job DSL support
steps {
    ansiblePlaybook(String playbook) {
        inventoryPath(String path)
        inventoryContent(String content, boolean dynamic = false)
        ansibleName(String name)
        limit(String limit)
        tags(String tags)
        skippedTags(String tags)
        startAtTask(String task)
        credentialsId(String id)
        become(boolean become = true)
        becomeUser(String user = 'root')
        sudo(boolean sudo = true)
        sudoUser(String user = 'root')
        forks(int forks = 5)
        unbufferedOutput(boolean unbufferedOutput = true)
        colorizedOutput(boolean colorizedOutput = false)
        hostKeyChecking(boolean hostKeyChecking = false)
        additionalParameters(String params)
        extraVars {
            extraVar(String key, String value, boolean hidden)
        }
    }

    ansibleAdHoc(String module, String command) {
        ansibleName(String name)
        inventoryPath(String path)
        inventoryContent(String content, boolean dynamic = false)
        credentialsId(String id)
        hostPattern(String pattern)
        become(boolean become = true)
        becomeUser(String user = 'root')
        sudo(boolean sudo = true)
        sudoUser(String user = 'root')
        forks(int forks = 5)
        unbufferedOutput(boolean unbufferedOutput = true)
        colorizedOutput(boolean colorizedOutput = false)
        hostKeyChecking(boolean hostKeyChecking = false)
        additionalParameters(String params)
        extraVars {
            extraVar(String key, String value, boolean hidden)
        }
    }
}
Example
steps {
    ansiblePlaybook('path/playbook.yml') {
        inventoryPath('hosts.ini')
        ansibleName('1.9.4')
        tags('one,two')
        credentialsId('credsid')
        become(true)
        becomeUser("user")
        extraVars {
            extraVar("key1", "value1", false)
            extraVar("key2", "value2", true)
        }
    }
}
Получение информации
Сюда войдут примеры, которые позволят собирать информацию, выводить ее на экран, помогать в отладке и всякое такое.
1. Показать информацию об удаленной системе, на которой запускается ansible.

Выполняется с помощью модуля debug, который должен показать содержимое ansible_facts:
— name: Print all available facts
debug:
var: ansible_facts
* ansible_facts содержит массив данных с информацией о системе. Однако, функция сборки информации может быть отключена (так как на ее работу тратится, относительно, много времени) в настройках плейбука с помощью опции gather_facts: false — в этом случае, значение нужно изменить на true.
Также мы можем обратиться к конкретному элементу массива ansible_facts, получив информацию о конкретной настройке или опции:
…
ansible_facts.hostname
* например, имя компьютера.
Ссылка на документацию: https://docs.ansible.com/ansible/latest/user_guide/playbooks_vars_facts.html.
2. Отображение на экран переменной.
Выше мы уже использовали debug для отображения переменной — принцип тот же:
— name: Show Value of Variable
debug:
msg: «{{ variable }}»
* при выполнении задачи на экране мы увидим значение переменной variable. Обратите внимание, что запись ansible.builtin.debug и debug — это одно и то же, то есть, ansible.builtin можно не писать. О debug: https://docs.ansible.com/ansible/latest/collections/ansible/builtin/debug_module.html
О debug: https://docs.ansible.com/ansible/latest/collections/ansible/builtin/debug_module.html.
3. Сохранение результата в переменную.
Результат выполняется команды может быть сохранен с помощью register:
— name: Run a shell command and register its output as a variable
shell: command
register: command_result
* в данном примере мы запишем в переменную command_result все то, что мы получили с помощью команды command.
Также нам может понадобиться сохранить в переменную результат обработки строки или другой переменной:
— name: Set variable
set_fact:
my_hosts: «{{ command_result.stdout.split(‘:’) | replace(‘ ‘, ») }}»
* в данном случае мы взяли переменную, которую получили в примере выше и разбили строку по знаку «:». Таким образом, мы получим массив данных, который будет сохранен в переменную my_hosts.
Вывести на экран содержимое можно с помощью debug:
— name: Show Value of Variable
debug:
var: command_result.stdout
* обратите внимание, что мы выводим не все содержимое, а только stdout, то есть то, что должна была вывести в консоль команда. 4
Получить список сервисов
4. Получить список сервисов.
Для этого существует service_facts:
— name: Populate service facts
ansible.builtin.service_facts:
— name: Print all available facts
debug:
var: ansible_facts.services
* цель достигается двумя задачами. В первой мы собираем информацию о сервисах с помощью service_facts, второй — выводим на экран содержимое.
О service_facts: https://docs.ansible.com/ansible/latest/collections/ansible/builtin/service_facts_module.html.
Example Job Configuration File
Here’s an example of what you could put in
:
<?xml version='1.0' encoding='UTF-8'?>
<project>
<actions/>
<description>My first job, it says "hello world"</description>
<keepDependencies>false</keepDependencies>
<properties/>
<scm class="hudson.scm.NullSCM"/>
<canRoam>true</canRoam>
<disabled>false</disabled>
<blockBuildWhenDownstreamBuilding>false</blockBuildWhenDownstreamBuilding>
<blockBuildWhenUpstreamBuilding>false</blockBuildWhenUpstreamBuilding>
<triggers/>
<concurrentBuild>false</concurrentBuild>
<builders>
<hudson.tasks.Shell>
<command>echo "Hello World!"</command>
</hudson.tasks.Shell>
</builders>
<publishers/>
<buildWrappers/>
</project>
Проверка коллекций
Проверка коллекций с помощью
После установки вы можете проверить,что содержимое установленной коллекции совпадает с содержимым коллекции на сервере.Эта функция ожидает,что коллекция будет установлена по одному из настроенных путей и что она существует на одном из настроенных серверов галактики.
ansible-galaxy collection verify my_namespace.my_collection
Результат команды — тихий, если она успешна. Если коллекция была изменена, измененные файлы перечислены под именем коллекции.
ansible-galaxy collection verify my_namespace.my_collection
Collection my_namespace.my_collection contains modified content in the following files:
my_namespace.my_collection
    plugins/inventory/my_inventory.py
    plugins/modules/my_module.py
Вы можете использовать флаг для отображения дополнительной информации, такой как версия и путь установленной коллекции, URL-адрес удаленной коллекции, используемой для проверки, и результат успешной проверки.
ansible-galaxy collection verify my_namespace.my_collection -vvv
...
Verifying 'my_namespace.my_collection:1.0.0'.
Installed collection found at '/path/to/ansible_collections/my_namespace/my_collection/'
Remote collection found at 'https://galaxy.ansible.com/download/my_namespace-my_collection-1.0.0.tar.gz'
Successfully verified that checksums for 'my_namespace.my_collection:1.0.0' match the remote collection
Если у вас установлена предварительная или не последняя версия коллекции,вам следует включить в нее конкретную версию для проверки.Если версия опущена,установленная коллекция проверяется на наличие последней версии,доступной на сервере.

ansible-galaxy collection verify my_namespace.my_collection:1..
В дополнение к формату вы можете предоставить коллекции для проверки в файле . Зависимости, перечисленные в , не включаются в процесс проверки и должны проверяться отдельно.
ansible-galaxy collection verify -r requirements.yml
Проверка файлов не поддерживается. Если ваш файл содержит пути к файлам tar или URL-адреса для установки, вы можете использовать флаг , чтобы гарантировать, что все коллекции, использующие формат в файле, обрабатываются.
Global Configuration
Ansible needs to be on the PATH for the build job in order to be used.
This can be done through either Jenkins Global Tool Configuration or
including Ansible on the OS User PATH variable.
Global Tool Configuration
Configuring Ansible through the Global Tool Configuration in Jenkins
(Jenkins → Manage Jenkins → Global Tool Configuration) allows for
multiple Ansible installations to be present and used by different
Jenkins jobs.
-
Click Add Ansible
-
Configure the name and path
Field name Description Name Symbolic name used to identify a specific Ansible installation when multiple installations are configured Path to ansible executables directory Directory containing the ansible, ansible-playbook, and ansible-vault binaries -
Repeat for any additional desired installations
OS User PATH
Ansible can also be added to the PATH user used by the Jenkins executor
instead of configured through Global Tool Configuration. This is done
through normal OS tools outside of Jenkins and is not covered by this
guide.
Finding tarballs of tagged releases
If you are packaging Ansible or wanting to build a local package yourself, and you want to avoid a git checkout, you can use a tarball of a tagged release. You can download the latest stable release from PyPI’s ansible package page. If you need a specific older version, beta version, or release candidate, you can use the pattern . VERSION must be the full version number, for example 3.1.0 or 4.0.0b2. You can make VERSION a variable in your package managing system that you update in one place whenever you package a new version.
Note
If you are creating your own Ansible package, you must also download or package (or for packages based on 2.10.x) from PyPI as part of your Ansible package. You must specify a particular version. Visit the PyPI project pages to download files for ansible-core or ansible-base.


![Comprehensive guide to jenkins declarative pipeline [with examples]](http://myeditor.ru/wp-content/uploads/1/a/c/1acea88d2e5fd6a15d49287c4376a407.png)
