Cross-Namespace Communication
Often it is necessary to establish some sort of communication between the parent and the child namespace. This might be for doing configuration work within an isolated environment, or it can simply be to retain the ability to peek into the condition of that environment from outside. One way of doing that is to keep an SSH daemon running within that environment. You can have a separate SSH daemon inside each network namespace. However, having multiple SSH daemons running uses a lot of valuable resources like memory. This is where having a special “init” process proves to be a good idea again.
The “init” process can establish a communication channel between the parent namespace and the child namespace. This channel can be based on UNIX sockets or can even use TCP. To create a UNIX socket that spans two different mount namespaces, you need to first create the child process, then create the UNIX socket, and then isolate the child into a separate mount namespace. But how can we create the process first, and isolate it later? Linux provides . This special system call allows a process to isolate itself from the original namespace, instead of having the parent isolate the child in the first place. For example, the following code has the exact same effect as the code previously mentioned in the network namespace section:
And since the “init” process is something you have devised, you can make it do all the necessary work first, and then isolate itself from the rest of the system before executing the target child.
Отображение идентификаторов пользователей и групп: uid_map и gid_map
/proc//uid_map/proc//gid_mappid
В следующих параграфах объясняется формат uid_map; gid_map имеет тот
же формат, но каждый экземпляр «ID пользователя» заменяется на «ID группы».
Файл uid_map предоставляет отображение пользовательских ID из
пользовательского пространства имён процесса pid в пользовательское
пространство имён процесса, который открыл uid_map (но смотрите уточнение
далее). Другими словами, процессы, которые находятся в разных
пользовательских пространствах имён, возможно будут видеть разные значения
при чтении соответствующего файла uid_map, в зависимости от отображений
пользовательских ID у пользовательских пространств имён читающего процесса.
Каждая строка в файле uid_map определяет отображение 1-в-1 непрерывного
диапазона пользовательских ID между двумя пользовательскими пространствами
имён (при создании пользовательского пространства имён этот файл пуст). В
каждой строке содержится три числа через пробел. Первые два числа определяют
начальный пользовательский ID в каждом из двух пользовательских пространств
имён. Третье число определяет длину отображаемого диапазона. Эти поля
рассматриваются так:
- (1)
-
Начало диапазона пользовательских ID в пользовательском пространстве имён
процесса pid. - (2)
-
Начало диапазона пользовательских ID, на который отображаются
пользовательские ID, указанные в первом поле. Интерпретация второго поля
зависит от того, находится ли процесс, открывший uid_map, и процесс
pid, в одном пользовательском пространстве имён:-
- а)
-
Если два процесса находятся в разных пользовательских пространствах имён:
поле два — начало диапазона пользовательских ID в пользовательском
пространстве имён процесса, который открыл uid_map. - б)
-
Если два процесса находятся в одном пользовательском пространстве имён: поле
два — начало диапазона пользовательских ID в родительском пользовательском
пространстве имён процесса pid. Это позволяет открывшему uid_map
(обычно открывают /proc/self/uid_map) видеть отображение пользовательских
ID в пользовательском пространстве имён процесса, создавшего это
пользовательское пространство имён.
-
- (3)
-
Длина диапазона пользовательских ID, выполняющего отображение между двумя
пользовательскими пространствами имён.
Системные вызовы, возвращающие пользовательские ID (ID групп), например,
getuid(2), getgid(2), и мандатные поля в структуре, возвращаемой
stat(2), возвращают пользовательский ID (ID группы), отображённый в
пользовательском пространстве имён вызывающего.
Когда процесс обращается к файлу, его ID пользователя и группы отображаются
в начальном пользовательском пространстве имён с целью проверки прав доступа
и назначенного ID при создании файла. Когда процесс получает ID пользователя
и группы файла через stat(2), то ID отображаются в обратном направлении,
для создания значений, относительно отображений ID пользователя и группы
процесса.
Начальное пользовательское пространство имён не имеет родительского
пространства имён, но для однородности, для него ядро предоставляет
фиктивные файлы отображения ID пользователей и групп. Посмотрим на файл
uid_map (в gid_map тоже самое) из оболочки в начальном пространстве
имён:
$ cat /proc/$$/uid_map
         0          0 4294967295
Сетевое изолирование
Мы уже начинаем понимать, что запустив процесс во вложенном network namespace, таком как , мы можем быть уверены, что он изолирован от остальной системы в том, что касается сети. Наш шелл-процесс, работающий в , может общаться только через . Это означает, что он может общаться только с процессами, которые также являются членами пространства имён , но в настоящее время других таких процессов нет (и, во имя изолированности, мы хотели бы, чтобы так и оставалось), так что он немного одинок. Давайте попробуем несколько ослабить эту изолированность. Мы создадим туннель, через который процессы в смогут общаться с процессами в нашем исходном пространстве имён.
Сейчас любое сетевое общение должно происходить через какое-то сетевое устройство, а устройство может существовать ровно в одном network namespace в данный конкретный момент времени, поэтому связь между любыми двумя процессами в разных пространствах имён должна осуществляться как минимум через два сетевых устройства — по одному в каждом network namespace.
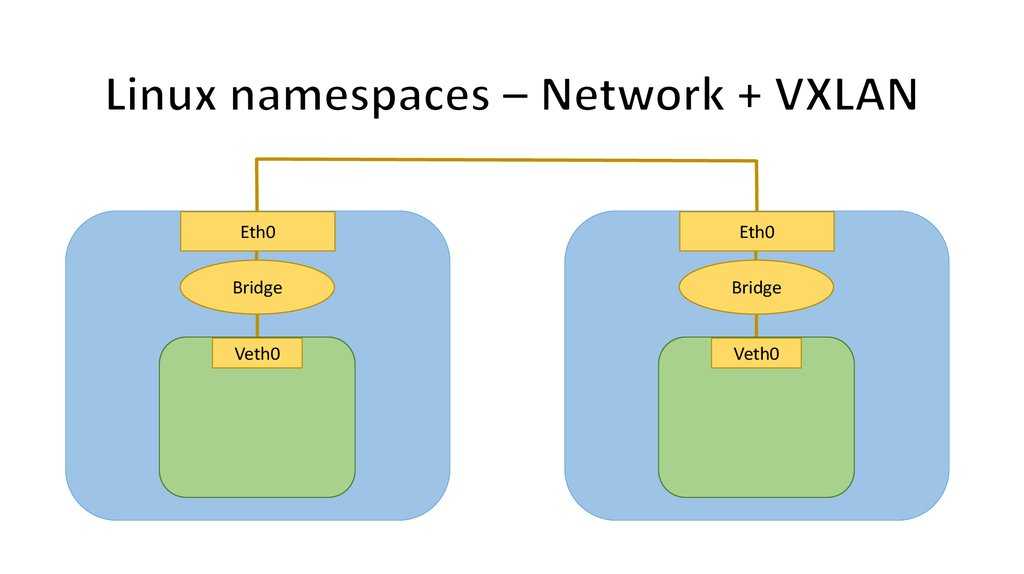
Устройства veth
Для выполнения этого нашего требования, мы будем использовать сетевое устройство virtual ethernet (или сокращённо ). Устройства veth всегда создаются как пара устройств, связанных по принципу туннеля, так что сообщения, отправленные на одном конце, выходят из устройства на другом. Вы могли бы предположить, что мы могли бы легко иметь один конец в исходном network namespace, а другой — в нашем дочернем network namespace, а всё общение между пространствами имён network проходило бы через соответствующее оконечное устройство veth (и вы были бы правы).
Наше устройство теперь появилось в пространстве имён . Но чтобы заставить пару veth работать, нам нужно назначить там IP-адреса и поднять интерфейсы. Мы сделаем это в каждом соответствующем network namespace.
Мы должны увидеть, что интерфейс поднят и имеет назначенный нами адрес . Тоже самое должно произойти с в исходном пространстве имён. Теперь у нас должна быть возможность сделать интер-namespace ping между двумя процессами, запущенными в обоих пространствах имён.
Assigning Interfaces to Network Namespaces
Creating the network namespace is only the beginning; the next part is to assign interfaces to the namespaces, and then configure those interfaces for network connectivity. One thing that threw me off early in my exploration of network namespaces was that you couldn’t assign physical interfaces to a namespace (see the update at the bottom of this post). How in the world were you supposed to use them, then?
It turns out you can only assign virtual Ethernet (veth) interfaces to a network namespace (incorrect; see the update at the end of this post). Virtual Ethernet interfaces are an interesting construct; they always come in pairs, and they are connected like a tube—whatever comes in one veth interface will come out the other peer veth interface. As a result, you can use veth interfaces to connect a network namespace to the outside world via the “default” or “global” namespace where physical interfaces exist.
Let’s see how that’s done. First, you’d create the veth pair:
I found a few sites that repeated this command to create and link it to , but my tests showed that both interfaces were created and linked automatically using this command listed above. Naturally, you could substitute other names for and , if you wanted.
You can verify that the veth pair was created using this command:
You should see a pair of veth interfaces (using the names you assigned in the command above) listed there. Right now, they both belong to the “default” or “global” namespace, along with the physical interfaces.
Let’s say that you want to connect the global namespace to the blue namespace. To do that, you’ll need to move one of the veth interfaces to the blue namespace using this command:
If you then run the command again, you’ll see that the veth1 interface has disappeared from the list. It’s now in the blue namespace, so to see it you’d need to run this command:
Whoa! That’s a bit of a complicated command. Let’s break it down:
-
The first part, , is how you execute commands in a different network namespace.
-
Next is the specific namespace in which the command should be run (in this case, the blue namespace).
-
Finally, you have the actual command to be executed in the remote namespace. In this case, you want to see the interfaces in the blue namespace, so you run .
-


When you run that command, you should see a loopback interface and the veth1 interface you moved over earlier.
Отображение идентификаторов пользователей и групп: запись в uid_map и gid_map
После создания нового пользовательского пространства имён в файл uid_map
один из процессов в пространстве имён может выполнить однократную
запись для определения отображения пользовательских ID в новом
пользовательском пространстве имён. Повторная попытка записи в файл
uid_map в пользовательском пространстве имён завершится с ошибкой
EPERM. Эти же правила применимы к файлам gid_map.
Записываемые в uid_map (gid_map) строки должны соответствовать
следующим правилам:
- *
-
В трёх полях должны быть корректные числа и последнее поле должно быть
больше 0. - *
- Строки заканчиваются символами новой строки.
- *
-
Есть (произвольное) ограничение на количество строк в файле. В Linux 3.18
ограничение равно пятью строкам. Также количество байт, записываемых в файл,
должно быть меньше размера системной страницы, и запись должна выполняться в
начало файла (т. е., после выполнения lseek(2) и pwrite(2) с ненулевым
смещением запись в файл невозможна). - *
-
Диапазон пользовательских ID (групповых ID), указанный в каждой строке, не
должен перекрываться с диапазонами в других строках. В первой реализации
(Linux 3.8) это требование удовлетворялось простейшим способом, который
задавал другое требование: значения в полях 1 и 2 следующих одна за одной
строк, должны увеличиваться, что не давало создавать некоторые корректные
отображения. В Linux 3.9 и новее это ограничение было снято, и допустим
любой набор не перекрывающихся отображений. - *
- В файл должна быть записана, как минимум, одна строка.
Попытки записи, нарушающие перечисленные выше правила, завершаются с ошибкой
EINVAL.
Чтобы процесс мог записывать в файл /proc//uid_map
(/proc//gid_map) должны быть удовлетворены все условия:
- 1.
-
Записывающий процесс должен иметь мандат CAP_SETUID (CAP_SETGID) в
пользовательском пространстве имён процесса pid. - 2.
-
Записывающий процесс должен находиться в пользовательском пространстве имён
процесса pid или быть родительским пользовательским пространством имён
процесса pid. - 3.
-
Отображаемые пользовательские ID (групповые ID) должны иметь соответствующее
отображение в родительском пользовательском пространстве имён. - 4.
-
Применимо к одному из двух случаев:
-
- *
-
Или записывающий процесс имеет мандат CAP_SETUID (CAP_SETGID) в
родительском пользовательском пространстве имён.-
- +
-
В дальнейшем ограничения не применяются: процесс может создавать отображения
в произвольные пользовательские ID (групповые ID) в родительском
пользовательском пространстве имён.
-
- *
-
Или в противном случае накладываются следующие (все) ограничения:
-
- +
-
Данные, записываемые в uid_map (gid_map), должны состоять из одной
строки, которая отображает эффективный пользовательский ID (групповой ID)
записывающего процесса в родительском пользовательском пространстве имён в
пользовательский ID (групповой ID) в пользовательском пространстве имён. - +
-
Записывающий процесс должен иметь мандат тот же эффективный пользовательский
ID что и процесс, который создал пользовательское пространство имён. - +
-
В случае gid_map, перед записью в gid_map сначала нужно использовать
системный setgroups(2) для записи «deny» в файл
/proc//setgroups (смотрите ниже).
-
-
Conclusion
Namespaces and cgroups are the building blocks for containers and modern applications. Having an understanding of how they work is important as we refactor applications to more modern architectures.
Namespaces provide isolation of system resources, and cgroups allow for fine‑grained control and enforcement of limits for those resources.
Containers are not the only way that you can use namespaces and cgroups. Namespaces and cgroup interfaces are built into the Linux kernel, which means that other applications can use them to provide separation and resource constraints.
Learn more about NGINX Unit and to try it for yourself.
COLOPHON top
       This page is part of the iproute2 (utilities for controlling
       TCP/IP networking and traffic) project.  Information about the
       project can be found at
       ⟨http://www.linuxfoundation.org/collaborate/workgroups/networking/iproute2⟩.
       If you have a bug report for this manual page, send it to
       netdev@vger.kernel.org, shemminger@osdl.org.  This page was
       obtained from the project's upstream Git repository
       ⟨https://git.kernel.org/pub/scm/network/iproute2/iproute2.git⟩ on
       2021-08-27.  (At that time, the date of the most recent commit
       that was found in the repository was 2021-08-18.)  If you
       discover any rendering problems in this HTML version of the page,
       or you believe there is a better or more up-to-date source for
       the page, or you have corrections or improvements to the
       information in this COLOPHON (which is not part of the original
       manual page), send a mail to man-pages@man7.org

iproute2                       16 Jan 2013                   IP-NETNS(8)
Pages that refer to this page:
systemd-nspawn(1),
veth(4),
network_namespaces(7),
ip(8),
ip-link(8)
Why Use Namespaces for Process Isolation?
In a single-user computer, a single system environment may be fine. But on a server, where you want to run multiple services, it is essential to security and stability that the services are as isolated from each other as possible. Imagine a server running multiple services, one of which gets compromised by an intruder. In such a case, the intruder may be able to exploit that service and work his way to the other services, and may even be able compromise the entire server. Namespace isolation can provide a secure environment to eliminate this risk.
For example, using namespacing, it is possible to safely execute arbitrary or unknown programs on your server. Recently, there has been a growing number of programming contest and “hackathon” platforms, such as HackerRank, TopCoder, Codeforces, and many more. A lot of them utilize automated pipelines to run and validate programs that are submitted by the contestants. It is often impossible to know in advance the true nature of contestants’ programs, and some may even contain malicious elements. By running these programs namespaced in complete isolation from the rest of the system, the software can be tested and validated without putting the rest of the machine at risk. Similarly, online continuous integration services, such as Drone.io, automatically fetch your code repository and execute the test scripts on their own servers. Again, namespace isolation is what makes it possible to provide these services safely.
Namespacing tools like Docker also allow better control over processes’ use of system resources, making such tools extremely popular for use by PaaS providers. Services like Heroku and Google App Engine use such tools to isolate and run multiple web server applications on the same real hardware. These tools allow them to run each application (which may have been deployed by any of a number of different users) without worrying about one of them using too many system resources, or interfering and/or conflicting with other deployed services on the same machine. With such process isolation, it is even possible to have entirely different stacks of dependency softwares (and versions) for each isolated environment!
If you’ve used tools like Docker, you already know that these tools are capable of isolating processes in small “containers”. Running processes in Docker containers is like running them in virtual machines, only these containers are significantly lighter than virtual machines. A virtual machine typically emulates a hardware layer on top of your operating system, and then runs another operating system on top of that. This allows you to run processes inside a virtual machine, in complete isolation from your real operating system. But virtual machines are heavy! Docker containers, on the other hand, use some key features of your real operating system, including namespaces, and ensure a similar level of isolation, but without emulating the hardware and running yet another operating system on the same machine. This makes them very lightweight.
Process isolation (PID namespace)
A PID, or process ID helps a system track a specific task on a computer. When you launch Firefox on your computer, it will have a PID associated with it. In order to make sure that the computer interacts with a task properly, the task is referenced by the PID. Let’s assume that you have Firefox and the Brave Browser open at the same time. You fire up your preferred search engine, such as DuckDuckGo, in each browser and search for cat pictures in one and dog pictures in the other. Both browsers are making a similar request to the same website. How does the computer ensure that the correct search results are returned to the correct browser? One of the main ways is by tracing the requests each PID makes and then returning the results to the requesting process.
«Great, I’m lost,» you say. What does this have to do with apartment buildings and namespaces? Well, let’s say that you want to run identical copies of a piece of software. Some software was not written to have more than one copy open at a time. To accomplish this, you might have to isolate the PID so that it is not aware of what is going on outside of its own processes. This is what process isolation can help to solve.
To put it another way, going back to our apartment building, the individual apartments in the complex are similar to the PID namespace. Each household in the apartment complex wants to turn on their TVs and watch a variety of content. In a silly parallel universe, imagine that when a single person in the apartment building turned on their TV, no one else could watch TV because otherwise, the cable provider wouldn’t know which TV should be watching «The Office» and which «The Apprentice.» Namespaces would allow the cable company to isolate each household and provide distinct programming to each resident because it no longer matters what other people in your complex are viewing.
Connecting Network Namespaces to the Physical Network
This part of it threw me for a while. I can’t really explain why, but it did. Once I’d figured it out, it was obvious. To connect a network namespace to the physical network, just use a bridge. In my case, I used an Open vSwitch (OVS) bridge, but a standard Linux bridge would work as well. Place one or more physical interfaces as well as one of the veth interfaces in the bridge, and—bam!—there you go. Naturally, if you had different namespaces, you’d probably want/need to connect them to different physical networks or different VLANs on the physical network.
So there you go—an introduction to Linux network namespaces. It’s quite likely I’ll build on this content later, so while it seems a bit obscure right now just hang on to this knowledge. In the meantime, if you have questions, clarifications, or other information worth sharing with other readers, please feel free to speak up in the comments.
UPDATE: As I discovered after publishing this post, it most certainly is possible to assign various types of network interfaces to network namespaces, including physical interfaces. (I’m not sure why I ran into problems when I first wrote this post.) In any case, to assign a physical interface to a network namespace, you’d use this command:
Sorry for the confusion!
UPDATE 2: I’ve removed the use of the command as it’s been deprecated. The article already mentioned that users could use , , and in its place, but this change makes it more obvious.
UPDATE 3: A reader contacted me to point out that it’s possible to create the veth pairs and assign one of the pairs to a network namespace all in one command:
Thanks to Rick van Rein for pointing this out!
Metadata and Navigation
CLI Linux Networking
Previous Post: Technology Short Take #35
Next Post: Vendor Meetings at VMworld 2013
Be social and share this post!
Cgroups
Cgroup namspace gives the possibility of administrate a number of resources and set resource limits to them by using certain resources controllers also known as Cgroup subsystems.
With tihs we can adminbstrate CPU, memory, network brandwith and I/O amonsgst hierarchically ordered groups of processes. In the hierarchies the are composed by slices, they dont have any
processes instead, they prodive a blueprint for organizing a hierarchy around processes. A slice can have a scope (transient processes, eg: VM, user sessins) or a service (system services, normally started via systemd).

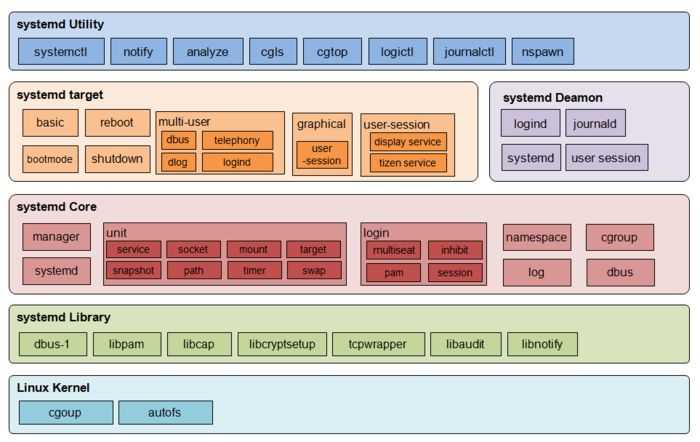
systemd——-
!
There are four default slices:
-
-.slice: The root slice at the top of the Cgrpup tree
-
System.slice: The default place for all system services
-
User.slice: The default +lace for all user sessions
-
Machine.slice: VM and containers.
![]()
# See Cgroup hierarchy of processes
systemd-cgls


# See the number of tasks, CPU consuption, Memory, I/O
systemd-cgtop

#Run transient process in a new sclice
systemd-run --unit=top --slice=nuno.slice top -b


#Check if is running
systemctl status nuno.slice

#Check again
systemd-cgls

#stop it
systemctl stop nuno.slice

#Apply Cgroup limit

#Run a program that requires 2g of RAM
echo "while true; do memhog 2g; sleep 2; done" > memhogtest.sh

cat <<EOF > memhogtest.service

After=network.target remote-fs.target nss-lookup.target


Type=notify
ExecStart=/home/nuno/memtest.sh -DBACKGROUND
ExecStop=/bin/kill -WINCH ${MAINPID}
killSignal=SIGTERM
PrivateTmp=true


WantedBy=multi-user.target

EOF

cp memhogtest.service /usr/lib/systemd/system

systemctl deamon-reaload
systemctl enable memhogtest.service

#Force Ram limit
systemctl set-property --runtime memhogtest.service MemoryLimit=1G

systemctl deamon-reaload

#Check if the proccess was killed
systemctl status memhogtest.service
![]()
Other way of limit process resources is to manipulate the files that kernel expose. To our goal we will limit the memory usage up to 100MB using Cgroups.
All containers that will be spawned will be this resource limited. The kernel exposes cgroups through the /sys/fs/cgroup directory.
ls /sys/fs/cgroup
#create new memory group

mkdir /sys/fs/cgroup/memory/cogsi
Once created the kernel creates all files that we can mannually configure. our goal is to set memory up to 100Mb and disable swap
echo "100000000" > /sys/fs/cgroup/memory/cogsi/memory.limit_in_bytes
echo "0" > /sys/fs/cgroup/memory/demo/memory.swappiness
The special task file, holds all PIDs that will have this policy activated, later on we will show a full container that
have this restriction.
Map-файлы
Map-файлы — особенные файлы в системе. Чем особенные? Ну, тем, что возвращают разное содержимое всякий раз, когда вы читаете из них, в зависимости от того, какой ваш процесс читает. Например, map-файл возвращает маппинг от UID’ов из user namespace, которому принадлежит процесс , UID’ам в user namespace читающего процесса. И, как следствие, содержимое, возвращаемое в процесс X, может отличаться от того, что вернулось в процесс Y, даже если они читают один и тот же map файл одновременно.
В частности, процесс X, считывающий UID map-файл , получает набор строк. Каждая строка отображает непрерывный диапазон UID’ов в user namespace C процесса , соответствующий диапазону UID в другом namespace.
Каждая строка имеет формат , где:
- является стартовым UID диапазона для user namespace процесса
- — это длина диапазона.
- Трансляция зависит от читающего процесса X. Если X принадлежит другому user namespace U, то — это стартовый UID диапазона в U, который мапится с . В противном случае — это стартовый UID диапазона в P — родительского user namespace процесса C.
Например, если процесс читает файл и среди полученных строк видно , то UID’ы с 15 по 19 в user namespace процесса маппятся в UID’ы 22-26 отдельного user namespace читающего процесса.
С другой стороны, если процесс читает из файла (или map-файла любого процесса, принадлежащего тому же user namespace, что и читающий процесс) и получает , то UID’ы c 15 по 19 в user namespace C маппятся в UID’ы c 22 по 26 родительского для C user namespace.
Давайте это попробуем:
Хорошо, это было не очень захватывающе, так как это были два крайних случая, но это говорит там о нескольких вещах:
- Вновь созданный user namespace будет фактически иметь пустые map-файлы.
- UID 4294967295 не маппится и непригоден для использования даже в user namespace. Linux использует этот UID специально, чтобы показать отсутствие user ID.
Реализация
Как вы можете видеть, есть много сложностей, связанных с управлением user namespaces, но реализация довольно проста. Всё, что нам нужно сделать, это написать кучу строк в файл — муторно было узнать, что и где писать. Без дальнейших церемоний, вот наши цели:
- Клонировать командного процесса в его собственном user namespace.
- Написать в UID и GID map-файлы командного процесса.
- Сбросить все привилегии суперпользователя перед выполнением команды.
достигается простым добавлением флага в наш системный вызов .
Для мы добавляем функцию , которая осторожно представляет одного обычного пользователя в качестве. И вызовем его из основного процесса в родительском user namespace прямо перед тем, как мы подадим сигнал командному процессу
И вызовем его из основного процесса в родительском user namespace прямо перед тем, как мы подадим сигнал командному процессу.
Для шага мы обновляем функцию , чтобы убедиться, что команда выполняется от обычного непривилегированного пользователя , которого мы предоставили в маппинге (помните, что root пользователь в user namespace командного процесса — это пользователь ):
И это всё! теперь запускает процесс в изолированном user namespace.
В этом посте было довольно много подробностей о том, как работают User namespaces, но в конце концов настройка экземпляра была относительно безболезненной. В следующем посте мы рассмотрим возможность запуска команды в своём собственном Mount namespace с помощью (раскрывая тайну, стоящую за инструкцией из ). Там нам потребуется немного больше помочь Linux, чтобы правильно настроить инстанс.
Но что, например, такое контейнер?
Надеюсь, теперь у вас есть некоторое представление о том, что может делать namespace. Вы можете предположить, что контейнеры по своей сути — обыкновенные процессы с отличающимися от других процессов namespaces, и вы будете правы. Фактически это квота. Контейнер без квот не обязан принадлежать уникальному namespace каждого типа — он может совместно использовать некоторые из них.
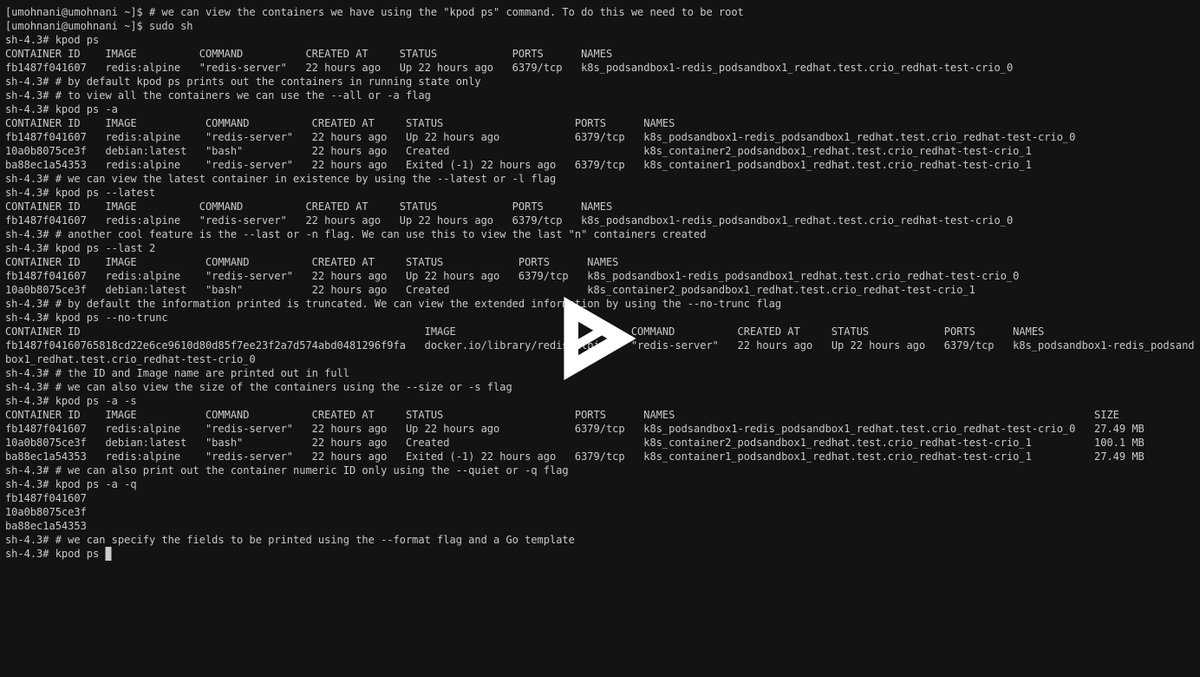
Например, когда вы набираете , всё, что вы делаете — говорите докеру не создавать новый Network namespace для процесса redis. И, как мы видели, Linux добавит этот процесс участником дефолтного Network namespace, как и любой другой обычный процесс. Таким образом, с точи зрения сети процесс redis точно такой же, как и все остальные. Это возможность настройки не только сети, позволяет вам делать такие изменения для большей части существующих namespaces. Тут возникает вопрос, что же такое контейнер? Остаётся ли контейнером процесс, использующий все, кроме одного, общие namespace? ¯\_(ツ)_/¯ Обычно контейнеры идут вместе с понятием изоляции, достигаемой через namespaces: чем меньше количество namespaces и ресурсов, которые процесс делит с остальными, тем более он изолирован и это всё, что действительно имеет значение.


