1) With lsof
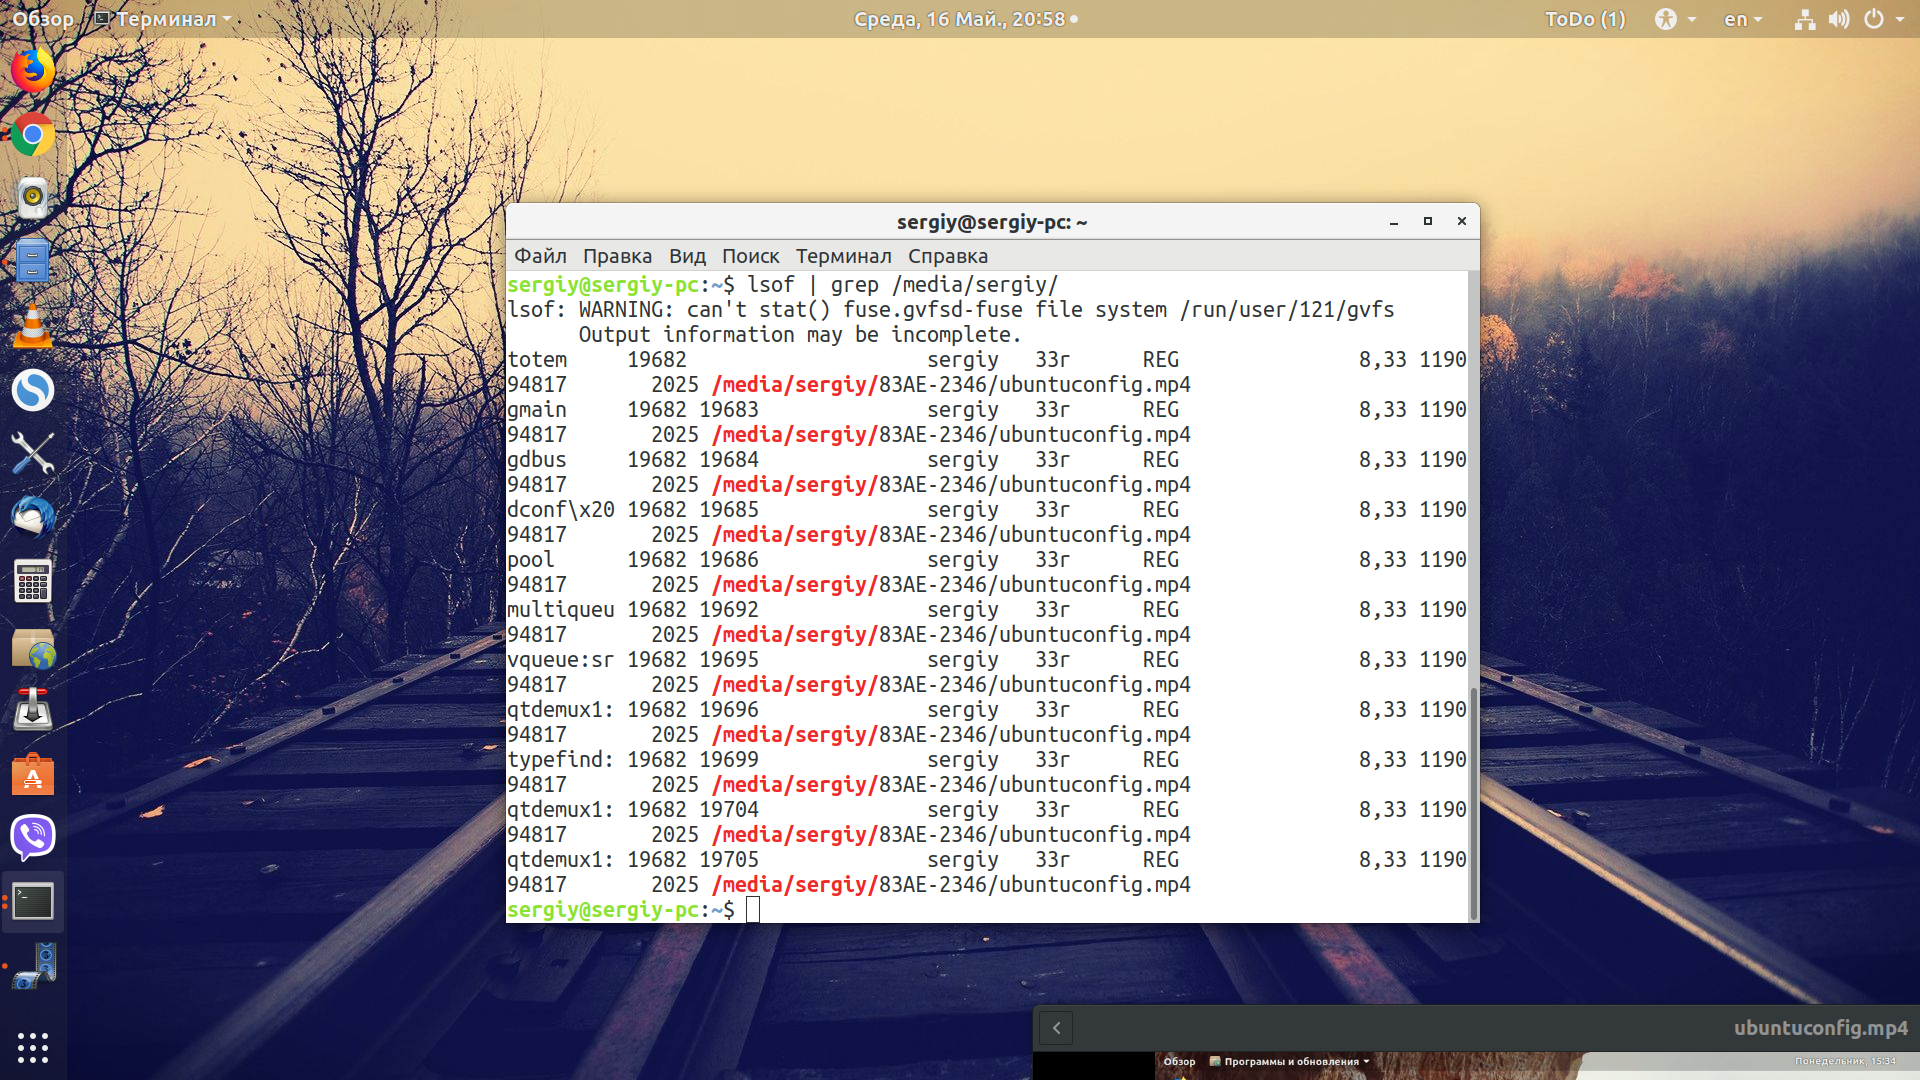
The lsof (list open files) command displays a list of all open files and the processes associated with them on a specific file system, directory, or device. By default, it lists all files, shared libraries, and directories that are currently open and provides as much information as possible about each of them.
Here we can use lsof command to find PID (process id) corresponding to our mount point and then kill that process.
Here we have the 3 PID of the process using the mounted directory. You can see vim command, which means that a file is being edited by the ‘linoxide’ user. You can inform the user to stop his action or kill the process.
Now, let’s see the results:
You can look that our user has stopped his modification but we still have bash command in execution but we don’t know why. We can now kill the two processes with kill command.
Now we will kill the first bash process
We can verify the result
We can see that one process is killed
Now let’s verify for the second process
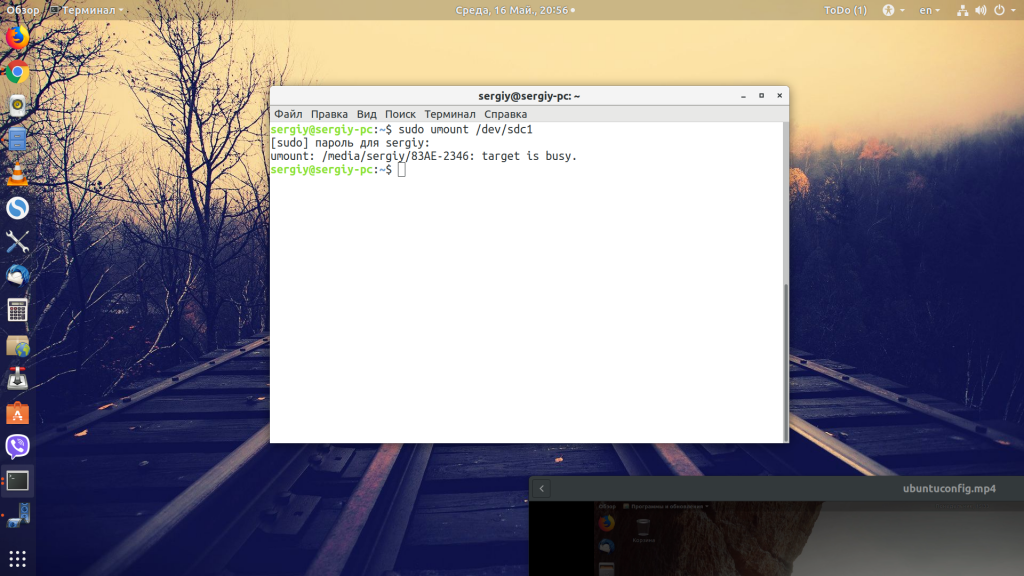
Now let’s try to unmount the folder
Our action has automatically unmounted the folder but let’s check with df command.
From the output, we can see directory has been unmounted from the system.
USB 2 Issues
old kernels workaround
If you encounter problems using your USB device with USB 2 (i.e. ‘high speed’ mode), you can revert to the ‘full speed’ mode (slower) by unloading ehci_hcd. To do that, type in a terminal:
sudo rmmod ehci_hcd
before plugging in your device.
recent kernels workaround, from Karmic
see also AbsolutelyTech
ehci_hcd is now built into the kernel and cannot be load/unloaded using modprobe. To revert a connected device from (failing) high-speed to full-speed:
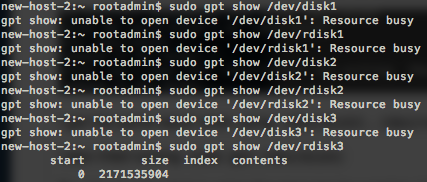
- Determine your device id using
lsusb
- Find which bus it is connected to. The bus id can be found as a folder in /sys/bus/pci/drivers/ehci_hcd. The following script explores buses and connected devices:
pushd /sys/bus/pci/drivers/ehci_hcd > /dev/null
for bus in 0000:??:??.? ; do
        echo "ehci_hcd bus $bus"
        pushd $bus/usb1 > /dev/null
        for dev in ?-?; do
                idVendor=`cat $dev/idVendor`
                idProduct=`cat $dev/idProduct`
                echo "ehci_hcd bus $bus: device $dev = $idVendor:$idProduct"
        done
        popd > /dev/null
done
popd > /dev/null
The information is also usually available in /var/log/kern.log
- Unbind the bus (and all devices) from the ehci_hcd driver. Insert the bus id in the following command, using the format 0000:00:xx.x
sudo sh -c 'echo -n "0000:00:xx.x" > unbind'
Mounting
By default, storage devices that are plugged into the system mount automatically in the /media/<username> directory, open a file browser window for each volume and place an icon on your desktop. The rationale for this slight change of behavior can be found . If you plug in a usb hard disk with many partitions, all of the partitions will automatically mount. This behaviour may not be what you want; you can configure it as shown below.
If the volumes have labels the icons will be named accordingly. Otherwise, they will be named «disk», «disk-1» and so on.
To change the volume label see RenameUSBDrive.
Сохранение параметров mount после перезагрузки
Для того, что бы устройства при перезагрузки системы монтировались автоматически, необходимо прописать инструкции монтирования в файл /etc/fstab. Файл /etc/fstab содержит список записей в следующем формате:
Например:
/dev/sdb1 /home ext4 defaults 0 0
Подключит устройство /dev/sdb1 (например жесткий диск) в директорию /home
После того как инструкция для mount прописаны в /etc/fstab, что бы проверить правильность написания дайте команду
mount -a
Если команда отработает без ошибок, то все устройства прописанные в /etc/fstab будут подключены, а также изменения не потеряются после перезагрузки.
Using mount
Get the Information
Sometimes, devices don’t automount, in which case you should try to manually mount them. First, you must know what device you are dealing with and what filesystem it is formatted with. Most flash drives are FAT16 or FAT32 and most external hard disks are NTFS. Type the following:
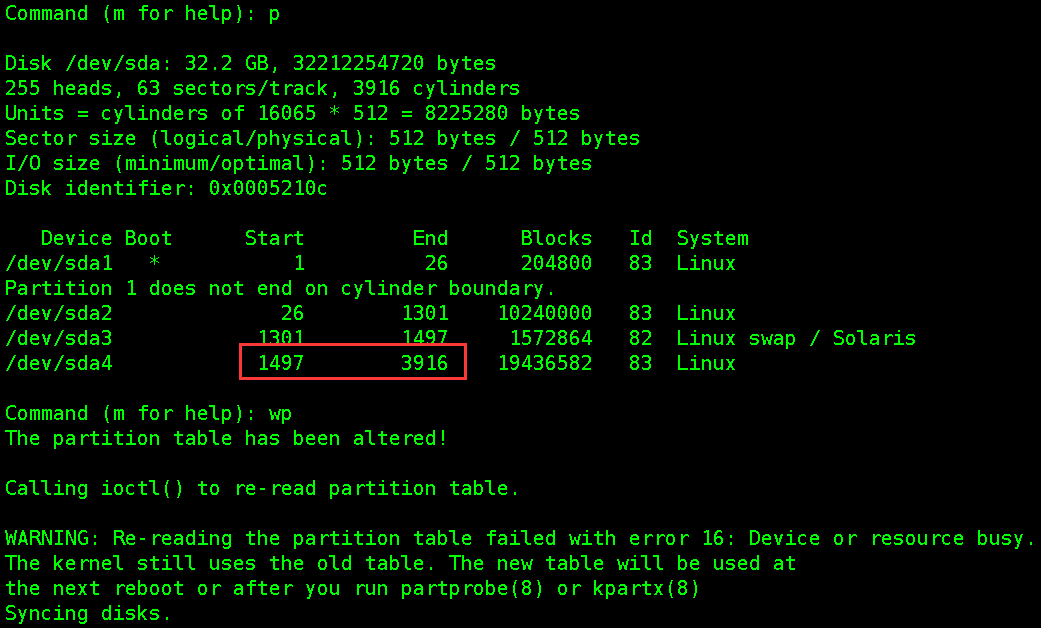
sudo fdisk -l
Find your device in the list. It is probably something like /dev/sdb1. For more information about filesystems, see LinuxFilesystemsExplained.
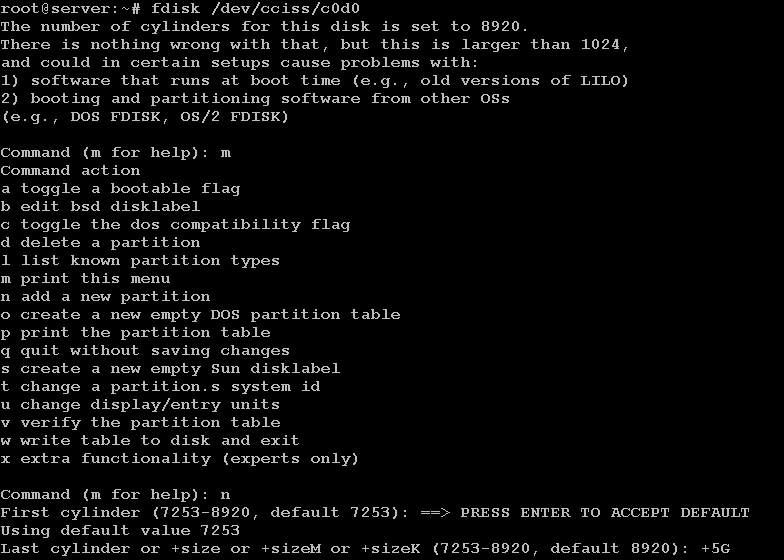
Create the Mount Point
Now we need to create a mount point for the device. Let’s say we want to call it «external». You can call it whatever you want, but if you use spaces in the name it gets a little more complicated. Instead, use an underscore to separate words (like «my_external»). Create the mount point:
sudo mkdir /media/external
Mount the Drive
We can now mount the drive. Let’s say the device is /dev/sdb1, the filesystem is FAT16 or FAT32 (like it is for most USB flash drives), and we want to mount it at /media/external (having already created the mount point):
sudo mount -t vfat /dev/sdb1 /media/external -o uid=1000,gid=1000,utf8,dmask=027,fmask=137
The options following the «-o» give you ownership of the drive, and the masks allow for extra security for file system permissions. If you don’t use those extra options you may not be able to read and write the drive with your regular username.
Otherwise, if the device is formatted with NTFS, run:
sudo mount -t ntfs-3g /dev/sdb1 /media/external
Note: You must have the ntfs-3g driver installed. See MountingWindowsPartitions for more information.
Unmounting the Drive
When you are finished with the device, don’t forget to unmount the drive before disconnecting it. Assuming /dev/sdb1 is mounted at /media/external, you can either unmount using the device or the mount point:
sudo umount /dev/sdb1
or:
sudo umount /media/external
You cannot unmount from the desktop by right-clicking the icon if the drive was manually mounted.
Синтаксис команды mount
Чаще всего такую процедуру выполняют специальные сервисы, входящие в состав оболочки системы. Случаются ситуации, когда они просто-напросто недоступны. Здесь потребуется выполнить задачу ручным методом. Пользователь самостоятельно задает опции для монтирования, вводит различные параметры.
Процесс использования утилиты подразумевает обаятельное применение всевозможных опций, каждая из которых выполняет свою функцию. К примеру, опция «-t» является необязательной, но дает возможность без особого труда задать файловую систему, которая в последующем будет использоваться. Нередко это оказывается весьма полезным.
Специальная опция «-о» позволяет предварительно прописать параметры, которые будут распространяться на монтирование. В синтаксис обаятельно включен адрес файл, по которому расположено само устройство, а также папка назначения.
Перед тем, как приступить к полноценному использованию утилиты «mount», рекомендуется максимально подробно изучить список опций. На самом деле их огромное множество, но чаще всего применяются:
- «-v». Отображение максимально подробного режима.
- «-a». Монтируются все требуемые устройства, которые предварительно прописаны в fstab
- «-F». Создается отдельный экземпляр утилиты для каждого из исследуемых разделов.
- «-n». Исключается вероятность записи информации о выполняемом монтировании в /etc/mtab.
- «-f». Исключается вероятность осуществления каких-либо действий. С помощью такой опции можно посмотреть перечень процедур, которые планирует выполнить утилита.
- «-l». Добавляется специальная метка на диск, которая приравнивается к точке монтирования.
- «-c». При выполнении команды не использовать относительные пути, а руководствоваться только абсолютными путями (пример – /etc/exim4) .
- «-r». Создаваемый раздел будет доступен лишь для чтения.
- «-w». Создаваемый раздел будет доступен как для чтения, так и для записи.
- «-L». Монтируется раздел с использованием метки.
- «-U». Монтируется раздел с использованием UUID.
- «-T». Появляется возможность применения альтернативного fstab
- «-B». Монтируется раздел в локальную папку
- «-R». Перемонтируется сама локальная папка.
- «-h». Вывести справочную информацию.
- «-V». Параметр покажет текущею версию утилиты.
Представленный выше список опций является неполным. Такие функции основные, чаще всего могут потребоваться пользователю операционной системы «Линукс» во время работы с утилитой «mount».
Buffer I/O Errors
If you see errors related to Buffer I/O when attaching a USB storage device, there are two ways to work around it. First, try using varying max_sectors settings, as such:
sudo sh -c "echo 120 > /sys/block/sda/queue/max_sectors_kb"
Try values of 120, 64 and 32.
If this does not resolve the issue, then you may need an unusual_dev entry for your device. It would look something like this:
UNUSUAL_DEV(0x03eb , 0x2002, 0x0100, 0x9999,
            "Generic",
            "MusicDrive",
            US_SC_DEVICE, US_PR_DEVICE, NULL,
            US_FL_IGNORE_RESIDUE),
The vendor and device IDs can be obtained from the output of «lsusb». The entry would be placed in drivers/usb/storage/unusual_devs.h. If you cannot compile your own kernel, please file a bug report, and we’ll attempt to compile a test module for you.
Файловая система Linux
Файловые системы в Linux, macOS и других Unix-подобных операционных системах не используют отдельные идентификаторы томов для устройств хранения, как, скажем, в Windows. Windows назначает каждому тому букву диска, такую как C: или D:, а файловая система для каждого тома представляет собой дерево каталогов, расположенное под этой буквой диска.
В Linux файловая система представляет собой дерево каталогов «все в одном». У смонтированного запоминающего устройства его файловая система привита к этому дереву, так что оно кажется неотъемлемой частью единой файловой системы. Вновь смонтированная файловая система будет доступна через каталог, в который она смонтирована. Этот каталог называется точкой монтирования для этой файловой системы.
Многие файловые системы автоматически монтируются во время загрузки или на лету как тома хранения, подключенные к компьютеру во время выполнения. Осторожные системные администраторы могут отключить функции автоматического монтирования во время выполнения, чтобы они могли контролировать соединения с системой.
Это означает, что запоминающие устройства, подключенные во время выполнения, могут не монтироваться автоматически и требуют установки вручную. Монтирование файловой системы вручную позволяет принимать решения об этой файловой системе, например о том, где будет находиться точка монтирования и будет ли файловая система доступна только для чтения или для чтения и записи.
Команды , и дают вам возможность контролировать этот важный аспект вашей системы Linux, вне зависимости от необходимости или по выбору.
3) Lazy unmount
Umount command has an option to perform a lazy unmount (requires kernel 2.4.11 or later). The mount will be removed from the filesystem namespace (so you won’t see it under anymore) but it stays mounted, so programs accessing it can continue to do so. When the last program accessing it exits, the unmount will actually occur.
We can see that the folder is busy. Now let’s try to do a lazy unmount
We don’t have an error message. We will check if the command was being executed without error
Now let’s check the mount point
We can see that the mount point doesn’t appear again but as we said earlier, for example, our ‘linoxide’ user is still modifying his file, can create new files, etc. On the server, we can see the file that the user is modifying.
We can need to unmount a partition because of an emergency or simply to remove a device but a problem can occur because that device is busy. It is important to examine every process on the system before making a decision for the method to resolve the problem. The lsof and fuser commands make it easy to identify the processes that are preventing you from unmounting a file system. Finally, if you want to use a force unmount use option.
Что такое монтирование?
Как я уже сказал Linux имеет единую корневую файловую систему, куда подключаются все запоминающие устройства и другие ресурсы. На самом деле, в Windows происходит что-то подобное, только все это скрыто от пользователя.

![Linux: какой процесс вызывает "устройство занято" при выполнении umount? [закрытый]](https://myeditor.ru/wp-content/uploads/a/f/5/af5f575c639f5f6a6d5e350f872b66e1.png)
Фактически смонтированный раздел становится частью корневой файловой системы и система старается сделать работу со всеми разделами, независимо от их файловых систем, прозрачной. Это значит, что если вы примонтируете участок оперативной памяти или удаленную сетевую папку, то сможете работать с ней в файловом менеджере точно так же, как и с локальным диском.
Например, вы хотите примонтировать флешку. Вы даете системе команду подключить ее в папку /run/media/имя_пользователя/UUID_флешки/. Система определяет файловую систему устройства, а затем, используя драйвера ядра подключает ее к указанной папке. Дальше вам остается работать с той папкой, как с любой другой. Больше ни о чем думать не нужно. Когда надумаете извлечь флешку, ее нужно отмонтировать.
Формат строки
Каждая строка в файле /etc/fstab содержит следующие поля, разделенные пробелами или символами табуляции:
filesystem dir type options dump pass
filesystem
Физическое место размещения файловой системы, по которому определяется конкретный раздел или устройство хранения для монтирования.
type
Тип файловой системы. Поддерживается множество типов: ext2, ext3, ext4, btrfs, reiserfs, xfs, jfs, smbfs, iso9660, vfat, ntfs, swap и auto. При выборе auto команда mount попытается определить реальный тип файловой системы самостоятельно. Это полезно для компакт-дисков (CD/DVD).
options
Параметры монтирования файловой системы. Подробнее смотрите на man странице mount
Обратите внимание, что некоторые параметры относятся к конкретным типам файловых систем.
| Опция | Значение |
|---|---|
| auto | Файловая система монтируется при загрузке автоматически или после выполнения команды ‘mount -a’. |
| noauto | Файловая система может быть смонтирована только вручную. |
| exec | Позволяет исполнять бинарные файлы на разделе диска. Установлено по умолчанию. |
| noexec | Бинарные файлы не выполняются. Использование опции на корневой системе приведёт к её неработоспособности. |
| ro | Монтирует файловую систему только для чтения. |
| rw | Монтирует файловую систему для чтения/записи. |
| sync | Все операции ввода-вывода должны выполняться синхронно. |
| async | Все операции ввода-вывода должны выполняться асинхронно. |
| user | Разрешает любому пользователю монтировать файловую систему. Применяет опции noexec, nosuid, nodev, если они не переопределены. |
| nouser | Только суперпользователь может монтировать файловую систему. Используется по умолчанию. |
| defaults | Использовать значения по умолчанию. Соответствует набору rw, suid, dev, exec, auto, nouser, async. |
| suid | Разрешить операции с suid и sgid битами. В основном используются, чтобы позволить пользователям выполнять бинарные файлы со временно приобретёнными привилегиями для выполнения определённой задачи. |
| nosuid | Запрещает операции с suid и sgid битами. |
| nodev | Данная опция предполагает, что на монтируемой файловой системе не будут созданы файлы устройств (/dev). Корневой каталог и целевая директория команды chroot всегда должны монтироваться с опцией dev или defaults. |
| atime | Включает запись информации о последнем времени доступа (atime) при каждом чтении файла. Включено по умолчанию на Linux до v.2.6.29 включительно. |
| noatime | Отключает запись информации о последнем времени доступа (atime) при каждом чтении файла. |
| relatime | Включает запись информации о последнем времени доступа при чтении файла, если предыдущее время доступа (atime) меньше времени изменения файла (ctime). Включено по умолчанию на Linux начиная с v.2.6.30. |
| acl | Включить обработку ACL для раздела |
dump
Используется утилитой dump для определения того, нужно ли создать резервную копию данных в файловой системе. Возможные значения: или 1. Если указано число 1, dump создаст резервную копию. У большинства пользователей утилита dump не установлена, поэтому им следует указывать 0 в этом поле.
pass
Используется программой fsck для определения того, нужно ли проверять целостность файловой системы. Возможные значения: , 1 или 2
Значение 1 следует указывать только для корневой файловой системы (с точкой монтирования ); для остальных ФС, которые вы хотите проверять, используйте значение 2, которое имеет менее высокий приоритет.Обратите внимание, что в случае btrfs следует всегда указывать , даже если эта файловая система используется в качестве корневой. Файловые системы, для которых в поле указано значение , не будут проверяться fsck.
Using pmount
There is a program called pmount available in the repositories which allows unprivileged users to mount drives as if they were using sudo, even without an entry in /etc/fstab. This is perfect for computers that have users without RootSudo access, like public terminals or thin clients.
pmount can be used with the same syntax as mount (but without sudo), or quite simply as follows:
pmount <device>
Example:
pmount /dev/sdb1 flash_drive
This will mount the device /dev/sdb1 at /media/flash_drive.
If you leave off the label option, it will mount by default at /media/device.
To unmount the device, use pumount, like so:
pumount <device>
Example:
pumount /dev/sdb1
For more help, see the man pages for pmount and pumount.
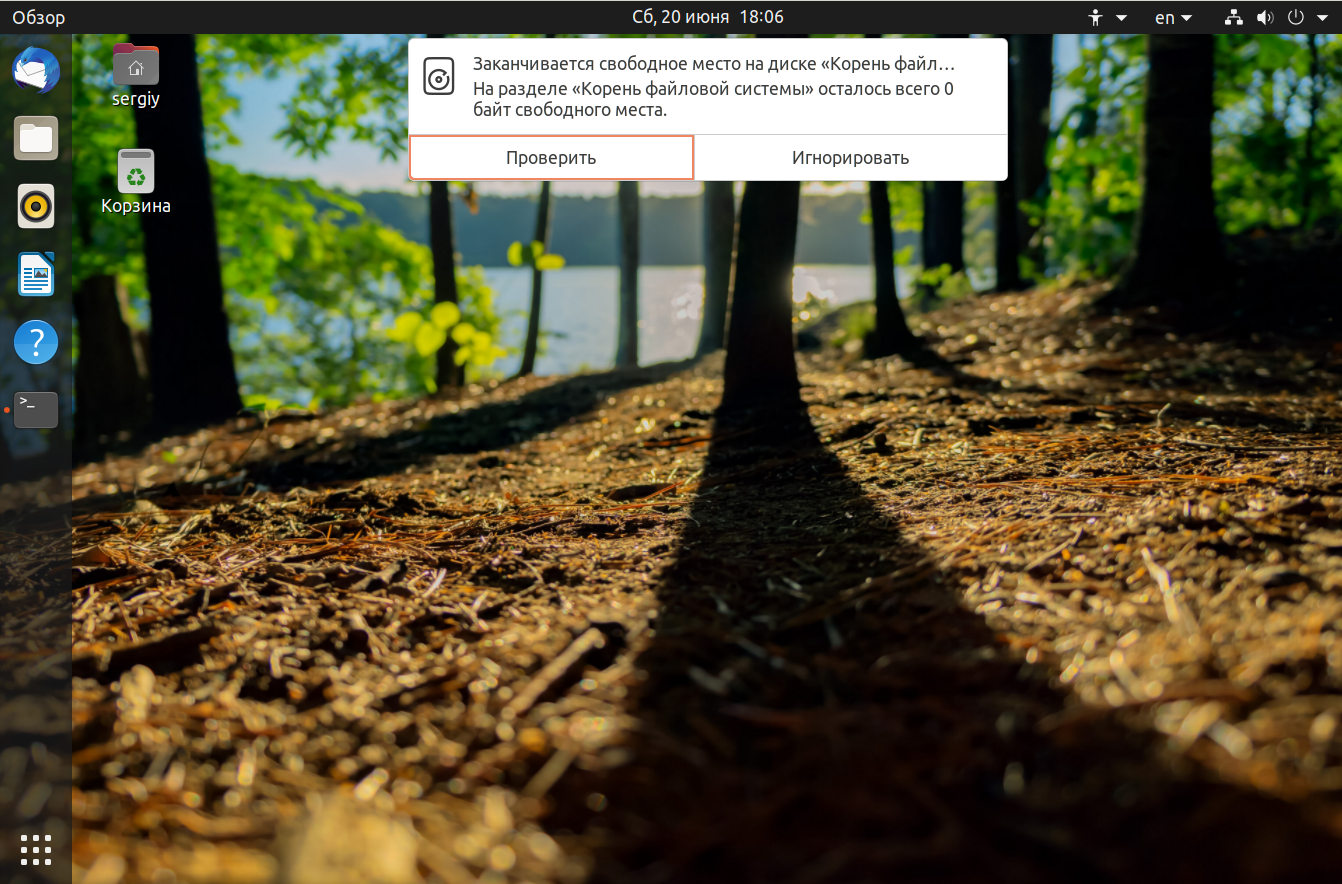
The Importance of Unmounting
Before disconnecting devices, you must unmount them first. This is similar to «Safely Remove» in Windows in that the device won’t unmount until data is finished being written to the device, or until other programs are finished using it. This applies to all types of storage devices, including flash drives, flash cards, external hard drives, ipods and other media players, and even remote storage like Samba or NFS shares.
Failure to unmount before disconnecting the device can result in loss of data and/or a corrupted file system. There are no exceptions to this rule. Be safe — unmount your drives before disconnecting them!
Other Useful Commands
To see a list of your USB devices (the vendor and device ID’s), run:
lsusb
To see all attached storage devices and their partitions, run:
sudo fdisk -l
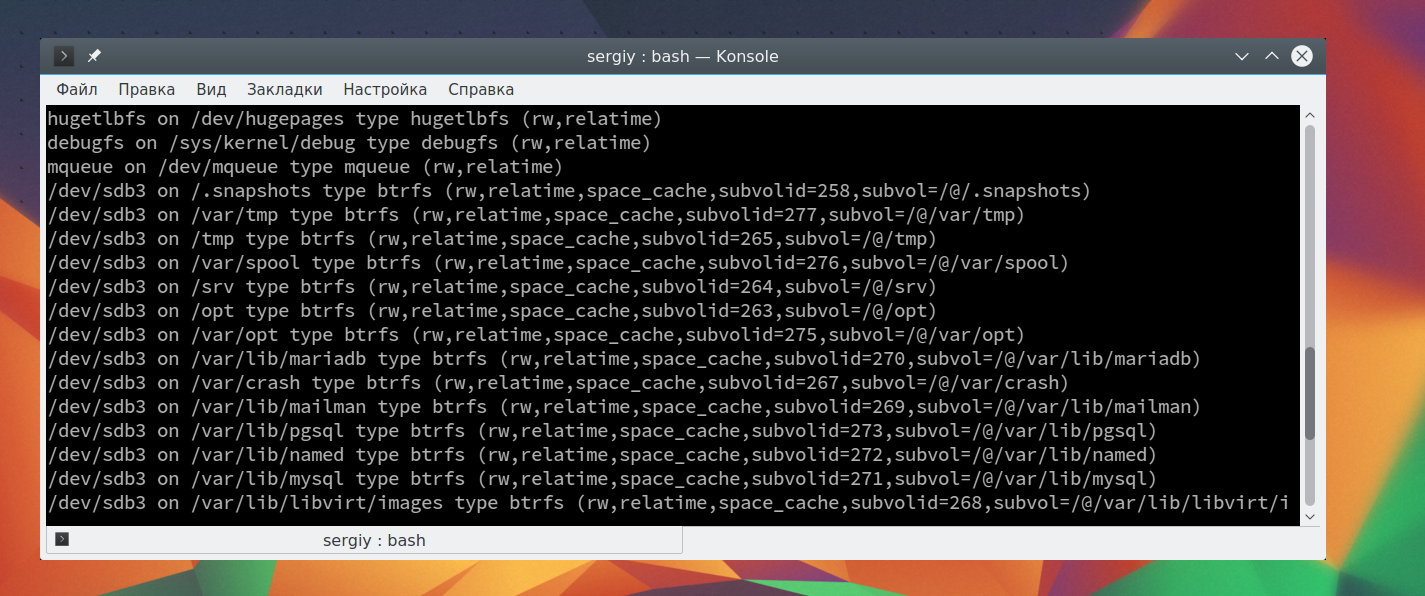
To see information about currently mounted systems, simply run:
mount
Unclean LogFile
If you are mounting drives formatted with NTFS (like most external USB hard disks are), you must first have the ntfs-3g driver installed. This is done automatically in newer versions of Ubuntu. You should also install ntfs-config and enable mounting, which is not done automatically. For ntfs-3g and ntfs-config, see MountingWindowsPartitions.
When a drive is not Safely Removed from a Windows machine (or a forced shutdown occurs from Windows), you may get an error like this when you plug in your drive:
$LogFile indicates unclean shutdown (0, 0)
Failed to mount '/dev/sda1': Operation not supported
Mount is denied because NTFS is marked to be in use. Choose one action:

Choice 1: If you have Windows then disconnect the external devices by
clicking on the 'Safely Remove Hardware' icon in the Windows
taskbar then shutdown Windows cleanly.

Choice 2: If you don't have Windows then you can use the 'force' option for
your own responsibility. For example type on the command line:

mount -t ntfs-3g /dev/sda1 /media/sda1/ -o force
The best option is Choice 1, but you can force the mount by running Choice 2 with sudo. You must then manually unmount it from the terminal (you can’t right click the desktop icon):
sudo umount <mount_point>
After that the drive should automount normally again.
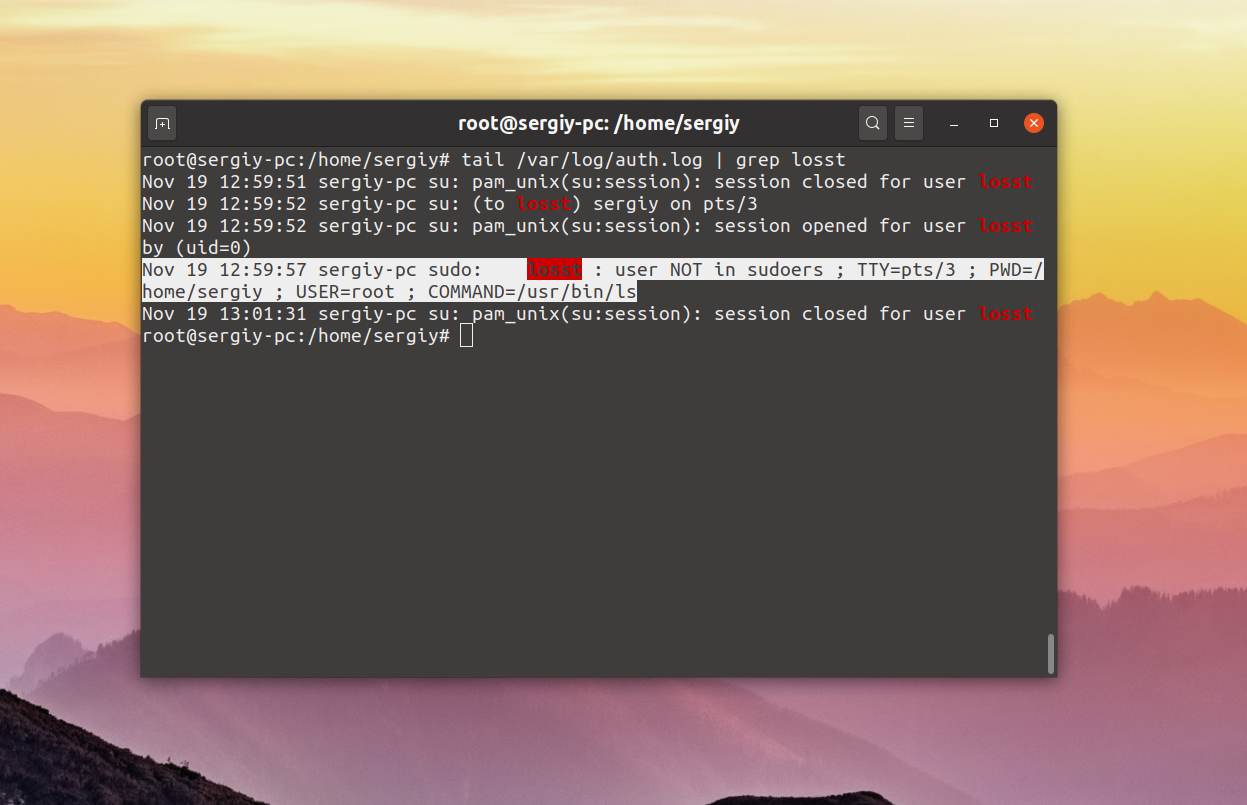
2) With fuser
The fuser (find user processes) command helps to identify processes that are preventing you from unmounting file systems. It finds user processes that are associated with whatever files, directories, or file system mount points that you supply as command-line arguments.
![Linux: какой процесс вызывает "устройство занято" при выполнении umount? [закрытый]](https://myeditor.ru/wp-content/uploads/4/c/1/4c12ae3c6a2cadb03874ecbe0f9db9a5.jpeg)

We can use fuser command with option which lists all the processes accessing the files or mount point on the file system and the option which shows a result like ps command with PID, user and the executed command.
You can see the command in execution.
With fuser command, it is possible to directly kill the process in execution with option without kill command
Check the result
It seems that only the mount is in execution. Let’s try to unmount the folder
We don’t have any more error messages. Check the mount point
We can see that the folder has been unmounted as we want.
Configuring Automounting
To enable or disable automount open a terminal and type:
dconf-editor
Browse to org.gnome.desktop.media-handling.
The automount key controls whether to automatically mount media. If set to true, Nautilus will automatically mount media such as user-visible hard disks and removable media on start-up and media insertion.
Another key, org.gnome.desktop.media-handling.automount-open, controls whether to automatically open a folder for automounted media.
If set to true, Nautilus will automatically open a folder when media is automounted. This only applies to media where no known x-content type was detected; for media where a known x-content type is detected, the user configurable action will be taken instead. This can be configured as shown below.


