Установите новую ОС в VMware Workstation
Шаг 1: Перейдите в Файл> Новая виртуальная машина.
Шаг 2. Выберите Обычный (рекомендуется),
и затем нажмите Далее.
Шаг 3: Выберите, как установить операционную систему.
Выберите установщик
диск, если операционная система находится в дисководе. В противном случае выберите установочный файл образа диска (iso), если вы
есть файл, который содержит ОС, например, Windows 10 ISO или ISO для macOS.
Шаг 4: Выберите точно, где находятся файлы ОС.
Если вы выбрали для установки операционной
Система с диска, выберите правильный дисковод в раскрывающемся меню. За
установить ISO, выберите Обзор и
найдите образ ISO.
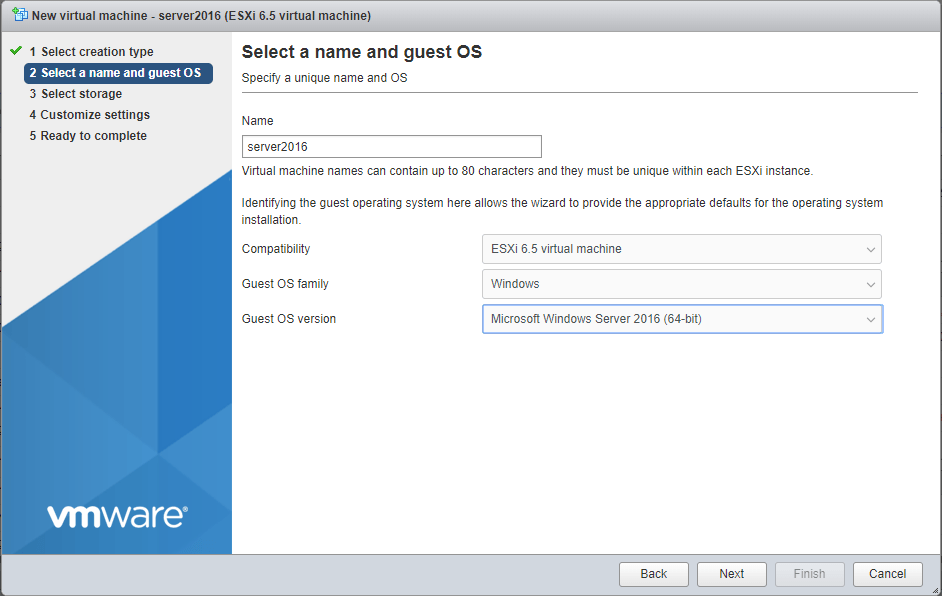
Шаг 5: Нажмите Далее, чтобы перейти к
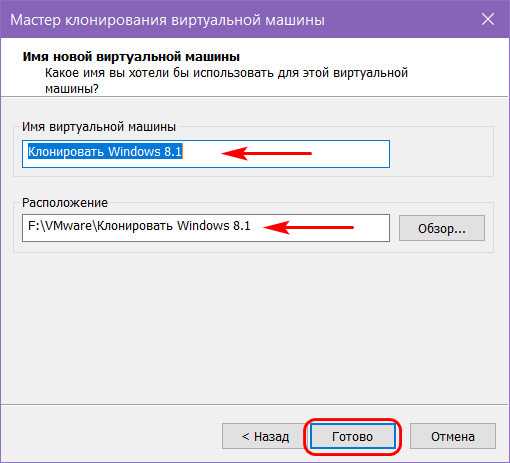
экран, где вы называете новую виртуальную машину и выбираете, где ее файлы
должны быть сохранены. Заполните эту информацию и затем нажмите Next еще раз.
Важный:
Обязательно выберите место, которое может обрабатывать, возможно, очень большие файлы
созданный операционной системой в процессе ее использования. Вам может понадобиться
сотни гигабайт, если вы интенсивно используете эту виртуальную машину. Хранение на внешнем
Жесткий диск — хорошая идея, если на вашем локальном жестком диске недостаточно места.
Замечания:
Для некоторых настроек операционной системы вам будет предложено ввести ключ продукта, используемый
активировать его. Вы должны быть в состоянии пропустить этот шаг, если вы хотите
введите ключ позже.
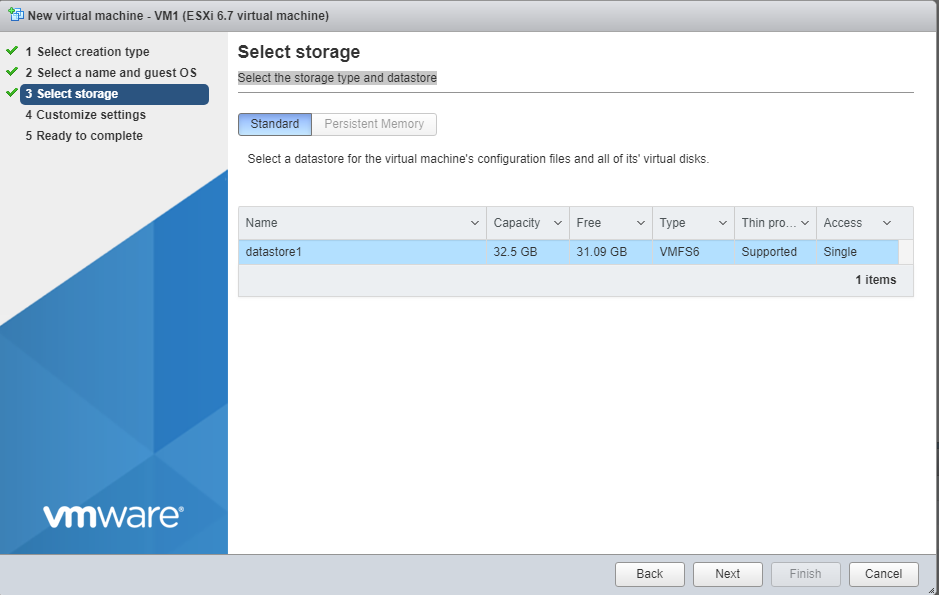
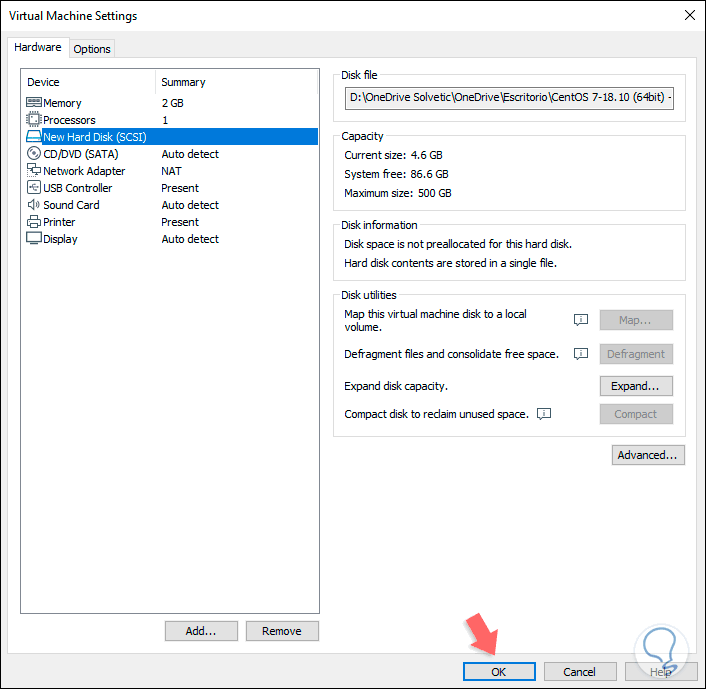
Шаг 6: Определите, как должно храниться хранилище с этой виртуальной машиной, и
затем нажмите Далее.
Вы можете изменить максимальный размер виртуального
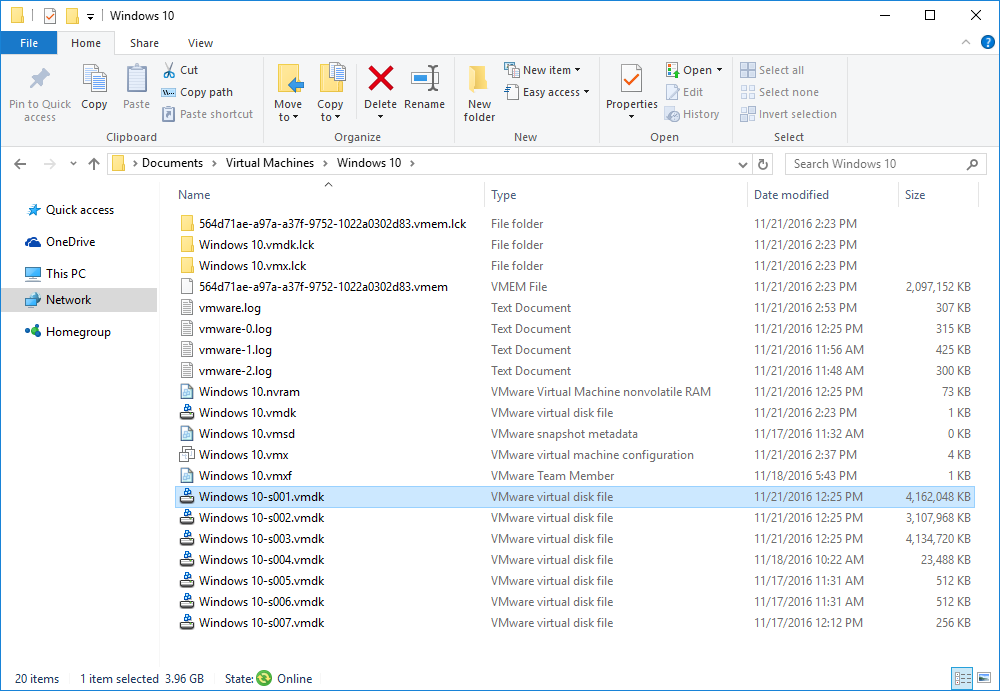
жесткий диск из маленькой коробки. В нижней части этого окна есть две опции: сохранить виртуальный диск как один файл и
Храните виртуальный диск в нескольких файлах.
Выберите второй вариант, если вы думаете, что могли бы
однажды перенесите жесткий диск VMware на другой компьютер, но обратите внимание на
текст на этом экране, который упоминает о возможном снижении производительности использования
несколько файлов с большим жестким диском. Другими словами, если вы планируете хранить много
данные в этой виртуальной машине, выберите опцию «один файл», в противном случае перейдите с «несколько
файлы «
Другими словами, если вы планируете хранить много
данные в этой виртуальной машине, выберите опцию «один файл», в противном случае перейдите с «несколько
файлы «.
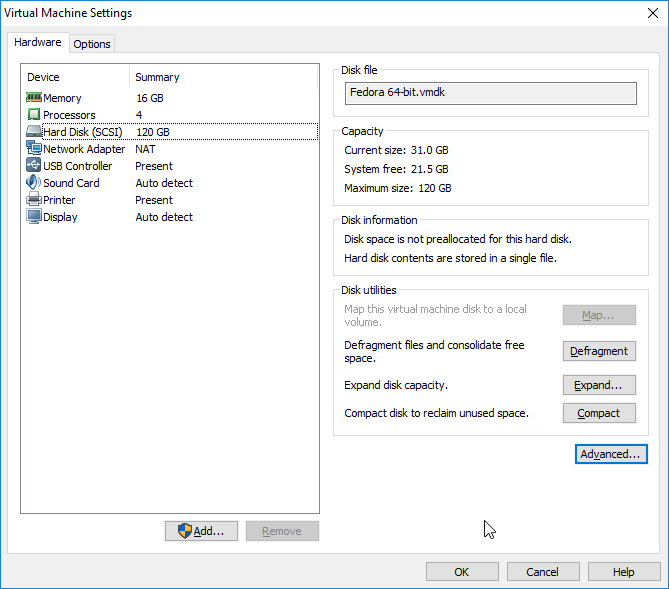
Шаг 7: Выберите «Настроить оборудование»
и внесите любые необходимые изменения. Вы можете изменить детали о памяти,
процессоры, дисковод, сетевой адаптер, USB-контроллер, звуковая карта, принтер,
и дисплей.
Например, в разделе «Память» вы указываете, сколько физического ОЗУ виртуальное
машина отведена. Если позже вы решите, что слишком мало памяти
ВМ, он может работать медленно. Точно так же, если вы даете слишком много, ваш хозяин
компьютер будет работать вяло и будет трудно даже при использовании
VM.
VMware Workstation рекомендует конкретный
сумма зависит от того, сколько вы установили, но вы можете настроить память на
все что угодно (хотя лучше придерживаться рекомендованного уровня).
Разные операционные системы требуют разного объема памяти (например, Windows
10 нужно больше, чем Windows 2000).
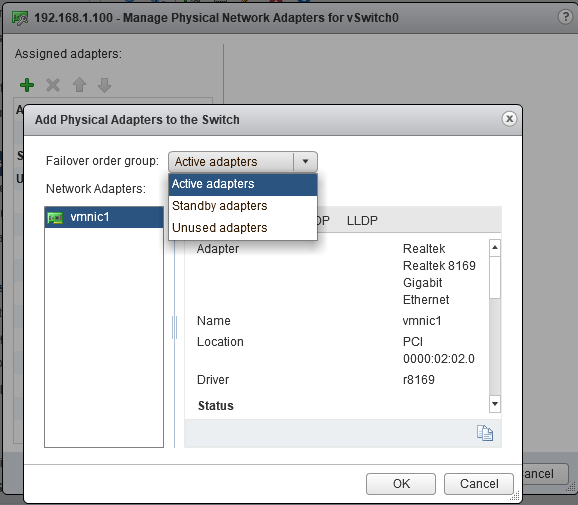
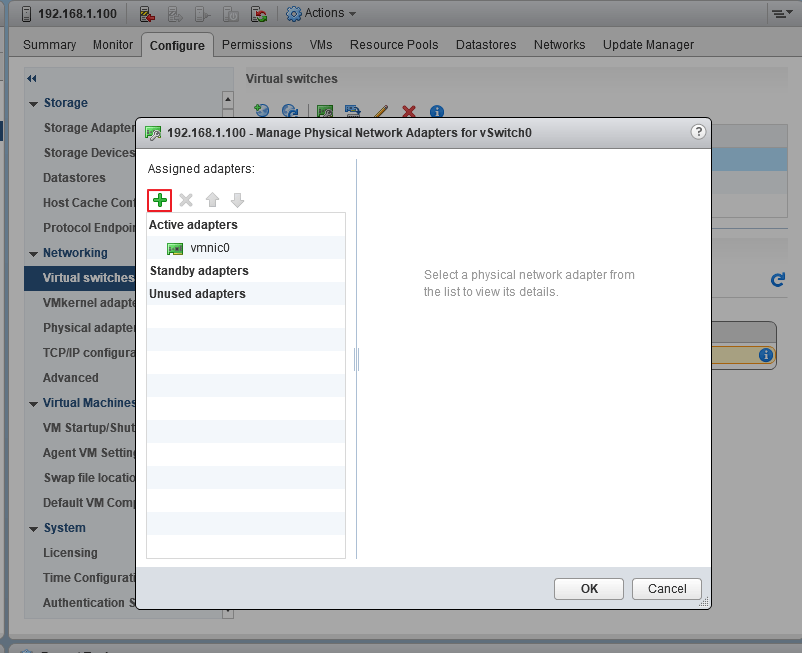
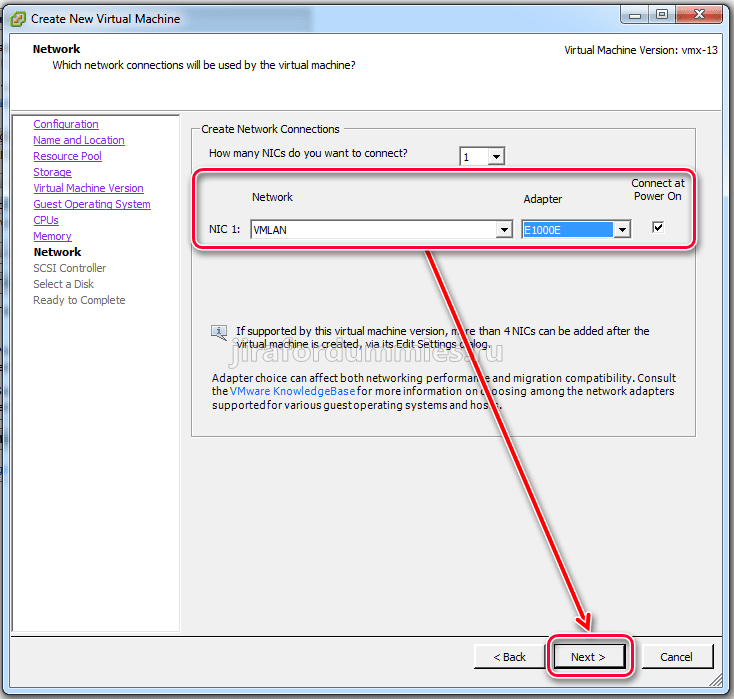
сеть
Адаптер является важным компонентом здесь, который вы могли бы
в конечном итоге придется настроить позже, если ваша виртуальная машина не имеет Интернета
доступ. Есть несколько вариантов, и некоторые могут или не могут работать должным образом
в зависимости от того, как настроен ваш хост-компьютер и как гостевая ОС (ВМ)
работает. Вы можете пропустить это сейчас, чтобы выбрать вариант по умолчанию для вас.
Шаг 8: Выберите Закрыть, чтобы выйти аппаратные средства экрана, а затем нажмите Готово.
VMware Workstation создаст виртуальную
диск, указанный на шаге 6, а затем включите виртуальную машину
автоматически. Этот процесс может занять некоторое время, но вы можете наблюдать за прогрессом
бар для оценки того, когда он закончится.
Шаг 9: Следуйте инструкциям на экране, чтобы начать установку ОС. За
Например, если вы видите Нажмите любую клавишу для загрузки
с CD или DVD, сделать это, чтобы начать установку ОС.
Шаг 10: Следуйте инструкциям для вашей конкретной операционной системы для установки на
добавьте ОС на VMware Workstation.
Conversion method 1: VBoxManage
We have used VBoxManage to clone VirtualBox disks. The method here is
identical, except that we will be converting to a different disk format. Let’s see how this is done.
VBoxManage clonehd source.vdi target.vmdk —format VMDK
Where source is your VirtualBox disk, target is
your VMware disk and —format VMDK is the desired output format. Similarly, you
can go the other way around, using VMDK as your source and VDI as your target. Make sure to specify the right
disk format. VBoxManage clonehd function supports other formats as well.
See example:
![]()
Again, using an external disk for storing virtual machines can reduce the performance penalty due to massive
I/O. You can read more about optimizing virtual machine usage in my virtualization tips guide.
Let it run.
![]()
![]()
Once the procedure is successfully completed, create a new virtual machine in a VMware product and use the new
disk as your storage.
You have quite a bit of leeway. I have converted a VirtualBox machine that was installed on a different
machine, running a quad-core Intel processor, and deployed the VMware disk on a machine equipped with a
dual-core Intel processor one generation behind. VirtualBox Guest
Addons were installed in the guest operating system. Moreover, I let the VMware machine use PAE extension,
whereas I disabled this feature in VirtualBox. Furthermore, I changed the disk controller from IDE to SCSI in
the VMware machine settings and it still worked fairly well, with only a minor inconvenience of installing new
hardware drivers on the machine startup. So you have a large margin for error and can be flexible about your
conversions.
As to which machines and software I used …
The so-called source host was my newest HP Pavilion dv6-2130ej laptop with
the i5 processor, running Ubuntu 10.04. The target host was my somewhat older but still new and powerful
LG RD510 laptop, with the Core 2 Duo P7450 processor, also running Ubuntu
10.04 and equipped with both VirtualBox and the spectacular VMware
Workstation.
P.S., on a side note, the Workstation installed flawlessly on Lucid Lynx, even
more smoothly than it did on openSUSE 11.2. Compared to the fairly
complex and difficult VMware Server setup on Ubuntu, this is an
extremely impressive result.
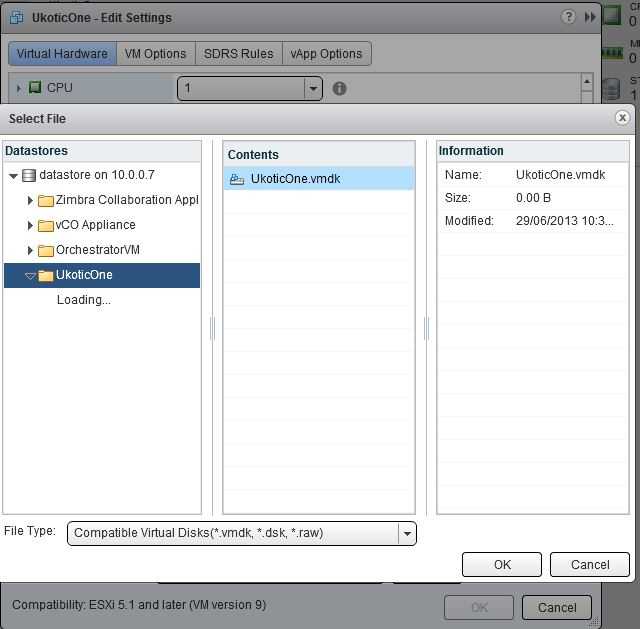
![]()
The Workstation (and possibly other products) may ask you to convert the virtual machine to the latest version
of the VMware series. You can accept this, but you should not if you intend to use it with older products.
![]()
Let us see what gives.
![]()
Notice the same serial number. Likewise, pay attention to the PAE featured used in the converted copy of the
virtual machine.
![]()
Please note that if your virtual machines are running Windows, you will need to make sure you have enough
licenses to run the several instances of the operating system in parallel. You are probably good for the few
seconds of testing, but each virtual machine requires its own license. You may also need to reactive your
installation.
Vice versa
Oh, yes, the other direction is fairly simple.
VBoxManage clonehd source.vmdk target.vdi —format VDI
And that’s it.
Для чего нужно конвертировать VMDK
Прежде, чем мы с вами займемся преобразованием виртуальных дисков в формат шаблонов, я бы хотел разобрать вопрос, при каких условиях вам все это необходимо, всегда нужно знать сценарии:
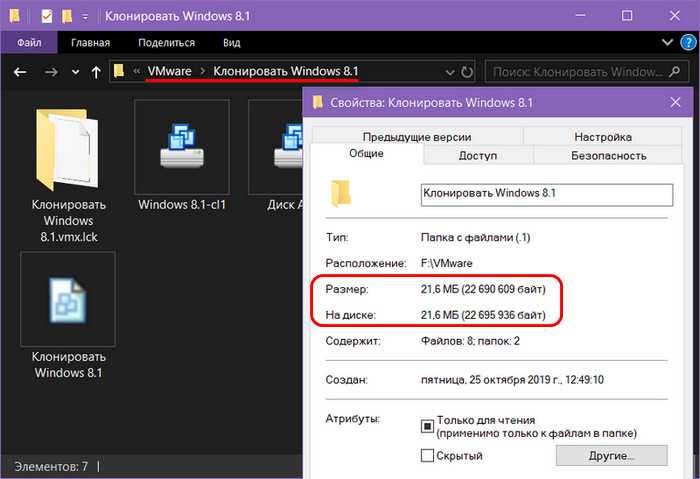
- Самый распространенный сценарий, по которому вам нужно сделать из VMDK OVF или OVA шаблон, это передача машины другим лица. Простой пример, ваш друг попросил вас помочь ему в развертывании какой-либо инфраструктуры или сервиса. Вы развернули у себя VMware ESXI 6.5 или Vmware Workstation 14, создали виртуальную машины. Все настроили на ней и хотели бы передать ее своему приятелю. Но проблема в том, что она может весить приличное количество мета, например, 100 гб в несжатом виде. Согласитесь, что это даже сейчас муторное дело, по передачи такого объема данных. Но вас может выручить конвертация виртуальной машины в шаблон OVF или OVA, в результате чего она сожмется раза в 3, в среднем, а это уже 30 гб
- Второй сценарий, это вам так же нужно перенести настроенную виртуальную машину на другую площадку, например, VMware vCLoud Director, понятно, что вы можете поднять дополнительную инфраструктуру, которая поможет вам мигрировать виртуальную машину, но согласитесь, вы же не будите это делать из-за одного или двух раз переноса данных в облако.
Migrate from VMware to VirtualBox
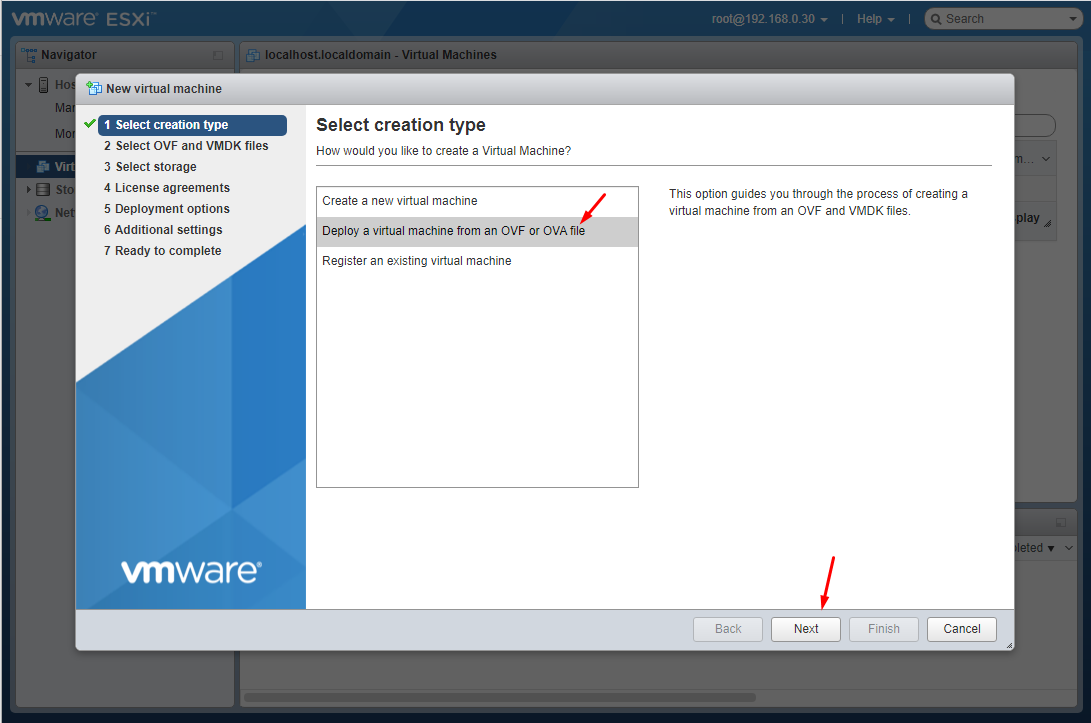
To migrate from VMware to VirtualBox, you first need to export the VM in an .ovf file. To do that open the VMware folder located inside the “Programs Files” folder in the C drive. Once you are there, open the “OVFTool” folder. Press “Shift + right-click,” and then select the “Open Command Prompt here” option.
In the command prompt window, use the below command, and press the Enter button. Don’t forget to change the path of the .vmx file of the VM you want to export and the destination for the new .ovf file.
As soon as you execute the command, the VM will be exported as an .ovf file to the marked destination.
Note: if you are using VMware Workstation, you can also export the VM as an .ovf file by navigating to “File” and then selecting the option “Export to OVF.”
Now, open up the VirtualBox and select the option “Import Appliance.”
The above action will open the “Appliance to Import” window. Here, browse and select the exported .ovf file, and click on the “Next” button.


In this window VirtualBox will show you all the VM settings. Leave them as is; you can always change them later. Just click on the “Import” button to continue.
The above action will start the import process.
Once the importing has been done, you will see your imported virtual machine in the VM VirtualBox Manager. Just select the VM, and click on the “Start” button to power on the VM.
You’ve successfully imported VM from VMware to VirtualBox.
Troubleshooting Import Errors in VirtualBox
If you are receiving importing errors, then follow the below steps.
1. Open the “export.ovf” file with your favorite text editor, find all instances of “ElementName” and replace it with “Caption.”
2. Next, find the instance of “vmware.sata.ahci” and replace it with “AHCI.”
3. Finally, calculate the SHA1 hash value of the “export.ovf” file using this online tool, and replace the old hash value with the new one found in the “export.mf” file. You can open it with any text editor.
Note: you need to replace the hash value of “SHA1(export.ovf).”
Once you are done with the changes, try importing again. This should solve the import errors. If not, you should probably create a new VM from ground up.
Виртуальная машина, VMware, Hyper-V, VirtualBox. Знакомые вещи, не так ли?
Думаю, что не ошибусь, если скажу, что большинство людей, связанных с разработкой, тестированием и администрированием давно привыкли к виртуальным машинам. Воспринимают их как что-то давно знакомое, а главное — полезное. Ведь если у вас есть относительно мощный компьютер с достаточным объемом оперативной памяти, можно параллельно работать в двух, а то и в трех разных операционных системах.
А теперь представьте ситуацию: вы или ваша организация использует, к примеру, Hyper-V. Ваш партнер хочет передать вам на тестирование или для ознакомления какое-то решение, установленное и настроенное на виртуальной машине. Но так случилось, что партнер использует VMware. У вас возникает вопрос: как переделать виртуальную машину? А можно ли это вообще? Об этом и пойдет речь дальше.
Что же представляет из себя виртуальная машина? Вне зависимости от гипервизора, виртуальная машина состоит из двух частей: виртуальной машины (файла или набора файлов с описанием конфигурации, параметров запуска и другой служебной информации) и виртуального жесткого диска. Именно виртуальный жесткий диск в большинстве случаев и надо конвертировать. Именно на нем установлена операционная система и весь набор программного обеспечения.
А теперь важное лирическое отступление. После установки виртуальной машины гипервизор, в большинстве случаев, предлагает установить пакет программного обеспечения
Этот пакет повышает производительность виртуальной машины и ее управляемость. Так же он может содержать набор драйверов, оптимизированных для работы в виртуальной среде. Процесс конвертации подразумевает смену гипервизора. Поэтому все пакеты программного обеспечения, поставляемые гипервизором, с которого планируется переход, необходимо удалить. Сделать это лучше заранее, до конвертации.
How to Convert VHD to VMDK with VBoxManage
VBoxManage is the command line interface (CLI) for managing the VirtualBox hypervisor and virtual machines. VBoxManage is the multiplatform tool that is installed when you install VirtualBox (as you recall, VirtualBox is a multiplatform virtualization solution). One of VBoxManage‘s most attractive features is its ability to convert multiple virtual disks formats. You can convert VHD to VMDK with VBoxManage.
If you use Windows as the host operating system, run CMD as Administrator and go to the installation directory of VirtualBox to run VBoxManage. In the current example, VirtualBox is installed in the default directory.
cd C:\Program Files\Oracle\VirtualBox
You can add the installation path of VirtualBox to the Path environment variable to avoid going to the VirtualBox installation directory manually each time when you want to run VBoxManage.
Run the command to convert Hyper-V VHD to VMware VMDK as following:
VBoxManage clonehd —format vmdk C:\virtual\Hyper-V\WinServer2016.vhdx С:\virtual\Hyper-V\WinServer2016vbox.vmdk
The syntax is understandable – you set the destination virtual disk format (vmdk) and define the source vhdx file and destination vmdk file names.
Wait until the conversion process is finished.
![]()
If you use Linux on your machine where VirtualBox is installed, use the identical commands (but keep in mind the structure of Linux partitions and directories).
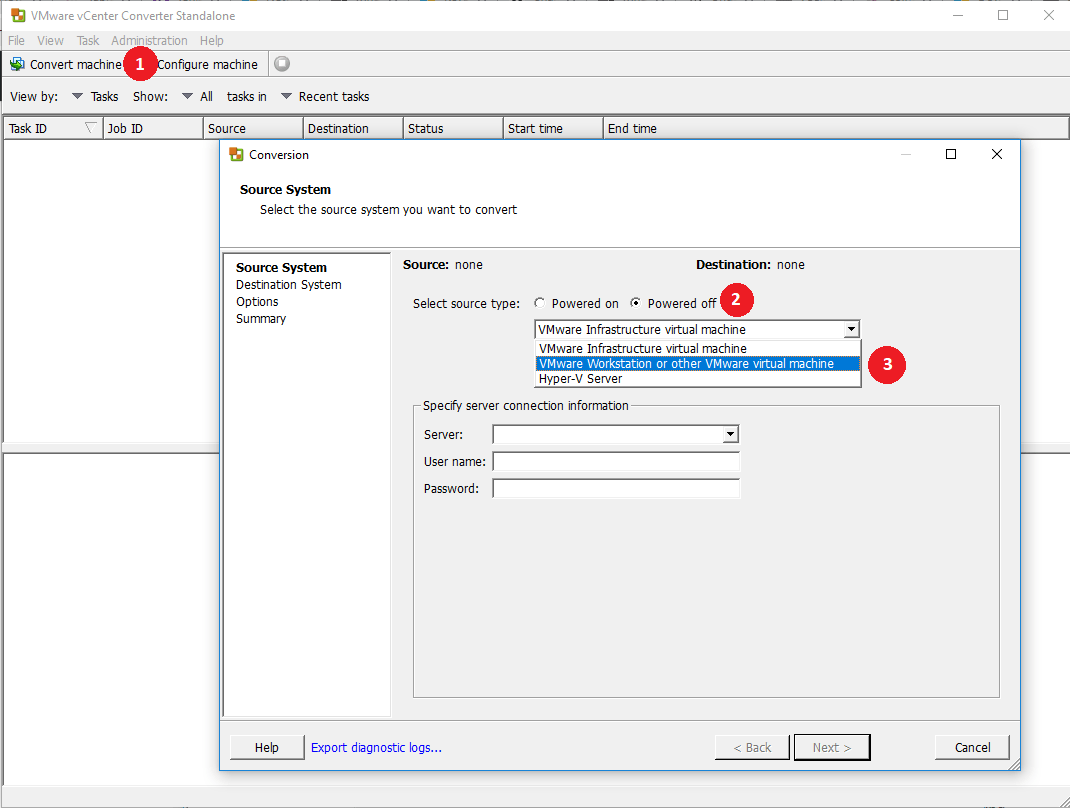
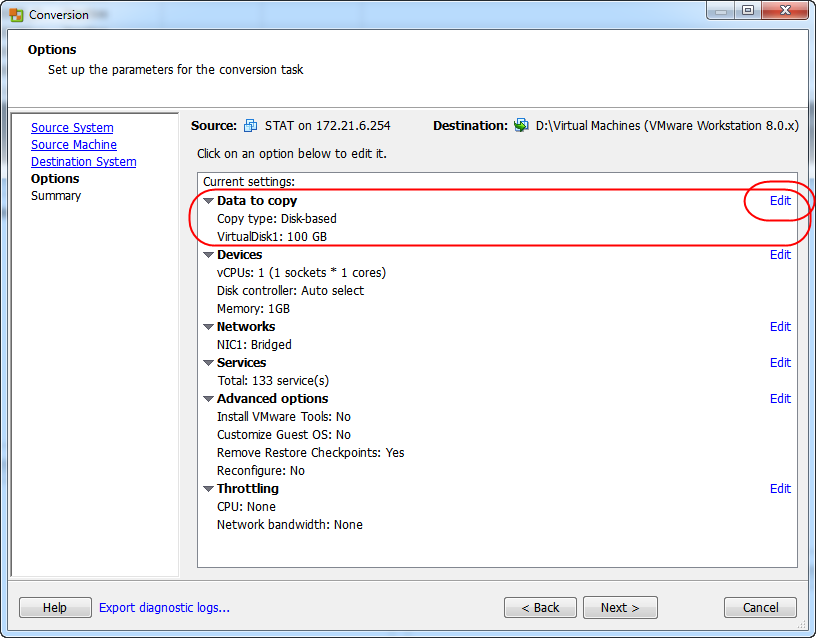
Conversion method 3 (maybe): VMware Converter
To the best of my knowledge, and I’ve already stated in the past, it does not seem that VMware Converter
supports VirtualBox. Therefore, using VMware Converter may or may not work.
Now, you can try a different method. Export your VirtualBox machine as an appliance, which will save it in the
.ovf format, including a ready VMDK disk. Then, convert the appliance using VMware Converter. There’s no
guarantee, though. I have read a few forum threads here and there where various users claimed to have done it
successfully, so it indeed may be possible.
I have not managed this yet, so keep this in mind!
![]()
![]()
Another options is to use other tools to convert to VMDK, then use VMware Converter for additional conversions,
including ESXi disks. Therefore, even if you cannot use the Converter directly, you can later benefit by using
it.
Migrate from VirtualBox to VMware
Migrating from VirtualBox to VMware is easy as well. Open the VirtualBox application, and select the option “Export Appliance” from the “File” menu.
The above action will open the export wizard. Here, select the VM you want to export, and click on the “Next” button to continue.
Here in this screen, select the destination, and click on the “Save” button.
VirtualBox will now show you the storage settings. Leave the defaults as is, and click on the “Next” button.
Check all the appliance settings, and click on the “Export” button to start the exporting process.
Depending on the size of the VM, the exporting process may take some time.
Once you are done exporting the VM, you can import it to VMware. To do that, open up VMware Player/Workstation, and select the “Open” option from the “File” menu.
Now select the exported .ova file.
In this screen click on the “Import” button to start the importing process.
If you receive an error saying that the import has failed to due to hardware compliance issues, simply click on the “Retry” button. This action should start the importing process.
Note: if the above action didn’t solve the problem, then you have to create a new virtual machine from ground up.
If everything goes as planned, VMware starts importing the VM. Again, the process may take some time to complete.
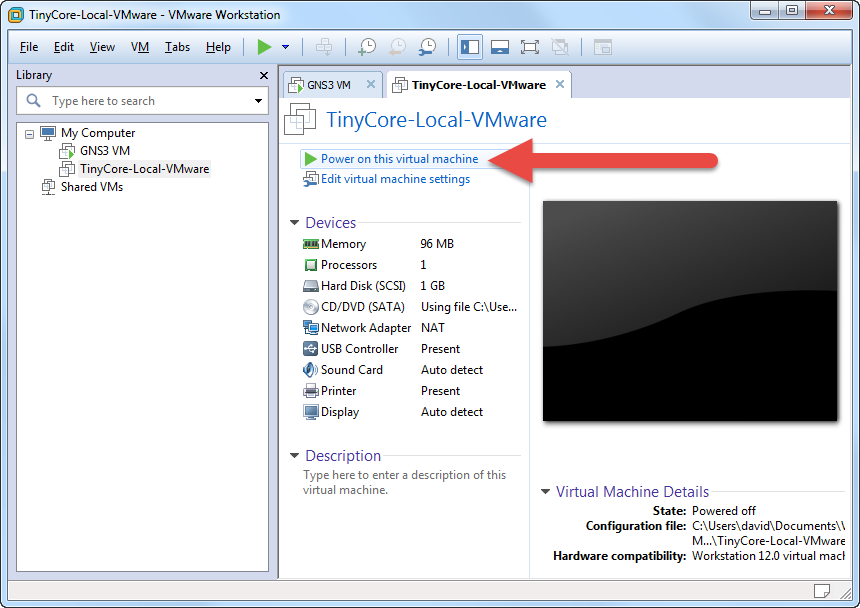
Once the importing has been completed, turn on the VM by clicking on the option “Power on this virtual machine.”
You’ve successfully imported or migrated your VM from VirtualBox to VMware.
Do comment below sharing your thoughts and experiences about using the above method to migrate from VMware to VirtualBox and vice versa. We also have some more virtual machine features on the site, such as how to import and export OVA files on Linux. Also check out our whole list of the best sandbox applications for Windows 10.
Never Miss Out
Receive updates of our latest tutorials.
Vamsi Krishna
Vamsi is a tech and WordPress geek who enjoys writing how-to guides and messing with his computer and software in general. When not writing for MTE, he writes for he shares tips, tricks, and lifehacks on his own blog Stugon.
Check the VHD Content Before You Convert VHD to VMDK
This is an optional step that allows you to ensure that a source VHD or VHDX virtual disk is healthy, and view contained files. This approach prevents you from confusing and wasting time on converting the wrong virtual disk. If you want only to extract files from VHD images, this section is what you need. VHD files can be mounted to a directory on Linux and can be mapped to a specified drive letter in Windows.
How to open VHDX in Linux
In Linux VHD and VHDX, files can be mounted to a specified directory (mount point) in the console by using libguestfs tools. Thus, you can view the contents of VHD and VHDX files in Linux before you start to convert VHD to VMDK. Let’s explore how to view the content of VHD and VHDX virtual disk images in Linux.
Install the needed package:
sudo apt-get install libguestfs-tools
Create the directory to which you want to mount the VHD or VHDX images, for example, /mnt/vhd/:
sudo mkdir /mnt/vhd/
Run the command to mount a VHD disk image to the specified directory. We are in the directory where the required VHD file is located, and run the command as root:
guestmount —add test-disk.vhd —ro /mnt/vhd/ -m /dev/sda1
Where:
-add – opens a virtual disk.
—ro – a virtual disk is mounted in read-only mode.
/mnt/vhd/ is the path to the VHD file you want to mount.
-m /dev/sda1/ is the name of partition existing on the VHD virtual disk. There is one NTFS partition on the VHD virtual disk used in this example.
![Vdi to vhd/vhdx - convert virtualbox vms to hyper-v [simple guide]](https://myeditor.ru/wp-content/uploads/7/4/2/7425909ace26ad74cfe2e68e4a798629.jpeg)
![- как установить образ vmware на раздел жесткого диска [дубликат]](https://myeditor.ru/wp-content/uploads/3/0/c/30c043542f3e3034609d6a06aaeb881c.png)
![Миграция из vmware в virtualbox [закрыто]](https://myeditor.ru/wp-content/uploads/e/8/3/e83827f770a41e21141e932ffa1d5e2c.png)
You can see all available commands by running guestmount —help
Note: If you run the command in another directory, specify the full path to your VHD file, for example:guestmount —add /media/user1/data/test-disk.vhd —ro /mnt/vhd/ -m /dev/sda1
Check the contents of the mounted VHD image:
ls -al /mnt/vhd/
![]()
To unmount the virtual disk, use the command:
guestunmount /mnt/vhd/
Similarly, you can mount VHDX files to the /mnt/vhd/ directory created previously, and copy content from the mounted virtual disk:
guestmount —add /media/user1/data/WinServer2016.vhdx —ro /mnt/vhd -m /dev/sda2
Where: /dev/sda2 is used because /dev/sda1/ is the service partition created by Windows installer by default.
You can see the contents of the Windows system partition (disk C:) of the VHDX virtual disk in the Linux console (see the screenshot below).
![]()
How to open VHD in Windows
Open the Computer Management window (right click My Computer and select Manage in the context menu).
![]()
In the Computer Management window, select Disk Management, then click Action > Attach VHD.
![]()
In the pop-up window, define the path to your VHD or VHDX file. Tick the Read-only checkbox if you don’t want to write data to the virtual disk. This option also protects data stored on the virtual disk against accidental corruption.
![]()
The disk is now mounted and displayed in the Disk Management window and in Windows Explorer (the drive X: in this case).
Note: Windows can determine only partitions with supported file systems: NTFS, FAT32, exFAT, ReFS. If your virtual disk contains Linux partitions with ext3, ext4, and other file systems, you will not be able to view the content of VHD or VHDX files mounted to your Windows system without third-party tools.
In order to unmount a VHD or VHDX virtual disk from your Windows system, open Windows Explorer, right click the drive letter assigned to your virtual disk, and in the context menu, click Eject.
![]()
Now, when you have checked the content of the VHD (VHDX) virtual disk and you are ensured that this is the disk you need, you can start to convert VHD to VMDK. There are two highly affordable methods to convert VHD to VMDK – using qemu-img and using VBoxManage. Both considered solutions are free to use, and are explained below.
Virtual Disk Formats
VHD refers to the disk image format that was introduced as the virtual disk format of virtual machines for Connectix Virtual PC. Later, Microsoft bought Virtual PC and continued development of this virtualization product. Then, Microsoft presented Hyper-V as a substitution of Microsoft Virtual PC. The main VHD features are:
- The maximum supported size of VHD files is 2 TB (2^32*512 bytes) where 32 bit is quantity and 512 bytes is the sector size.
- The VHD format of virtual disks is also supported by VirtualBox and is still used in the Microsoft Azure Cloud.
- Generation 1 Hyper-V VMs can use only virtual disks of the VHD format.
VHDX is the new version of the virtual disk format provided by Microsoft, which is the successor of the VHD format. The VHDX format has the wide area of usage – virtual disks of Hyper-V virtual machines and Microsoft cluster shared volumes. VHDX is a semi-open file format and you can download this file format specification from Microsoft’s web site and create your own applications that work with VHDX files. The main VHDX features are:
- Maximum disk capacity is 64 TB comparing to the 2-TB limit for VHD.
- Supports 4-KB sectors
- Is better protected against failures caused by power loss, comparing to VHD disks
Generation 2 VMs support using both VHDX and VHD virtual disks. However, Azure VMs can use only virtual disks of the VHD format. VHDX virtual disks can be created in the Disk Management window in Windows 10 and Windows Server 2016. VHDX images can be also mounted (attached) as a disk drive, displayed in Windows Explorer (My Computer) in the latest Windows versions thanks to the built-in VHDX driver.
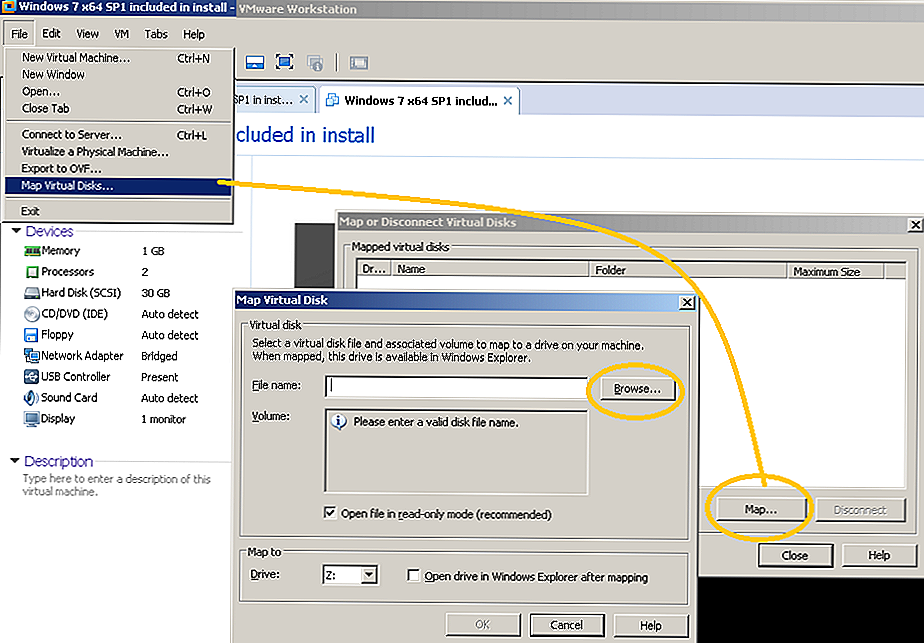
VMDK is an open format of virtual disk images that is used by VMware hypervisors, VirtualBox, QEMU etc., and is not supported by Hyper-V. VMDK image files can be regarded as containers to store data similarly as on physical hard disks, and have a high compatibility with diverse virtualization software. The maximum size of the VMDK virtual disk has been increased from 2 TB to 62 TB. VMDK virtual disks can be divided into the following types and variations: monolithic, split, sparse, flat, as well as thin and thick provisioned. Delta VMDK disks are created when taking VM snapshots. VMDK files can be mapped (mounted) to the specified mount point on your host machine if VMware Workstation is installed. A high level of reliability is provided. 4-KB native sectors are supported for VMDK virtual disks, used by the newest versions of VMware products with VMF S6.
Data Protection with NAKIVO Backup & Replication
Designed for businesses of all sizes, NAKIVO Backup & Replication offers complete data protection for all of your production workloads, including VMware vSphere Backup, Hyper-V Backup, Microsoft 365 Backup and more.
Steps to Convert VDI to VHD (VirtualBox to Hyper-V)
Note: It is recommended to uninstall the VirtualBox guest additions from the VM before starting the migration. It may cause an issue on the Hyper-V platform.
VirtualBox snapshots keep separate VDI files for each machine. So if you convert the original base VDI file, you will not get the latest state of the virtual machine. Also, you can’t convert snapshot VDI files separately. Therefore it’s recommended to delete snapshots, that will merge current machine’s state to the single original disk file.
We Can Convert in 2 Ways,
- Using the VirtualBox Media manager
- Using the command line tool.
VDI to VHD by VirtualBox Media Manager
1) Click on File in VirtualBox and open Virtual Media Manager.
Obviously, the VM should be powered off before proceeding further.
2) Select the appropriate disk that is attached to the VM you want to migrate. Click on Copy.
3) In the next disk copy option, select the VHD file format as output.
4) Next screen gives the option to make the disk dynamic or fixed size. If you are familiar with a Virtualization platform, you must be aware of them. For testing and less disk usage, you can try dynamically allocated disks. For production and high disk utilization usage, always use the fixed disk option.
5) Select the path of the VHD file and start copying. It will start copying/cloning the selected VDI file to VHD disk format.
Now you have the VHD file which converted from VDI by using GUI screens.
Convert VDI to VHD in Command Prompt (VirtualBox Tool)
1) Once the prerequisites are met (like uninstalling guest additions, deleting snapshots and powering off the VM), run the following command from the VirtualBox installation location.
vboxmanage clonehd WinXP.vdi F:\winxp.vhd --format VHD
WinXP.vdi – Working VM hard disk
F:\winxp.vhd – Destination and file name of VHD
The above command returned the following error.
2) This is because it is attached to one virtual machine and listed in the virtual media manager. Release and remove the disk from virtual media manager (Note – Do not remove the VDI file from physical hard disk).
Run the command again, it will return following the successful conversion message.
VDI to VHD then VHDX
If you want the latest and recommended file format of Hyper-V which the VHDX, you can convert VHD to VHDX by using Hyper-V disk utility.
The steps are simple and you can refer to this guide.
So basically you need to convert the VDI to VHD by using VirtualBox tools, then the VHD to VHDX by Hyper-V disk tool.
Attach the Disk to Hyper-V VM
Remember, as mentioned earlier this is not the export-import way. We have just converted the disk to VHD which is compatible for Microsoft Hyper-V.
a) Create a new VM in Hyper-V. Setup the hardware configuration as you wish, but instead of creating a new virtual hard disk, you must attach (browse) the converted VHD or VHDX to the VM configuration.
2) Power on the virtual machine. Since the hardware platform (VirtualBox to Hyper-V) is changed for the Operating System, it may install additional drivers and tools for its platform. Restart the VM if required. Make sure to installation Hyper-V guest additions to get better performance and features.
Here is the screenshot of working same virtual machines on both desktop virtualization software.
It hardly took 5 minutes to convert this working machine (2GB VDI) to Virtual PC. Some blogs and forums mentioned about third-party software to convert VDI to VHD, but it can be done easily by VirtualBox command as shown here. I hope this guide is helpful.
Конвертация из VirtualBox в VMware или в Hyper-V
Самый простой способ перенести виртуальную машину из VirtualBox в VMware — воспользоваться экспортом виртуальной машины из VirtualBox в формат OVA (Open Virtualization Format Archive, файл .ova) и импортом этого архива в VMware. В таком варианте конвертации виртуальная машина перенесется целиком, со всеми параметрами выделенной памяти и процессорных ресурсов. Этот способ недоступен для переноса виртуальной машины в Hyper-V, так как Hyper-V напрямую не способен импортировать формат ova. Так же для конвертации можно использовать менеджер виртуальных носителей (меню «Файл», пункт «Менеджер виртуальных носителей»). Встроенный конвертер позволяет преобразовывать из одних форматов в другие все поддерживаемые программой файлы виртуальных жёстких дисков — VDI, VHD, VMDK, HDD, QED, QCOW. Этот способ более универсальный, подходит для переноса в Hyper-V, но требует повторной детальной настройки виртуальной машины в новом гипервизоре.
Conversion method 2: QEMU
QEMU is an old friend, too. We’ve seen in my very first article on virtualization, when I was still young and naive. Strike that, I was
never young. We have also used QEMU to convert VMDK disks to RAW format, so we could use them with Amazon EC2 machines. The concept is exactly the same here. And it works both ways.
VDI to VMDK
It’s extremely simple.
qemu-img convert something.vdi -O vmdk something.vmdk
VMDK to VDI
You have two ways to do this. Use a one-step qemu-img-vdi tool or go about using
classic qemu-img, which will require an intermediate conversion to raw format.
qemu-img-vdi
Pretty much like all other conversions we’ve seen before:
qemu-img-vdi convert something.vmdk -O vdi something.vdi


qemu-img
Now, using qemu-img, you have two steps, first convert to RAW format, then use VBoxManage to convert to VDI.
Older versions of VirtualBox used the tool called vditool, so you may find online resources that reference this
utility.
Step 1: Convert VMDK to RAW (you don’t need any file extension, btw)
qemu-img convert something.vmdk something.raw
Step 2: Convert RAW to VDI
VBoxManage convertdd something.raw something.vdi
Note: If you’re using sparse disks, as we’ve seen in other tutorials, the raw file will them inflated to their
intended max. size. A 20GB disk, even though if only 2.4GB are used, will become a 20GB byte-by-byte file on
your hard disk.
That would be all. Next, please!
How to Convert VHD to VMDK with qemu-img
QEMU is an open source machine emulation and virtualization platform. Qemu-img is a utility of the QEMU software kit that can be used to convert virtual disks from one format to another. Qemu-img can be used to convert VHD to VMDK, and using this utility is the first method to convert Hyper-V to VMware virtual disks that we will discuss in this blog. Qemu-img can be run in both Windows and Linux operating systems.
Using qemu-img in Linux
Ubuntu Linux is used in this example for running qemu-img.
First, install qemu-img from the online software repositories:
sudo apt-get install qemu-utils
Go to the directory where virtual disk images are stored (in this example VHD and VHDX virtual disk files are stored in /media/user1/data/):
cd /media/user1/data/
Check the VHDX file
Get the root privileges (with the sudo su command) and view the VHD image information:
qemu-img info test-disk.vhd
Similarly, you can check the information about the VHDX virtual disk:
qemu-img info /media/user1/data/WinServer2016.vhdx
Convert VHD to VMDK in Linux
In order to convert VHD to VMDK with qemu-img in Linux, run the command as root:
qemu-img convert /media/user1/data/WinServer2016.vhdx -O vmdk /media/user1/data/WinServer2016qemu.vmdk -p
Where:
-O – define the output file format
-p – show the progress bar
Wait until the conversion process is finished.
Using qemu-img in Windows
Download qemu-img from the official web site (32-bit and 64-bit installers are available to download). In the current example, qemu-img-win-x64-2_3_0 is used. Extract files form the downloaded archive, for example, to C:\Programs\qemu-img\. Then launch the Windows command line (CMD) — Press Windows+R to open the “Run” box. Type “cmd” into the box and press Ctrl+Shift+Enter to run the command as an administrator.
Go to the qemu-img directory:
cd C:\Programs\qemu-img
Commands of qemu-img in Linux and Windows are identical.
Convert VHD to VMDK in Windows
Run CMD as administrator and go to the directory where qemu-img is installed.
View the virtual disk information:
qemu-img.exe info c:\Virtual\Hyper-V\test-disk.vhd
Convert the VHD disk image to the VMDK format:
qemu-img.exe convert -p c:\Virtual\Hyper-V\test-disk.vhd -O vmdk c:\Virtual\Hyper-V\test-disk.vmdk
Where:
-p – show progress
-O – the output file
Wait until the conversion process is finished.
Reason To Migrate from Virtualbox to VMware:
This is clearly something you may want to do if you appear to be a virtualization fan and you’re running both VirtualBox and one of VMware products. The reasons for conversion could be many, including the need to preserve a license or a machine state, run it in different software for compatibility testing and who knows what other reasons virtualization users may have.
Anyhow, today, in through this post, I’m going to show you two definite ways of how you can convert your vdi(Virtual Disk Image) format, used by VirtualBox to vmdk format, used by VMware, and the other way around. Furthermore, you will also learn how to convert to other formats, should you fancy them, including VHD, RAW, and others. We will be using tools like the VBoxManage command line utility and QEMU, and take a look at how to convert corrupt VDI Files to VMDK Online. All combined, this tutorial will significantly enhance the flexibility and portability of our setup to convert vdi to vmdk.