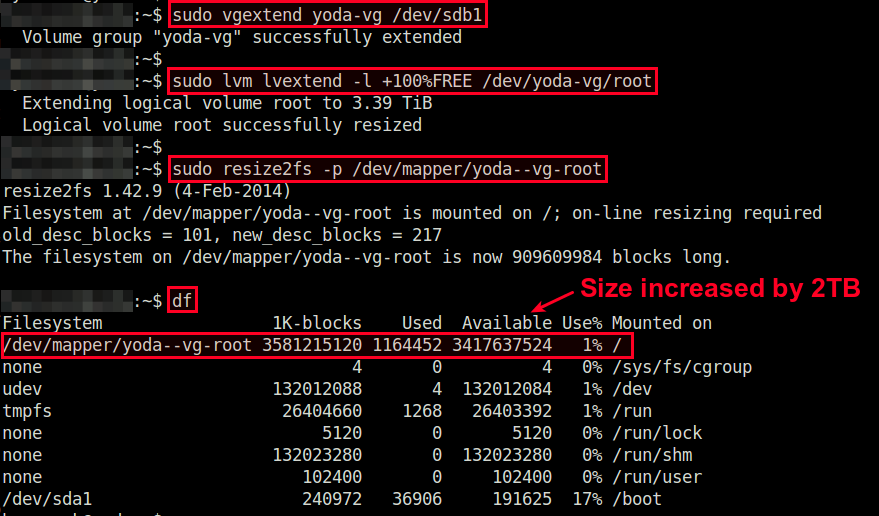
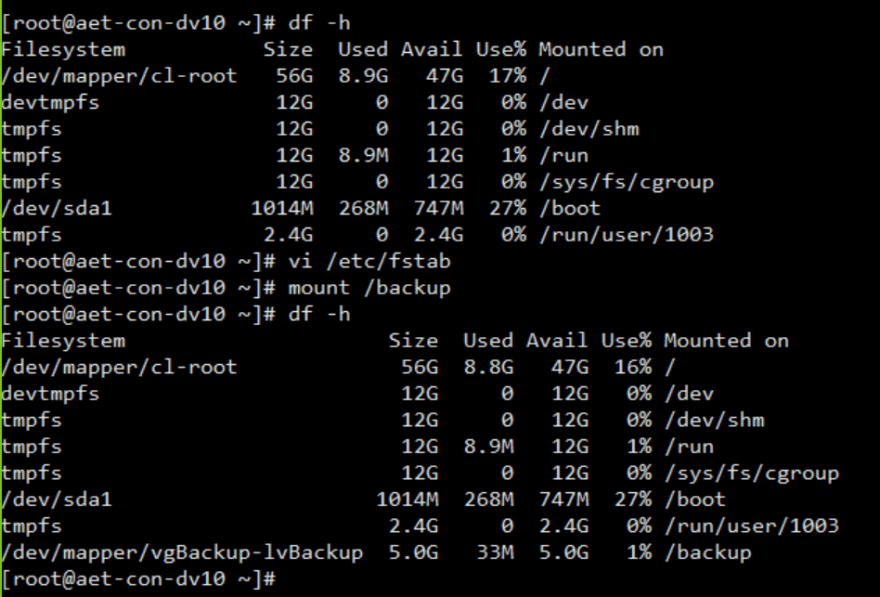
Увеличение логического тома LVM
Чтобы добавить дополнительный диск к группе томов, нужно воспользоваться уже знакомой схемой:
Чтобы расширить логический том, воспользуйтесь следующей схемой:
Чтобы добавить дополнительный диск к группе томов, нужно воспользоваться уже знакомой схемой:
pvcreate /dev/нашдиск
| 1 | pvcreatedevнашдиск |
— инициализация диска для lvm
vgextend test /dev/нашдиск
| 1 | vgextend testdevнашдиск |
— добавление диска в группу томов
Чтобы расширить логический том, воспользуйтесь следующей схемой:
lvextend -L10G /dev/test/test1
| 1 | lvextend-L10Gdevtesttest1 |
Данным способом вы расширите раздел на 10 Гб.
![]()
Еще несколько примеров расширения LVM раздела:
lvextend -L+10G /dev/test/test1
| 1 | lvextend-L+10Gdevtesttest1 |
— добавите 10 Гб к вашему тому
lvextend -l +100%FREE /dev/test/test1
| 1 | lvextend-l+100%FREEdevtesttest1 |
— выделите все нераспределенное пространство в группе test
resize2fs /dev/test/test1
| 1 | resize2fsdevtesttest1 |
– для ext4
xfs_growfs /dev/test/test1
| 1 | xfs_growfsdevtesttest1 |
– для xfs
Definitions
-
PV : Physical Volumes. This means the hard disk, hard disk partitions, RAID or LUNs from a SAN which form «Physical Volumes» (or PVs).
-
VG : Volume Groups. This is a collection of one or more Physical Volumes.
-
LV : Logical Volumes. LVs sit inside a Volume Group and form, in effect, a virtual partition.
-
PE : Physical Extents. In order to manipulate the actual data, it is divided into blocks of data called Physical Extents.
-
LE : Logical Extents. Similar to Physical Extents, but at the Logical Volume level. Physical Extents are to Physical Volumes as Logical Extents are to Logical Volumes. The size of blocks are the same for each logical volume (LV) in the same volume group (VG).
An example:
||-------------------------OS----------------------------||
||-------------------------LVM---------------------------||
||  LV-1 (/)    |LV-2 (swap)|  LV 3 (/home) | LV-4 (/tmp)|| Logical Volumes(LV)
||------------------------------------------|------------||
||                  VG 1                    |    VG 2    || Volume Groups(VG)
||------------------------------------------|------------||
||  /dev/sda2 |    /dev/sda3    | /dev/sdb2 | /dev/sdd4  || Physical Volumes(PV)
||-------------------------------------------------------||
Snapshots
LVM allows you to take a snapshot of your system in a much more efficient way than a traditional backup. It does this efficiently by using a COW (copy-on-write) policy. The initial snapshot you take simply contains hard-links to the inodes of your actual data. So long as your data remains unchanged, the snapshot merely contains its inode pointers and not the data itself. Whenever you modify a file or directory that the snapshot points to, LVM automatically clones the data, the old copy referenced by the snapshot, and the new copy referenced by your active system. Thus, you can snapshot a system with 35 GiB of data using just 2 GiB of free space so long as you modify less than 2 GiB (on both the original and snapshot). In order to be able to create snapshots you need to have unallocated space in your volume group. Snapshot like any other volume will take up space in the volume group. So, if you plan to use snapshots for backing up your root partition do not allocate 100% of your volume group for root logical volume.
Configuration
You create snapshot logical volumes just like normal ones.
# lvcreate --size 100M --snapshot --name snap01vol /dev/MyVolGroup/lvol
With that volume, you may modify less than 100 MiB of data, before the snapshot volume fills up.
Reverting the modified logical volume to the state when the snapshot was taken can be done with
# lvconvert --merge /dev/MyVolGroup/snap01vol
In case the origin logical volume is active, merging will occur on the next reboot (merging can be done even from a LiveCD).
Note: The snapshot will no longer exist after merging.
Also multiple snapshots can be taken and each one can be merged with the origin logical volume at will.
The snapshot can be mounted and backed up with dd or tar. The size of the backup file done with dd will be the size of the files residing on the snapshot volume.
To restore just create a snapshot, mount it, and write or extract the backup to it. And then merge it with the origin.
This article or section needs expansion.
Snapshots are primarily used to provide a frozen copy of a file system to make backups; a backup taking two hours provides a more consistent image of the file system than directly backing up the partition.
See Create root filesystem snapshots with LVM for automating the creation of clean root file system snapshots during system startup for backup and rollback.
and .
If you have LVM volumes not activated via the initramfs, enable , which is provided by the package.
Logical Volume Manager (LVM)
Traditional storage capacity is based on individual disk capacity. LVM uses a different concept. Storage space is managed by combining or pooling the capacity of the available drives. With traditional storage, three 1 TB disks are handled individually. With LVM, those same three disks are considered to be 3 TB of aggregated storage capacity. This is accomplished by designating the storage disks as Physical Volumes (PV), or storage capacity useable by LVM. The PVs are then added to one or more Volume Groups (VGs). The VGs are carved into one or more Logical Volumes (LVs), which then are treated as traditional partitions.
Image
Image
Source: Red Hat LVM Architecture Overview
1. Install a new hard disk drive
Obviously, there needs to be a storage disk available. Just as we saw above, you must physically install a drive in the server.
2. Designate Physical Volumes
Physical Volumes (PV) are disks or partitions that are available to LVM as potential storage capacity. They have identifiers and metadata that describes each PV. It is interesting to note that, as opposed to RAID, PVs do not have to be the same size or or on disks that are the same speed. You can mix and match drive types to create PVs. To implement LVM, first designate a drive as a Physical Volume.
Command to create a PV:
These two command examples are slightly different. The first command designates partition 1 on storage disk b as a PV. The second command sets the total capacity of storage disk c as a PV.
Display PV capacity and additional information:
This command displays all of the Physical Volumes configured on the server.
3. Manage Volume Groups
Once one or more of the disks are available to LVM as Physical Volumes, the storage capacity is combined into Volume Groups (VGs). There may be more than one VG on a server, and disks may be members of more than one VG (but PVs themselves may only be members of one VG).
Use the command to create a new Volume Group. The VG must have at least one member. The command syntax is:
Use the following command to create a Volume Group named vg00 with and as members:
Display information for a VG named vg00:
4. Manage Logical Volumes
The VG can be subdivided into one or more Logical Volumes (LVs). These Logical Volumes are then used as if they were traditional partitions. The VG has a total capacity, and then some part of that capacity is allocated to a Logical Volume.
The command carves storage capacity from a VG. There are a few options to be aware of.
| Option | Description |
| -n | Name of LV — ex. sales-lv |
| -L | Size in G or T — ex. 10G |
| -q | Quiet, suppresses command output |
| -v | Verbose mode providing additional details |
The syntax for the command is as follows:
Here is the command to create a 10 GB Logical Volume named sales-lv carved from the vg00 Volume Group:
As you recall, we created the vg00 Volume Group from two Physical Volumes, and . So, in summary, we combined the capacity of and into vg00, then carved a Logical Volume named sales-lv from that aggregated storage space.
You can use the command to see the Logical Volume’s configuration.
5. Apply a filesystem and set a mount point
Once the LV is created, it is managed as any other partition. It needs a filesystem and a mount point, just like we configured in the standard partition management section above.
- Run the command on the LV.
- Create a mount point by using
- Manually mount the volume using the command, or edit the file to mount the volume automatically when the system boots.
- Use the command to verify the storage capacity is available.
Cache
From :
- The cache logical volume type uses a small and fast LV to improve the performance of a large and slow LV. It does this by storing the frequently used blocks on the faster LV. LVM refers to the small fast LV as a cache pool LV. The large slow LV is called the origin LV. Due to requirements from dm-cache (the kernel driver), LVM further splits the cache pool LV into two devices — the cache data LV and cache metadata LV. The cache data LV is where copies of data blocks are kept from the origin LV to increase speed. The cache metadata LV holds the accounting information that specifies where data blocks are stored (e.g. on the origin LV or on the cache data LV). Users should be familiar with these LVs if they wish to create the best and most robust cached logical volumes. All of these associated LVs must be in the same VG.
Create cache
Convert your fast disk () to PV and add to your existing VG ():
# vgextend MyVolGroup /dev/fastdisk
Create a cache pool with automatic meta data on and convert the existing LV to a cached volume, all in one step:
# lvcreate --type cache --cachemode writethrough -l 100%FREE -n root_cachepool MyVolGroup/rootvol /dev/fastdisk
Tip: Instead of using to allocate 100% of available space from PV , you can use instead to allocate only 20 GiB for cachepool.
Cachemode has two possible options:
- ensures that any data written will be stored both in the cache pool LV and on the origin LV. The loss of a device associated with the cache pool LV in this case would not mean the loss of any data;
- ensures better performance, but at the cost of a higher risk of data loss in case the drive used for cache fails.
If a specific is not indicated, the system will assume as default.
Remove cache
If you ever need to undo the one step creation operation above:
# lvconvert --uncache MyVolGroup/rootvol
This commits any pending writes still in the cache back to the origin LV, then deletes the cache. Other options are available and described in .
Configure HA LVM on cluster nodes
Now our environment is all set up to start configuring HA LVM. First of all we need to create a LVM resource group
Create LVM resource group for LVM
Now we can create the HA LVM resources. Where LVM is a generic resource that we are going to use in the cluster, and is just the name that we are assigning. equals , exclusive is , and we are going to put it in a group with name .
# pcs resource create halvm LVM volgrpname=vgcluster exclusive=true --group halvmfs
Assumed agent name 'ocf:heartbeat:LVM' (deduced from 'LVM')
Now that we have created the resource for the cluster, we can verify that it has indeed been started.
# pcs status
Cluster name: mycluster
Stack: corosync
Current DC: node1.example.com (version 1.1.18-11.el7_5.3-2b07d5c5a9) - partition with quorum
Last updated: Wed Dec 26 18:34:28 2018
Last change: Wed Dec 26 18:34:14 2018 by root via cibadmin on node1.example.com

2 nodes configured
5 resources configured

Online:

Full list of resources:

 Resource Group: apache-group
     apache-ip  (ocf::heartbeat:IPaddr2):       Started node2.example.com
     apache-service     (ocf::heartbeat:apache):        Started node2.example.com
 Resource Group: ftp-group
     ftp-ip     (ocf::heartbeat:IPaddr2):       Stopped
     ftp-service        (systemd:vsftpd):       Stopped
 Resource Group: halvmfs
     halvm      (ocf::heartbeat:LVM):   Started node2.example.com

Daemon Status:
  corosync: active/enabled
  pacemaker: active/enabled
  pcsd: active/enabled
As you see our HA LVM service has started successfully on . Now we need to take care of the file system, and the file system needs to be mounted somewhere.
Create resource group to mount the file system
For the sake of this article to configure HA LVM I will create directory as my mount point on both my cluster nodes.
# mkdir /xfs
# mkdir /xfs
Next we need to create a resource that mounts the file system through the cluster.
# pcs resource create xfsfs Filesystem device="/dev/vgcluster/lvcluster" directory="/xfs" fstype="xfs" --group halvmfs
Here we are creating a resource with type for our logical volume which should be mounted on and let it be part of our existing group
So our last command execution was successful so let us validate the .
# pcs status
Cluster name: mycluster
Stack: corosync
Current DC: node1.example.com (version 1.1.18-11.el7_5.3-2b07d5c5a9) - partition with quorum
Last updated: Wed Dec 26 18:37:51 2018
Last change: Wed Dec 26 18:37:29 2018 by root via cibadmin on node1.example.com

2 nodes configured
6 resources configured

Online:

Full list of resources:

 Resource Group: apache-group
     apache-ip  (ocf::heartbeat:IPaddr2):       Started node2.example.com
     apache-service     (ocf::heartbeat:apache):        Started node2.example.com
 Resource Group: ftp-group
     ftp-ip     (ocf::heartbeat:IPaddr2):       Stopped
     ftp-service        (systemd:vsftpd):       Stopped
 Resource Group: halvmfs
     halvm      (ocf::heartbeat:LVM):   Started node2.example.com
     xfsfs      (ocf::heartbeat:Filesystem):    Started node2.example.com


Daemon Status:
  corosync: active/enabled
  pacemaker: active/enabled
  pcsd: active/enabled
As you see our resource has been successfully started on
Flexibility
Capacity can also be easily reallocated with LVM. You can reduce capacity in one VG and add it to another. This is accomplished by shrinking the filesystem and then removing the LV from the VG. Let’s say you have a server with 10 TB of capacity. Using the above processes, you have created two LVs of 5 TB each. After a few weeks, you discover that you should have created LVs of 7 TB and 3 TB instead. You can remove 2 TB of capacity from one of the Volume Groups and then add that capacity to the other VG. This is far more flexibility than traditional partitioning offers.
LVM also supports RAID configurations, mirroring, and other advanced settings that make it an even more attractive solution. Tyler Carrigan’s article Creating Logical Volumes in Linux with LVM has some good information on striping and mirroring Logical Volumes.
How to manually delete LVM metadata in Linux?
To manually delete LVM metadata in Linux you can use various tools such as , etc. can erase filesystem, raid or partition-table signatures (magic strings) from the specified device to make the signatures invisible for libblkid. wipefs does not erase the filesystem itself nor any other data from the device.
WARNING:
Execute this command wisely and is not recommended to be executed in production environments as it will delete all the file system signature of the device.
In this example we will use wipefs to delete LVM metadata from device. Since the device in question is in use by Volume Group, we have to use to forcefully wipe the LVM metadata
# wipefs --all --backup -f /dev/sdb
/dev/sdb: 8 bytes were erased at offset 0x00000218 (LVM2_member): 4c 56 4d 32 20 30 30 31
We have used so that before deleting the LVM metadata, wipefs will create a backup of the ext4 signature containing LVM metadata under the home folder of the user who is executing the command. Since we used root user, our LVM metadata backup is stored under root user’s home folder.
# ls -l /root/wipefs-sdb-0x00000218.bak
-rw------- 1 root root 8 Apr  5 13:45 /root/wipefs-sdb-0x00000218.bak
Next you can verify that all the logical volumes, volume groups and physical volume part of is missing from the Linux server
# lvs -o+devices
  LV   VG   Attr       LSize   Pool Origin Data%  Meta%  Move Log Cpy%Sync Convert Devices
  root rhel -wi-ao----  13.56g                                                     /dev/sda2(239)
  swap rhel -wi-ao---- 956.00m                                                     /dev/sda2(0)  <--Our Logical volume no more visible
# vgs
  VG   #PV #LV #SN Attr   VSize   VFree
  rhel   1   2   0 wz--n- <14.50g    0  <-- test_vg no more visible
# pvs
  PV         VG   Fmt  Attr PSize   PFree
  /dev/sda2  rhel lvm2 a--  <14.50g    0  <-- /dev/sdb no more visible
Similarly with also we can verify that there are no LVM2 partitions under
# lsblk
NAME          MAJ:MIN RM  SIZE RO TYPE MOUNTPOINT
sda             8:0    0   15G  0 disk
├─sda1          8:1    0  512M  0 part /boot
└─sda2          8:2    0 14.5G  0 part
  ├─rhel-root 253:0    0 13.6G  0 lvm  /
  └─rhel-swap 253:1    0  956M  0 lvm
sdb             8:16   0    8G  0 disk
sr0            11:0    1 1024M  0 rom
sr1            11:1    1 1024M  0 rom
List of LV commands
-
lvchange — Change attributes of a Logical Volume.
-
lvconvert — Convert a Logical Volume from linear to mirror or snapshot.
-
lvcreate — Create a Logical Volume in an existing Volume Group.
-
lvdisplay — Display the attributes of a Logical Volume.
-
lvextend — Extend the size of a Logical Volume.
-
lvreduce — Reduce the size of a Logical Volume.
-
lvremove — Remove a Logical Volume.
-
lvrename — Rename a Logical Volume.
-
lvresize — Resize a Logical Volume.
-
lvs — Report information about Logical Volumes.
-
lvscan — Scan (all disks) for Logical Volumes.
See also:
-
Comparison of Linux volume management solutions for Debian users
- Upstream:
-
https://sourceware.org/lvm2/ — Homepage, mailing list, IRC…
-
https://sourceware.org/lvm2/wiki/ — Wiki
-
-
RedHat:
Logical Volume Manager Administration
CategorySystemAdministration CategoryStorage
Работа со снапшотами
Снимки диска позволят нам откатить состояние на определенный момент. Это может послужить быстрым вариантом резервного копирования. Однако нужно понимать, что данные хранятся на одном и том же физическом носителе, а значит, данный способ не является полноценным резервным копированием.
Создание снапшотов для тома, где уже используется файловая система XFS, имеет некоторые нюансы, поэтому разберем разные примеры.
Создание для не XFS:
lvcreate -L500 -s -n sn01 /dev/vg01/lv01
* данная команда помечает, что 500 Мб дискового пространства устройства /dev/vg01/lv01 (тома lv01 группы vg01) будет использоваться для snapshot (опция -s).
Создание для XFS:
xfs_freeze -f /mnt; lvcreate -L500 -s -n sn01 /dev/vg01/lv01; xfs_freeze -u /mnt
* команда xfs_freeze замораживает операции в файловой системе XFS.
Посмотрим список логических томов:
lvs
Получим что-то на подобие:
LV VG Attr LSize Pool Origin Data% Meta% Move Log Cpy%Sync Convert
lv01 vg01 owi-aos— 1,00g
sn01 vg01 swi-a-s— 500,00m lv01 2,07
* поле Origin показывает, к какому оригинальному логическому тому относится LV, например, в данной ситуации наш раздел для снапшотов относится к lv01.
Также можно посмотреть изменения в томах командой:
lsblk
Мы должны увидеть что-то подобное:
sdc 8:32 0 1G 0 disk
vg01-lv01-real 253:3 0 1G 0 lvm
vg01-lv01 253:2 0 1G 0 lvm /mnt
vg01-sn01 253:5 0 1G 0 lvm
vg01-sn01-cow 253:4 0 500M 0 lvm
vg01-sn01 253:5 0 1G 0 lvm
С этого момента все изменения пишутся в vg01-sn01-cow, а vg01-lv01-real фиксируется только для чтения и мы может откатиться к данному состоянию диска в любой момент.
Содержимое снапшота можно смонтировать и посмотреть, как обычный раздел:
mkdir /tmp/snp
Монтирование не XFS:
mount /dev/vg01/sn01 /tmp/snp
Монтирование XFS:
mount -o nouuid,ro /dev/vg01/sn01 /tmp/snp
Для выполнения отката до снапшота, выполняем команду:
lvconvert —merge /dev/vg01/sn01
Renaming a volume group
Renaming a volume group can be tricky of the it contains the root or swap partition. In that case it should be insured that the old names are still accessible via /dev/mapper until a full reboot cycle is complete.


sudo vgrename somename-vg vgsomename
cd /dev/mapper
ls somename-vg*
## somename--vg-lv1
## somename--vg-lv2
...

sudo ln -s vgsomename-lv1   somename--vg-lv1
sudo ln -s vgsomename-lv2   somename--vg-lv2
...

# if logical volumes of the group are contained in /etc/fstab:
sudo sed -i 's#/dev/mapper/somename--vg-#/dev/vgsomename/#g' /etc/fstab

# if logical volumes of the group are contained in /boot/grub/grub.cfg:
sudo sed -i 's#/dev/mapper/somename--vg-#/dev/vgsomename/#g' /boot/grub/grub.cfg  # this is only good for the initramfs run and the initial next reboot
sudo update-initramfs -c -k all

sudo reboot
sudo update-grub #creating final /boot/grub/grub.cfg
Создание разделов
Рассмотрим пример создания томов из дисков sdb и sdc с помощью LVM.
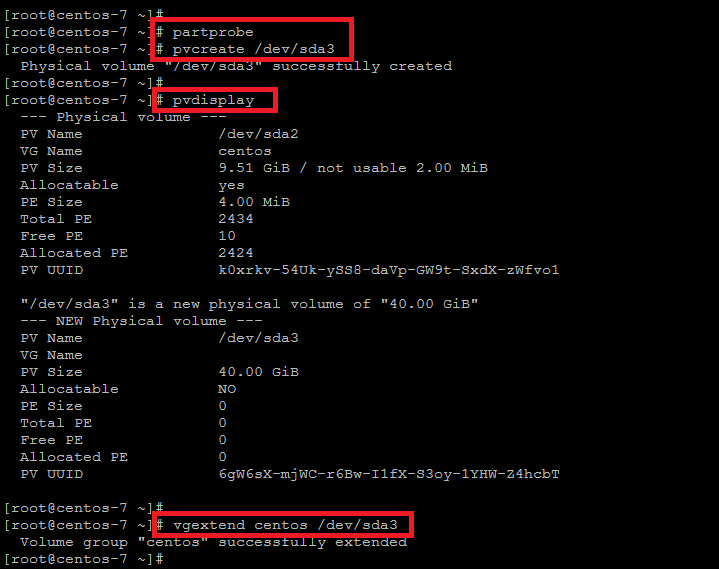
1. Инициализация
Помечаем диски, что они будут использоваться для LVM:
pvcreate /dev/sdb /dev/sdc
* напомним, что в качестве примера нами используются диски sdb и sdc.
Посмотреть, что диск может использоваться LMV можно командой:
pvdisplay
В нашем случае мы должны увидеть что-то на подобие:
 "/dev/sdb" is a new physical volume of "1,00 GiB"
  --- NEW Physical volume ---
  PV Name               /dev/sdb
  VG Name
  PV Size               1,00 GiB
  Allocatable           NO
  PE Size               0
  Total PE              0
  Free PE               0
  Allocated PE          0
  PV UUID               rR8qya-eJes-7AC5-wuxv-CT7a-o30m-bnUrWa

  "/dev/sdc" is a new physical volume of "1,00 GiB"
  --- NEW Physical volume ---
  PV Name               /dev/sdc
  VG Name
  PV Size               1,00 GiB
  Allocatable           NO
  PE Size               0
  Total PE              0
  Free PE               0
  Allocated PE          0
  PV UUID               2jIgFd-gQvH-cYkf-9K7N-M7cB-WWGE-9dzHIY
* где
- PV Name — имя диска.
- VG Name — группа томов, в которую входит данный диск (в нашем случае пусто, так как мы еще не добавили его в группу).
- PV Size — размер диска.
- Allocatable — распределение по группам. Если NO, то диск еще не задействован и его необходимо для использования включить в группу.
- PE Size — размер физического фрагмента (экстента). Пока диск не добавлен в группу, значение будет 0.
- Total PE — количество физических экстентов.
- Free PE — количество свободных физических экстентов.
- Allocated PE — распределенные экстенты.
- PV UUID — идентификатор физического раздела.
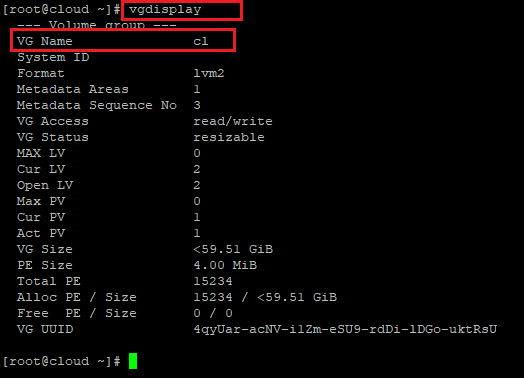
2. Создание групп томов
Инициализированные на первом этапе диски должны быть объединены в группы.
Группа может быть создана:
vgcreate vg01 /dev/sdb /dev/sdc
* где vg01 — произвольное имя создаваемой группы; /dev/sdb, /dev/sdc — наши диски.
Просмотреть информацию о созданных группах можно командой:
vgdisplay
На что мы получим, примерно, следующее:
  --- Volume group ---
  VG Name               vg01
  System ID
  Format                lvm2
  Metadata Areas        2
  Metadata Sequence No  1
  VG Access             read/write
  VG Status             resizable
  MAX LV                0
  Cur LV                0
  Open LV               0
  Max PV                0
  Cur PV                2
  Act PV                2
  VG Size               1,99 GiB
  PE Size               4,00 MiB
  Total PE              510
  Alloc PE / Size       0 / 0
  Free  PE / Size       510 / 1,99 GiB
  VG UUID               b0FAUz-wlXt-Hzqz-Sxs4-oEgZ-aquZ-jLzfKz
* где:
- VG Name — имя группы.
- Format — версия подсистемы, используемая для создания группы.
- Metadata Areas — область размещения метаданных. Увеличивается на единицу с созданием каждой группы.
- VG Access — уровень доступа к группе томов.
- VG Size — суммарный объем всех дисков, которые входят в группу.
- PE Size — размер физического фрагмента (экстента).
- Total PE — количество физических экстентов.
- Alloc PE / Size — распределенное пространство: колическтво экстентов / объем.
- Free PE / Size — свободное пространство: колическтво экстентов / объем.
- VG UUID — идентификатор группы.
3. Создание логических томов
Последний этап — создание логического раздела их группы томов командой lvcreate. Ее синтаксис:
lvcreate <имя группы томов>
Примеры создания логических томов:
lvcreate -L 1G vg01
* создание тома на 1 Гб из группы vg01.
lvcreate -L50 -n lv01 vg01
* создание тома с именем lv01 на 50 Мб из группы vg01.
lvcreate -l 40%VG vg01
* при создании тома используется 40% от дискового пространства группы vg01.
lvcreate -l 100%FREE vg01
* использовать все свободное пространство группы vg01 при создании логического тома.* также можно использовать %PVS — процент места от физического тома (PV); %ORIGIN — размер оригинального тома (применяется для снапшотов).
Посмотрим информацию о созданном томе:
lvdisplay
  --- Logical volume ---
  LV Path                /dev/vg01/lv01
  LV Name                lv01
  VG Name                vg01
  LV UUID                4nQ2rp-7AcZ-ePEQ-AdUr-qcR7-i4rq-vDISfD
  LV Write Access        read/write
  LV Creation host, time vln.dmosk.local, 2019-03-18 20:01:14 +0300
  LV Status              available
  # open                 0
  LV Size                52,00 MiB
  Current LE             13
  Segments               1
  Allocation             inherit
  Read ahead sectors     auto
  - currently set to     8192
  Block device           253:2
* где:
- LV Path — путь к устройству логического тома.
- LV Name — имя логического тома.
- VG Name — имя группы томов.
- LV UUID — идентификатор.
- LV Write Access — уровень доступа.
- LV Creation host, time — имя компьютера и дата, когда был создан том.
- LV Size — объем дискового пространства, доступный для использования.
- Current LE — количество логических экстентов.
Disk Setup
First off, we setup the drives. I’ll assume your four SATA drives are /dev/sda, /dev/sdb, /dev/sdc and /dev/sdd.
One disk at a time! Repeat these steps for four drives. It’s the same deal; just replace /dev/sda with the appropriate device /dev/sdb, etc.
cfdisk
cfdisk /dev/sda
It should say that no partitions exist, so create a new one by choosing «New». Make it a «Primary» partition and give it as much space as you want — I gave it the entire disk (the default). Now you should be back to the main menu, with one partition showing up on the list at the top. For this setup, the drives will need to be set to «Linux raid autodetect» — so choose the «Type» option and you’ll see a list of dozens of formats — choose «Linux raid autodetect», which is «fd». You should be once again back at the main menu. Choose «Write» and say «yes» — you do want to write the changes to the disk. Finally; choose «Quit».
fdisk
fdisk /dev/sda
Press ‘m’ for a helpful list of commands. Pressing ‘p’ for «print the partition table», it should say that no partitions exist, so ‘n’ for «add a new partition» to create a new one. Select ‘p’ for «primary partition» and give it as much space as you want — or give it the entire disk (the default). Now you should be back to the main menu, with one partition showing up on the ‘p’ list at the top. For this setup, the drives will need to be set to «Linux raid autodetect» — so choose the ‘t’ for the «Type» option and you’ll see a ‘L’ list of dozens of formats — choose «Linux raid autodetect», which is «fd».
LVM Setup
That’s the RAID 1 bit of the setup taken care of — so this is the point at which we get LVM to create a nice big partition out of the first two disks. But there’s a problem — the pvcreate command is a little broken. We need to run the command:
pvcreate /dev/md0 /dev/md1
Ubuntu 7.04 (Feisty)
But running that gives the following error: «No program «pvcreate» found for your current version of LVM». Thankfully, someone over on the Ubuntu forums worked out how to fix it. It’s quite simple, too. Run this: cp -r /lib/lvm-200/ /lib/lvm-0
Now run pvcreate again: pvcreate /dev/md0 /dev/md1
Success! On to the next step.
vgcreate datavg /dev/md0 /dev/md1
You can call «datavg» anything you want — it’s just a name for the «volume group». «datavg» is what I used — simple and descriptive. Onwards:
lvcreate --name datalv --size 931.51G datavg
Again, «datalv» (notice the difference to the above name) can be whatever you like, but this is fine for me. If you didn’t use «datavg» as the name in the previous line, make sure you replace the «datavg» in this line with whatever you used. The value given after «—size» is the total size of the new partition — the sum of the combined partitions. My two 500 GB (465 GiB) drives make 1 TB (931 GiB), so that’s how much I put.
Assuming that all went well (you can check with the lvdisplay command), you’ll now have a large partition with no usuable (to you) format. Time to change that. I’m going to be using Ext3, but you can use Ext2, ReiserFS, or whatever you want.
mkfs.ext3 -m 0 -T largefile /dev/datavg/datalv
The «-m 0» tells it to reserve zero percent of the disk for the super user (root). If I didn’t set that and used the default value, it would eat 60 GiB of my partition! If the system were going to be using it for the OS, then leaving some for root would be important (possibly) — but this is to be a pure data drive, so we don’t need it.
«-T largefile» is used because the files created for my recordings are large wave files, so using this is better than using a system optimized for small files. If you’re going to use your system for small files (pictures, text files, etc), you can omit this option.
Creating the file system may take a while — it took few minutes on my system. Once it’s done, you’ll have a nice large Ext3 (or whatever format you chose) partition ready to be mounted. Let’s give it a spin. Create a mount point then mount it:
mkdir /mnt/data
mount /dev/mapper/datavg-datalv /mnt/data/
chmod 777 /mnt/data/
Notice the device used. If you didn’t use the names «datavg» and «datalv» as per the above examples, your device will be named differently. It should be trivial to work out.
Do a «df -h» and look on with a smile:
/dev/mapper/datavg-datalv 932G 200M 932G 1% /mnt/data
That’s it! You now have the first two disks working under LVM — as if they were using RAID 0 — and they’re mirrored with RAID 1. Easy, wasn’t it?
Уменьшение томов
Размер некоторый файловых систем, например, XFS уменьшить нельзя. Из положения можно выйти, создав новый уменьшенный том с переносом на него данных и последующим удалением.
LVM также позволяет уменьшить размер тома. Для этого необходимо выполнить его отмонтирование, поэтому для уменьшения системного раздела безопаснее всего загрузиться с Linux LiveCD. Далее выполняем инструкцию ниже.
Отмонтируем раздел, который нужно уменьшить:
umount /mnt
Выполняем проверку диска:
e2fsck -fy /dev/vg01/lv01
resize2fs /dev/vg01/lv01 500M
Уменьшаем размер тома:
lvreduce -L-500 /dev/vg01/lv01
На предупреждение системы отвечаем y:
  WARNING: Reducing active logical volume to 524,00 MiB.
  THIS MAY DESTROY YOUR DATA (filesystem etc.)
Do you really want to reduce vg01/lv01? [y/n]: y
Готово.
Очень важно, чтобы сначала был уменьшен размер файловой системы, затем тома. Также важно не уменьшить размер тома больше, чем файловой системы
В противном случае данные могут быть уничтожены. Перед выполнением операции, обязательно создаем копию важных данных.
Создание зеркала
С помощью LVM мы может создать зеркальный том — данные, которые мы будем на нем сохранять, будут отправляться на 2 диска. Таким образом, если один из дисков выходит из строя, мы не потеряем свои данные.
Зеркалирование томов выполняется из группы, где есть, минимум, 2 диска.
1. Сначала инициализируем диски:
pvcreate /dev/sd{d,e}
* в данном примере sdd и sde.
2. Создаем группу:
vgcreate vg02 /dev/sd{d,e}
3. Создаем зеркальный том:
eate -L200 -m1 -n lv-mir vg02
* мы создали том lv-mir на 200 Мб из группы vg02.
В итоге:
lsblk
… мы увидим что-то на подобие:
sdd                       8:16   0    1G  0 disk
  vg02-lv--mir_rmeta_0  253:2    0    4M  0 lvm
    vg02-lv--mir        253:6    0  200M  0 lvm
  vg02-lv--mir_rimage_0 253:3    0  200M  0 lvm
    vg02-lv--mir        253:6    0  200M  0 lvm
sde                       8:32   0    1G  0 disk
  vg02-lv--mir_rmeta_1  253:4    0    4M  0 lvm
    vg02-lv--mir        253:6    0  200M  0 lvm
  vg02-lv--mir_rimage_1 253:5    0  200M  0 lvm
    vg02-lv--mir        253:6    0  200M  0 lvm
* как видим, на двух дисках у нас появились разделы по 200 Мб.