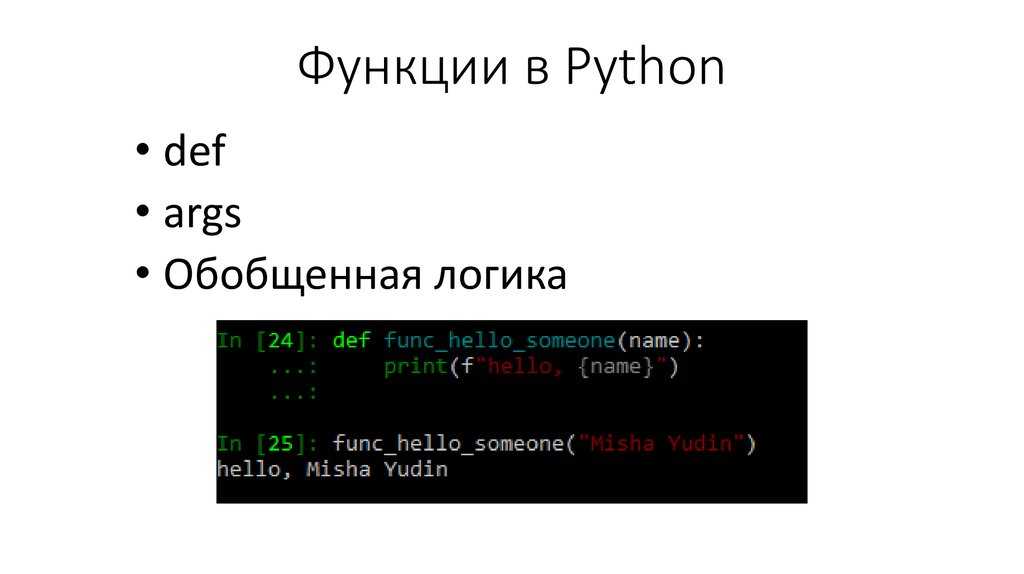
Local commands
As used above, only really saves a couple lines of
boilerplate. It’s mostly designed for use with
Fabric’s API, which contains functions (or operations) for executing shell
commands, transferring files, and so forth.
Let’s build a hypothetical Web application fabfile. This example scenario is
as follows: The Web application is managed via Git on a remote host
. On , we have a local clone of said Web application.
When we push changes back to , we want to be able to immediately
install these changes on a remote host in an automated fashion.
We will do this by automating the local and remote Git commands.
Fabfiles usually work best at the root of a project:
.
|-- __init__.py
|-- app.wsgi
|-- fabfile.py <-- our fabfile!
|-- manage.py
`-- my_app
    |-- __init__.py
    |-- models.py
    |-- templates
    |   `-- index.html
    |-- tests.py
    |-- urls.py
    `-- views.py
Note
We’re using a Django application here, but only as an example – Fabric is
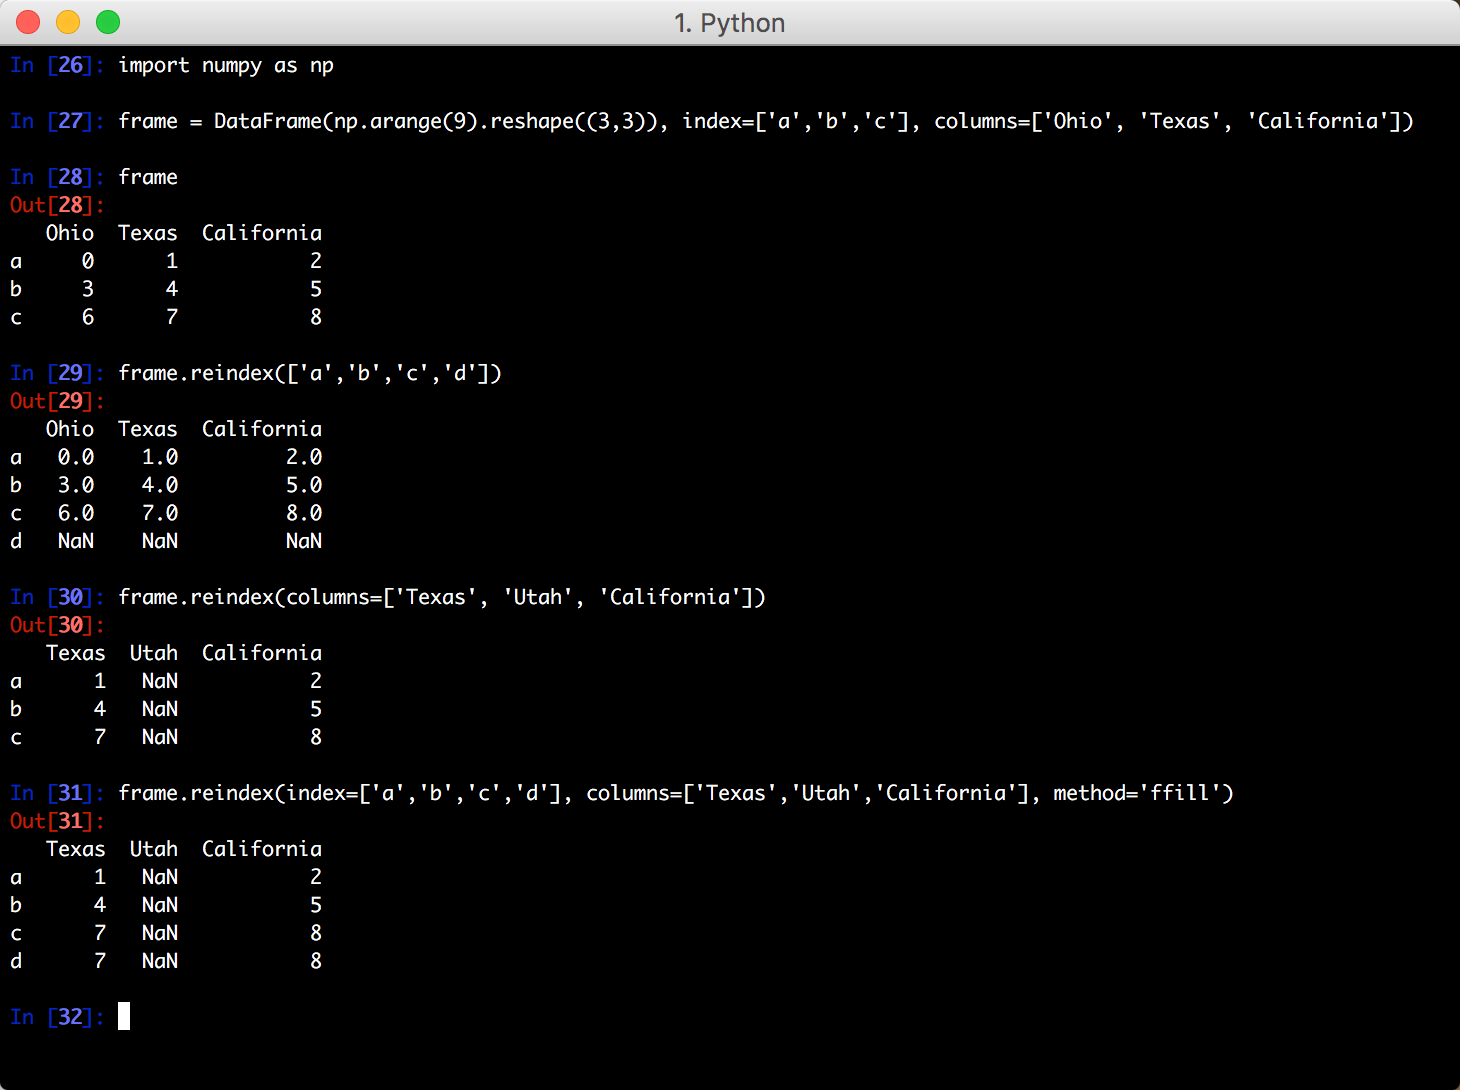
not tied to any external codebase, save for its SSH library.
For starters, perhaps we want to run our tests and commit to our VCS so we’re
ready for a deploy:
from fabric.api import local

def prepare_deploy():
    local("./manage.py test my_app")
    local("git add -p && git commit")
    local("git push")
The output of which might look a bit like this:
$ fab prepare_deploy
 run: ./manage.py test my_app
Creating test database...
Creating tables
Creating indexes
..........................................
----------------------------------------------------------------------
Ran 42 tests in 9.138s

OK
Destroying test database...

 run: git add -p && git commit

<interactive Git add / git commit edit message session>

 run: git push

<git push session, possibly merging conflicts interactively>

Done.
The code itself is straightforward: import a Fabric API function,
, and use it to run and interact with local shell
commands. The rest of Fabric’s API is similar – it’s all just Python.
Making connections
Let’s start wrapping up our fabfile by putting in the keystone: a
task that is destined to run on one or more remote server(s), and ensures the
code is up to date:
def deploy():
    code_dir = '/srv/django/myproject'
    with cd(code_dir):
        run("git pull")
        run("touch app.wsgi")
Here again, we introduce a handful of new concepts:
- Fabric is just Python – so we can make liberal use of regular Python code
constructs such as variables and string interpolation; -
, an easy way of prefixing commands with a call. This is similar to
which does the same locally. -
, which is similar to but
runs remotely instead of locally.
We also need to make sure we import the new functions at the top of our file:
from __future__ import with_statement
from fabric.api import local, settings, abort, run, cd
from fabric.contrib.console import confirm
With these changes in place, let’s deploy:
$ fab deploy
No hosts found. Please specify (single) host string for connection: my_server
 run: git pull
 out: Already up-to-date.
 out:
 run: touch app.wsgi

Done.
We never specified any connection info in our fabfile, so Fabric doesn’t know
on which host(s) the remote command should be executed. When this happens,
Fabric prompts us at runtime. Connection definitions use SSH-like “host
strings” (e.g. ) and will use your local username as a
default – so in this example, we just had to specify the hostname,
.
Remote interactivity
works fine if you’ve already got a checkout of your source code –
but what if this is the first deploy? It’d be nice to handle that case too and
do the initial :
def deploy():
    code_dir = '/srv/django/myproject'
    with settings(warn_only=True):
        if run("test -d %s" % code_dir).failed
            run("git clone user@vcshost:/path/to/repo/.git %s" % code_dir)
    with cd(code_dir):
        run("git pull")
        run("touch app.wsgi")
As with our calls to above,
also lets us construct clean Python-level logic based on executed shell
commands. However, the interesting part here is the call: since
we’re using Git’s SSH method of accessing the repository on our Git server,
this means our remote call will need to authenticate
itself.
Older versions of Fabric (and similar high level SSH libraries) run remote
programs in limbo, unable to be touched from the local end. This is
problematic when you have a serious need to enter passwords or otherwise
interact with the remote program.
Fabric 1.0 and later breaks down this wall and ensures you can always talk to
the other side. Let’s see what happens when we run our updated task
on a new server with no Git checkout:
$ fab deploy
No hosts found. Please specify (single) host string for connection: my_server
 run: test -d /srv/django/myproject

Warning: run() encountered an error (return code 1) while executing 'test -d /srv/django/myproject'

 run: git clone user@vcshost:/path/to/repo/.git /srv/django/myproject
 out: Cloning into /srv/django/myproject...
 out: Password: <enter password>
 out: remote: Counting objects: 6698, done.
 out: remote: Compressing objects: 100% (2237/2237), done.
 out: remote: Total 6698 (delta 4633), reused 6414 (delta 4412)
 out: Receiving objects: 100% (6698/6698), 1.28 MiB, done.
 out: Resolving deltas: 100% (4633/4633), done.
 out:
 run: git pull
 out: Already up-to-date.
 out:
 run: touch app.wsgi

Done.
Notice the prompt – that was our remote call on our Web server, asking for the password to the Git server. We were able to type it in and the clone continued normally.
See also
Task arguments
It’s often useful to pass runtime parameters into your tasks, just as you might
during regular Python programming. Fabric has basic support for this using a
shell-compatible notation: . It’s
contrived, but let’s extend the above example to say hello to you personally:
def hello(name="world"):
    print("Hello %s!" % name)
By default, calling will still behave as it did before; but now
we can personalize it:
$ fab hello:name=Jeff
Hello Jeff!

Done.
Those already used to programming in Python might have guessed that this
invocation behaves exactly the same way:
$ fab hello:Jeff
Hello Jeff!

Done.
For the time being, your argument values will always show up in Python as
strings and may require a bit of string manipulation for complex types such
as lists. Future versions may add a typecasting system to make this easier.
Hello, fab
This wouldn’t be a proper tutorial without “the usual”:
def hello():
    print("Hello world!")
Placed in a Python module file named in your current working
directory, that function can be executed with the tool
(installed as part of Fabric) and does just what you’d expect:
$ fab hello
Hello world!

Done.
That’s all there is to it. This functionality allows Fabric to be used as a
(very) basic build tool even without importing any of its API.
Note
The tool simply imports your fabfile and executes the function or
functions you instruct it to. There’s nothing magic about it – anything
you can do in a normal Python script can be done in a fabfile!
Operate Channels with Fabric Network
2.1 Create a new channel and join it
Use sdk to create a new channel and let peers join it.
import asyncio
from hfc.fabric import Client

loop = asyncio.get_event_loop()

cli = Client(net_profile="test/fixtures/network.json")
org1_admin = cli.get_user(org_name='org1.example.com', name='Admin')

# Create a New Channel, the response should be true if succeed
response = loop.run_until_complete(cli.channel_create(
            orderer='orderer.example.com',
            channel_name='businesschannel',
            requestor=org1_admin,
            config_yaml='test/fixtures/e2e_cli/',
            channel_profile='TwoOrgsChannel'
            ))
print(response == True)

# Join Peers into Channel, the response should be true if succeed
orderer_admin = cli.get_user(org_name='orderer.example.com', name='Admin')
responses = loop.run_until_complete(cli.channel_join(
               requestor=org1_admin,
               channel_name='businesschannel',
               peers='peer0.org1.example.com',
                      'peer1.org1.example.com'],
               orderer='orderer.example.com'
               ))
print(len(responses) == 2)


# Join Peers from a different MSP into Channel
org2_admin = cli.get_user(org_name='org2.example.com', name='Admin')

# For operations on peers from org2.example.com, org2_admin is required as requestor
responses = loop.run_until_complete(cli.channel_join(
               requestor=org2_admin,
               channel_name='businesschannel',
               peers='peer0.org2.example.com',
                      'peer1.org2.example.com'],
               orderer='orderer.example.com'
               ))
print(len(responses) == 2)
Веб-разработка
К первой категории относятся модули, связанные с веб-разработкой HTTP-запросов. Python широко применяется для бэкенда, поэтому несложно догадаться, что он предоставляет множество разных инструментов для создания корпоративных веб-сайтов.
Запросы
Встроенные модули urllib и urllib2 подходят для обработки HTTP-процессов. Каждый из них включает разный набор функциональностей, и в большинстве случаев их необходимо задействовать совместно. Основной недостаток, сбивающий с толку, состоит в том, что ряд методов urllib также доступен и в urllib2. Суть другого недостатка — не совсем понятная документация, вследствие чего приходится писать много кода для создания самого простого HTTP-запроса. Во избежание этих сложностей большинство разработчиков предпочитают для запроса привлекать сторонний модуль. Речь идет об HTTP-библиотеке под лицензией Apache2, основанной на urllib3 и httplib.
Django
Несмотря на то, что Django больше относится к высокоуровневым веб-фреймворкам Python, чем к модулям, настоятельно рекомендую его загрузить и установить. Он избавит вас от стресса, связанного со сборкой веб-приложений с нуля. В число его сильных сторон входят: быстрая разработка, продуманный дизайн, скорость и хорошая масштабируемость. Можно сочетать Django с другими языками и фреймворками. Он предоставляет множество инструментов и сложные функциональности для разработчиков, позволяющие создавать качественные корпоративные сайты.
Flask
Еще одним веб-фреймворком, обычно конкурирующим с Django, является Flask. Выбор одного из них всецело зависит от создаваемого проекта. Flask намного легче и быстрее установить, но он включает меньший набор инструментов, чем Django. Последний лучше всего подходит для приложений с тяжёлыми функциями, например аутентификацией, тогда как Flask предпочтителен для простых базовых веб-приложений.
BeautifulSoup
BeautifulSoup — великолепный модуль для сбора данных с различных интернет-ресурсов. Если вы занимаетесь парсингом веб-страниц, то в его лице вы обретете незаменимого помощника. Он предоставляет несколько простых методов и идиомы Python для навигации, поиска и изменения дерева разбора. BeautifulSoup также преобразует входящие документы в Unicode, а исходящие — в UTF-8. О кодировке придется задумываться лишь в случаях, когда она не будет указана в документации и модуль не сможет ее обнаружить. В такой ситуации вам придется задать ее исходный вариант. BeautifulSoup парсит все, что вы ему предоставляете, и совершает за вас полный обход дерева.
Selenium
Selenium — это инструмент для выполнения автоматизированных задач. Он позволяет либо тестировать веб-сайты, либо создавать бота, взаимодействующего с ними. С Selenium у вас есть возможность, например, обращаться к HTTP-полям, передвигать курсор мыши, задействовать клавиши и т. д. У меня был опыт его применения при разработке виртуального ассистента, осуществляющего поиск нужной информации. Он мог подключаться к строке поиска, вводить поисковый термин, просматривать полученные результаты и выбирать нужный для перехода. При правильном применении Selenium раскроет вам всю свою мощь.
fab命令
安装完后会连同工具一起装到下,在终端输入查看命令参数简单来说,干这么件事,直接执行当前目录下的脚本里的函数,下面介绍具体如何写
首先按照国际惯例,导入包:
12 |
from fabric import Connectionfrom invoke import task |
实例化对象:
12 |
conn = Connection("${remote host}", user='${remote user}', connect_kwargs={'password': "${remote user's password}"})
|
定义一个功能函数:
123 |
@taskdef execute(c): conn.run("uname -s")
|
这个装饰器是必须加的,保证能直接执行,参数不用管它,但不能定义成与你实例化的同名,原因后面会说
保存为:fabfile.py
12345678 |
from fabric import Connectionfrom invoke import taskconn = Connection("${remote host}", user='${remote user}', connect_kwargs={'password': "${remote user's password}"})@taskdef execute(c): conn.run("uname -s")
|
在终端执行(服务器系统为Linux):
12 |
$ fab executeLinux # Linux下的输出 |
说回参数,在这里实际上是本地连接,是的一个对象。我们可以试一下:fabfile.py
123456 |
from fabric import Connectionfrom invoke import task@taskdef execute(c): c.run("uname -s")
|
在终端执行(我的系统为Mac):
12 |
$ fab executeDarwin # Mac下的输出 |
一目了然
到这里大家应该大致明白是干啥的了。这样的玩法就多了,下面举几个例子:fabfile.py
123456789101112131415161718192021 |
from fabric import Connectionfrom invoke import taskconn = Connection("${remote host}", user='${remote user}', connect_kwargs={'password': "${remote user's password}"})@taskdef uname_local(c): c.run("uname -s")@taskdef ls_remote(c, dir_path): with conn.cd(dir_path): conn.run("ls -la")@taskdef uname_rmt(c, host, user, password): con = Connection(host, user=user, connect_kwargs={'password': password}) con.run("uname -s")
|
执行:
123456789 |
$ fab uname_localDarwin$ fab ls_remote /hometrendytd_root$ fab uname_rmt 10.10.22.13 root ******* Linux |
具体的还封装了哪些命令,就需要大家在使用中探索了
fab
1.x 与 fab 2.x
与最大的不同就是没有了模块,所有的操作都基于对象完成,对于命令的调用,将暴露方法封装到模块,使其独立出来。这是我觉得最大的不同。只是现在还没有很多的博客写到的一些特性,官方文档也很简单,还是需要大家花时间阅读下源码才能清楚里面的逻辑
有时间的话会再对做个详细剖析
Roles
You can define roles in Fabric, and only run actions on servers tied to a
specific role.

This script will run get_version on hosts members of the role "webservers",
by running first on www1, then www2 etc.
fab -R webservers
from fabric.api import *

# Define sets of servers as roles

env.roledefs = {
    'webservers' 'www1', 'www2', 'www3', 'www4', 'www5'],
    'databases' 'db1', 'db2'
}

# Set the user to use for ssh
env.user = 'fabuser'

# Restrict the function to the 'webservers' role

@roles('webservers')

def get_version():
    run('cat /etc/issue')
# To run get_version on both roles (webservers and databases);
$ fab get_version
@roles ('webservers', 'databases')

    def get_version():

 run('cat /etc/issue')
Any function you write in your fab script can be assigned to one or more roles.

You can also include a single server in multiple roles.
6.3. Функция dir()
Встроенная функция используется для получения имён, определённых в модуле.
Она возвращает отсортированный список строк:
>>> import fibo, sys
>>> dir(fibo)

>>> dir(sys)
Без аргументов в перечислены имена, определенные в данный момент:
>>> a = 1, 2, 3, 4, 5
>>> import fibo
>>> fib = fibo.fib
>>> dir()
Обратите внимание, что в нем перечислены все типы имен: переменные, модули,
функции и т.д. не перечисляет имена встроенных функций и переменных
Если вам
требуется их список, они определены в стандартном модуле :
не перечисляет имена встроенных функций и переменных. Если вам
требуется их список, они определены в стандартном модуле :
Features
Mods
A mod is a jar with a fabric.mod.json mod metadata file in its root declaring how it should be loaded. It primarily declares a mod ID and version as well as entrypoints and mixin configurations. The mod ID identifies the mod so that any mod with the same ID is considered to be the same mod. Only one version of a mod may be loaded at a time. A mod may declare other mods that it depends on or conflicts with. Fabric Loader will attempt to satisfy dependencies and load the appropriate versions of mods, or fail to launch otherwise.
Fabric Loader makes all mods equally capable of modifying the game. As an example, anything Fabric API does can be done by any other mod.
Mods are loaded both from the classpath and from the mods directory. They are expected to match the mappings in the current environment, meaning Fabric Loader will not remap any mods.
Nested JARs
Nested JARs allow a mod to provide its own dependencies, so Fabric Loader can pick the best version matching the dependencies instead of requiring separate installation of dependencies. They also allow clean packaging of submodules, so each module can be used separately. Non-mod libraries can be repackaged as mods for nested JAR usage. A mod may bundle a number of other mods within its JAR. A nested JAR must itself also be a mod, which again can have nested JARs. Fabric Loader will load nested JARs while attempting to satisfy dependency constraints.
Entrypoints
Fabric Loader has an entrypoint system, which is used by mods to expose parts of the code for usage by Fabric Loader or other mods. Fabric Loader uses it for mod initialization. Initializers are loaded and called early during the game’s initialization which allows a mod to run some code to make its modifications. These entrypoints are typically used to bootstrap mods by registering registry objects, event listeners and other callbacks for doing things later.
Mixin
Mixin allows mods to transform Minecraft classes and even mod classes, and is the only method of class transformation that Fabric Loader officially supports. A mod can declare its own mixin configuration which enables the use of Mixin.
Mixin was not specifically made for Fabric, so Fabric Loader uses a slightly modified version of Mixin. However, the documentation of the upstream version is still mostly valid. The modifications are mostly related to making it work without LegacyLauncher/LaunchWrapper.
Mappings
Fabric Loader provides an API to determine names of classes, fields and methods with respect to the different environments that mods may be loaded in. This can be used to support reflection in any environment provided Fabric Loader has access to mappings to resolve the name.
# Растягивание виждета
Комбинируя параметры и , можно растянуть элемент по вертикали:
1234567891011121314
Результат выполнения:
Следующие два свойства – (заполнение) и (расширение). По-умолчанию равен нулю (другое значение – единица), а – (другие значения , , ). Создадим окно с одной меткой:
12345
Если начать расширять окно или сразу раскрыть его на весь экран, то метка окажется вверху по вертикали и в середине по горизонтали. Причина, по которой метка не в середине по вертикали заключается в том, что по-умолчанию равен .
Если установить свойство в 1, то при расширении окна метка будет всегда в середине:
123
Результат выполнения:
Свойство заставляет виджет заполнять все доступное пространство. Заполнить его можно во всех направлениях или только по одной из осей:
123
Результат выполнения:
Последняя опция метода – (якорь) – может принимать значения N ( – север), S ( – юг), W ( – запад), E ( – восток) и их комбинации:
123
Результат выполнения:
Creating a Fabfile
To start just create a blank file called fabfile.py in the directory you’d like
to use the fabric commands from.

You basically write rules that do something and then you (can) specify on which
servers the rules will run on.

Fabric then logs into one or more servers in turn and executes the shell commands
defined in "fabfile.py".

If you are located in the same dir as "fabfile.py" you can go "fab --list"
to see a list of available commands and then "fab " to execute a
command.

From https://github.com/fabric/fabric

Below is a small but complete "fabfile" containing a single task:
from fabric.api import run
def host_type():
    run('uname -s')
Once a task is defined, it may be run on one or more servers, like so
$ fab -H localhost,linuxbox host_type

localhost run uname -s
localhost out Darwin
linuxbox run uname -s
linuxbox out Linux

Done.
Disconnecting from localhost... done.
Disconnecting from linuxbox... done.
You can run fab -h for a full list of command line options

In addition to use via the fab tool, Fabric's components may be imported into
other Python code, providing a Pythonic interface to the SSH protocol suite at
a higher level than that provided by e.g. the ssh library,
(which Fabric itself uses.)
Task arguments
It’s often useful to pass runtime parameters into your tasks, just as you might
during regular Python programming. Fabric has basic support for this using a
shell-compatible notation: . It’s
contrived, but let’s extend the above example to say hello to you personally:
def hello(name="world"):
    print("Hello %s!" % name)
By default, calling will still behave as it did before; but now
we can personalize it:
$ fab hello:name=Jeff
Hello Jeff!

Done.
Those already used to programming in Python might have guessed that this
invocation behaves exactly the same way:
$ fab hello:Jeff
Hello Jeff!

Done.
For the time being, your argument values will always show up in Python as
strings and may require a bit of string manipulation for complex types such
as lists. Future versions may add a typecasting system to make this easier.
Графические пользовательские интерфейсы в Python
Kivy
Kivy — это отличный фреймворк для создания приложений с возможностью запуска на всевозможных платформах. Любое создаваемое вами приложение Kivy будет работать на Linux, Mac, Windows, iOS и Android.
PyQt5
По моему мнению, PyQt5 является лучшим инструментом для создания GUI на Python. С ним вы получаете максимальный спектр возможностей и гибкость. В вашем распоряжении даже стиль CSS для оформления визуального облика приложения. Например, с помощью PyQt5 была создана Spider IDE. Если вы намерены создавать более сложные приложения для настольного компьютера, то лучшего варианта и не придумаешь.
Tkinter
Tkinter — это библиотека “со стажем”, также применяемая для создания GUI. Она очень похожа на PyQt5 с точки зрения внешнего вида интерфейса, но обладает меньшими возможностями. На мой взгляд, ее легче освоить новичкам и тем, кто хочет получить быстрый результат без заморочек.
Машинное обучение и искусственный интеллект
Эта область заслуживает пристального внимания, особенно в связи с развитием технологий. Почти везде в наше время присутствует код МО: в беспилотных автомобилях, распознавании изображений, персонализированном поиске и т. д.
TensorFlow
TensorFlow бесспорно является самым мощным модулем в этом разделе. С помощью данной библиотеки вы можете делать невероятные вещи и при этом особо не вдаваться в суть выполняющихся математических вычислений, но это совсем не повод забросить математику. Преимущество TensorFlow заключается в том, что она позволяет создавать нейронные сети и выполнять стандартные алгоритмы МО. Трудно переоценить огромное значение этого модуля для тех, кто занимается МО.
Keras
Библиотека Keras — это высокоуровневый API для TensorFlow. Она больше подходит для тех, кто только начинает работу в данной области. Keras упрощает доступ к ряду возможностей TensorFlow. Можно сказать, что она представляет собой надстройку над ней, предлагая более простые способы создания моделей и ускоряя выполнение действий.
Pytorch
Хотя у меня самого небольшой опыт работы с Pytorch, я не мог не включить его в этот раздел. В Python он является одним из наиболее значительных фреймворков для МО и ИИ. Pytorch обладает двумя главными особенностями. Во-первых, императивное программирование в противоположность символическому. Императивная программа выполняет вычисления по мере того, как вы их вводите. Благодаря этому свойству программа становится более гибкой. Во-вторых, задействуется динамический вычислительный граф в противоположность статическому. Это означает, что во время выполнения система порождает структуру графа, более подходящую для динамических нейронных сетей.
Scikit-learn
Scikit-learn не обладает такими мощными возможностями, как предыдущие библиотеки и фреймворки. Она более легковесная и позволяет работать с такими алгоритмами, как кластеризация, линейная прогрессия, метод опорных векторов и т. д. Все это можно сделать и в TensorFlow, однако весьма нецелесообразно задействовать массивную библиотеку для выполнения задач, с которыми справится более легкая Scikit-learn.
Using Fabric
Now for the fun part. The installation process added a Python script called to a directory in your path (hopefully). This is the script which will be used to make magic happen with Fabric. However, just running from the command-line won’t do much at all. In order to do anything interesting, we’ll need to create our first fabfile.
Creating a fabfile
The fabfile is where all of your functions, roles, configurations, etc. will be defined. It’s just a little bit of Python which tells Fabric exactly what it needs to do. By convention, this file should be named , but you can name it anything you’d like. Just keep in mind that if it’s something other than fabfile.py, you’ll need to specify the path with . Here’s a simple example which runs locally:
fabfile.py
#!/usr/bin/env python
from fabric.api import local

def uptime():
  local('uptime')
Now, let’s run the script by calling the uptime function with :
Sweet! Well, not really. There’s nothing too special about just running commands locally. Let’s learn some more about what Fabric can do so that we can get this show on the road.


Remote Administration
For instance, if you were managing 192.168.1.100-102 with your fabfile, you could configure the following env.hosts:
#!/usr/bin/env python

from fabric.api import env

env.hosts =
Obviously, this is a pretty contrived example. Without any tasks defined, Fabric won’t do much at all. So let’s make some. Fabric provides a set of functions which can be used to interact with these remote hosts. Here are the most commonly used ones:
- run — Run a shell command on a remote host.
- sudo — Run a shell command on a remote host, with superuser privileges.
- get — Download one or more files from a remote host.
- put — Upload one or more files to a remote host.
Let’s put this all together and create a basic fabfile.py which runs on each of the remote hosts.
#!/usr/bin/env python

from fabric.api import env, run

env.hosts =

def uptime():
  run('uptime')
Pretty simple, right? Now let’s run it by calling again from the command line:
You may have noticed the when I ran the task. This tells Fabric to run the commands asynchronously (in parallel). As with any other application, run for a full list of command line options.
Типы аргументов в интерфейсе командной строки
Есть два аргумента, которые мы можем добавить к интерфейсу командной строки.
- Позиционный аргумент
- Необязательный аргумент
Давайте разберемся с обоими аргументами.
Позиционные аргументы – это типы аргументов, которые мы используем в команде для работы. Мы передаем аргумент команде и выполняем некоторые операции. Их положение определяется их функцией. Вот почему они называются позиционным аргументом.
По умолчанию позиционные аргументы обрабатываются как String, однако мы можем привести к другому типу данных.
В предыдущем примере мы использовали позиционные аргументы для выполнения операции сложения между двумя числами.
Давайте разберемся в следующем коде.
Пример – 1
import argparse

parser = argparse.ArgumentParser()

# By default, it treats input number as string
parser.add_argument('num', help="Enter nmber to get square of it.")
args = parser.parse_args()
print(args.num**2)
Выход:
Мы прошли 15, и он вернул 1515, потому что argparse обрабатывается как строка. Мы можем исправить это с помощью атрибута type.
Пример –
import argparse

parser = argparse.ArgumentParser()


parser.add_argument('num', help="Enter number to get square of it.", type = int)
args = parser.parse_args()
print(args.num**2)
Выход:
Теперь мы получили желаемый результат.
Необязательный аргумент – необязательный аргумент не является обязательным. Мы не получим ошибку, если она не будет передана в скрипт. Эти типы аргументов начинаются с префикса – одинарного тире или двойного тире “-“. Нам нужно вызвать .add_parse() для передачи необязательных аргументов.
Давайте разберемся в следующем примере.
# importing argparse module
import argparse
parser = argparse.ArgumentParser()

# creating two variables using the add_argument method
parser.add_argument("--num1", help = "first number")
parser.add_argument("--num2", help = "second number")
parser.add_argument("--operation", help = "operation")


args = parser.parse_args()

print(args.num1)
print(args.num2)
print(args.operation)

n1 = int(args.num1)
n2 = int(args.num2)


if args.operation == "add":
    result = n1 + n2
    print("The Result is : ",result)

elif args.operation == "sub":
    result = n1 - n2

elif args.operation == "mul":
    result = n1 * n2
elif args.operation == "div":
    result = n1 / n2
else:
    print("Unmatched Argument")

print("result is : ",result)
Когда мы запускаем приведенный выше код без передачи каких-либо аргументов, он покажет следующий результат.
Выход:
Как видно из приведенного выше кода, мы запустили скрипт без передачи каких-либо необязательных аргументов, и вместо того, чтобы возвращать ошибку, он ничего не возвращает. Типы справочного сообщения и данных для необязательных параметров такие же, как и в позиционных параметрах.
Fabric Loader internals
Deobfuscation
When launched in a non-development environment, Fabric Loader will remap the Minecraft jar and realms client jar to intermediary names. Mods are expected to be mapped to intermediary, which will be compatible with this environment. The remapped jars are cached and saved in for re-use across launches.
Class loading and transformation
Fabric Loader depends on a custom class loader to transform some classes at runtime. Classes belonging to a mod or Minecraft are loaded with a class loader that applies transformations to classes before they are loaded. Other classes, those belonging to other libraries, cannot be transformed. With Knot, these classes are delegated to the default classloader for isolation and performance.
Fabric Loader will perform side stripping on mod classes and Minecraft classes depending on the physical side that is launched. This involves completely removing classes, methods and fields annotated with annotations where the environment does not match. It also involves removing interface implementations on classes annotated with where the environment does not match. On Minecraft classes, this is used to simulate which classes and members that are available in the targeted runtime development environment. The annotation can be applied to mod classes to avoid class loading issues.
Package access hacks might be applied to Minecraft classes depending on the mappings in the current environment. With official (obfuscated) names and intermediary names, most classes are placed in the same package. However, Yarn mappings place classes in various packages which sometimes creates illegal access violations due to the access rules of protected and package-private members. Therefore, in a development environment where such access issues are expected to exist, Minecraft classes are transformed so that package-private and protected members are made public. Outside a development environment we know that the package structure is flat, so the package access hack is not needed. Note that this transformation is applied at runtime, which means it is not visible in the source.
Launchers
A launcher (not to be confused with the game launcher) is something provides a method to use Fabric Loader in a Java process. A launcher must provide a few features to support Fabric Loader’s functionality such as class transformation and dynamic class loading. Knot and LegacyLauncher/LaunchWrapper are the current supported launchers.
Knot is the default launcher included in Fabric Loader, designed specifically for Fabric Loader’s features with support for modern versions of Java. Knot has the main classes and for clients and servers respectively.
When launching a server using Knot in a production environment, the main class must be used, which is a main class that wraps the launch of KnotServer. It can be configured with the placed in the current working directory. The file has one property, , whose value is ‘server.jar’ by default, which is used to configure the path to the minecraft server jar.
Fabric Loader can also be launched with LegacyLauncher/LaunchWrapper using the tweakers and for clients and servers respectively. However, LegacyLauncher/LaunchWrapper support is currently outdated.
Failure
Our base case works fine now, but what happens if our tests fail? Chances are
we want to put on the brakes and fix them before deploying.
Fabric checks the return value of programs called via operations and will abort
if they didn’t exit cleanly. Let’s see what happens if one of our tests
encounters an error:
$ fab prepare_deploy
 run: ./manage.py test my_app
Creating test database...
Creating tables
Creating indexes
.............E............................
======================================================================
ERROR: testSomething (my_project.my_app.tests.MainTests)
----------------------------------------------------------------------
Traceback (most recent call last):


----------------------------------------------------------------------
Ran 42 tests in 9.138s

FAILED (errors=1)
Destroying test database...

Fatal error: local() encountered an error (return code 2) while executing './manage.py test my_app'

Aborting.
Great! We didn’t have to do anything ourselves: Fabric detected the failure and
aborted, never running the task.
See also
Заключение
Итак, в 4-х рассмотренных нами категориях были представлены модули, которые должен знать каждый разработчик Python. Этот язык программирования предоставляет удивительные возможности, однако необязательно использовать все из них. В зависимости от решаемых задач какие-то подойдут лучше других. Вы никогда не ошибетесь, если будете выбирать инструмент согласно своим целям.

- 5 доказательств силы итерируемых объектов в Python
- К подготовке и публикации первого пакета Python готовы!
- 4 шага к совершенству: правила для идеальных функций
Читайте нас в Telegram, VK и
Перевод статьи Samuel Martins: Most Useful Modules Every Python Developer Should Know