Known limitations, use cases, and workarounds
Following is a summary of current limitations on the Docker Desktop for Mac
networking stack, along with some ideas for workarounds.
Changing internal IP addresses
The internal IP addresses used by Docker can be changed via the Settings (Windows)
or Preferences (Mac). After changing IPs, it is necessary to reset the Kubernetes
cluster and to leave any active Swarm.
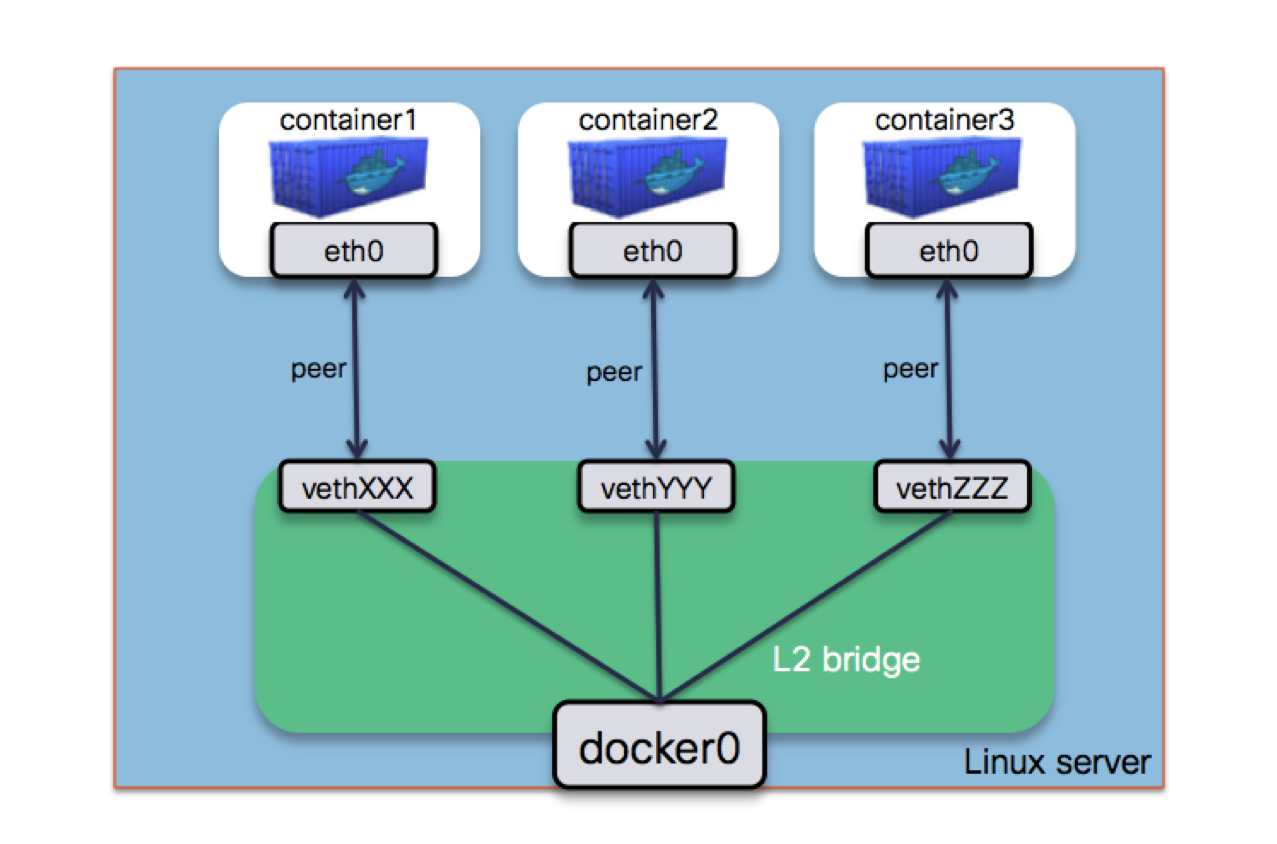
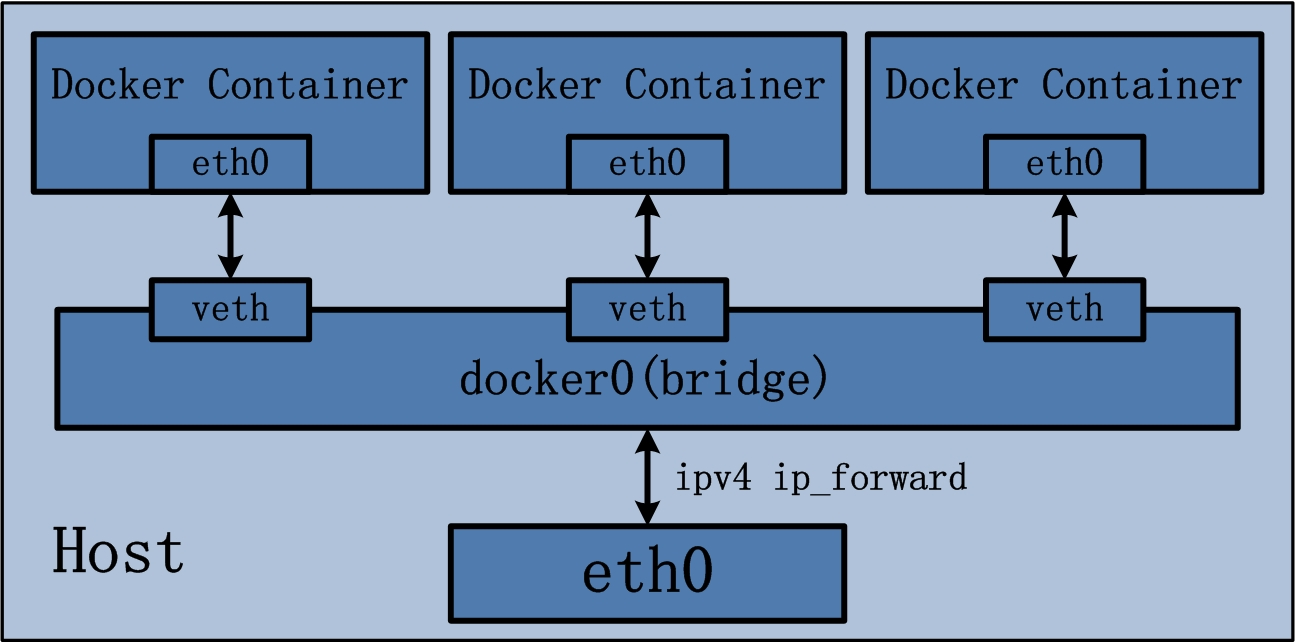
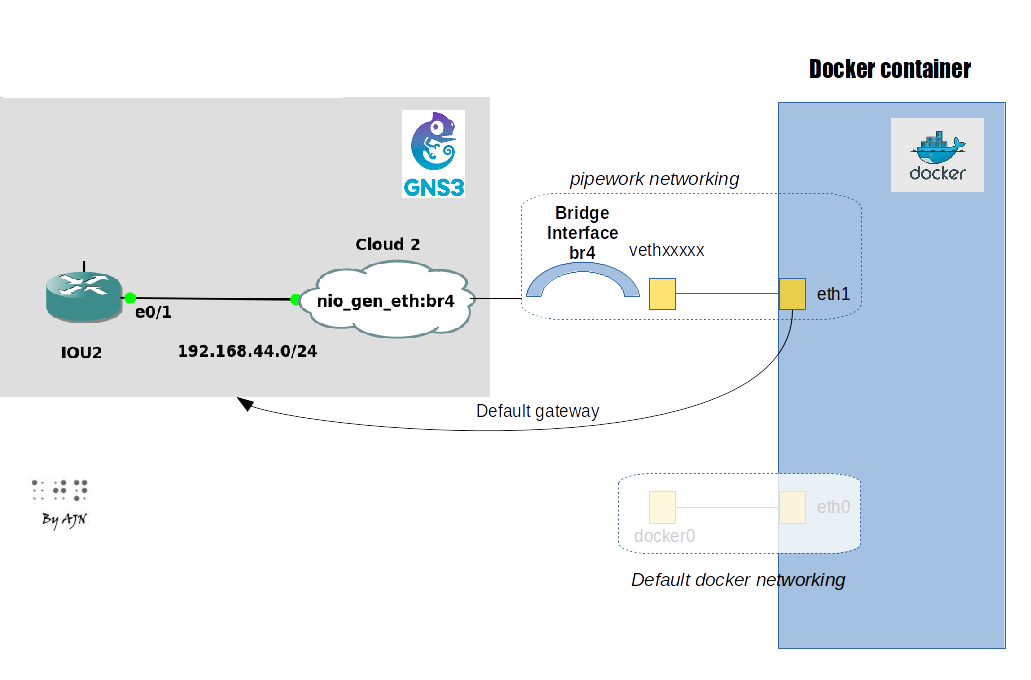
There is no docker0 bridge on macOS
Because of the way networking is implemented in Docker Desktop for Mac, you cannot see a
interface on the host. This interface is actually within the virtual
machine.
I want to connect from a container to a service on the host
The host has a changing IP address (or none if you have no network access). We recommend that you connect to the special DNS name
which resolves to the internal IP address used by the
host. This is for development purpose and will not work in a production environment outside of Docker Desktop for Mac.
You can also reach the gateway using .
If you have installed Python on your machine, use the following instructions as an example to connect from a container to a service on the host:
-
Run the following command to start a simple HTTP server on port 8000.
If you have installed Python 2.x, run .
-
Now, run a container, install , and try to connect to the host using the following commands:
I want to connect to a container from the Mac
Port forwarding works for ; , , or all work.
Ports exposed from Linux are forwarded to the host.
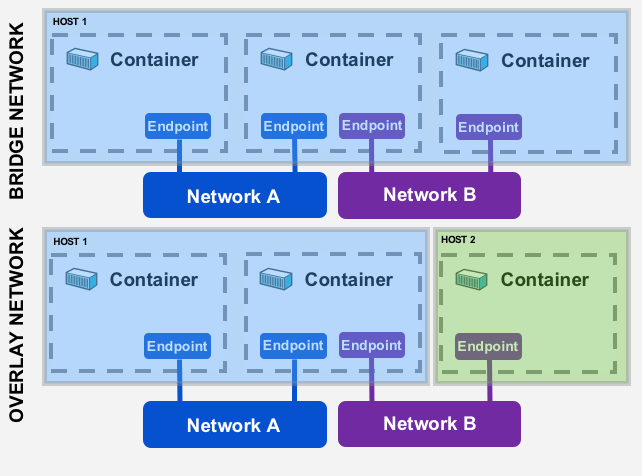
Our current recommendation is to publish a port, or to connect from another
container. This is what you need to do even on Linux if the container is on an
overlay network, not a bridge network, as these are not routed.
For example, to run an webserver:
To clarify the syntax, the following two commands both expose port on the
container to port on the host:
To expose all ports, use the flag. For example, the following command
starts a container (in detached mode) and the exposes all ports on the
container to random ports on the host.
See the run command for more details on
publish options used with .
mac, networking
Features
VPN Passthrough
Docker Desktop for Mac’s networking can work when attached to a VPN. To do this,
Docker Desktop for Mac intercepts traffic from the containers and injects it into
Mac as if it originated from the Docker application.
Port Mapping
When you run a container with the argument, for example:
Docker Desktop for Mac makes whatever is running on port 80 in the container (in
this case, ) available on port 80 of . In this example, the
host and container ports are the same. What if you need to specify a different
host port? If, for example, you already have something running on port 80 of
your host machine, you can connect the container to a different port:
Now, connections to are sent to port 80 in the container. The
syntax for is .
SSH agent forwarding
Docker Desktop for Mac allows you to use the host’s SSH agent inside a container. To do this:
-
Bind mount the SSH agent socket by adding the following parameter to your command:
-
Add the environment variable in your container:
To enable the SSH agent in Docker Compose, add the following flags to your service:
Known limitations, use cases, and workarounds
Following is a summary of current limitations on the Docker Desktop for Windows
networking stack, along with some ideas for workarounds.
There is no docker0 bridge on Windows
Because of the way networking is implemented in Docker Desktop for Windows, you cannot
see a interface on the host. This interface is actually within the
virtual machine.
I want to connect from a container to a service on the host
The host has a changing IP address (or none if you have no network access). We recommend that you connect to the special DNS name
which resolves to the internal IP address used by the
host. This is for development purpose and will not work in a production environment outside of Docker Desktop for Windows.
You can also reach the gateway using .
If you have installed Python on your machine, use the following instructions as an example to connect from a container to a service on the host:
-
Run the following command to start a simple HTTP server on port 8000.
If you have installed Python 2.x, run .
-
Now, run a container, install , and try to connect to the host using the following commands:
I want to connect to a container from Windows
Port forwarding works for ; , , or all work.
Ports exposed from Linux are forwarded to the host.
Our current recommendation is to publish a port, or to connect from another
container. This is what you need to do even on Linux if the container is on an
overlay network, not a bridge network, as these are not routed.
For example, to run an webserver:
To clarify the syntax, the following two commands both publish container’s port to host’s port :
To publish all ports, use the flag. For example, the following command
starts a container (in detached mode) and the flag publishes all exposed ports of the
container to random ports on the host.
See the run command for more details on
publish options used with .
windows, networking
Installing Compose V2
This section contains instructions on how to install Compose V2.
Install on Mac and Windows
Docker Desktop for Mac and for Windows version 3.2.1 and above includes the new Compose command along with the Docker CLI. Therefore, Windows and Mac users do not need to install Compose V2 separately.
We will progressively turn Docker Compose V2 on automatically for Docker Desktop users, so that users can seamlessly move to Docker Compose V2 without the need to change any of their scripts. If you run into any problems with Compose V2, you can simply switch back to Compose v1, either in Docker Desktop, or in the CLI.
For Docker Desktop installation instructions, see:
- Install Docker Desktop on Mac
- Install Docker Desktop on Windows
To disable Docker Compose V2 using Docker Desktop:
- From the Docker menu, click Preferences (Settings on Windows) > General.
- Clear the Use Docker Compose V2 check box.
To disable Docker Compose V2 using the CLI, run:
Install on Linux
You can install Compose V2 by downloading the appropriate binary for your system
from the project release page and copying it into as .
-
Run the following command to download the current stable release of Docker Compose:
This command installs Compose V2 for the active user under directory. To install Docker Compose for all users on your system, replace with .
-
-
Apply executable permissions to the binary:
-
Test your installation


Compose Switch
Compose Switch is a replacement to the Compose V1 (python) executable. Compose switch translates the command line into Compose V2 and then runs the latter.
To install Compose Switch automatically, run:
To install Compose Switch manually:
-
Download the binary for your architecture
-
Run the following command to make it an executable:
-
Rename the binary if you’ve already installed it as
-
Define an alternatives group for the command:
-
Verify your installation:
Области применения
Среды разработки
Запуск и взаимодействие с приложением в изолированной среде — важная часть разработки. Compose помогает создать необходимое окружение и взаимодействовать с ним через интерфейс командной строки.
Вы описываете все зависимости службы в файле — базы данных, веб-службы API, очереди, кеши. Создать и запустить один или несколько контейнеров можно одной командой — .
Такой подход помогает значительно ускорить процесс разработки. Не нужны многостраничные инструкции, вся конфигурация укладывается в один небольшой файл.
Автоматизированные среды тестирования
Для непрерывного проведения автоматизированных тестов нужна изолированная среда. Docker Compose обеспечивает удобный процесс создания и удаления систем для тестирования. Все действия можно уложить в три простые команды:
docker-compose up -d
./run_tests
docker-compose down
В этом примере вы запускаете приложение, выполняете необходимые тесты и останавливаете выполнение контейнера.
Развертывание хоста
Традиционно Compose больше используется для разработки и тестирования. Но с каждым новым релизом в нем появляется больше инструментов для деплоя.
Define the app service
To remember, this was the command we were using to define our app container.
If you are using PowerShell then use this command:
-
First, let’s define the service entry and the image for the container. We can pick any name for the service.
The name will automatically become a network alias, which will be useful when defining our MySQL service. -
Typically, you will see the close to the definition, although there is no requirement on ordering.
So, let’s go ahead and move that into our file. -
Let’s migrate the part of the command by defining the for the service. We will use the
here, but there is also a more verbose
available as well. -
Next, we’ll migrate both the working directory () and the volume mapping () by using
the and definitions. Volumes also has a and syntax.One advantage of Docker Compose volume definitions is we can use relative paths from the current directory.
-
Finally, we need to migrate the environment variable definitions using the key.
Define the MySQL service
Now, it’s time to define the MySQL service. The command that we used for that container was the following:
If you are using PowerShell then use this command:
-
We will first define the new service and name it so it automatically gets the network alias. We’ll
go ahead and specify the image to use as well. -
Next, we’ll define the volume mapping. When we ran the container with , the named volume was created
automatically. However, that doesn’t happen when running with Compose. We need to define the volume in the top-level
section and then specify the mountpoint in the service config. By simply providing only the volume name,
the default options are used. There are though. -
Finally, we only need to specify the environment variables.
At this point, our complete should look like this:
Step 2: Create a Dockerfile
In this step, you write a Dockerfile that builds a Docker image. The image
contains all the dependencies the Python application requires, including Python
itself.
In your project directory, create a file named and paste the
following:
This tells Docker to:
- Build an image starting with the Python 3.7 image.
- Set the working directory to .
- Set environment variables used by the command.
- Install gcc and other dependencies
- Copy and install the Python dependencies.
- Add metadata to the image to describe that the container is listening on port 5000
- Copy the current directory in the project to the workdir in the image.
- Set the default command for the container to .
For more information on how to write Dockerfiles, see the
Docker user guide
and the Dockerfile reference.
Upgrading
If you’re upgrading from Compose 1.2 or earlier, remove or
migrate your existing containers after upgrading Compose. This is because, as of
version 1.3, Compose uses Docker labels to keep track of containers, and your
containers need to be recreated to add the labels.
If Compose detects containers that were created without labels, it refuses
to run, so that you don’t end up with two sets of them. If you want to keep using
your existing containers (for example, because they have data volumes you want
to preserve), you can use Compose 1.5.x to migrate them with the following
command:
Alternatively, if you’re not worried about keeping them, you can remove them.
Compose just creates new ones.
Возможные проблемы
Рассмотрим некоторые проблемы, которые могут возникнуть в процессе настройки.
1. Errors during downloading metadata for repository ‘AppStream’
Ошибка возникает при попытке собрать имидж на Linux CentOS 8. Полный текст ошибки может быть такой:
Errors during downloading metadata for repository ‘AppStream’:
— Curl error (6): Couldn’t resolve host name for http://mirrorlist.centos.org/?release=8&arch=x86_64&repo=AppStream&infra=container
Error: Failed to download metadata for repo ‘AppStream’: Cannot prepare internal mirrorlist: Curl error (6): Couldn’t resolve host name for http://mirrorlist.centos.org/?release=8&arch=x86_64&repo=AppStream&infra=container
Причина: система внутри контейнера не может разрешить dns-имена в IP-адрес.
Решение: в CentOS 8 запросы DNS могут блокироваться брандмауэром, когда в качестве серверной части (backend) стоит nftables. Переключение на iptables решает проблему. Открываем файл:
vi /etc/firewalld/firewalld.conf
Находим строку:
FirewallBackend=nftables
… и меняем ее на:
FirewallBackend=iptables
Перезапускаем сервис firewalld:
systemctl restart firewalld
Step 8: Experiment with some other commands
If you want to run your services in the background, you can pass the flag
(for “detached” mode) to and use to
see what is currently running:
The command allows you to run one-off commands for your
services. For example, to see what environment variables are available to the
service:
See to see other available commands. You can also install command completion for the bash and zsh shell, which also shows you available commands.
If you started Compose with , stop
your services once you’ve finished with them:
You can bring everything down, removing the containers entirely, with the
command. Pass to also remove the data volume used by the Redis
container:
At this point, you have seen the basics of how Compose works.
Использование docker-compose
В отличие от docker, с помощью docker-compose можно разворачивать проекты, состоящие из нескольких контейнеров, одной командой.
И так, автоматизируем запуск наших контейнеров с использованием docker-compose. Необходимо, чтобы он был .
Сначала удалим контейнеры, которые создали на предыдущих этапах:
docker rm -f web_server maria_db
Переходим в каталог для наших сборок:
cd /opt/docker/
Создаем yml-файл с инструкциями сборки контейнеров через docker-compose:
vi docker-compose.yml
—
version: «3.8»
services:
web_server:
build:
context: ./web-server/
args:
buildno: 1
container_name: web_server
restart: always
environment:
TZ: «Europe/Moscow»
ports:
— 80:80
maria_db:
image: mariadb
container_name: maria_db
restart: always
environment:
TZ: «Europe/Moscow»
volumes:
— /var/lib/docker/volumes/mariadb/_data/:/var/lib/mysql
* в формате yml очень важное значение имеют отступы. Если сделать лишний пробел, то мы получим ошибку.
* где:
- version — версия файла yml. На странице docs.docker.com представлена таблица, позволяющая понять, какую версию лучше использовать, в зависимости от версии docker (docker -v).
- services — docker-compose оперирует сервисами, где для каждого создается свой блок описания. Все эти блоки входят в раздел services.
- build — опции сборки. В нашем примере для веб-сервера мы должны собрать имидж.
- context — указываем путь до Dockerfile.
- args — позволяет задать аргументы, которые доступны только в процессе сборки. В данном примере мы используем только аргумент с указанием номера сборки.
- container_name — задаем имя, которое будет задано контейнеру после его запуска.
- restart — режим перезапуска. В нашем случае всегда, таким образом, после перезагрузки сервера, наши контейнеры запустятся.
- ports — при необходимости, указываем порт, который будет наш сервер пробрасывать запрос внутрь контейнера.
- environment — задает системные переменные. В данном примере, временную зону.
- volumes — позволяет внутрь контейнера прокинуть каталог сервера. Таким образом, важные данные не будут являться частью контейнера и не будут удалены после его остановки.
Запускаем сборку наших контейнеров с помощью docker-compose:
docker-compose build
Запускаем контейнеры в режиме демона:
docker-compose up -d
Проверяем, какие контейнеры запущены:
docker ps
При внесении изменений можно перезапускать контейнеры командой:
docker-compose up —force-recreate —build -d
Просто пересоздать контейнеры:
docker-compose restart
или только для одного из сервисов:
docker-compose restart web_server
* где web_server — название сервиса в файле docker-compose.
Extending services
Docker Compose’s keyword enables the sharing of common configurations
among different files, or even different projects entirely. Extending services
is useful if you have several services that reuse a common set of configuration
options. Using you can define a common set of service options in one
place and refer to it from anywhere.
Keep in mind that and are never shared between
services using . These exceptions exist to avoid implicit
dependencies; you always define locally. This ensures
dependencies between services are clearly visible when reading the current file.
Defining these locally also ensures that changes to the referenced file don’t
break anything.
Understand the extends configuration
When defining any service in , you can declare that you are
extending another service like this:
This instructs Compose to re-use the configuration for the service
defined in the file. Suppose that
looks like this:
In this case, you get exactly the same result as if you wrote
with the same , and configuration
values defined directly under .
You can go further and define (or re-define) configuration locally in
:
You can also write other services and link your service to them:
Example use case
Extending an individual service is useful when you have multiple services that
have a common configuration. The example below is a Compose app with
two services: a web application and a queue worker. Both services use the same
codebase and share many configuration options.
In a common.yml we define the common configuration:
In a docker-compose.yml we define the concrete services which use the
common configuration:
DNS services
By default, a container inherits the DNS settings of the host, as defined in the
configuration file. Containers that use the default
network get a copy of this file, whereas containers that use a
use Docker’s embedded DNS server, which forwards external DNS lookups to the DNS
servers configured on the host.
Custom hosts defined in are not inherited. To pass additional hosts
into your container, refer to
in the reference documentation. You can override these settings on
a per-container basis.
| Flag | Description |
|---|---|
| The IP address of a DNS server. To specify multiple DNS servers, use multiple flags. If the container cannot reach any of the IP addresses you specify, Google’s public DNS server is added, so that your container can resolve internet domains. | |
| A DNS search domain to search non-fully-qualified hostnames. To specify multiple DNS search prefixes, use multiple flags. | |
| A key-value pair representing a DNS option and its value. See your operating system’s documentation for for valid options. | |
| The hostname a container uses for itself. Defaults to the container’s ID if not specified. |
Adding and overriding configuration
Compose copies configurations from the original service over to the local one.
If a configuration option is defined in both the original service and the local
service, the local value replaces or extends the original value.
For single-value options like , or , the new value
replaces the old value.
original service:
local service:
result:
For the multi-value options , , , ,
, and , Compose concatenates both sets of values:
original service:
local service:
result:
In the case of , , , and , Compose
“merges” entries together with locally-defined values taking precedence. For
and , the environment variable or label name determines
which value is used:
original service:
local service:
result
Entries for and are merged using the mount path in the
container:
original service:
local service:
result:
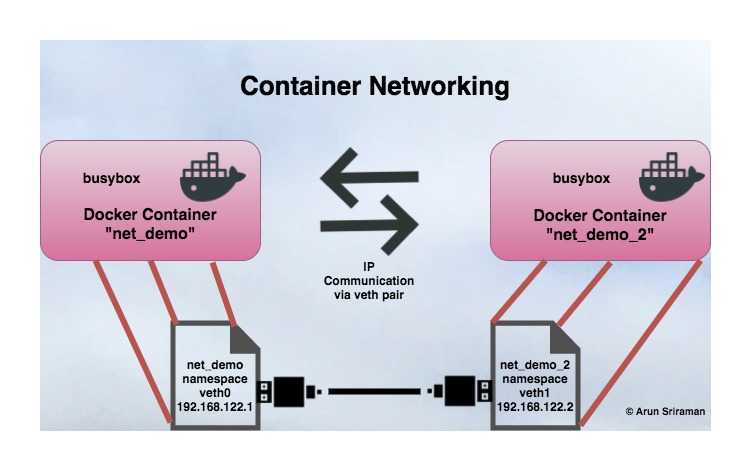
IP address and hostname
By default, the container is assigned an IP address for every Docker network it
connects to. The IP address is assigned from the pool assigned to
the network, so the Docker daemon effectively acts as a DHCP server for each
container. Each network also has a default subnet mask and gateway.

When the container starts, it can only be connected to a single network, using
. However, you can connect a running container to multiple
networks using . When you start a container using the
flag, you can specify the IP address assigned to the container on
that network using the or flags.
When you connect an existing container to a different network using
, you can use the or flags on that
command to specify the container’s IP address on the additional network.
In the same way, a container’s hostname defaults to be the container’s ID in
Docker. You can override the hostname using . When connecting to an
existing network using , you can use the
flag to specify an additional network alias for the container on that network.
Features
VPN Passthrough
Docker Desktop networking can work when attached to a VPN. To do this,
Docker Desktop intercepts traffic from the containers and injects it into
Windows as if it originated from the Docker application.
Port Mapping
When you run a container with the argument, for example:
Docker Desktop makes whatever is running on port 80 in the container (in
this case, ) available on port 80 of . In this example, the
host and container ports are the same. What if you need to specify a different
host port? If, for example, you already have something running on port 80 of
your host machine, you can connect the container to a different port:
Now, connections to are sent to port 80 in the container. The
syntax for is .
Создание сети
Конечно же можно создать свою сеть в Docker Compose. Вначале приведем для представление как можно описать сети и поясним что происходит:
version: '2.3'
#network_mode: "bridge"
services:
  nginx:
    image: nginx
    ports:
      - "80:80"
    networks:
      back:
        ipv4_address: 172.16.238.2
        ipv6_address: 2001:3984:3989::2
      default:

  wetty:
    build:
      context: ./wetty
      dockerfile: Dockerfilealt
    image: wetty:latest
    ports:
      - "3000:3000"
    networks:
      back:
        ipv4_address: 172.16.238.3
        ipv6_address: 2001:3984:3989::3

  codiad:
    build: ./docker-codiad
    image: docker-codiad:latest
    volumes:
       - ./code:/code
       - /etc/localtime:/etc/localtime:ro
    ports:
      - "5000:5000"
      - "8080:8080"
    networks:
      back:
        ipv4_address: 172.16.238.4
        ipv6_address: 2001:3984:3989::4
      default:

networks:
#Internal-only network for proper nginx proxying and ssh
  back:
    driver: bridge
    enable_ipv6: true
    internal: true
    ipam:
     driver: default
     config:
       - subnet: 172.16.238.0/24
       - subnet: 2001:3984:3989::/64
#External network actually
  default:
    driver: bridge
В файле описывается внутренняя сеть с своей подсетью (), а так же внешняя сеть, основанная на стандартной (). У некоторых контейнеров заданы статические IP-адреса.
Необходимо отметить, что в Dockerfile 2 версии в целом больше настраиваемых параметров вроде IPv6 адресации, а в Dockerfile 3 версии таких параметров нет, так как их пока не поддерживает Docker Swarm (сделано было для удобства).
Наглядная иерархия параметров в Docker Compose
Стоит учитывать, что многие параметры в представленном ниже описании конфликтуют, но они были описаны вместе для удоства и понимания иерархии параметров.
networks:
  # Имя default для реконфигурации стандартной сети для Compose
  имясети:
    # Типы драйверов: bridge, overlay
    driver: overlay
    # attachable работает только в Compose 3.2+
    attachable: true
    # параметры драйвера (см. документацию драйвера)
    driver_opts:
      foo: "bar"
      baz: 1
    # Поддержка IPv6 не доступна в Compose 3, только 2.
    enable_ipv6: true
    # Настройка IPAM конфигурации
    ipam:
      # драйвер IPAM заместо default если нужно
      driver: default
      # Конфигурация с 0 и больше блоков, содержащая ключ subnet:
      config:
        - subnet: 172.28.0.0/16
        - subnet: 192.168.10.0/24

    # Делает сеть изолированной
    internal: true

    # Использование сети, созданной вне Compose.
    # Если параметр external имеет флаг true, то это указывает Compose, что сеть была создана извне. docker-compose up ее не создаст и если не найдет, то выкинет ошибку.
    # external не может быть использован с другими ключами конфигурации (driver, driver_opts, ipam, internal)
    external: true

    # Для external можно задать имя для использования в Compose файле начиная с версии 3.5:
    external:
      name: actual-name-of-network

    # Так же с версии 3.5 можно задать имя сети даже с спецсимволами:
  network1:
    # Использование файла external так же работает в купе с заданным именем сети
    external: true
    name: my-app-net

    # Метаданные для контейнера могут быть созданы с помощью Docker labels: это массив или словарь.
    labels:
      com.example.description: "Financial transaction network"
      com.example.department: "Finance"
      com.example.label-with-empty-value: ""
Версия без комментариев:
networks:
  networkname:
    driver: overlay
    attachable: true
    driver_opts:
      foo: "bar"
      baz: 1
    enable_ipv6: true
    ipam:
      config:
        - subnet: 172.28.0.0/16
        - subnet: 192.168.10.0/24
    internal: true
    external: true

    external:
      name: actual-name-of-network

  network1:
    external: true
    name: my-app-net
    labels:
      com.example.description: "Financial transaction network"
      com.example.department: "Finance"
      com.example.label-with-empty-value: ""
Описание host и none режимов сети
и режимы отличаются в описании по сравнению с и . Для них и не требуются какие-либо еще параметры.
# Host
services:
  web:
    ...
    networks:
      hostnet: {}

networks:
  hostnet:
    external:
      name: host
# None
services:
  web:
    ...
    networks:
      nonet: {}

networks:
  nonet:
    external:
      name: none


