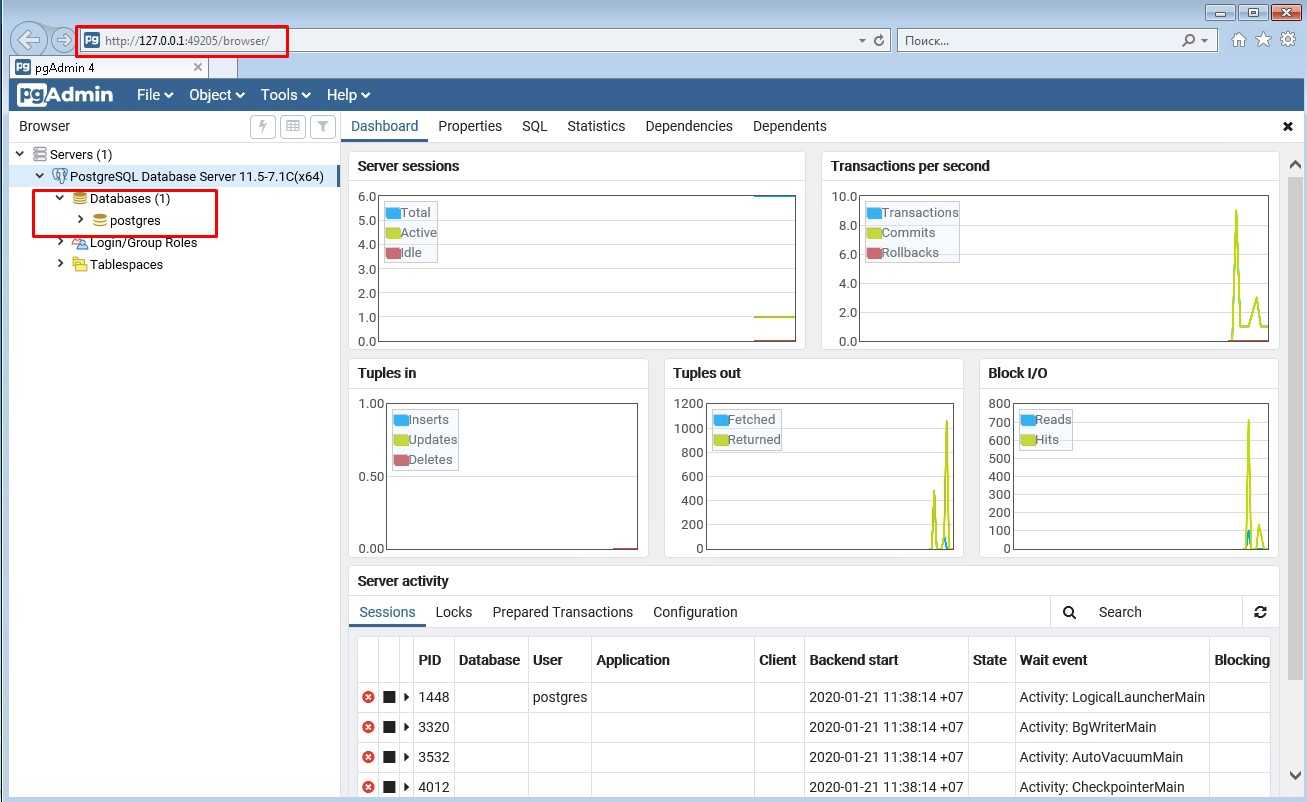
Redis rdbSave() and rdbSaveBackground() functions
Exactly the dump itself is created by the only one Redis’ function — :
.../* Save the DB on disk. Return C_ERR on error, C_OK on success. */int rdbSave(char *filename, rdbSaveInfo *rsi) { ... snprintf(tmpfile,256,"temp-%d.rdb", (int) getpid()); fp = fopen(tmpfile,"w");...
Which is called when you are executing the command.
And here is our temp-1652.rdb file name from the output above:
...snprintf(tmpfile,256,"temp-%d.rdb", (int) getpid());...
Where 1652 — is the Redis server’s main process PID.
For its part, during the command another function is called — :
...int rdbSaveBackground(char *filename, rdbSaveInfo *rsi) { ... start = ustime(); if ((childpid = fork()) == 0) { int retval; /* Child */ closeListeningSockets(0); redisSetProcTitle("redis-rdb-bgsave"); retval = rdbSave(filename,rsi);...
Which in its turn creates a new child process:
...if ((childpid = fork()) == 0)...
And this process in its turn will execute the :
...retval = rdbSave(filename,rsi);...
The story
Actually, the whole story with the started for me about a year ago.
I wasn’t too much familiar with the Redis at this time and I just came to the new project where Redis already was used.
In one perfect day — our Production server (and by the time when I just came to this project — the whole backend was working on the only one AWS EC2) tired a bit and went down for some rest.
After a magic dropkick via AWS Console — the server went back online and I started looking for the root cause.
In its logs, I found records about OOM Killer that cam to the Redis or RabbitMQ — not sure now exactly. But anyway during the investigation I found the was set to the 1, i.e. disabled at all.
So anyway — this story at first gave me a reason to create a more reliable and fault-tolerant architecture for our backend’s infrastructure, and as the second thing — teach me not to blindly trust to any documentation.
Поиск проблемы
Вначале мы решили разобраться, из-за чего падал кластер. Redis занимал максимум 80 Гб RAM, но на сервере доступно 126 Гб. В чем тогда проблема?
Пока проблема с большим потреблением ОЗУ не была решена — мы просто выключили сохранение RDB-снепшотов.
Далее мы выдвинули первую гипотезу увеличения потребления ОЗУ: в Redis попадает много больших по размеру записей. Решили проанализировать данные, которые хранили в Redis, найти самые тяжеловесные ключи, сгруппировать и определить виновника.
Результат получился неутешительный.Больше всего памяти занимали кеши результатов поиска, причем они занимали столько места на 1 элемент, сколько мы и ожидали. Наша первая гипотеза провалилась.
Redis save, SAVE и BGSAVE
A bit confusing may be Redis itself: in its configuration file the option is responsible for the operation.
However, Redis also has the command but it works differently:
- is in-sync command and performs write blocks on the memory during creating a copy
- in its turn is an asynchronous mechanism — it works in a parallel to a main server’s process and doesn’t affect its operations and client connected, thus it is the preferable way to create a backup
But in a case when can not be used, for example, because of the «» error — one can use the command.
To check it let’s use the tool.
Create a test config file :
save 1 1port 7777
Run and using this config:
root@bttrm-dev-console:/home/admin# strace -o redis-trace.log redis-server redis-testing.conf
will write its output to the redis-trace.log file which we will check to find system calls used by the redis-server during the and operations:
root@bttrm-dev-console:/home/admin# tail -f redis-trace.log | grep -v ‘gettimeofday\|close\|open\|epoll_wait\|getpid\|read\|write’
Here with the we removed a «garbage» calls which we don’t need now.
We could use to grab only necessary calls — but we don’t know yet what exactly we are looking for.
In the Redis configuration file, we set and , e.g. to create a database copy to the disk each second if at least one key was changed.
Add a new key:
admin@bttrm-dev-console:~$ redis-cli -p 7777 set test test
OK
And check the log:
root@bttrm-dev-console:/home/admin# tail -f redis-trace.log | grep -v ‘gettimeofday\|close\|open\|epoll_wait\|getpid\|read\|write’accept(5, {sa_family=AF_INET, sin_port=htons(60816), sin_addr=inet_addr(“127.0.0.1”)}, ) = 6…stat(“/etc/localtime”, {st_mode=S_IFREG|0644, st_size=2097, …}) = 0clone(child_stack=NULL, flags=CLONE_CHILD_CLEARTID|CLONE_CHILD_SETTID|SIGCHLD, child_tidptr=0x7ff26beda190) = 1790stat(“/etc/localtime”, {st_mode=S_IFREG|0644, st_size=2097, …}) = 0 — — SIGCHLD {si_signo=SIGCHLD, si_code=CLD_EXITED, si_pid=1790, si_uid=0, si_status=0, si_utime=0, si_stime=0} — -wait4(-1, , WNOHANG, NULL) = 1790stat(“/etc/localtime”, {st_mode=S_IFREG|0644, st_size=2097, …}) = 0
Here is the call (why instead of the — we will speak a bit later, in the ). This creates a new child process which in its turn will create the data copy.
Now — run the command:
admin@bttrm-dev-console:~$ redis-cli -p 7777 saveOK
And check the log:
accept(5, {sa_family=AF_INET, sin_port=htons(32870), sin_addr=inet_addr(“127.0.0.1”)}, ) = 6…rename(“temp-1652.rdb”, “dump.rdb”) = 0stat(“/etc/localtime”, {st_mode=S_IFREG|0644, st_size=2097, …}) = 0epoll_ctl(3, EPOLL_CTL_DEL, 6, 0x7ffe6712430c) = 0
No at this time — the dump was performed by the main Redis’ process and saved to the file — check the rename(«temp-1652.rdb», «dump.rdb») line in the ‘s output (we will see shortly from there this name appeared — temp-1652.rdb).
Now call the :
admin@bttrm-dev-console:~$ redis-cli -p 7777 bgsaveBackground saving started
And check the log again:
accept(5, {sa_family=AF_INET, sin_port=htons(33030), sin_addr=inet_addr(“127.0.0.1”)}, ) = 6…clone(child_stack=NULL, flags=CLONE_CHILD_CLEARTID|CLONE_CHILD_SETTID|SIGCHLD, child_tidptr=0x7ff26beda190) = 1879stat(“/etc/localtime”, {st_mode=S_IFREG|0644, st_size=2097, …}) = 0epoll_ctl(3, EPOLL_CTL_DEL, 6, 0x7ffe6712430c) = 0 — — SIGCHLD {si_signo=SIGCHLD, si_code=CLD_EXITED, si_pid=1879, si_uid=0, si_status=0, si_utime=0, si_stime=0} — -wait4(-1, , WNOHANG, NULL) = 1879stat(“/etc/localtime”, {st_mode=S_IFREG|0644, st_size=2097, …}) = 0
And again our is here which spawned another child process with PID 1879:
…clone() = 187…
Как дать пользователю возможности cap_sys_admin
cap_sys_admin для su-пользователей CentOS 6/7
# vi /etc/security/capability.conf
cap_sys_admin testuser
Далее подключаем PAM-модуль (Pluggable Authentication Modules)
ВНИМАНИЕ! Строка подключения должна быть перед строкой подключения !
# vi /etc/pam.d/su
#%PAM-1.0
auth optional pam_cap.so
auth sufficient pam_rootok.so
...
...
Авторизируемся с помощью su, проверяем capabilities для текущего пользователя:
$ su - testuser

$ capsh --print
Current: = cap_sys_admin+i
Bounding set =cap_chown,cap_dac_override,cap_dac_read_search,cap_fowner,cap_fsetid,cap_kill,cap_setgid,cap_setuid,cap_setpcap,cap_linux_immutable,cap_net_bind_service,cap_net_broadcast,cap_net_admin,cap_net_raw,cap_ipc_lock,cap_ipc_owner,cap_sys_module,cap_sys_rawio,cap_sys_chroot,cap_sys_ptrace,cap_sys_pacct,cap_sys_admin,cap_sys_boot,cap_sys_nice,cap_sys_resource,cap_sys_time,cap_sys_tty_config,cap_mknod,cap_lease,cap_audit_write,cap_audit_control,cap_setfcap,cap_mac_override,cap_mac_admin,cap_syslog,35,36
Securebits: 000x01b0
 secure-noroot: no (unlocked)
 secure-no-suid-fixup: no (unlocked)
 secure-keep-caps: no (unlocked)
uid=1001(testuser)
gid=1001(testuser)
groups=1001(testuser)
Команды для управления памятью в Linux
Давайте рассмотрим некоторые команды для управления памятью в Linux.
Файл /proc/meminfo
Файл /proc/meminfo содержит всю информацию, связанную с памятью. Для просмотра данного файла используйте команду cat:
Эта команда выводит множество параметров, связанных с памятью. Чтобы получить информацию о физической памяти из файла /proc/meminfo, используйте:
Чтобы получить информацию о виртуальной памяти из файла /proc/meminfo, используйте:
Команда top
Команда top позволяет отслеживать процессы и использование системных ресурсов в Linux в режиме реального времени. Когда вы запустите команду, то заметите, что значения в выходных данных продолжают изменяться с некоторым небольшим интервалом:
В верхней части отображается текущая статистика использования системных ресурсов. Нижняя часть содержит информацию о запущенных процессах. Вы можете перемещаться вверх и вниз по списку с помощью клавиш со стрелочками вверх/вниз и использовать для выхода.
Команда free
Команда free отображает объем свободной и используемой памяти в системе.
Значения для каждого поля указаны в кибибайтах (КиБ).
Чтобы получить вывод в более удобочитаемом формате, используйте:
Команда vmstat
Команда vmstat — это инструмент мониторинга производительности в Linux, который предоставляет полезную информацию о процессах, памяти, операциях ввода-вывода, подкачке, диске и планировании процессора, а также приводит статистику виртуальной памяти вашей системы.
Why overcommitting is bad?
As this post originally was in Russian and has this part translated — I’ll just copy-past a part of the original text here. Read the full story — What is Overcommit? And why is it bad?
Overcommit refers to the practice of giving out virtual memory with no guarantee that physical storage for it exists. To make an analogy, it’s like using a credit card and not keeping track of your purchases. A system performing overcommit just keeps giving out virtual memory until the debt collector comes calling — that is, until some program touches a previously-untouched page, and the kernel fails to find any physical memory to instantiate it — and then stuff starts crashing down.
What happens when “stuff starts crashing down”? It can vary, but the Linux approach was to design an elaborate heuristic “OOM killer” in the kernel that judges the behavior of each process and decides who’s “guilty” of making the machine run out of memory, then kills the guilty parties. In practice this works fairly well from a standpoint of avoiding killing critical system processes and killing the process that’s “hogging” memory, but the problem is that no process is really “guilty” of using more memory than was available, because everyone was (incorrectly) told that the memory was available.
Suppose you don’t want this kind of uncertainty/danger when it comes to memory allocation? The naive solution would be to immediately and statically allocate physical memory corresponding to all virtual memory. To extend the credit card analogy, this would be like using cash for all your purchases, or like using a debit card. You get the safety from overspending, but you also lose a lot of fluidity. Thankfully, there’s a better way to manage memory.
The approach taken in reality when you want to avoid committing too much memory is to account for all the memory that’s allocated. In our credit card analogy, this corresponds to using a credit card, but keeping track of all the purchases on it, and never purchasing more than you have funds to pay off. This turns out to be the Right Thing when it comes to managing virtual memory, and in fact it’s what Linux does when you set the vm.overcommit_memory sysctl parameter to the value 2. In this mode, all virtual memory that could potentially be modified (i.e. has read-write permissions) or lacks backing (i.e. an original copy on disk or other device that it could be restored from if it needs to be discarded) is accounted for as “commit charge”, the amount of memory the kernel as committed/promised to applications. When a new virtual memory allocation would cause the commit charge to exceed a configurable limit (by default, the size of swap plus half the size of physical ram), the allocation fails.
Предыстория
На тот момент в Redis кешировались в основном такие данные:
- Пользовательские результаты поиска. Каждая запись занимает много памяти, с недолгим временем жизни (20 минут).
- Части HTML. Каждая запись занимает много памяти, короткое время жизни (до 10 минут).
- Тестовые группы пользователя. Мы используем A/B тесты (UI, тесты релевантности и т.д.) и в Redis храним розданные группы для пользователя. Записей очень много, и храним мы их долго (до 14 дней). Каждая запись имеет очень маленький размер.
В какой-то момент мы заметили, что наш кластер становится нестабильным. Redis часто падал по «out of memory».
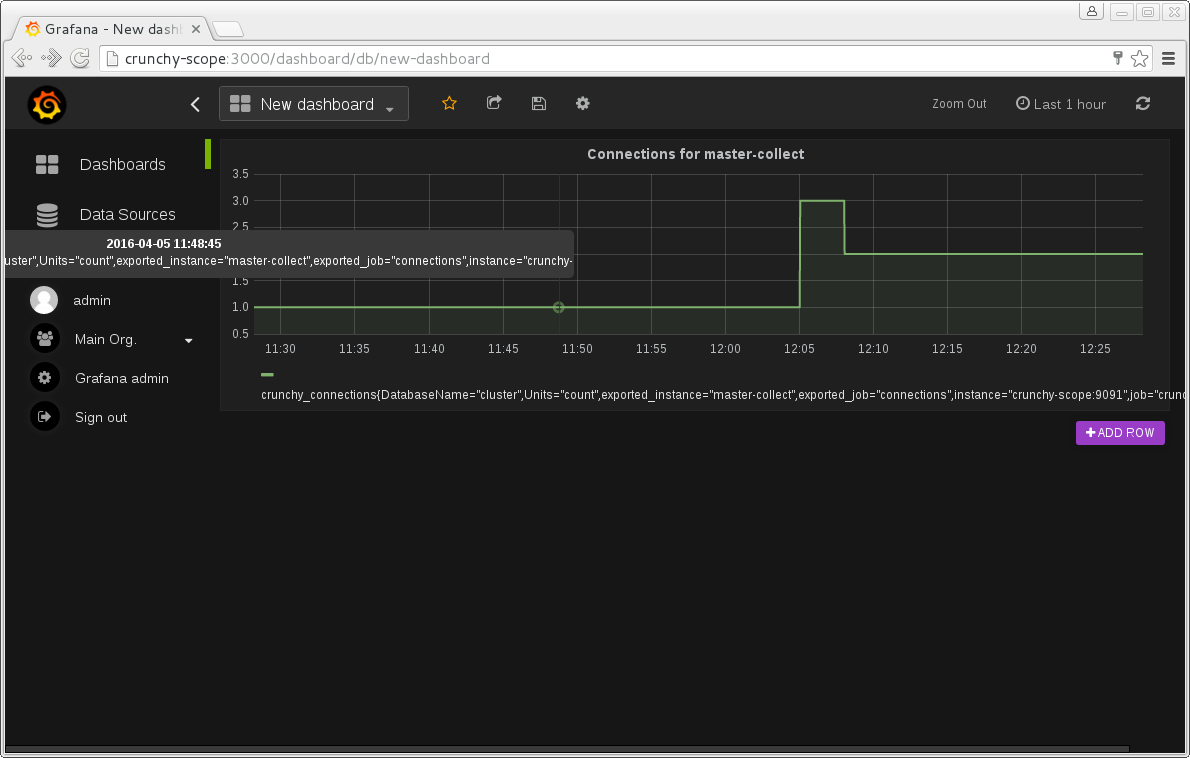
Мы рассчитали, что на каждом из серверов должно быть занято около 20 Гб RAM. Вот только показывала совсем другое. В пиковые моменты Redis занимал 80 Гб оперативной памяти:
used_memory:59681435584
used_memory_human:55.58G
used_memory_rss:65407717376
used_memory_rss_human:60.92G
used_memory_peak:85893162568
used_memory_peak_human:79.99G
total_system_memory:134991085568
total_system_memory_human:125.72G
used_memory_lua:71680
used_memory_lua_human:70.00K
maxmemory:0
maxmemory_human:0B
maxmemory_policy:allkeys-lru
mem_fragmentation_ratio:1.10
mem_allocator:jemalloc-3.6.0
VSZ and RSS Linux memory
Что такое VSZ и RSS? Ответ нам даст :VSZ — virtual memory size; RSS — resident set size, the non-swapped physical memory that a task has used (in kiloBytes).
$ man ps|grep -A 3 VSZ
...
STANDARD FORMAT SPECIFIERS
...
vsz VSZ virtual memory size of the process in KiB
 (1024-byte units). Device mappings are currently
 excluded; this is subject to change. (alias
 vsize).

$ man ps|grep -A 3 RSS
The SIZE and RSS fields dont count some parts of a process including
the page tables, kernel stack, struct thread_info, and struct
task_struct. This is usually at least 20 KiB of memory that is always
resident. SIZE is the virtual size of the process (code+data+stack).
--
rss RSS resident set size, the non-swapped physical
 memory that a task has used (in kiloBytes).
 (alias rssize, rsz).
Короче:
- VSZ — виртуально выделенная память, но не означает, что вся она используется. Кто в теме, тот в курсе, что Linux на запрос приложения перевыделяет (overcommitting) памяти больше, чем есть в наличии — прямо как американцы печатают баксов больше, чем фактически обеспечено золотовалютным резервом;
- RSS — фактически занимаемый в данный момент размер оперативки без учёта страниц перемещённых в swap.
Как исправить ошибку «Out of memory»
Для решения указанной проблемы рекомендую сделать следующее:
- Перезагрузите ваш ПК, и запустите требуемую программу вновь. Возможно, что проблема имеет случайный характер, и более повторяться не будет;
- Перед запуском нужной программы закройте другие ненужные программы (браузер, музыкальный или видео плеер, текстовый или графический редактор, мессенджер и так далее);
- Если проблема возникает во время серфинга в сети, закройте всё множество вкладок вашего браузера (при наличии), оставив лишь одну или две.
Альтернативным вариантом решения проблемы является установка соответствующего фикса от Майкрософт. Или использование расширений или дополнений для браузера уровня «The Great Suspender» для «Google Chrome», хорошо работающего с ненужными вкладками браузера.
- Добавьте оперативной памяти на ваш ПК. Если у вас на компьютере установлено 1-2 гигабайта памяти, будет оптимальным довести её объём до 4 гигабайт (а для 64-битных Виндовс 7, 8 и 10 версии рекомендую 8 и более гигабайт);
- Убедитесь, что на вашем жёстком диске (или SSD) достаточно свободного места. При необходимости, освободите диск от ненужных файлов;
- Используйте инструмент командной строки BCDEdit для изменения параметров загрузки системы. Если у вас на ПК установлена Виндовс 7 и более, запустите командную строку от имени администратора на Виндовс 7 и Виндовс 10, и в ней наберите:
bcdedit/set IncreaseUserVa 3072
И нажмите на ввод, и перезагрузите ваш ПК. Функционал данной команды позволяет выделить пользовательским приложениям 3 гигабайта оперативной памяти для работы. В некоторых системах этого может быть слишком много, потому если после ввода данной команды система начала чаще сбоить, то введите в командной строке от имени администратора:
bcdedit /set IncreaseUserVa 2560 —что позволит задействовать 2,5 гигабайта вместо ранее забронированных 3.
Если ситуацию этим исправить не удалось, верните настройки на состояние по умолчанию:
bcdedit /deletevalue IncreaseUserVa
-
Увеличьте объём файла подкачки. Нажмите кнопку «Пуск», в строке поиска введите sysdm.cpl и нажмите ввод. В открывшемся окне настроек системы выберите «Дополнительно» — «Быстродействие» — «Параметры» — «Дополнительно» — «Виртуальная память» — «Изменить». Снимите галочку с опции автоматического размера, поставьте галочку на «Указать размер», и поставьте исходный размер в 8192, и максимальный в 8192. Затем выберите «Задать»;
- Если ошибка возникает при использовании игровой программы, перейдите в её графические настройки, и выберите их минимальные значения;
- Произведите правильную настройку «Java». Для решения проблем с игровой программой «Майнкрафт» перейдите в Панель управления Виндовс, найдите там «Java» и запустите данную среду исполнения. Нажмите на кнопку «View», затем дважды кликните на «Runtime Parametres». Введите туда –Xms256m – Xmx3072m (или больше). Xms – это минимальное выделение ОЗУ, Xmx – максимальное. Значение Xmx рекомендуют устанавливать на процентов 70-80% от общего объёма ОЗУ. Примените изменения, и перезагрузите ваш ПК.
fork() vs fork() vs clone()
Now, let’s go back to the question — why in the ‘s output we are seeing the syscall instead of the which is called by the function?
Well, that’s just because of the != :
- there is the Linux-kernel syscall
- and there is also a ‘s function which is a wrapper around the syscall
Try to check them by using the tool:
[setevoy@setevoy-arch-work ~/Temp/redis] $ apropos forkfork (2) — create a child processfork (3am) — basic process managementfork (3p) — create a new process
So, the — is a system call, whereas the — is the ‘s function — .
Now, Read the Following Manual ![]() — open the :
— open the :
[setevoy@setevoy-arch-work ~/Temp/redis] $ man 2 fork | grep -A 5 NOTESNOTESUnder Linux, fork() is implemented using copy-on-write pages, so the only penalty that it incurs is the time and memory required to duplicate the parent’s page tables, and to create a unique task structure for the child.C library/kernel differencesSince version 2.3.3, rather than invoking the kernel’s fork() system call, the glibc fork() wrapper that is provided as part of the NPTL threading implementation invokes clone(2) with flags that provide the same effect as the traditional system call. (A call to fork() is equivalent to a call to clone(2) specifying flags as just SIGCHLD.) The glibc wrapper invokes any fork handlers that have been established using pthread_atfork(3).
Consequently, when the executes the — it uses not the but the from the , which in its turn is aliased to the :
...weak_alias (__libc_fork, __fork)libc_hidden_def (__fork)weak_alias (__libc_fork, fork)
And inside of the — the «magic» itself is happening by calling the macros:
...pid = arch_fork (&THREAD_SELF->tid);...
Find it in the ‘s source code just by -ing it:
[setevoy@setevoy-arch-work ~/Temp/glibc] $ grep -r arch_fork ../ChangeLog: (arch_fork): Issue INLINE_CLONE_SYSCALL if defined../ChangeLog: * sysdeps/nptl/fork.c (ARCH_FORK): Replace by arch_fork../ChangeLog: * sysdeps/unix/sysv/linux/arch-fork.h (arch_fork): New function../sysdeps/unix/sysv/linux/arch-fork.h:/* arch_fork definition for Linux fork implementation../sysdeps/unix/sysv/linux/arch-fork.h:arch_fork (void *ctid)./sysdeps/nptl/fork.c: pid = arch_fork (&THREAD_SELF->tid);
The is described in the file which in its turn will call the :
...ret = INLINE_SYSCALL_CALL (clone, flags, 0, NULL, 0, ctid);...
Which we will see in the ‘s log.
To check if it is so and we are really using the and not the system call — let’s write some small C-program by using the official GNU’s documentation:
#include <unistd.h>#include <sys/wait.h>#include <stdio.h>int main () { pid_t pid; pid = fork (); if (pid == 0) { printf("Child created\n"); sleep(100); }}
Here in the we are calling the in the same way, as it did by the function.
Then let’s use to track a libraries functions (unlike the which is used to trace system calls):
$ ltrace -C -f ./test_fork_lib fork( <unfinished …> <… fork resumed> ) = 0 <… fork resumed> ) = 5531 puts(“Child created” <no return …> +++ exited (status 0) +++Child created <… puts resumed> ) = 14 sleep(100) = 0
And by using the tool — find all the files opened by our process:
[setevoy@setevoy-arch-work ~/Temp/glibc] $ lsof -p 5531COMMAND PID USER FD TYPE DEVICE SIZE/OFF NODE NAMEtest_fork 5531 setevoy cwd DIR 254,3 4096 4854992 /home/setevoy/Temp/glibctest_fork 5531 setevoy rtd DIR 254,2 4096 2 /test_fork 5531 setevoy txt REG 254,3 16648 4855715 /home/setevoy/Temp/glibc/test_fork_libtest_fork 5531 setevoy mem REG 254,2 2133648 396251 /usr/lib/libc-2.29.so…
Or by using the — check which libraries will be used to make out code working:
[setevoy@setevoy-arch-work ~/Temp/glibc] $ ldd test_fork_lib…libc.so.6 => /usr/lib/libc.so.6 (0x00007f26ba77f000)
is taken from the package:
[setevoy@setevoy-arch-work ~/Temp/glibc] $ pacman -Ql glibc | grep libc-2.29.soglibc /usr/lib/libc-2.29.so
Another way to check functions in a library’s file — by using the tool:
[setevoy@setevoy-arch-work ~/Temp/linux] $ objdump -T /usr/lib/libc.so.6 | grep fork00000000000c93c0 g DF .text 00000000000001fe GLIBC_PRIVATE __libc_fork
— here is our function in the section (see more in the Linux: C — адресное пространство процесса and C: создание и применение shared library в Linux, both Rus).
The story
Actually, the whole story with the started for me about a year ago.
I wasn’t too much familiar with the Redis at this time and I just came to the new project where Redis already was used.
In one perfect day — our Production server (and by the time when I just came to this project — the whole backend was working on the only one AWS EC2) tired a bit and went down for some rest.
After a magic dropkick via AWS Console — the server went back online and I started looking for the root cause.
In its logs, I found records about OOM Killer that cam to the Redis or RabbitMQ — not sure now exactly. But anyway during the investigation I found the was set to the 1, i.e. disabled at all.
So anyway — this story at first gave me a reason to create a more reliable and fault-tolerant architecture for our backend’s infrastructure, and as the second thing — teach me not to blindly trust to any documentation.
The famous “heuristic algorithm” (Heuristic Overcommit handling)
In the most documentations/guides/howtos etc this algorithm is only mentioned, but it was not so easy to find its detailed description to understand how it is working.
As usually — “Just read the source!”
The overcommit check is performed by the supplementary function from the memory management module and is described in the kernel’s file.
This function accepts a number of pages requested by a process to be allocated and then this function will::
- if overcommit_memory == 1 (): return 0 and allow overcommit
- if overcommit_memory == 0 ( and to the OVERCOMMIT_GUESS, and OVERCOMMIT_GUESS is set to the 0 in the file):
- count all free pages now and save them to the variable:
- increase the to the number of the file-backed (see , Memory-mapped file) memory pages, i.e. pages which can be freed by swapping to the disk:
- decrease the by the shared memory (see the , Shared memory) pages number
- increase the by adding swap-pages
- increase by the SReclaimable (see the SReclaimable) number
- increase by the KReclaimable (see the KReclaimable) number
- decrease by the minimal reserved pages (see the and An enhancement of OVERCOMMIT_GUESS)
- decrease by the memory which is reserved for the root user (см. )
- and the last step is to check currently available memory — and the requested by a process — if the variable with all our calculations above will contain enough pages — it will return the 0 value:
See the How Linux handles virtual memory overcommit, overcommit-accounting, Checking Available Memory.
fork() vs fork() vs clone()
Now, let’s go back to the question — why in the ‘s output we are seeing the syscall instead of the which is called by the function?
Well, that’s just because of the != :
- there is the Linux-kernel syscall
- and there is also a ‘s function which is a wrapper around the syscall
Try to check them by using the tool:
[setevoy@setevoy-arch-work ~/Temp/redis] $ apropos forkfork (2) — create a child processfork (3am) — basic process managementfork (3p) — create a new process
So, the — is a system call, whereas the — is the ‘s function — .
Now, Read the Following Manual ![]() — open the :
— open the :
[setevoy@setevoy-arch-work ~/Temp/redis] $ man 2 fork | grep -A 5 NOTESNOTESUnder Linux, fork() is implemented using copy-on-write pages, so the only penalty that it incurs is the time and memory required to duplicate the parent’s page tables, and to create a unique task structure for the child.C library/kernel differencesSince version 2.3.3, rather than invoking the kernel’s fork() system call, the glibc fork() wrapper that is provided as part of the NPTL threading implementation invokes clone(2) with flags that provide the same effect as the traditional system call. (A call to fork() is equivalent to a call to clone(2) specifying flags as just SIGCHLD.) The glibc wrapper invokes any fork handlers that have been established using pthread_atfork(3).
Consequently, when the executes the — it uses not the but the from the , which in its turn is aliased to the :
...weak_alias (__libc_fork, __fork)libc_hidden_def (__fork)weak_alias (__libc_fork, fork)
And inside of the — the «magic» itself is happening by calling the macros:
...pid = arch_fork (&THREAD_SELF->tid);...
Find it in the ‘s source code just by -ing it:
[setevoy@setevoy-arch-work ~/Temp/glibc] $ grep -r arch_fork ../ChangeLog: (arch_fork): Issue INLINE_CLONE_SYSCALL if defined../ChangeLog: * sysdeps/nptl/fork.c (ARCH_FORK): Replace by arch_fork../ChangeLog: * sysdeps/unix/sysv/linux/arch-fork.h (arch_fork): New function../sysdeps/unix/sysv/linux/arch-fork.h:/* arch_fork definition for Linux fork implementation../sysdeps/unix/sysv/linux/arch-fork.h:arch_fork (void *ctid)./sysdeps/nptl/fork.c: pid = arch_fork (&THREAD_SELF->tid);
The is described in the file which in its turn will call the :
...ret = INLINE_SYSCALL_CALL (clone, flags, 0, NULL, 0, ctid);...
Which we will see in the ‘s log.
To check if it is so and we are really using the and not the system call — let’s write some small C-program by using the official GNU’s documentation:
#include <unistd.h>#include <sys/wait.h>#include <stdio.h>int main () { pid_t pid; pid = fork (); if (pid == 0) { printf("Child created\n"); sleep(100); }}
Here in the we are calling the in the same way, as it did by the function.
Then let’s use to track a libraries functions (unlike the which is used to trace system calls):
$ ltrace -C -f ./test_fork_lib fork( <unfinished …> <… fork resumed> ) = 0 <… fork resumed> ) = 5531 puts(“Child created” <no return …> +++ exited (status 0) +++Child created <… puts resumed> ) = 14 sleep(100) = 0
And by using the tool — find all the files opened by our process:
[setevoy@setevoy-arch-work ~/Temp/glibc] $ lsof -p 5531COMMAND PID USER FD TYPE DEVICE SIZE/OFF NODE NAMEtest_fork 5531 setevoy cwd DIR 254,3 4096 4854992 /home/setevoy/Temp/glibctest_fork 5531 setevoy rtd DIR 254,2 4096 2 /test_fork 5531 setevoy txt REG 254,3 16648 4855715 /home/setevoy/Temp/glibc/test_fork_libtest_fork 5531 setevoy mem REG 254,2 2133648 396251 /usr/lib/libc-2.29.so…
Or by using the — check which libraries will be used to make out code working:
[setevoy@setevoy-arch-work ~/Temp/glibc] $ ldd test_fork_lib…libc.so.6 => /usr/lib/libc.so.6 (0x00007f26ba77f000)
is taken from the package:
[setevoy@setevoy-arch-work ~/Temp/glibc] $ pacman -Ql glibc | grep libc-2.29.soglibc /usr/lib/libc-2.29.so
Another way to check functions in a library’s file — by using the tool:
[setevoy@setevoy-arch-work ~/Temp/linux] $ objdump -T /usr/lib/libc.so.6 | grep fork00000000000c93c0 g DF .text 00000000000001fe GLIBC_PRIVATE __libc_fork
— here is our function in the section (see more in the Linux: C — адресное пространство процесса and C: создание и применение shared library в Linux, both Rus).
Redis — fork: Cannot allocate memory — the cause
Again, as the text below originally was translated for the Russian post — I’ll just copy-paste the documentation here. Read the full documentation — .
Redis background saving schema relies on the copy-on-write semantic of fork in modern operating systems: Redis forks (creates a child process) that is an exact copy of the parent. The child process dumps the DB on disk and finally exits. In theory the child should use as much memory as the parent being a copy, but actually thanks to the copy-on-write semantic implemented by most modern operating systems the parent and child process will share the common memory pages. A page will be duplicated only when it changes in the child or in the parent. Since in theory all the pages may change while the child process is saving, Linux can’t tell in advance how much memory the child will take, so if the overcommit_memory setting is set to zero fork will fail unless there is as much free RAM as required to really duplicate all the parent memory pages, with the result that if you have a Redis dataset of 3 GB and just 2 GB of free memory it will fail.
Setting overcommit_memory to 1 tells Linux to relax and perform the fork in a more optimistic allocation fashion, and this is indeed what you want for Redis.


![Zabbix настройка мониторинга сети и оборудования [айти бубен]](http://myeditor.ru/wp-content/uploads/0/1/a/01abd1c0864588b4143aaf34a41355e1.png)

