Download Putty For Mac Os X
It provides support for every advanced terminal feature like the images, true-color, mouse protocol, and more. It also supports tiling of different terminal windows parallelly in multiple patterns and does not require using the tmux. Best of all, it can be managed from the shell prompt or the scripts. The program can be extended using Kittens structure that helps build small terminal programs.
In addition, it provides support for startup sessions that enable you to fix a design, active directories, and apps to launch at the startup. Besides, it also lets you launch the scrollback option in an individual window that uses random apps.
Price: free and open source
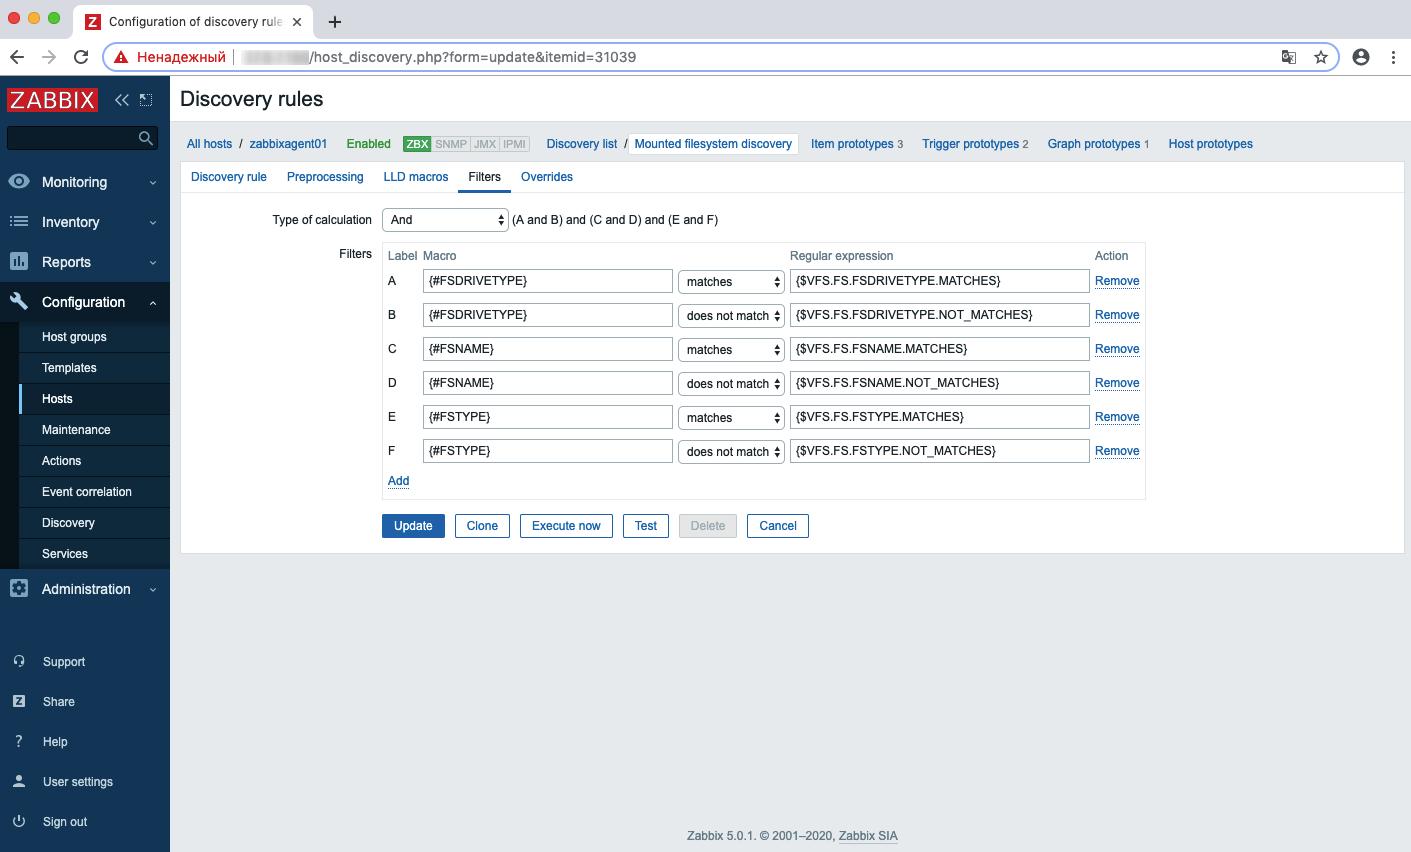
Как настроить PuTTY
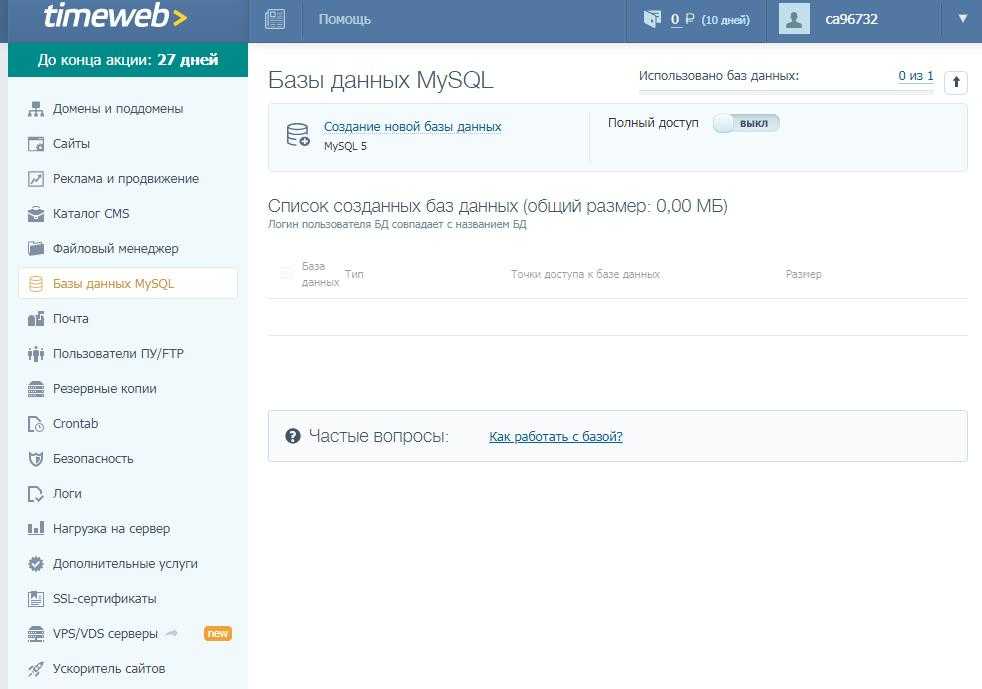
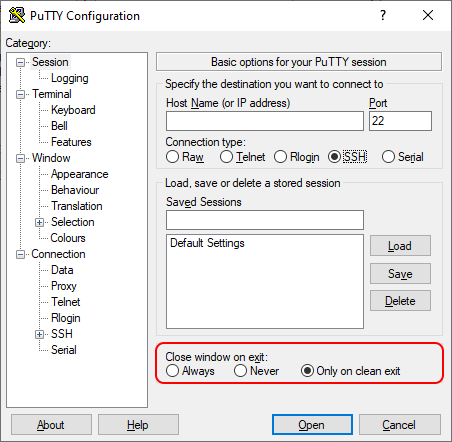
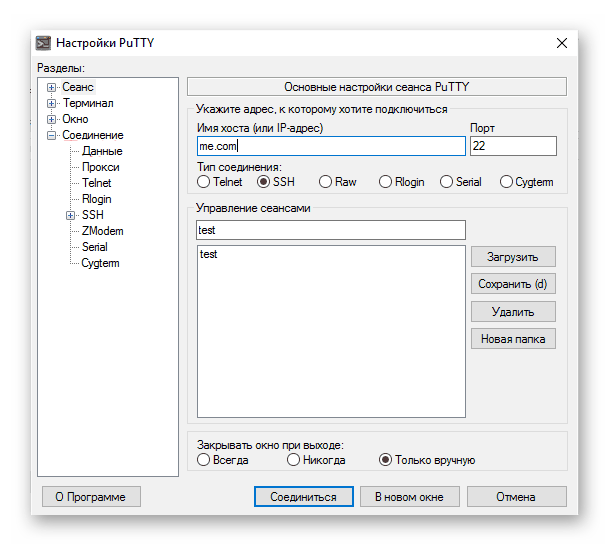
В настройках программы нет ничего сложного. Давайте откроем программу и посмотрим, что в ней есть. После запуска перед нами отобразится окно конфигурации приложения, где слева находятся различные категории, а справа – их настройки.
Программа включает в себя 4 основных раздела:
- Session — основная вкладка, предназначенная для подключения к удаленному компьютеру. Здесь вводятся параметры подключения, порт, адрес, а также вносятся так называемые пресеты, которыми можно воспользоваться, чтобы не вводить каждый раз данные для входа. Достаточно один раз прописать настройки сессии, сохранить ее и использовать при следующем запуске программы.
- Terminal — необходима для включения или отключения возможностей терминала.
- Window — здесь производятся все настройки интерфейса: внешний вид окна, цвет, шрифт и кодировка.
- Connection — настройка параметров подключения, алгоритма шифрования, сжатия, ключей аутентификации и других значений.
Нам потребуется всего две вкладки: Session и SSH. Первым делом перейдем ко второй и убедимся, что версия протокола стоит в значении «2». Как правило, сейчас используется понятие SSH-2, так как первая версия практически не применяется из-за существенных недостатков, например, ошибки в схеме обеспечения безопасности.
Вернемся к разделу Session, где находятся основные параметры, которые потребуются нам для подключения к серверу по SSH. Давайте немного остановимся и поговорим о них:
- Первый блок включает в себя основные параметры, необходимые для подключения: окно ввода IP-адреса и порта, строку с выбором типа подключения.
- Следующий блок предназначен для создания пресетов, которые можно использовать для быстрого подключения к удаленному компьютеру. В строку «Saved Sessions» вводится название сессии, оно сохраняется с помощью кнопки «Save». Чтобы воспользоваться сохраненным пресетом, достаточно его загрузить с помощью кнопки «Load».
- Последний блок – параметры закрытия окна при выходе. Доступные значения: always, never, only on clean exit.
Как видите, в настройках PuTTY нет ничего сложного. Теперь давайте перейдем к подключению по протоколу SSH.
OpenSSH
A free and open source terminal emulator for Mac OS, OpenSSH is also available for other platforms. It’s a leading connectivity software used to log in from a remote system with the SSH client. It encodes the entire traffic to remove any possibilities of spying, hijacking connection, and other malware attacks. Besides, it also offers an extended range of safe tunneling features, multiple verification techniques, and elegant configuration choices.
The program comes equipped with tools like ssh, scp, and sftp for remote functions, ssh-add, ssh-keysign, ssh-keyscan, and ssh-keygen for key management, and sshd, sftp-server, and ssh-agent as service options.
Price: free
How to Use the SSH Client on Mac
Assuming you have the remote server IP and the remote username handy, here’s all you need to do to connect via SSH in Mac OS and Mac OS X:
- Launch the Terminal application, Terminal is found in /Applications/Utilities/ directory but you can also launch it from Spotlight by hitting Command+Spacebar and typing “Terminal” and then return
![]()
At the command prompt, enter the following ssh syntax:
Replace “username” with the appropriate user account of the remote machine, and “ip.address” with the IP address of the remote machine. For example:
Hit the Return key to execute the command
Optional: You may need to verify the authenticity of the host, if everything checks out type “yes” to accept a fingerprint key and connect to the SSH server, or type ‘no’ to reject it and disconnect
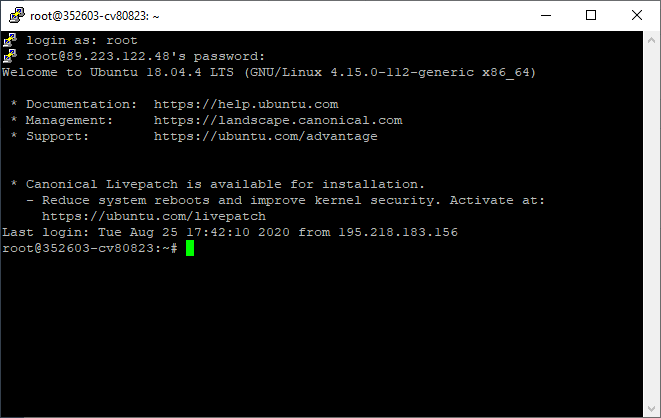
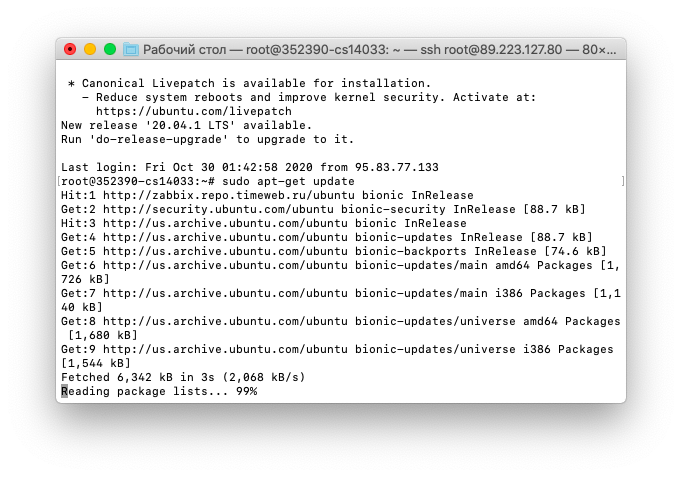
Login to the remote server by entering the password for the user account you are logging into
![]()
That’s it, now you’re logged in to the remote machine via SSH.
At this point you have access to any command line functionality on the remote computer, assuming you have privileges to perform the task or execute the command. What you do once you’re connected with SSH is up to you, but as state earlier it’s intended for advanced uses like systems administration, server management, network operations, and other higher level tasks that are generally less relevant to the average computer user.
When you’re finished you can type “exit” to disconnect from the remote machine, or just close the Terminal app to close the ssh client and connection.
* Side note: you can also SSH into your own Mac this way if you juts want to try this out, but there is little point to that since launching Terminal in and of itself grants you direct shell access to the computer to begin with. But, it does offer a means of experimenting with SSH connections if you have never done so before, just use your username @ localhost or 127.0.0.1 for the IP.
![]()
By the way if you want to allow someone else to remotely SSH into YOUR Mac, you’d need to setup the native SSH server on your Mac (easy as described here) and then you’d want to add a new user account to the Mac for that person, never share your own login and password with anyone else. Keep in mind if you give someone SSH access to your Mac with an admin account, you are giving them full access to your computer, all files, apps, activity, logs, and everything else, representing complete and total remote access to the computer. The command line has a huge number of commands available and is more powerful than the familiar graphical interface (GUI) we all know and love, so you probably do not want to allow for this randomly. Anything you can do at the command line can be done through ssh, assuming appropriate user privileges – this is why it’s so widely used for systems administration and by advanced users, and much less relevant to neophytes and the less technically inclined. If you want to give someone remote access for troubleshooting purposes and you’re a novice, a better approach is to use screen sharing instead.
Want to see more SSH tips (here)? Do have any fancy SSH tricks you want to share? Do you know of a better SSH client than OpenSSH that is built into Mac OS? Let us know in the comments!
Альтернативы для PuTTY для Mac OS
OpenSSH – бесплатная версия инструментов подключения SSH.
Бесплатная Windows iPhone Mac OS
OpenSSH является бесплатной версией инструментов подключения SSH, на которые полагаются технические пользователи. OpenSSH зашифровывает весь трафик (включая пароли), чтобы эффективно исключить подслушивание, перехват соединений и другие атаки. Кроме того, OpenSSH предоставляет несколько методов аутентификации, а также поддерживает все версии протокола SSH.
Эмулятор терминала, клиент SSH, клиент telnet, терминал последовательного подключения.
Платная Windows Mac OS
ZOC – это мощный и хорошо зарекомендовавший себя эмулятор терминала и клиент telnet, хорошо известный своим выдающимся пользовательским интерфейсом с поддержкой нескольких сеансов с вкладками.
Расширяемый кроссплатформенный терминал, построенный на открытых веб-стандартах.
Бесплатная Windows Mac OS
Hyper – это красивый и расширяемый кроссплатформенный терминал, построенный на открытых веб-стандартах. Он обеспечивает элегантный интерфейс командной строки, совместимый на всех поддерживаемых платформах, включая macOS, Windows и различные дистрибутивы Linux, такие как Fedora и Debian.
Royal TS обеспечивает простой и безопасный доступ к вашим удаленным системам.
Условно бесплатная Windows Android iPhone Mac OS
Royal TS обеспечивает простой и безопасный доступ к вашим удаленным системам.
SecureCRT объединяет эмуляцию терминала с надежным шифрованием и гарантией целостности данных.
Платная Windows Mac OS
SecureCRT сочетает в себе эмуляцию терминала с надежными возможностями шифрования, целостности данных и аутентификации протокола Secure Shell. SecureCRT обеспечивает безопасный удаленный доступ, передачу файлов и туннелирование данных для всех сотрудников в вашей организации.
Secure Shell – это xterm-совместимый эмулятор терминала и отдельный ssh-клиент для Chrome.
Бесплатная Windows Mac OS
Secure Shell – это xterm-совместимый эмулятор терминала и отдельный ssh-клиент для Chrome. Он использует Native-Client для прямого подключения к ssh-серверам без необходимости использования внешних прокси.


Мощный настольный (Chrome) SSH-клиент для iOS и Android.
Условно бесплатная Windows Android iPhone Mac OS
Termius – это больше, чем просто SSH-клиент, это комплексное решение для командной строки, которое переопределяет удаленный доступ для системных администраторов и сетевых инженеров. Безопасный доступ к устройствам Linux или IoT и быстрое решение проблем, не выходя из вашего кресла, через ноутбук или телефон.
Setting Up SSH Keys On Windows With PuTTYgen
PuTTYgen is used to generate public or private key pair for creating SSH keys. Below is the complete guidance about how to generate RSA key in Windows operating system:
- Once you install the PuTTY on your machine, you can easily run PuTTYgen. For the same, go to Windows -> Start Menu -> All Programs -> PuTTY -> PuTTYgen.
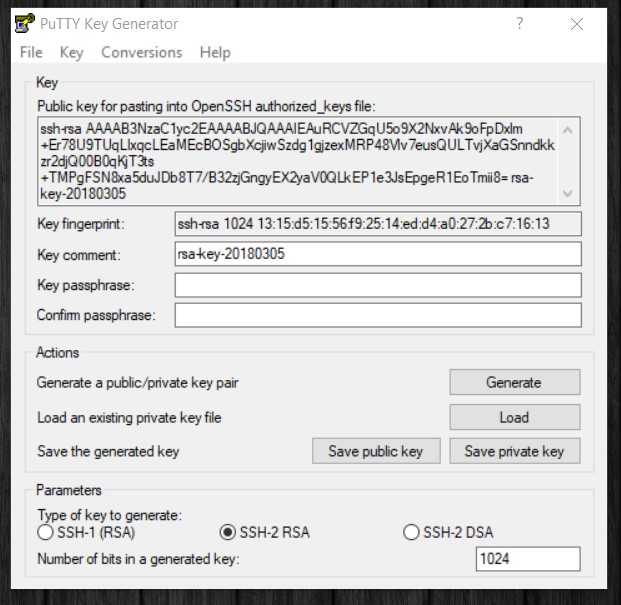
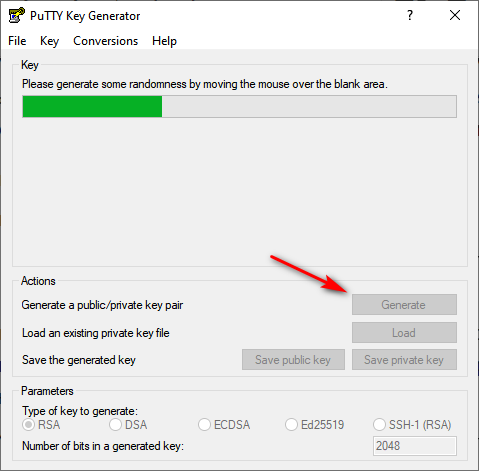
- You will see the PuTTY key generator dialog box on your screen
- You will find a “Generate” button in that dialog. Clicking on it will lead to generating the keys for you.
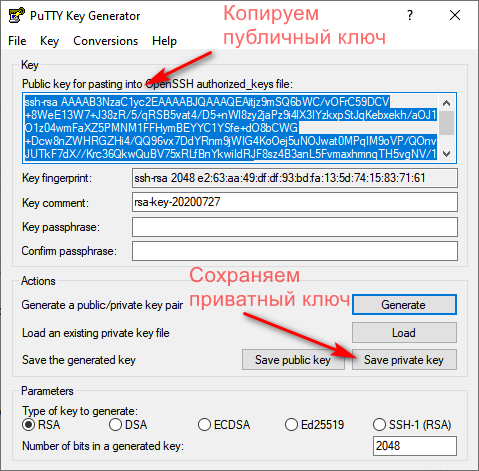
- Now you will need to add a unique key passphrase in the Key passphrase and Confirm passphrase field.
- Click on the “Save Public Key” and “Save Private Key” buttons to save your public and private keys.
- You will see the text starting with ssh-RSA in the Public key for pasting into OpenSSH authorized_keys file field which is located at the top of the window. Copy that entire text to your clipboard by pressing ctrl+c as you will require the key to paste on your clipboard in the public key tool of control panel or directly on the cloud server.
Various Ways to Use RSA Key Pair
RSA key pair generated through PuTTYgen is used in two various ways defined as below:
- To assign while creating a new cloud serverYou can choose the public key from the given list of keys at the time of creating cloud server. If you don’t find your key in that list, then first add and then assign it.
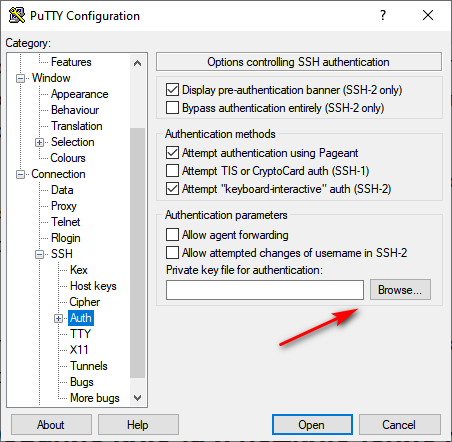
- Assign to an existing cloud serverAt the time of connecting to the cloud server, first of all, you need to tell PuTTY to use it for utilizing your newly created RSA key pair.
The installation of PuTTYgen is very simple as it is installed as a part of normal PuTTY .msi package installation. You can follow the simple steps to download PuTTYgen software for your system. That is the reason why you don’t need to download PuTTYgen separately. Once you download PuTTY software, you will be able to install and run PuTTYgen easily in no time. Below is the complete instruction about how to download and install PuTTY on Windows.
Kitty Terminal
Kitty Terminal can be easily considered among the best PuTTY alternatives for Mac OS as it’s a robust, multi-platform, and a GPU-supported terminal emulator. The program transfers description to the GPU and makes the OpenGL to work for quick, multi-platform performance. It includes native tiling designs along with support for visual, Unicode, and ligature.
It provides support for every advanced terminal feature like the images, true-color, mouse protocol, and more. It also supports tiling of different terminal windows parallelly in multiple patterns and does not require using the tmux. Best of all, it can be managed from the shell prompt or the scripts. The program can be extended using Kittens structure that helps build small terminal programs.
In addition, it provides support for startup sessions that enable you to fix a design, active directories, and apps to launch at the startup. Besides, it also lets you launch the scrollback option in an individual window that uses random apps.
Price: free and open source
Configure virtual machine scale set-based AKS clusters for SSH access
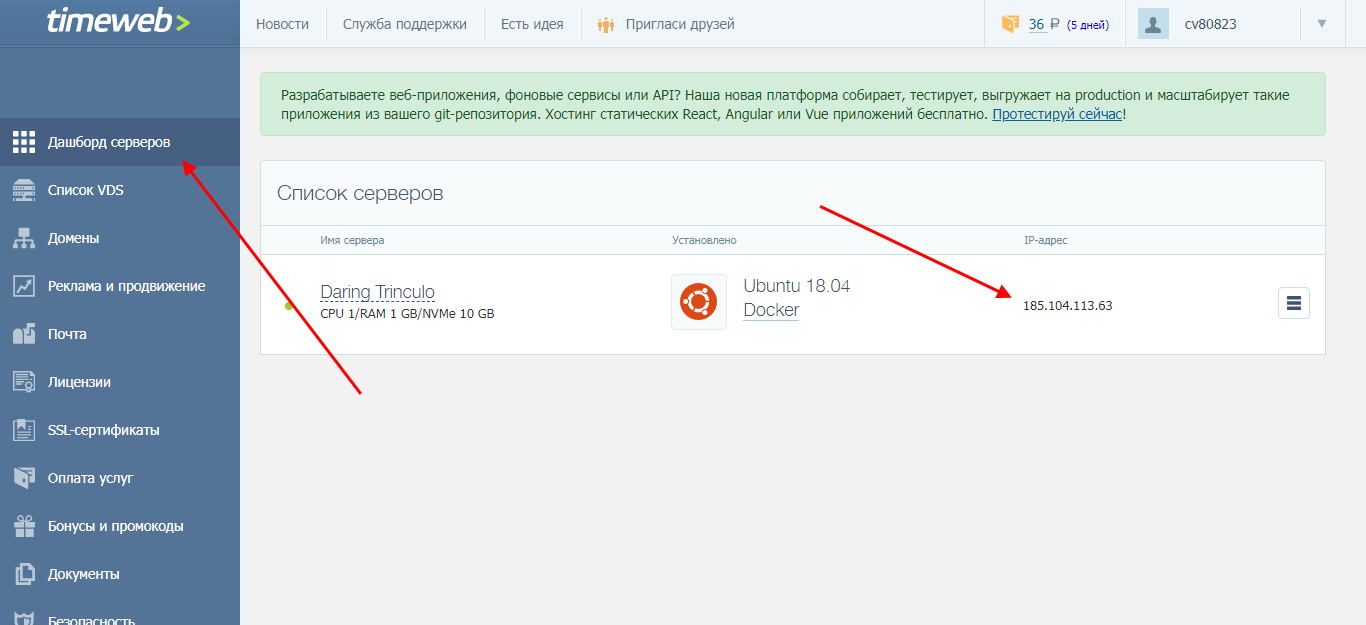
To configure your virtual machine scale set-based for SSH access, find the name of your cluster’s virtual machine scale set and add your SSH public key to that scale set.
Use the az aks show command to get the resource group name of your AKS cluster, then the az vmss list command to get the name of your scale set.
The above example assigns the name of the cluster resource group for the myAKSCluster in myResourceGroup to CLUSTER_RESOURCE_GROUP. The example then uses CLUSTER_RESOURCE_GROUP to list the scale set name and assign it to SCALE_SET_NAME.
Important
At this time, you should only update your SSH keys for your virtual machine scale set-based AKS clusters using the Azure CLI.
For Linux nodes, SSH keys can currently only be added using the Azure CLI. If you want to connect to a Windows Server node using SSH, use the SSH keys provided when you created the AKS cluster and skip the next set of commands for adding your SSH public key. You will still need the IP address of the node you wish to troubleshoot, which is shown in the final command of this section. Alternatively, you can connect to Windows Server nodes using remote desktop protocol (RDP) connections instead of using SSH.
To add your SSH keys to the nodes in a virtual machine scale set, use the az vmss extension set and az vmss update-instances commands.
The above example uses the CLUSTER_RESOURCE_GROUP and SCALE_SET_NAME variables from the previous commands. The above example also uses ~/.ssh/id_rsa.pub as the location for your SSH public key.
Note
By default, the username for the AKS nodes is azureuser.
After you add your SSH public key to the scale set, you can SSH into a node virtual machine in that scale set using its IP address. View the private IP addresses of the AKS cluster nodes using the kubectl get command.
The follow example output shows the internal IP addresses of all the nodes in the cluster, including a Windows Server node.
![]()
Record the internal IP address of the node you wish to troubleshoot.
To access your node using SSH, follow the steps in Create the SSH connection.
Исходный код PuTTY
Для удобства предоставлено несколько версий исходного кода, для различных платформ. Фактически, нет существенной разницы между архивами исходников для Unix и Windows; различия находятся главным образом в форматировании (имена файлов, окончания строк, и т.д.).
Если вы хотите внести свой вклад в разработку PuTTY, мы настоятельно рекомендуем начать с исходного кода Development Snapshot.
Исходный код PuTTY для Windows:
| Stable: | putty-src.zip | (цифровая подпись) |
| Snapshot: | putty-src.zip | (цифровая подпись) |
Для получения дополнительной информации о компиляции PuTTY из исходников, читайте файл .
Исходный код PuTTY для Linux:
| Stable: | putty-0.76.tar.gz | (цифровая подпись) |
| Snapshot: | putty.tar.gz | (цифровая подпись) |
Для сборки исходников release-версии, распакуйте архив, перейдите в директорию , и выполните команду:
make -f Makefile.gtk
Для сборки snapshot-исходников достаточно запустить стандартные:
./configure && make
Для дополнительной информации читайте файл .
Доступ к Git
Если вы хотите следить за развитием PuTTY вплоть до минуты, или посмотреть журнал изменений для каждого файла в базе исходников, вы можете получить доступ напрямую к git репозиторию PuTTY.
Версию исходников master (последнее состояние, с самыми свежими изменениями) можно получить используя команду:
git clone https://git.tartarus.org/simon/putty.git
Также по адресу https://git.tartarus.org/?p=simon/putty.git доступен WWW браузер по репозиторию Git.
Юридическое предупреждение:
Использование PuTTY, PSCP, PSFTP и Plink может оказаться незаконным в тех странах или организациях, где шифрование полностью или частично запрещено. Полагаем, что на данном этапе развития законодательной базы в сфере IT в России и русскоязычных странах, использование применяемых протоколов шифрования не противоречит законам, но мы не юристы, и поэтому, если у вас есть сомнения, вы должны обратиться за юридической помощью прежде, чем загрузить что-либо с этого сайта.
Использование отдельного Telnet-клиента PuTTYtel не ограничено законами о криптографии, так как данные в нём не шифруются.
Установка Xcode
Xcode — пакет программ от Apple, содержащий компиляторы, библиотеки, дополнительные инструменты, требуемые для разработки и сборки приложений под Mac.
На версиях OS X начиная с 10.7 Lion, достаточно поставить «Command Line Tools for Xcode» с сайта Apple Developer.
Для более ранних версий придётся скачать Xcode из Mac App Store (также доступен на установочном диске OS X), и затем через «Preferences» → «Downloads», доинсталлировать «Command Line Tools».
После установки полной версии Xcode, нужно не забыть принять лицензионное соглашение, выполнив команду:
sudo xcodebuild -license
Download PuTTYgen for Mac
You can find the step by step guide to download PuTTYgen for Mac operating system. Command-line SSH client is a part of the Mac operating system. To utilize it, go to Finder and then opt for Go -> utilities from the top menu. After that find the terminal which supports SSH connections to remote servers.
Ported PuTTY for Mac
Mac has the port of PuTTY which can be installed in various ways described as below:
- Installation using Homebrew:Use the below-given command to install PuTTY in case you have already installed “brew”command.sudo brew install putty
- Installation using MacPorts:PuTTY is easily available through MacPorts. First of all, install MacPorts and then apply the below-given command.sudo port install puttyUse the below-given command to add the shortcut on the desktop.cp /opt/local/bin/putty ~/Desktop/PuTTY
- Alternatives to PuTTY on Mac OSCyberduck, used by many people on Mac OS is the best SSH Client is the ultimate alternative to PuTTY on Mac OS.
SSH клиент под Mac OS
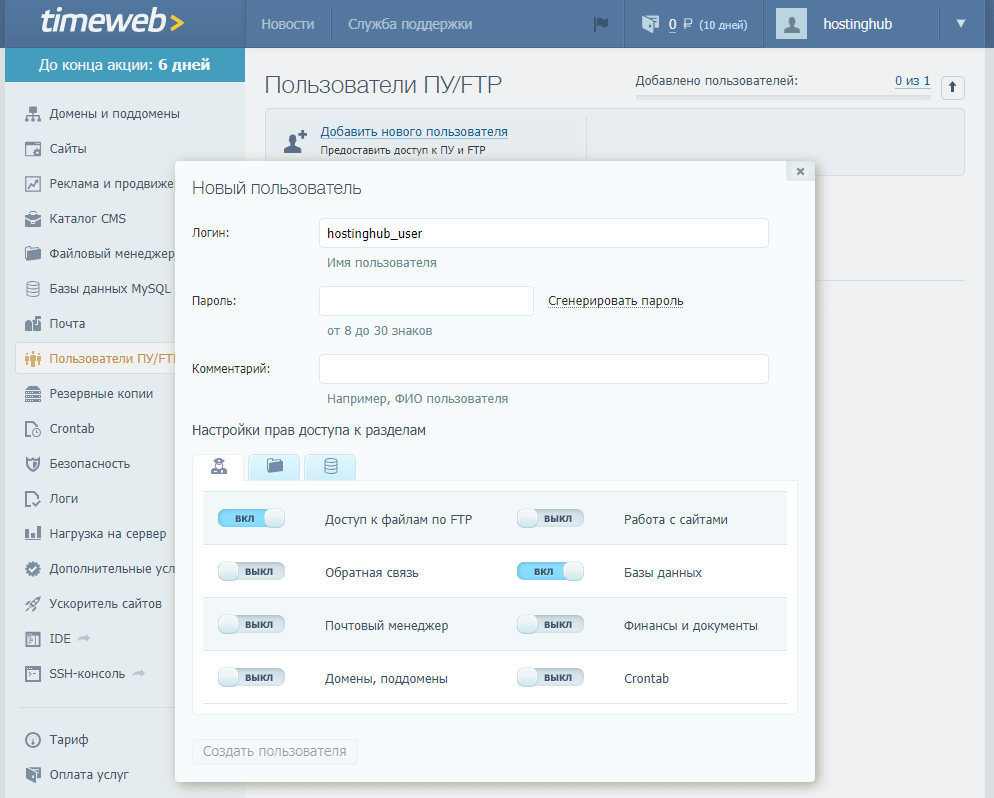
Как вы могли понять из вышеописанного, вы уже настроили SSH клиент, когда прописывали данные для доступа по FTP. Собственно чтобы подключиться к серверу по этому протоколу, можно пойти несколькими путями. Правой кнопкой мыши кликаем по панели, где расположены три иконки и в появившемся окне выбираем пункт «New Terminal». После этого откроется окно подключения через протокол SSH, а от вас будет необходимо лишь кнопку «Connect».


Также как вариант, можно воспользоваться кнопкой «+», которая расположена в верхнем углу программы. После нажатия на это ссылку, будет открыто всплывающее окно, где нужно выбрать кнопку «Terminal».
К слову, встроенный SSH клиент в CODA 2 имеет ряд преимуществ над другими. Например, клиент дает разрешение на «copy/paste» текста, хотя многие SSH клиенты считают эту функцию ненужной; здесь также работает и поиск, который доступен в текстовом редакторе (который подсвечивает).
Первое знакомство с CODA 2 оставляет только приятные впечатления, а тот, кто поработает с программой полгода-год, уже не будет мыслить своей деятельности без этого продукта.
iTerm 2
iTerm is one of the best PuTTY alternatives for MacOS that comes loaded with features. It offers solutions for any desire that a terminal user could have thought of. Among its major attractions is the option to split a tab into several windows with each one of them featuring a different session. Whether you choose to divide it vertically or horizontally, it allows you to generate endless panes in any possible alignment.
By registering a hotkey, you can bring the software to the front when working from another program. Simply press a key and the terminal comes up. You can get a terminal that’s always available by setting the hotkey to open a dedicated pane. Moreover, it features powerful search functionality, while the interface stays distant. As soon as you input your search term, the matches are instantly highlighted.
Autocomplete is another feature where as you type the first letter of any word that you might have used earlier, followed with “Cmd” and the word comes up at the top of the list. Find option to look for text, paste history to recheck the last copied or pasted text, or instant replay to travel back in time, are some of its other significant features.
Price: free
ZOC
ZOC is compatible with both Windows and Mac making it universally usable. This terminal emulator is a freeware that offers a splendid list of emulations and robust features. These features make it a dependable and classy tool that links you to hosts and mainframe. It connects you through different modes such as telnet, secure shell, and more.
It boasts an advanced interface that features a tabbed session with thumbnails. It offers address book containing folders and hosts (color-coded). It can be easily customized to suit your choices and requirements. Support for a scripting language with 200 plus commands, huge number of loggings, buttons that are user-defined, or full keyboard remapping features are among some of the major features.
Price: free
Configure virtual machine availability set-based AKS clusters for SSH access
To configure your virtual machine availability set-based AKS cluster for SSH access, find the name of your cluster’s Linux node, and add your SSH public key to that node.
Use the az aks show command to get the resource group name of your AKS cluster, then the az vm list command to list the virtual machine name of your cluster’s Linux node.
The above example assigns the name of the cluster resource group for the myAKSCluster in myResourceGroup to CLUSTER_RESOURCE_GROUP. The example then uses CLUSTER_RESOURCE_GROUP to list the virtual machine name. The example output shows the name of the virtual machine:
To add your SSH keys to the node, use the az vm user update command.
The above example uses the CLUSTER_RESOURCE_GROUP variable and the node virtual machine name from previous commands. The above example also uses ~/.ssh/id_rsa.pub as the location for your SSH public key. You could also use the contents of your SSH public key instead of specifying a path.
SSH-клиенты для Windows — программы и online — аддоны
PuTTY — клиент для подключения к SSH, Telnet, SCP, SFTP.
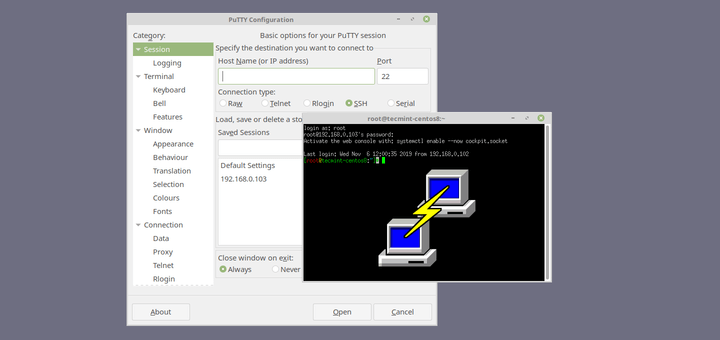
PuTTY, пожалуй, один из самых популярных SSH-клиентов для Windows. Популярен он за свою функциональность, быстроту работы, простоту использования. И он бесплатный! Скачайте этот клиент и установите его.
![]()
В стартовом окне приветствия сразу можно ввести все параметры подключения, запустить соединение и сразу же приступить к работе. Можно сохранить это подключение на будущее, чтобы каждый раз не вводить все данные заново. Это удобно.
WinSCP
WinSCP — еще одна довольно популярная программа-клиент. С помощью нее можно установить зашифрованное соединение к FTP-серверу удаленной машины путем туннелирования трафика через протокол SSH.
![]()
Работает быстро. Интерфейс похож на PuTTY. Ничего сверхъестественного, поэтому разобраться с подключением будет не сложно. Все то же самое: хост, порт, имя пользователя и пароль — все, что требуется для подключения и дальнейшего управления файловой структурой сервера.
Xshell
Xshell — бесплатный для некоммерческого использования клиент.
![]()
Преимущества программы: поддержка локальных команд, управление файлами и туннелирование. Имеет простой командный интерфейс. Помимо SSH-протокола поддерживает и другие: RLOGIN, SFTP, TELNET, SERIAL. Для профессиональных пользователей есть куча дополнительных настроек: динамическое перенаправление портов, поддержка сценариев, трассировка, функции настройки безопасности.
Онлайн расширение FireSSH для Firefox
Плагин для одного из популярных браузеров Mozilla Firefox.
![]()
Чтобы запустить клиент зайдите в «Меню», затем «Разработка», пункт «FireSSH». Ваш клиент запущен. Вводите ваши данные для подключения во вкладке «Main» и приступайте к работе. Во вкладке «Advanced» можно указать дополнительные параметры SSH-туннелирования. Работает эта штука в режиме онлайн на всех ОС, на которые можно поставить этот браузер.
Установите это расширение из официального репозитория https://addons.mozilla.org/en-US/firefox/addon/firessh/ и перезапустите свой браузер.
Secure Shell — хороший плагин для Google Chrome
Для браузера Google Chrome есть свой плагин ssh-клиент. Называется он Secure Shell.
![]()
Установите это расширение в свой браузер. После установки щелкните на пиктограмку, клиент откроется в новой вкладке. В этом окне вы настраиваете параметры подключения и устанавливаете соединение с удаленным сервером. Этот клиент также будет работать в любой ОС, для которой можно установить данный браузер.
VPS SSD хостинг — выбор профессионалов. Только сертифицированное серверное оборудование!
OpenSSH для Cygwin Terminal
Для Windows существует пакет UNIX-подобных утилит. Cygwin — один из таких пакетов. А OpenSSH может быть установлена вместе с ним. Попробуйте эту утилиту, возможно она вам понравится!
![]()
В чем ее преимущество? Вы можете использовать команды с синтаксисом для UNIX-платформ в Windows среде. Это удобно для пользователя, который не хочет изучать дополнительные команды для Windows. Установите пакет Cygwin. Во время установки вы можете выбрать установку только отдельно OpenSSH. После установки запускайте утилиту Cygwin Terminal и наслаждайтесь простым консольным терминалом!
Скачать установщик можно на официальном сайте — https://cygwin.com/install.html.
SecureCRT
SecureCRT offers a powerful terminal emulation function for those in the field of computers. While it helps to increase productivity with modern session control, it also sets up many methods to save time and streamline mundane tasks. It offers safe remote access, file transfer facility, and the option of data tunneling for all employees in the organization.
Moreover, it comes with pre-set color schemes, that includes Solarized scheme, making it easy to transform the look of your terminal workstation. You have the freedom to select from a different light and dark color mixups with matching forefront, background, and ANSI shades.
Price: free trial available; pro version starts at $59.95
Download PuTTYgen on Windows
To download PuTTYgen the primary requisite is to acquire the copy of PuTTY installation package. For the 64-bit operating system, one must install the 64-bit version of PuTTY, i.e. putty-64bit-<version>-installer.msi.Similarly, for the 32-bit operating system, the respective 32-bit version of PuTTY, i.e. putty-<version>-installer.msi needs to be installed.
To get PuTTY, go to PuTTY Installation Download page, whereby the complete installation package will be available with setup instructions, installation guide, and download links to all other components of PuTTY such as putty.exe, pscp.exe, psftp.exe, puttytel.exe, plink.exe, pageant.exe and putty.zip.
Following the successful download of the PuTTY installation package. It is time to install the program. Go to How to install PuTTY on Windows, whereby you will find the step by step guidance for PuTTY installation for Windows operating system.
After successfully downloading and installing PuTTY on your Windows machine, you are just 2-3 clicks away to run PuTTYgen. Follow the below-given step by step guidance to run PuTTYgen:
Run PuTTYgen on Windows
To run PuTTYgen, Go to Windows -> Start Menu -> All Programs -> PuTTY -> PuTTYgen. You will see a window for the PuTTY Key Generator on your screen.
PuTTY key generator screenshot
Voila! Now you can generate public or private key pair using PuTTYgen.
Как сделать ваши соединения Secure Shell еще более безопасными
Secure Shell является наиболее широко используемым средством входа на удаленный сервер Linux (или компьютер). Используя этот инструмент, вы получаете доступ к командной строке на удаленном компьютере через безопасный туннель. Из коробки вам будет предложено ввести пароль удаленного пользователя. Хотя это все еще более безопасно, чем использование более старых методов (таких как telnet), его можно сделать еще более безопасным с помощью SSH Key Authentication.
Что такое аутентификация по ключу?
Понимание аутентификации ключей на самом деле довольно просто. Представьте, что у вас есть замок, и единственный способ открыть его – использовать определенный ключ, который, как вам известно, принадлежит вам. Как замок узнает, что ключ принадлежит вам? Потому что ключ содержит уникальную для вас подпись. Внутри замка есть соответствующая подпись, которую ключ использует для сравнения. Если подписи совпадают, они откроются. Если ключ подходит, но подписи не совпадают, замок не открывается.
Это основа для аутентификации по ключу SSH. В реальной жизни это работает так, что вы создаете пару ключей (которая содержит закрытый и открытый ключи) и копируете открытый ключ на сервер, на который хотите войти. Если вы попытаетесь войти с аутентификацией по ключу, а у сервера нет открытого ключа, соответствующего вашему личному ключу, он не разрешит вам доступ.

Давайте заставим это работать.
Генерация пары ключей SSH
Первое, что нужно сделать, это создать пару ключей SSH. Для этого выполните следующие действия:
-
Откройте окно терминала на рабочем столе.
Выполните команду:
SSH-кейген
Присвойте ключу имя и местоположение (используйте настройки по умолчанию, используя Enter/Return на клавиатуре).
-
Введите и подтвердите ключевую фразу для ключа (убедитесь, что она является надежной и уникальной)
Теперь у вас есть пара ключей SSH. Эти два файла будут найдены в ~/.ssh и будут называться:
- id_rsa – закрытый ключ
- id_rsa.pub – открытый ключ.
Скопируйте ваш открытый ключ на удаленный компьютер
Затем вы должны скопировать файл открытого ключа на удаленный компьютер, на который хотите войти. Это можно сделать с помощью команды:
ssh-copy-id USER @ REMOTE_IP
Где USER – это имя пользователя на удаленном компьютере, а REMOTE_IP – это IP-адрес удаленного компьютера.
Если вы впервые зашли в безопасное место на удаленном компьютере, вам будет предложено ввести да , чтобы продолжить подключение, в противном случае вам будет предложено ввести пароль пользователя на удаленном компьютере. машина. После успешного ввода удаленного пароля ключ будет скопирован, и вы будете готовы проверить соединение.
Тестирование соединения
Проверьте соединение, введя команду:
ssh USER @ REMOTE_IP
Где USER – это имя пользователя на удаленном компьютере, а REMOTE_IP – это IP-адрес удаленного компьютера. Вместо запроса пароля пользователя вам будет предложено ввести ключевую фразу пары ключей SSH. После того, как вы ввели правильную ключевую фразу, вам будет разрешен доступ к удаленному компьютеру. Поздравляем, SSH Key Authentication запущена и работает.
Отключение аутентификации по паролю
Вы можете сделать этот шаг дальше, отключив аутентификацию по паролю. С этой конфигурацией единственный способ получить доступ к удаленному компьютеру – с компьютера, содержащего закрытый ключ из соответствующей пары. Другими словами, нет пары ключей, нет доступа.
Чтобы отключить аутентификацию по паролю, войдите на удаленный компьютер и введите команду:
sudo nano/etc/ssh/sshd_config
В этом файле найдите строку:
#PasswordAuthentication yes
Измените эту строку на:
PasswordAuthentication no
Сохраните и закройте файл. Перезапустите SSH с помощью команды:
sudo systemctl перезапустите sshd
Теперь, если вы попытаетесь войти на эту удаленную машину с любого рабочего стола (или сервера), который не содержит закрытый ключ, доступ будет запрещен.
Поздравляем, вы успешно сделали вход в удаленную систему Linux более безопасным с помощью SSH.
PuTTY for Mac
Let’s talk about the steps to install PuTTY on a MAC operating system. As a prerequisite, users need the following application installed on the system:
![]()
- Command-line Tools
- X-CODE
- MacPorts
Install Putty on a Mac using Command-line Tools
MAC users have this facility to use a Unix toolkit. Users have to use the terminal to access the kit. The tool package gives its users many tools, utilities, and compilers that include GCC, Perl, svn, git, etc. Many of the commands are found on Linux installations by default. Let’s look at the steps to install it.
- To begin with, the installation, go to the Apple Developer website.
- Login and in the download section and search for Command Line Tools.
- Install the .dmg file.
Use X-Code to install Putty for mac
It’s an IDE (Integrated Development Environment) specially designed for MAC OS. It consists of a suite of software development tools for developing software for MAC OS, iOS, WatchOS, and tvOS.
It also supports source codes from programming languages like C, C++, Java, Python, Ruby, etc. It’s available on the app store. So, go to app store, search for “x-code” and click on “get.”
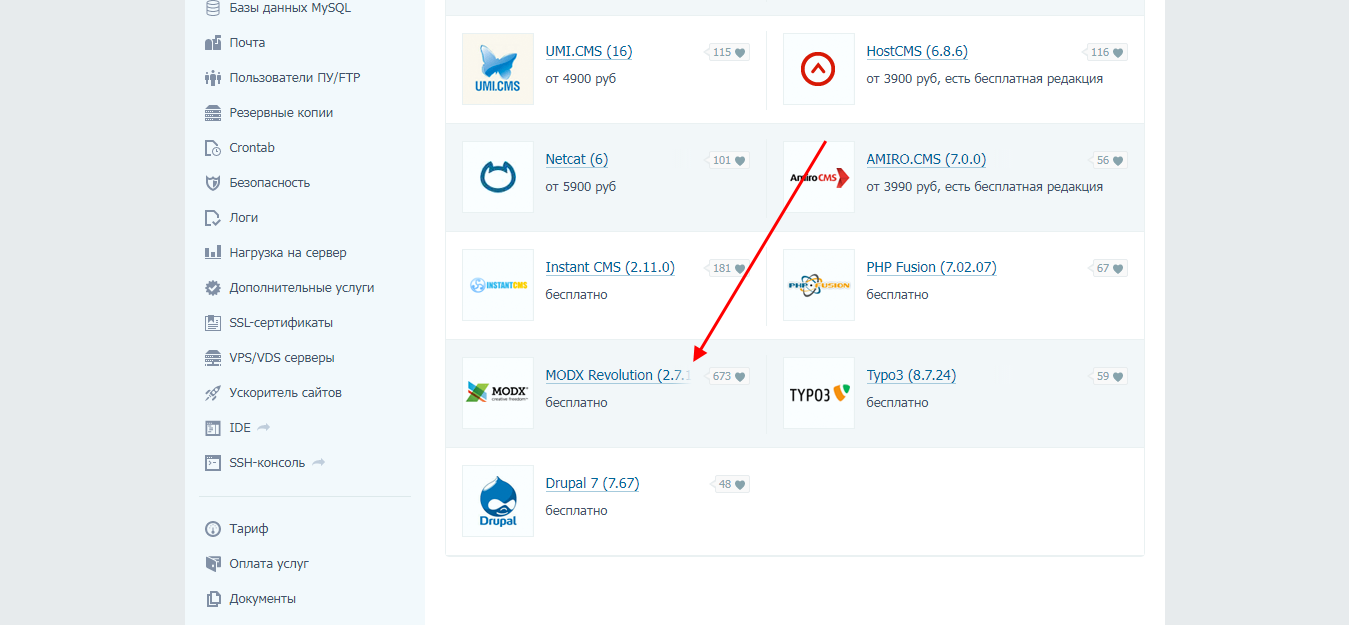
Install Putty for mac using MacPorts
It’s open-source software designed to simplify the installation of other software. One can install some packages by entering a command in the terminal, which will download, compile and install the requested software. It also installs any required dependencies related to the software automatically.
- Download MacPorts from here.
- A pkg file will be downloaded. Just double-click to install it.

![Папка продолжает возвращаться только для чтения [решено]](http://myeditor.ru/wp-content/uploads/4/f/a/4fa8f5d73b677bcf70f4efdfdf675688.gif)


