Scroll past the setup information and click the “Start Building” button.
![]()
This will kick off your first build process with CircleCI!
Completing the GitHub Setup
Next, lets go back to our open GitHub browser window and refresh the screen. We should now see the CircleCI option. Make sure the checkbox next to is checked and click Save Changes.
![]()
Pushing our configuration
At this point, your github repo is configured to automatically run your CI process. Lets go ahead and create a branch, commit the changes and push up to Github.
$ git checkout -b feature/circle-ci-configuration$ git add -a$ git commit -m "Adding CI to my project"$ git push origin feature/circle-ci-configuration
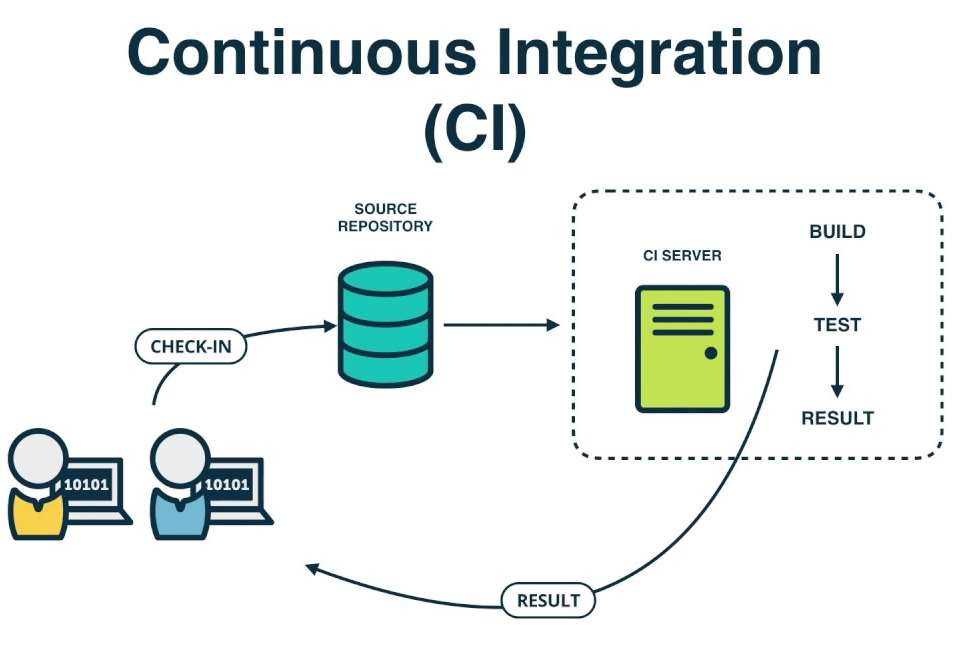
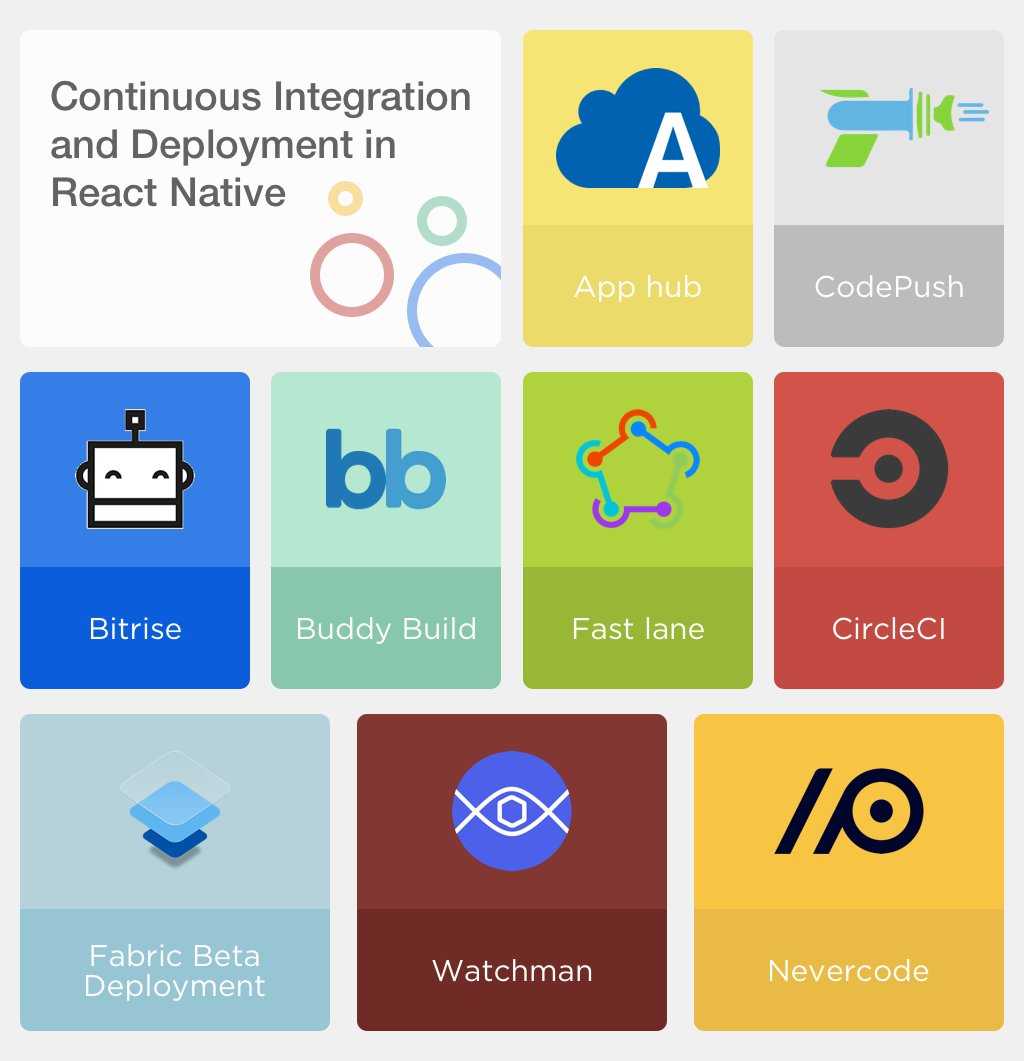
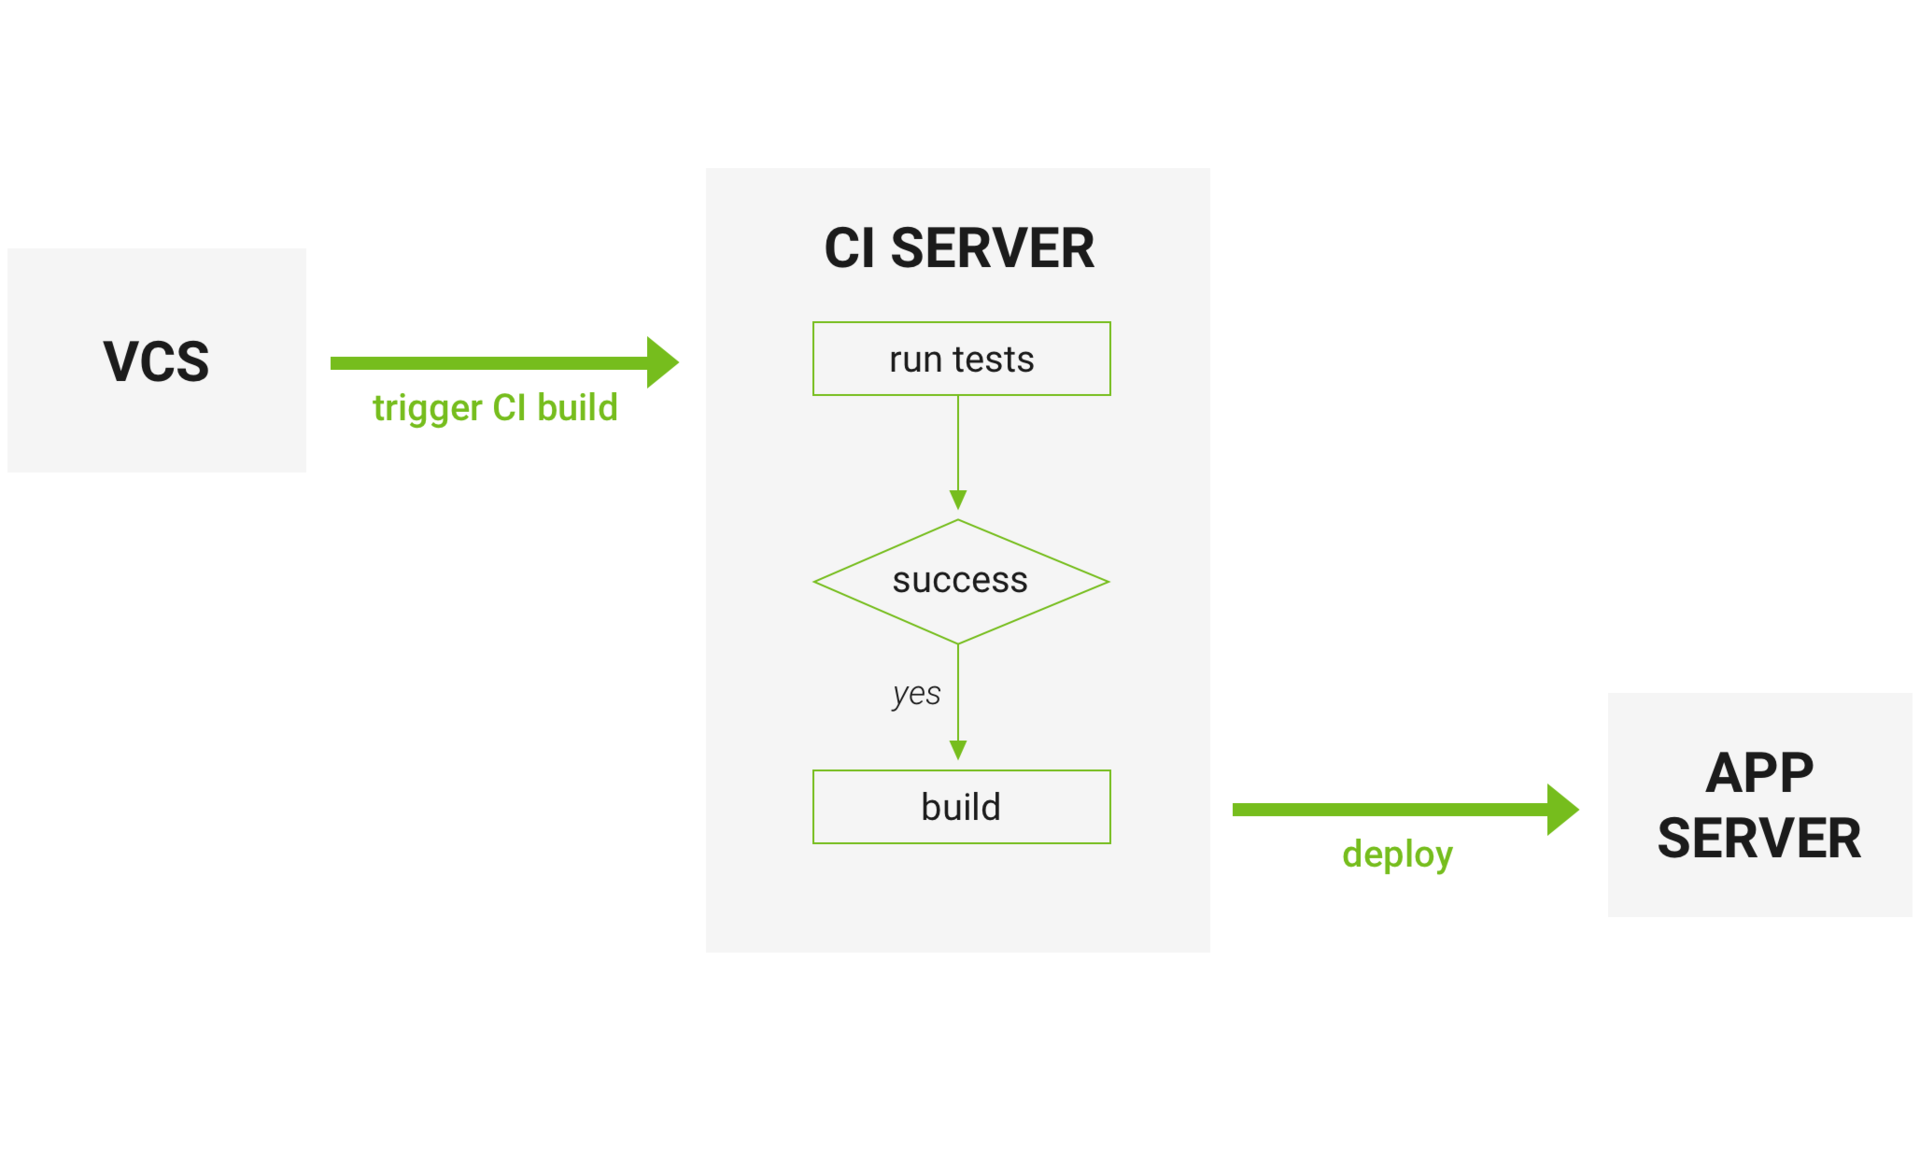
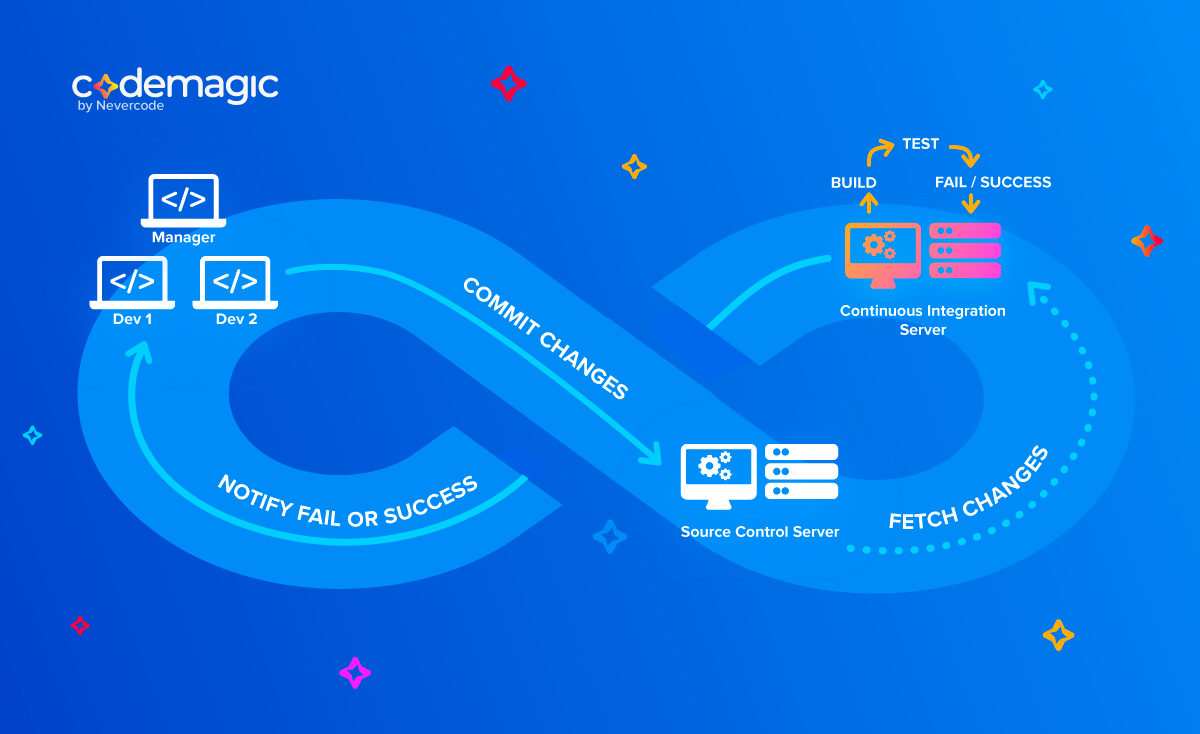
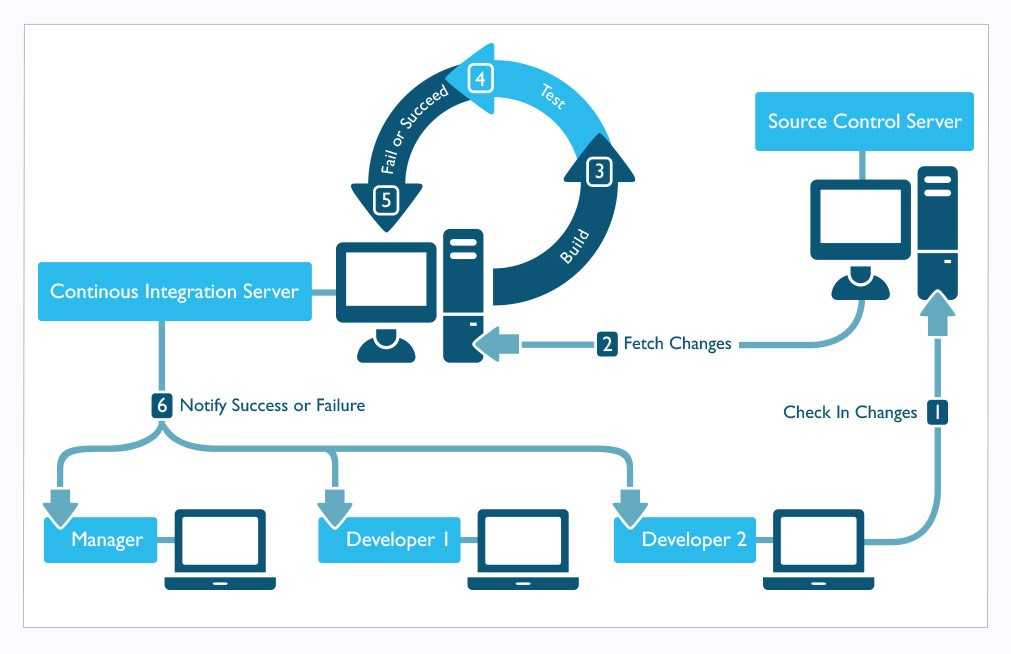
Continuous integration with CircleCI
Setting up on CircleCI
CircleCI uses the file in the folder at the root of our application as a blueprint to set up and run any builds. Let’s populate the file with some initial statements to make sure the build to run our tests will be configured correctly.
All we’re doing here is instructing CircleCI to install our project’s dependencies, run our tests, and then generate our coverage report.
Pushing to GitHub
In order to get things running on CircleCI, we’re going to have to commit our work to GitHub. To start, let’s initialize our project as a git repository and commit all the work we’ve done so far.
Execute the following commands in your terminal at the root of our project.
In our file, let’s add,
Then, run the following commands:
Create a repository for the project on GitHub, and then push our local copy to GitHub using the following commands:
If you’re new to this, this tutorial by my friend Stan should help. Skip through to the Pushing to GitHub section for a quick how to.
Triggering the build
Sign up for CircleCI if you haven’t already.
![]()
Log in through GitHub or go to your dashboard if you already have an account. From there, navigate to the relevant organization in your dashboard, and then the ADD PROJECTS tab on the left side of the window as shown below.
![]()
Click Set Up Project, and then Start Building on the next page. This will trigger a build of our project using the file we pushed to GitHub earlier. Let’s confirm that our fledgling build passes.
![]()
Indeed it does. Next, let’s see how to leverage the unique features that Code Climate provides to optimise our build pipeline for continuous integration.
What’s next?
![]()
After following these steps, we’ll have a fully-functional CI pipeline integrated with Contentful. Any time someone make a PR, CircleCI will automatically run tests and create a new environment based on the branch name that will be used to verify code quality. If all our tests pass and a deploy occurs we’ll create a new environment and update our environment alias to the branch that we PR into to target that new environment. While this tutorial most likely won’t match 1 to 1 with your current CI/CD pipeline, hopefully it’ll serve as an inspiration to add Contentful’s migration tooling and alias features into your pipeline. Given the differences in labeling when it comes to pipelines you’ll need to adjust the file and file to match the pipeline and branches that you’re using in your own project.
![]()
Prerequisites
A basic understanding of CodeIgniter may be helpful, but I will provide explanations and links to official documentation throughout the tutorial. If you are unclear on any concept, you can review the linked material before continuing.
Before you start, make sure these items are installed on your system:
- Composer: Composer will be used for dependency management in your CodeIgniter project.
- A local database instance. While MySQL will be used in this tutorial, you are free to select your preferred database service.
For repository management and continuous integration, you need:
- A GitHub account. You can create one here.
- A CircleCI account. You can create one here. To easily connect your GitHub projects, you can sign up with your GitHub account.
Conclusion
In this guide, we’ve seen how to easily integrate Code Climate’s Quality tool with both CircleCI and GitHub, leveraging them to optimize our CI pipeline. Using these tools, we’ve made our code resilient and our build process transparent, allowing us to focus on writing better, ready to ship code.
If you’re interested in having a look, all of the code for this guide can be found here. Feel free to leave a PR if you have a suggestion.
Mabishi Wakio is a software developer who unfortunately found the allure of product management too hard to resist. When they’re not listening to users, creating wireframes, or writing code, they can be found reading a book, lifting weights, or sparring with their boxing coach and seldom winning.
Creating the tests
In your editor, create a file and paste these lines into it:
Please see these references for more information about tests:
- http://flask.pocoo.org/docs/1.0/testing/
- https://damyanon.net/post/flask-series-testing/
Now we can run our test. Open Terminal and run:
Nothing should be returned to our Terminal. Why? We structured our Flask app so that it does not output to Terminal on a pass. No terminal output means that our tests are passing. The resources mentioned earlier give better examples of how Terminal handles passing and failing tests, but this example will work for our tutorial.
Get started with CI
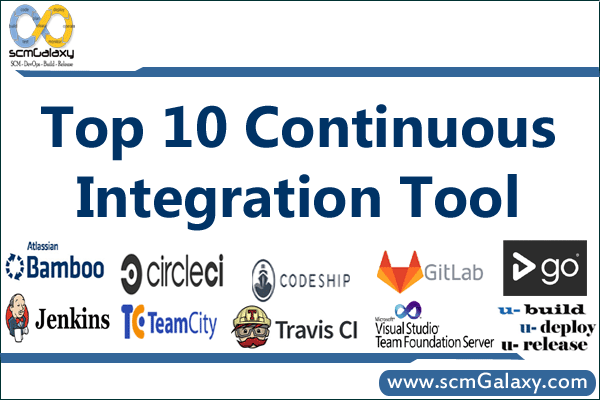
As I said at the very beginning, with large teams it may get chaotic when it’s time to integrate code changes and new features. In order to avoid human error and distraction, it’s always better to automate this process with continuous integration. By now, you should now have a good idea of the concepts behind CI and its most common tools. In conclusion, here are a couple of tips that will help you choose the CI tool that’s best for your needs:
- Test continuous integration with Drone — especially if your project is containerized.
- Consider trying out CircleCI and TravisCI for smaller teams and projects based on your preferences.
- Use Jenkins for full control over code; ideal for enterprises that have sensitive code and can dedicate a separate DevOps administrator to this tool.
- If your team is already using GitLab tools, your best bet is to extend to GitLab CI for continuous integration; it really saves time and hassle with seamless integration.
- Try TeamCIty if you’re already using (and like) JetBrains products or if having a modern interface is important.
Introduction
Like handling changes to a database, integrating Contentful into a continuous integration (CI) pipeline enables changes to a content model and migrating data as part of a deployment process. Further, it enables testing content changes and canceling a deploy process thereby preventing interruptions or downtime, in case the tests fail.
![]()
Using the Contentful CLI’s command, it is possible to create, delete, and edit content models and entries programmatically entirely in JavaScript. By using the Migrations DSL tool over the Contentful web app, updating a content model becomes a repeatable process. Changes made to a content model can also be tracked by integrating it to the version control.
Space environments are entities within a space that allow a developer to create and maintain multiple versions of space-specific data, and make changes to them in isolation. This promotes teams to work on modifying a Contentful space, as any changes made to an environment do not affect production data. Every time you create a new environment, you’re creating a copy from the current version of your master space. Contentful migration tooling, when combined with space environments, starts integrating Contentful into the CI Pipeline.
A typical continuous integration pipeline creates a build and runs tests against it, before deploying code. You may have different server environments such as , and . Integrating content migrations into that pipeline requires a few additional steps.
![]()
In the build phase, add a step to programmatically add a new environment, while running any needed migrations as part of deployment on that new environment. During the testing phase, utilize the newly-migrated environment. Assuming everything passes, we’ll create a new environment, run those migrations and update our aliases to target this created environment, and then deploy the code to the correct server.
Pre-requisites
- Understanding of the Contentful CLI to write migration scripts, Space Environments and using Environment Aliases to update an alias. Additionally to optionally deploy to a staging, or qa you’ll need two Custom Aliases named staging and qa in addition to the default master alias. Creating additional custom aliases is only available for Enterprise customers on current pricing plans.
- A CircleCI account, but it’s possible to modify the project to work with Jenkins, Travis, Buildbot or any other Continuous Integration software.
- A GitHub to host your code and Heroku for the deployment stage of this project.
You May Also Like:
TOX
In case you prefer any other CI platform — there is always an option to create a Build Matrix by using Tox.
envlist = py{27,34,35}-django{18,19,110,master}deps = py{27,34,35}: -rrequirements/test.txt django18: Django>=1.8,<1.9 django19: Django>=1.9,<1.10 django110: Django>=1.10,<1.11 djangomaster: https://github.com/django/django/archive/master.tar.gzcommands = ./runtests.pyignore_outcome = True
Tox is a generic virtualenv management and test command line tool. You may install it by using pip install tox or easy_install tox command.
Travis CI Pros:
- Build matrix out of the box
- Fast start
- Lightweight YAML config
- Free plan for open-sourced projects
- No dedicated server required
Travis CI Cons:
- Price is higher compared to CircleCI, no free enterprise plan
- Customization (for some stuff you’ll need 3rd parties)
Jenkins
![]()
Features:
- Jenkins is a self-contained Java-based program, ready to run out-of-the-box, with packages for Windows, Mac OS X and other Unix-like operating systems
- With hundreds of plugins in the Update Center, Jenkins integrates with practically every tool in the continuous integration and continuous delivery toolchain
- Jenkins can be extended via its plugin architecture, providing nearly infinite possibilities for what Jenkins can do
- Various job modes: Freestyle project, Pipeline, External Job, Multi-configuration project, Folder, GitHub Organization, Multibranch Pipeline
- Jenkins Pipeline. That’s a suite of plugins which supports implementing and integrating continuous delivery pipelines into Jenkins. Pipeline provides an extensible set of tools for modeling simple-to-complex delivery pipelines “as code” via the Pipeline DSL
- Allows you to launch builds with various conditions.
- You can run Jenkins with Libvirt, Kubernetes, Docker, and others.
- Rest API — have access to Controlling the amount of data you fetch, Fetch/Update config.xml, Delete a job, Retrieving all builds, Fetch/Update job description, Perform a build, Disable/Enable a job
Jenkins Pros:
- Price (it’s free)
- Customization
- Plugins system
- Full control of the system
Jenkins Cons:
- Dedicated server (or several servers) are required. That results in additional expenses. For the server itself, DevOps, etc…
- Time needed for configuration / customization
Conclusion
What CI system to chose? That depends on your needs and the way you are planning to use it.
CircleCI is recommended for small projects, where the main goal is to start the integration as fast as possible.
Travis CI is recommended for cases when you are working on the open-source projects, that should be tested in different environments.
Jenkins is recommended for the big projects, where you need a lot of customizations that can be done by usage of various plugins. You may change almost everything here, still this process may take a while. If you are planning the quickest start with the CI system Jenkins might not be your choice.
Which CI system do you prefer? Leave us a comment to share your thoughts.
You are always welcome to ask questions and share topics you want to read about!
Config Walkthrough
We always start with the version to clarify which version of CircleCI that we are using. Currently it has two version only.
We have a key. Each job represents a phase in your Build-Test-Deploy process. So everything else is going to live under that key.
We use the CircleCI provided Android image with the tag. You can see for more information about what images are available.
Now we’ll add several within the job. We start with so we can operate on the codebase.
Next we pull down the cache, if present. If this is your first run, or if you’ve changed either of your file, this won’t do anything. We run next to pull down the project’s dependencies. Normally you never call this task directly since it’s done automatically when it’s need, but calling it directly allows us to insert a step that will store the dependencies in order to speed things up for next time.
Then run the unit tests, and runs the built in linting tools to check your code for style issues.
After we get result from , we upload the build reports as job artifacts, and we upload the test metadata (XML) for CircleCI to process.
Building the app locally
Here’s what our folder structure will end up looking like. To follow along, you can fork or clone the complete project from here.
Dependencies
The only global install we’ll need is Node.js, so make sure you have that installed. I’m running version 12.13.0. If you have nvm installed, you can download and switch to 12.13.0 using the following command:
After that, let’s install our local project dependencies. Run the following command to initialize our file:
Install all our dependencies by running:
We’ll use:
- ESLint as our linting tool
- Mocha as our test framework
- chai as our assertion library for Mocha
- Istanbul for coverage reporting
To set up linting, run the following in your terminal at the root folder of our application:
Follow through with the steps to create your file.
Project code
Now that the setup is out of the way, let’s start work on our application. We’ll extend JavaScript’s String functionality by writing out additional prototype methods. In our file, add in:
Next, let’s write a few tests to make sure our methods work as expected. In our file, add these lines:
To run our tests, add the following to the portion of our file:
From here on, we can run our tests by executing this command:
As you can see, all our tests are passing for now.
![]()
Coverage
Now, let’s set up coverage reporting via Istanbul. This is pretty easy. All we need to do is add another script command to our file:
Now, running the command:
will both run our tests and generate a test coverage report which will be displayed in our terminal.
![]()
After executing the command, you’ll notice that two new folders, and have been added into our folder structure.
The HTML version of our coverage report can be found by opening the file, . If you’re not into tables fear not , the output format of the coverage reporter can be modified in several ways.
Adding tests to the Blog Project
Time to add some tests. You will be adding test scripts that will assert that the and methods work as expected.
Create a test file, , at the root of the project and paste this in:
In this code, the package (which can be found in ’s standard library) is imported. Two functions are then written to test the and methods respectively.
creates a new instance and saves an . It then checks the title to make sure the saved article is contained in the blog. If there is no saved article, an error causes the test to fail.
creates a new instance and saves an . Then it calls to retrieve the articles and checks that the blog contains any article. If there is no article, an error indicates that failed to return the new article.
How
If you do not already have an App that you want to test and deploy,
see:
2. Add Project
Click the «add project» button from the left-hand side menu.
Then select the project you want Circle-CI to test for you,
and click the «Setup Project» button:
![]()
You should see something like this now:
![]()
3. Setup File
Next, follow the on-screen instructions
to create a folder
and setup your file.
mkdir .circleci
vi .circleci/config.yml
Click on the «Copy To Clipboard» button to get the code.
paste the sample code into the
file you have open in your text editor.
e.g:
![]()
Save the file, commit it and push to .
e.g: https://github.com/nelsonic/circleci-hello-world-nodejs/commit/ad368321f3fa05686c97a8147f1e5570870bb527
4. Start Building
Once you have created the ,
scroll down the page and click on «Start building»:
![]()
You should be redirected to a build progress/status page:
![]()
The build and running the (single unit) test, took 3 seconds
and ended in «SUCCESS».
(it’s a «hello world» example, it should be fast and pass!)
Summary and next steps
We have just learned how to deploy the containerized app to the managed Kubernetes cluster with CircleCI and a GitHub repository. In practice, you will supplement the above workflow with another Git branch and create the pull request so others can review the changes you make.
If you are using CI/CD systems already, there is excellent https://circleci.com/docs/2.0/migration-intro/#section=getting-started to help you move your projects to CircleCI.
Fueled by this knowledge, you can now start building your GitOps workflows with CirlceCI, easily managing apps and freeing time to focus on new features. You can get started right away, by signing up for your CircleCI free trial today.
Migrations and seeders
Now that you have created a database and set up a connection to it, create migrations for the table.
From the terminal, create a migration file using the CodeIgniter CLI tool:
The CLI will ask you to name the migration file. Then, it will create the migration file in the directory. The name of the migration we are creating is .
The migration filename will be prefixed with a numeric sequence in the YYYY-MM-DD-HHIISS format. Go to the for a more detailed explanation.
Next, open the migration file located in and update its content:
Now, run your migrations:
This command creates a table in your database and adds the columns listed in the migration.
To make development easier, seed your database with some dummy client data. The fzaninotto faker bundle is a default dependency in the CodeIgniter skeleton. You can use it to add random posts to the database. Just as you did for the migration, use the CodeIgniter CLI tool to create a seeder for posts. Run:
When the CLI prompts you for a name, enter . A file will be created in the directory. Open the file and replace its content with:
Next, seed the database with dummy clients. Run:
![]()
Adding a project to CircleCI
Log into your CircleCI account. If you signed up with your GitHub account, all your repositories will be displayed on your project’s dashboard.
Next to your project click on Set Up Project.
![]()
CircleCI detects your configuration file and also gives you the option to use a default PHP configuration.
Click Use Existing Config and then Start Buildiing. Your first build process will start running. This build will fail. You will understand why later on.
![]()
Click build. You will see the job steps and the status of each job. Why did the build fail in the last step? It is because our application isn not passing all the tests.
![]()
This is an example of the beauty of continuous integration; you can catch bugs and issues beforei> they make it to production. The problem in this case is trivial, but you would get the same benefit using a more complex databases
It is time to make our pipeline build successfully by making our application pass the last test.
Our test is failing because our application throws an exception when a post cannot be found for the provided ID. When this happens, our application should catch the exception and return an error message in the response.


To do this, we need to make a few changes. First, create a directory named in the directory. In the directory, create a class named and add:
This class allows us handle only exceptions for items that could not be found in the database. If we need to, we can apply different logic for another exception (an , for example).
Next, use this exception in the function that is located in the class. Add:
Note: Don’t forget to add this import statement at the top of the file.
Change the function in the class:
Note: Don’t forget to add the import statement..
Commit and push your changes.
Once the changes are pushed successfully, go back to your CircleCI dashboard. There is a new build process running. When it is completed, the status changes to .
![]()
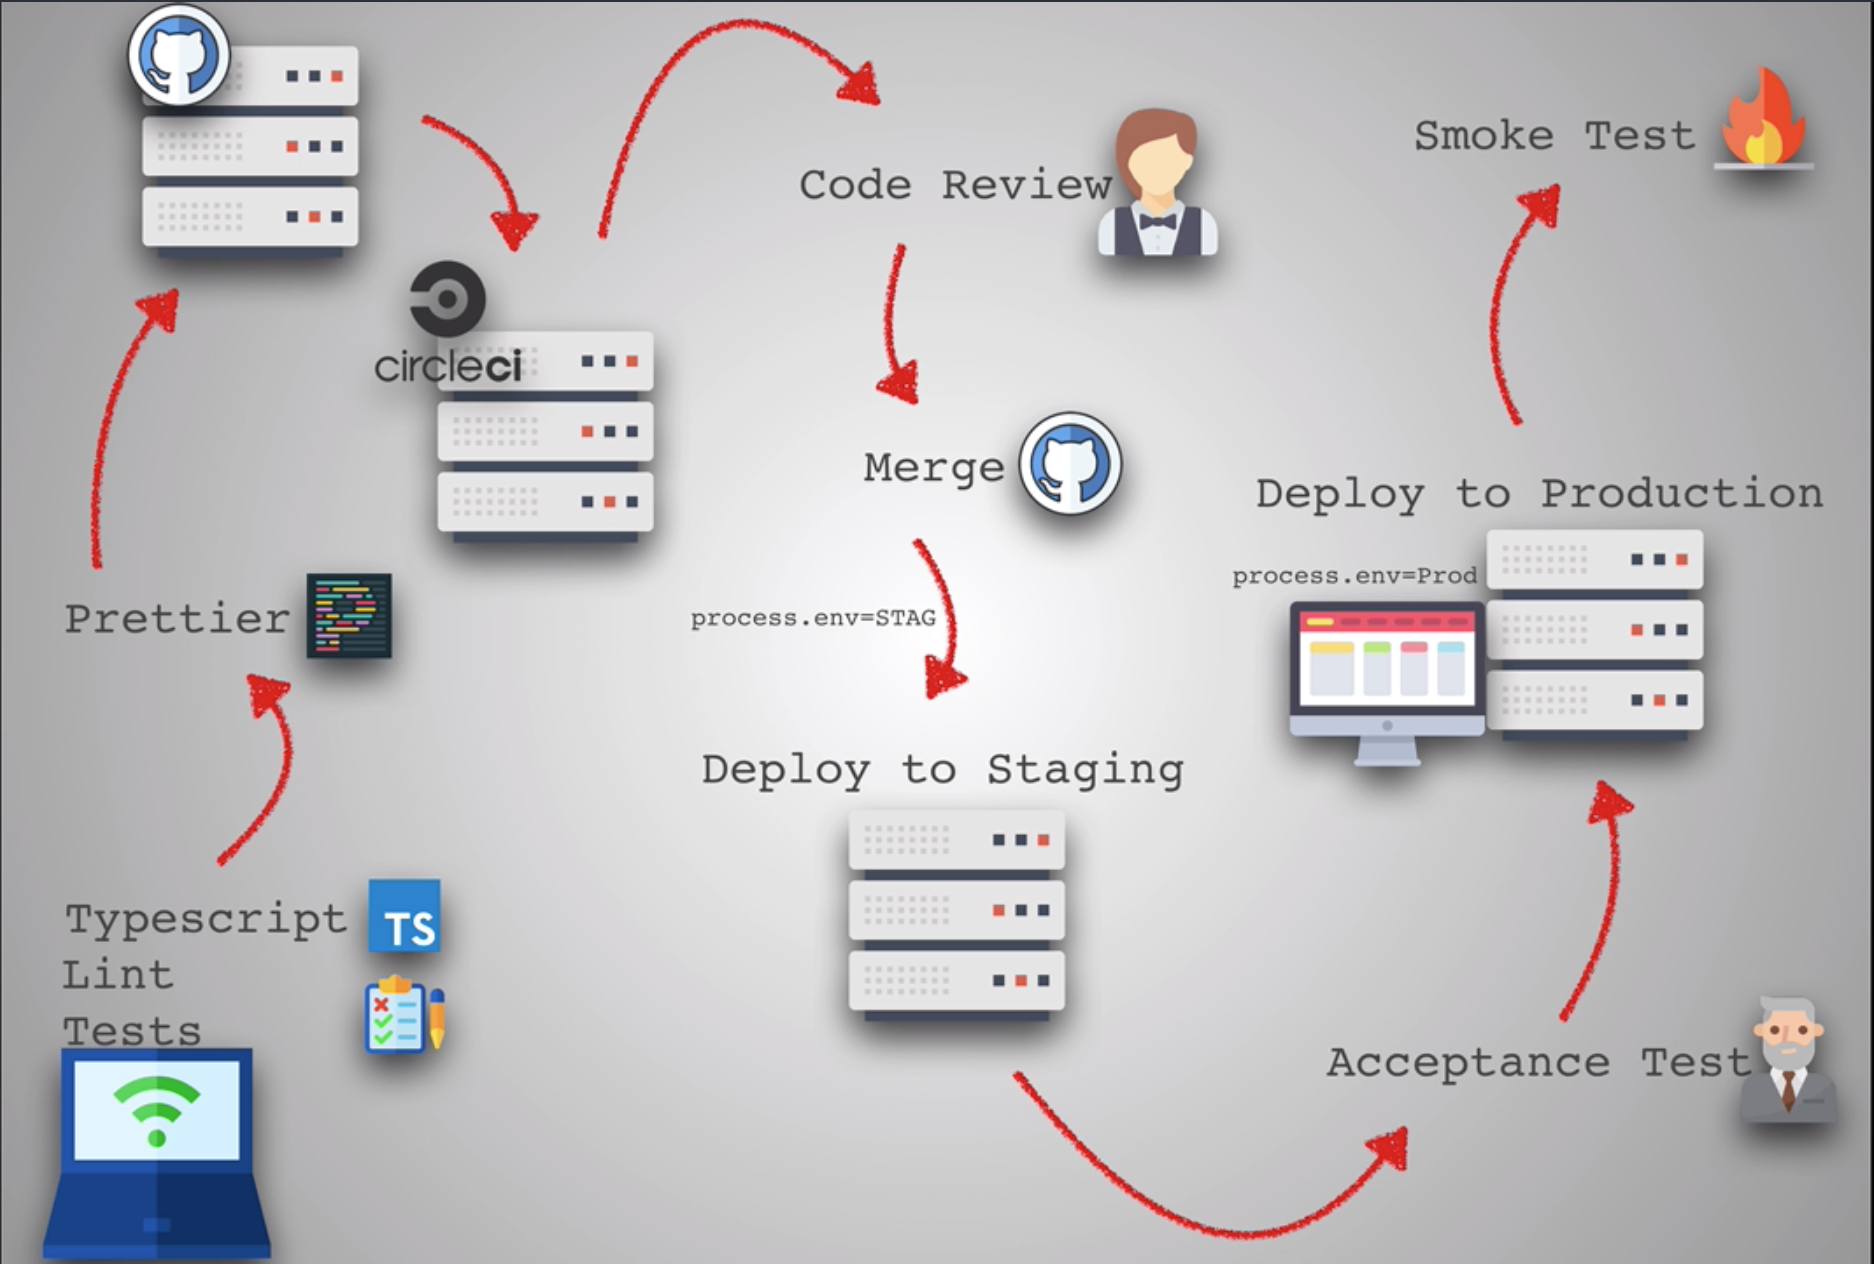
Setting up linter reporting
You’ll be happy to know that we can also set up code style reporting on Code Climate. We’re able to configure this either through our own file or through our Code Climate dashboard.
Let’s have a look at both methods.
Reporting through the Code Climate dashboard
Navigate to Repo Settings, and then the Maintainability tab on the dashboard as shown below.
![]()
From here, you can turn the different settings on or off depending on your requirements.
Reporting through .eslintrc file
For a more detailed style analysis, let’s use Code Climate’s ESLint plugin. We’re using ESLint mostly because our code is written in JavaScript, but feel free to use whatever plugins suit your project.
Navigate to the Plugins tab on your dashboard as shown.
![]()
Turn the plugin on by checking the ESLint box then clicking the Save button at the bottom of the page. To configure the ESLint plugin, we’ll need to create a file inside our root project folder.
We’re using , and instructing Code Climate to only review files. It does this by default, but I’ve added this in explicitly to show you how we can do it with other file extensions as well.
You can validate your Code Climate file by installing the Code Climate CLI and then running the following command:
Here’s my file:
We enable and disable rules in our file by using to disable a rule or to enable it. We’ll need to do this in order for Code Climate to treat enabled rules as issues. All we need now is to push our changes to GitHub in order to trigger a new build on CircleCI.
For a list of plugins you can use to extend your ESLint configuration, please have a look at the Code Climate ESLint documentation. If you want to experiment, there are also plenty of other plugins.
Running the application and testing the endpoints
Run the application:
Using Postman (or a similar application) we can verify that our application is working properly.
Writing tests
It looks like our endpoints work properly but we cannot be absolutely certain until we have tested for all possibilities. To be sure our application handles unexpected situations, we should write tests that simulate edge scenarios.
In the directory, create a folder called . In the directory, create a class named and add:
To save time, we are testing just 3 scenarios in this tutorial. First, we try to create a post and assert that the API handles it successfully and returns a HTTP response code. The second test checks that the API returns a response code when a request is made to get all posts. The last test is an edge case; it is a request for a post that does not exist on the database. We expect the system to return a response, because there is no such post on our database.
Next, we need to make some changes to the file. Modify the array:
With your test cases in place, you can add the CircleCI configuration.
Conclusion
In this tutorial, I have shown you how to set up a continuous integration pipeline for a CodeIgniter application using GitHub and CircleCI. While our application was a simple one, with minimal test coverage, we covered the key areas of pipeline configuration and feature testing in CodeIgniter.
Continuous integration truly shines when there is a strong testing culture reflected in the codebase. With used with test cases that determine how the application should respond to both expected and unexpected scenarios, continuous integration makes the process of adding (and deploying) new features much simpler. If all tests pass, the update gets deployed to the production servers. If not, the team is alerted and they can fix issues before they cause any downtime. Give continuous integration a try and make code base bottlenecks a thing of the past for your team!
The entire codebase for this tutorial is available on GitHub.
Happy coding!
Oluyemi is a tech enthusiast, programming freak, and a web development junkie who loves to embrace new technology.
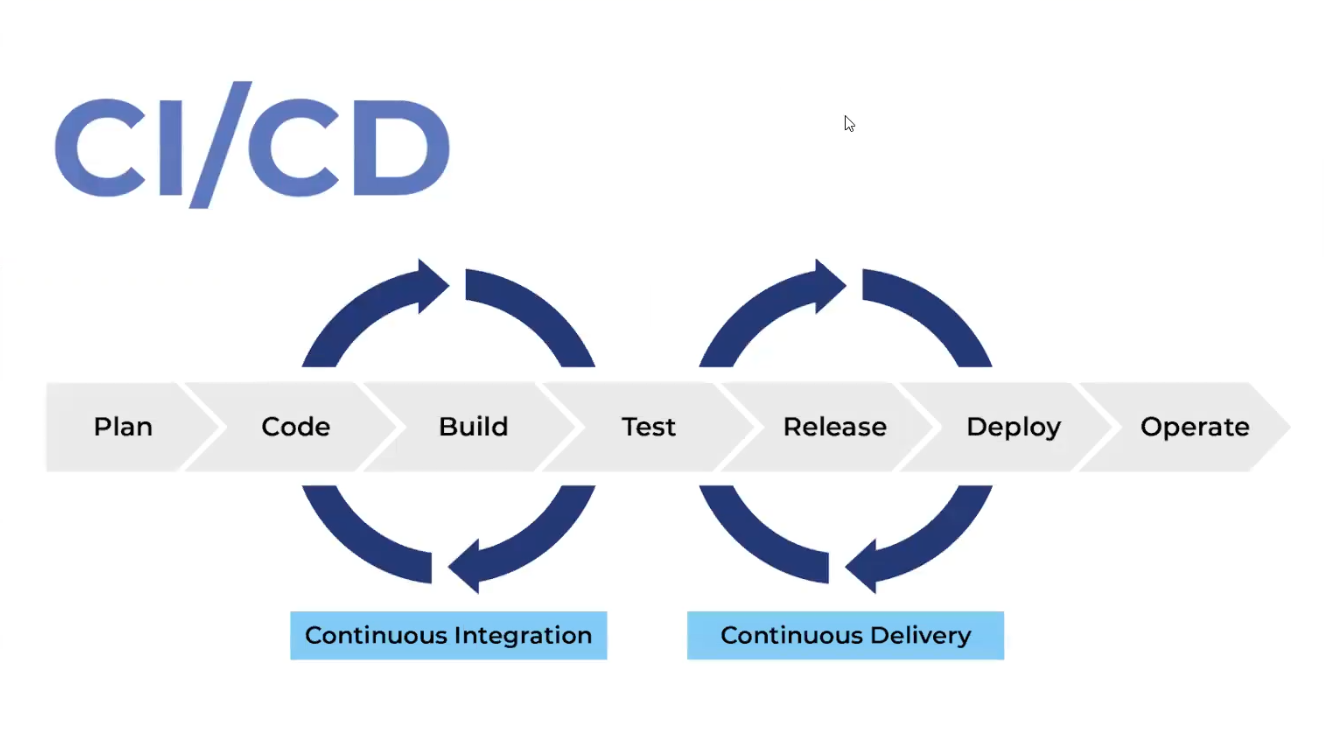
Part 2 — Continuous Deployment
Continuous Deployment (CD) is the perfect complement
to Continuous Integration (CI)
and people usually use the same «pipeline» (system) to automate it.
It just means that your application is automatically deployed
by the CI system (in this case CircleCI) when the PR is merged.
6. Pre-Deployment Checks
- Ensure that you have a script in your .
e.g:
{
  "scripts": {
    "start": "node server.js",
    "test": "node hello.test.js"
  }
}
- Ensure that your app runs on your before attempting
to deploy it to your chosen «cloud» provider.
Run the command:
npm start
![]()
Ok, so it’s working on ; we have a good «baseline». Onwards!
7. Deploy!
For this section we are doing an «advanced» deployment
to a DigitalOcean Instance using Dokku
(which is an Open Source Heroku «clone»).
It’s only «advanced» in that there are a few more «steps»
than deploying to Heroku, but don’t worry,
we have documented everything «step-by-step»
so it should only take you about 10 minutes to setup.
7.1 Add RSA Key
In order to deploy the app via SSH,
we need to add the SSH (RSA) key to CircleCI.
Thankfully this is a lot easier thank on Travis-CI!
In your app’s Settings page,
- Scroll down to the «Permissions» section.
- Click on SSH Permissions
-
Click on the button.
A «modal» window will appear which allows you to paste your Private Key.
![]()
![]()
We have successfully added our SSH Deployment RSA Key!
7.2 Add Deployment Scripts to your Project
Create a directory in your project.
mkdir bin
Copy the deployement scripts from:
https://github.com/nelsonic/circleci-hello-world-nodejs/tree/master/bin
You can either do this manually by downloading each file to your project,
or … using a script!
7.3 Add Required Environment Variables
Add any Environment Variables you need to your file.
The IP Address of the server is required as is the name.
e.g:
environment:
   SERVER_IP_ADDRESS: 138.68.163.126
   DOKKU_APP: circlecidemo
   TRAVIS: "false"
working example:
7.4 Add Command to Run Deployment Script
Add the following lines to your file:
# Use BASH instead of DASH! see: https://ubuntuforums.org/showthread.php?t=1932504
- run: ls -al /bin/sh && sudo rm /bin/sh && sudo ln -s /bin/bash /bin/sh && ls -al /bin/sh
# test shell script:
- run: echo ${SERVER_IP_ADDRESS}
- run: echo -e "Host $SERVER_IP_ADDRESS\n\tStrictHostKeyChecking no\n" >> ~/.ssh/config
- run: sh bin/deploy.sh
Working example:
In the build log you should see something like:
![]()
8. Check it Worked!
![]()
Notice the «Git Hash» value: dc933373388911d9405fb452c9753f0250766bb3
This corresponds to the latest commit on the branch:
https://github.com/nelsonic/circleci-hello-world-nodejs/commits/master
(GitHub only shows the first 7 characters of the has in the UI
in this case: )
![]()
So it worked! (the latest has been deployed by CircleCI!)
Alpha Tag
CircleCI Android Docker images are currently tagged with the suffix . This is to indicate the images are currently under development and might change in backwards incompatible ways from week to week.
- Please push your source code to your Bitbucket or GitHub repository that you’ve created. (write you file before push to your repository)
- Go to CircleCI Website > Go to app > On the left side choose ADD PROJECTS > Browse your project > Set Up Project
![]()
3. After Set Up Project Go to > JOBS or WORKFLOWS you will see your project was running build
![]()
4. You can click on your build and see more detail about it.

5. After finish your build, you can see the result like Test Summary, Artifacts, and your Configuration as below:
![]()
![]()
Finally we have run our first build in our CircleCI.
Подробный разбор процессов на вымышленном примере
Представим возможный процесс в вымышленной IT-компании и возможные требования, которые предъявляются от заинтересованных сторон. Возьмем небольшой IT-отдел, в котором присутствуют команды разработки, тестирования и эксплуатации. Рабочий процесс построен по Git-flow, а развертывание выполняется на Docker-хостах. Опишем основные требования каждой из сторон в формате таблицы.
|
Команда |
Требования |
|
Разработка |
Процессы CI/CD не должны отнимать много времени (отсутствие избыточных действий). Требуется простой для понимания процессов CI/CD (описание процесса в виде кода с минимумом ручных действий). По возможности процессы CI/CD во всех проектах должны быть похожи друг на друга (порог вхождения в новый проект). Требуется возможность быстрого отката изменений в случае возникших проблем (устранение влияния человеческого фактора на процесс развертывания). |
|
Тестирование |
Тестирование должно быть по возможности автоматизировано (правка от разработчика уже как минимум не приводит к нарушению работоспособности остальных частей системы). Должна быть возможность простого развертывания разных версий приложения для исследования регрессий (автоматизация процессов развертывания новых окружений). Необходим простой способ развертывания окружения с несколькими сервисами для интеграционного тестирования без необходимости привлекать другие отделы (простота использования). |
|
Эксплуатация |
Требуется минимизация простоя между развертываниями приложений (развертывание без простоя и минимизация человеческого фактора при развертывании новых версий). |
|
Бизнес |
Необходима возможность быстро доставлять новую функциональность пользователям для тестирования гипотез (автоматизация процессов и отсутствие избыточных действий). |
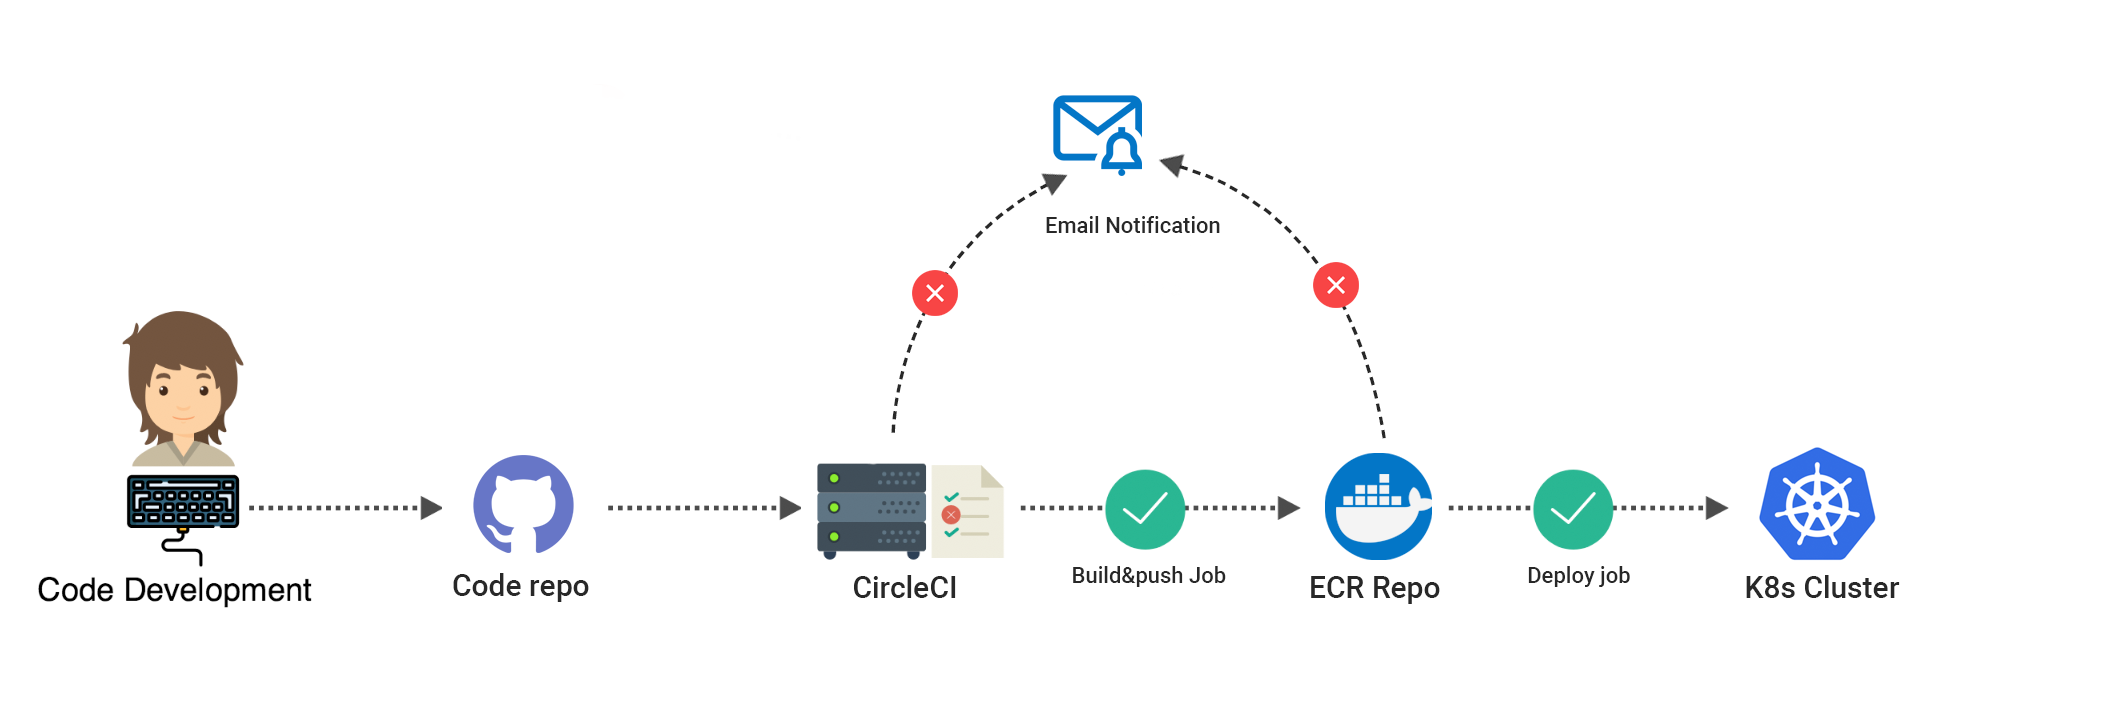
После сбора требований мы можем сформировать примерный вид процессов CI/CD в команде:
![]()
Разбор по части CI
Процесс интеграции не обязательно должен быть общим во всех случаях, намного удобнее описать различные сценарии для каждой ситуации. Давайте опишем возможные ситуации в качестве примера:
- При обновлении Pull/Merge Request выполняется статическая проверка кода на соответствие стандартам кодирования компании, статический анализ кода на возможные ошибки и уязвимости, автоматизированное модульное и функциональное тестирование с использованием заглушек вместо реальных внешних сервисов. При необходимости будет выполнена сборка образа для дальнейшей интеграции с остальными сервисами компании и внешними сервисами.
- При изменениях в основной ветке процесс аналогичен вышеприведенному, но с тем исключением, что теперь образ для интеграции собирается всегда: для дальнейшего развертывания на стенде для общего e2e и приемочного тестирования с остальными компонентами.
- При установке тега выполняется сборка образа с приложением для эксплуатации и smoke-тестирование после развертывания.
Почему нельзя построить общий процесс CI? В этом просто нет смысла – если выполнять сборку образа для интеграционного тестирования после ручного подтверждения для релизной ветки, то неминуемо случится ситуация, в которой про необходимость ручного запуска сборки просто забудут, и отдел тестирования будет проверять неактуальную версию приложения. Проводить проверку соответствия стандартам кодирования и юнит/функциональное тестирование на версии, помеченной тегом, – пустая трата времени, ведь все изменения уже есть в релизной ветке.
Чем больше будет автоматизированных задач, тем больше бессмысленной работы будет выполнено в общем процессе.
Разбор по части CD (Delivery)
В нашем случае доставкой является загрузка Docker-образа с приложением в Registry, из которого образы будут загружены на конкретный Docker-хост в процессе развертывания. Реестр может быть как общим, так и отдельным – для окружения разработки и тестирования и окружения эксплуатации. Тут все зависит от требований безопасности в конкретной компании.
Разбор по части CD (Deployment)
В нашем случае деплой в окружение эксплуатации может выполняться путем перенаправления всех новых HTTP-запросов на новый экземпляр приложения (основываясь на том, что максимальное время запроса ограничено сверху разумным лимитом для обеспечения развертывания без простоя).
Небольшим проектам или проектам без необходимости создания собственной инфраструктуры стоит обратить внимание на облачные хостинги, которые позволяют автоматизировать разработку проекта, налаживая процессы CI/CD
Выводы
Надеюсь, теперь вы точно разобрались в отличиях CI и CD, а также поняли всю важность автоматизации данных процессов. Подведем итог по всему вышесказанному – внедрение CI/CD само по себе является непрерывным процессом и постоянно видоизменяется в зависимости от новых требований отдельно взятой компании
В то же время процессы CI/CD требуют дополнительных инструментов и времени на внедрение, которое можно сократить, используя уже готовые сервисы для их автоматизации
Подведем итог по всему вышесказанному – внедрение CI/CD само по себе является непрерывным процессом и постоянно видоизменяется в зависимости от новых требований отдельно взятой компании. В то же время процессы CI/CD требуют дополнительных инструментов и времени на внедрение, которое можно сократить, используя уже готовые сервисы для их автоматизации.
Поэтому вывод о необходимости автоматизации того или иного процесса каждый должен сделать для себя сам. Я считаю, что автоматизация рассмотренных процессов должна присутствовать в каждой компании, которая связана с разработкой.


