How AEM Stores Headless Content
For the translation specialist, it is not important to understand in-depth how AEM manages headless content. However being familiar with the basic concepts and terminology will be helpful as you later use AEM’s translation tools. Most importantly you need to understand your own content and how it is structured in order to effectively translate it.
Content Models
In order for headless content to be delivered consistently across channels, regions, and languages, content must be highly structured. AEM uses Content Models to enforce this structure. Think of Content Models as a kind of template or pattern for creating headless content. Because every project has its own needs, every project defines its own Content Fragment Models. AEM has no fixed requirements or structure for such models.
The content architect works early in the project to define this structure. As the translation specialist, you should work closely with the content architect to understand and organize the content.
NOTE
It is the responsibility of the content architect to define the Content Models. The translation specialist should only be familiar with their structure as outlined in the following steps.
Because the Content Models define the structure of your content, you need to know which fields of your models must be translated. Generally you work with the content architect to define this. To browse the fields of your content models, follow the steps below.
- Navigate to Tools -> Assets -> Content Fragment Models.
- Content Fragment Models are generally stored in a folder structure. Tap or click on the folder for your project.
- The models are listed. Tap or click on the model to see the details.
- The Content Fragment Model Editor opens.
- The left column contains the fields of the model. This column interests us.
- The right column contains the fields that can be added to the model. This column we can ignore.
- Tap or click one of the fields of the model. AEM marks it and the details of that field are shown in the right column.
Take note of the field Property Name for all fields that must be translated. You will need this information later in the journey. These Property Names are required to inform AEM which fields of your content must be translated.
TIP
Generally the content architect provides the translation specialist with the Property Names of all of the fields required for translation. These field names are needed for later in the journey. The prior steps are provided for the understanding of the translation specialist.
Content Fragments
Content Models are used by the content authors to create the actual headless content. Content authors select which model to base their content on an then create Content Fragments. Content Fragments are instances of the models and represent actual content to be delivered headlessly.
If the Content Models are the patterns for the content, the Content Fragments are the actual content based on those patterns. The Content Fragments represent the content that must be translated.
Content Fragments are managed as assets in AEM as part of digital asset management (DAM). This is important since they are all located under the path .
Setup AEM
Follow the AEM Content Fragments documentation to setup a GraphQL endpoint for your AEM project. Additionally, in your AEM project, add the following configurations to allow your PWA Studio application to access the GraphQL endpoint:
-
Adobe Granite Cross-Origin Resource Sharing Policy (com.adobe.granite.cors.impl.CORSPolicyImpl)
Set the allowedorigin property to the full hostname of your PWA application.
Example: https://pwa-studio-test-vflyn.local.pwadev:9366
-
Apache Sling Referrer Filter (org.apache.sling.security.impl.ReferrerFilter.cfg.json)
Set the allow.hosts property to the hostname of your PWA application.
Example: pwa-studio-test-vflyn.local.pwadev
You can find full examples of both configurations here: https://github.com/adobe/aem-pwa-studio-extensions/tree/master/aem-cfm-blog-extension/aem/config/src/main/content/jcr_root/apps/blog-demo/config.
To showcase the GraphQL endpoint, we prepared some sample Content Fragment models and data via a content package. These work well together with the React Components provided with the PWA Studio extension.
Setup PWA Studio
Follow the Adobe Commerce PWA Studio documentation to setup your PWA Studio app.
To connect PWA Studio with the GraphQL endpoint of AEM, you can use the AEM Extension for PWA Studio.
-
Check out the repository
-
In your PWA Studio application, add the extension as a development dependency.
-
Add the Apollo Link wrapper to your PWA Studio application. In pwa-root/src/index.js, make the following changes:
You can find more details on the Apollo Client customisation in linkWrapper.js.
-
To extend the navigation component with a Blog entry, add the following adaptions to pwa-root/local-intercept.js:
You can find more details on the customization of the Navigation component in addBlogToNavigation.js and in the Extensibility Framework documentation of PWA Studio.
-
The Apollo client will expect the AEM GraphQL endpoint at https://pwa-studio/endpoint.js. To map the endpoint to this location, you will need to customise the UPWARD configuration of your PWA Studio application:
a. Add the AEM_CFM_GRAPHQL variable to pwa-root/.env and adapt it to point to your AEM Content Fragments GraphQL endpoint.Example: AEM_CFM_GRAPHQL=http://localhost:4503/content/graphql/global
b. Add a proxy resolver to your UPWARD configuration. A sample UPWARD configuration could look like this:
Workflow
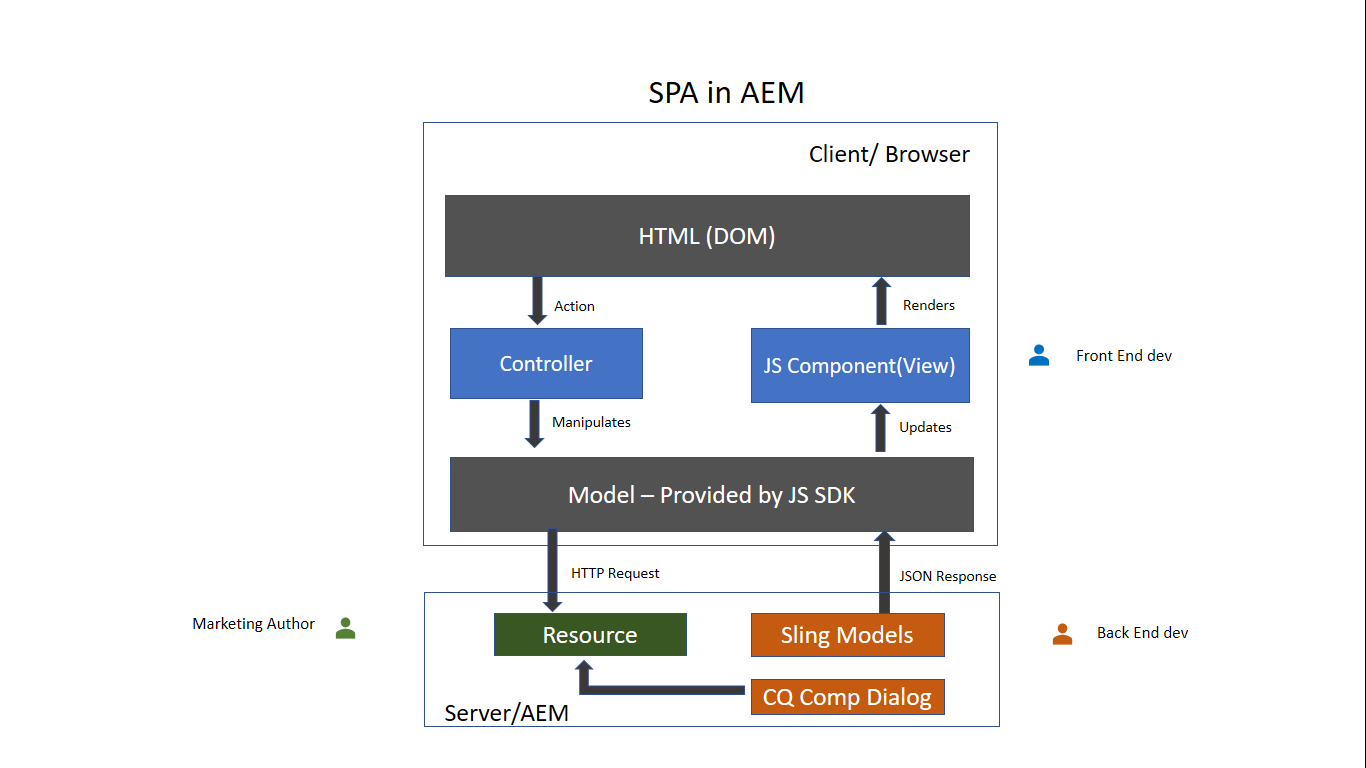
You can understand the flow of the interaction between the SPA and AEM by thinking of the SPA Editor as a mediator between the two.
- The communication between the page editor and the SPA is made using JSON instead of HTML.
- The page editor provides the latest version of the page model to the SPA via the iframe and messaging API.
- The page model manager notifies the editor it is ready for edition and passes the page model as a JSON structure.
- The editor doesn’t alter or even access the DOM structure of the page being authored rather it provides the latest page model.
![]()
Basic SPA Editor Workflow
Keeping in mind the key elements of the SPA Editor, the high-level workflow of editing a SPA within AEM appears to the author as follows.
![]()
- SPA Editor loads.
- SPA is loaded in a separate frame.
- SPA requests JSON content and renders components client-side.
- SPA Editor detects rendered components and generates overlays.
- Author clicks overlay, displaying the component’s edit toolbar.
- SPA Editor persists edits with a POST request to the server.
- SPA Editor requests updated JSON to the SPA Editor, which is sent to the SPA with a DOM Event.
- SPA re-renders the concerned component, updating its DOM.
NOTE
Keep in mind:
- The SPA is always in charge of its display.
- The SPA Editor is isolated from the SPA itself.
- In production (publish), the SPA editor is never loaded.
Client-Server Page Editing Workflow
This is a more detailed overview of the client-server interaction when editing a SPA.
![]()
-
The SPA initializes itself and requests the page model from the Sling Model Exporter.
-
The Sling Model Exporter requests the resources that compose the page from the repository.
-
The repository returns the resources.
-
The Sling Model Exporter returns the model of the page.
-
The SPA instantiates its components based on the page model.
-
6a The content informs the editor that it is ready for authoring.
6b The page editor requests the component authoring configurations.
6c The page editor receives the component configurations.
-
When the author edits a component, the page editor posts a modification request to the default POST servlet.
-
The resource is updated in the repository.
-
The updated resource is provided to the POST servlet.
-
The default POST servlet informs the page editor that the resource has been updated.
-
The page editor requests the new page model.
-
The resources that compose the page are requested from the repository.
-
The resources that compose the page are provided by the repository to the Sling Model Exporter.
-
The updated page model is returned to the editor.
-
The page editor updates the page model reference of the SPA.
-
The SPA updates its components based on the new page model reference.
-
The component configurations of the page editors are updated.
17a The SPA signals the page editor that content is ready.
17b The page editor provides the SPA with component configurations.
17c The SPA provides updated component configurations.
Authoring Workflow
This is a more detailed overview focusing on the authoring experience.
![]()
-
The SPA fetches the page model.
-
2a The page model provides the editor with the data required for authoring.
2b When notified, the component orchestrator update the content structure of the page.
-
The component orchestrator queries the mapping between an AEM resource type and a SPA component.
-
The component orchestrator dynamically instantiates the SPA component based on the page model and component mapping.
-
The page editor updates the page model.
-
6a The page model provides updated authoring data to the page editor.
6b The page model dispatches changes to the component orchestrator.
-
The component orchestrator fetches the component mapping.
-
The component orchestrator updates the content of the page.
-
When the SPA completes updating the content of the page, the page editor loads the authoring environment.
Webpack DevServer — Watch and aemsync
Another technique is to have Node.js watch for any file changes to the src files in the module. Whenever a file changes it will quickly compile the client library and use the aemsync npm module to sync the changes to a running AEM server.

-
Start the webpack dev server in watch mode from a new terminal by running the following command from within the ui.frontend module:
-
This will compile the files and sync the changes with AEM at http://localhost:4502
-
Navigate to AEM and the LA Skateparks article: http://localhost:4502/content/wknd/us/en/magazine/guide-la-skateparks.html?wcmmode=disabled
The changes should be deployed to AEM. There is a slight delay and you will have to refresh the browser manually to see the updates. However viewing the changes directly in AEM is beneficial if you are working with new components and dialog authoring.
-
Revert the change to and save the changes. The changes should again be synced with the local instance of AEM after a slight delay.
-
Stop the webpack dev server and perform a full Maven build from the root of the project:
Again the module is compiled, transformed to clientlibraries and deployed to AEM via the module. However this time Maven performs everything for us.
Настройка единого входа Azure AD
Выполните следующие действия, чтобы включить единый вход Azure AD на портале Azure.
-
На портале Azure на странице интеграции с приложением Adobe Experience Manager найдите раздел Управление и выберите Единый вход.
-
На странице Выбрать метод единого входа выберите SAML.
-
На странице Настройка единого входа с помощью SAML щелкните значок карандаша, чтобы открыть диалоговое окно Базовая конфигурация SAML для изменения параметров.
-
Если вы хотите настроить приложение в режиме, инициируемом поставщиком удостоверений, в разделе Базовая конфигурация SAML введите значения следующих полей.
а. В текстовом поле Идентификатор введите уникальное значение, которое определяется на сервере AEM.
b. В текстовом поле URL-адрес ответа введите URL-адрес в формате .
Примечание
Значение URL-адреса ответа приведено для примера. Обновите значение URL-адреса ответа актуальным значением. Чтобы его получить, свяжитесь с группой поддержки клиента Adobe Experience Manager Client. Можно также посмотреть шаблоны в разделе Базовая конфигурация SAML на портале Azure.
-
Чтобы настроить приложение для работы в режиме, инициируемом поставщиком услуг, щелкните Задать дополнительные URL-адреса и выполните следующие действия.
В текстовом поле URL-адрес для входа введите URL-адрес сервера Adobe Experience Manager.
-
На странице Настройка единого входа с помощью SAML в разделе Сертификат подписи SAML щелкните Загрузить, чтобы загрузить требуемый сертификат (Base64) из предложенных вариантов, и сохраните его на компьютере.
-
Скопируйте требуемый URL-адрес из раздела Set up Adobe Experience Manager (Настройка Adobe Experience Manager).
Создание тестового пользователя Azure AD
В этом разделе описано, как на портале Azure создать тестового пользователя с именем B.Simon.
- На портале Azure в области слева выберите Azure Active Directory, Пользователи, а затем — Все пользователи.
- В верхней части экрана выберите Новый пользователь.
- В разделе Свойства пользователя выполните следующие действия.
- В поле Имя введите .
- В поле Имя пользователя введите . Например, .
- Установите флажок Показать пароль и запишите значение, которое отображается в поле Пароль.
- Нажмите кнопку Создать.
Назначение тестового пользователя Azure AD
В этом разделе описано, как включить единый вход в Azure для пользователя B.Simon, предоставив этому пользователю доступ к Adobe Experience Manager.
- На портале Azure выберите Корпоративные приложения, а затем — Все приложения.
- Из списка приложений выберите Adobe Experience Manager.
- На странице «Обзор» приложения найдите раздел Управление и выберите Пользователи и группы.
- Выберите Добавить пользователя, а в диалоговом окне Добавление назначения выберите Пользователи и группы.
- В диалоговом окне Пользователи и группы выберите B.Simon в списке пользователей, а затем в нижней части экрана нажмите кнопку Выбрать.
- Если пользователям необходимо назначить роль, вы можете выбрать ее из раскрывающегося списка Выберите роль. Если для этого приложения не настроена ни одна роль, будет выбрана роль «Доступ по умолчанию».
- В диалоговом окне Добавление назначения нажмите кнопку Назначить.
Exporting Editable Content
You can export a component and keep it editable.
The function returns a which is the result of a composition that extends the provided with the class names and attributes that enable the authoring. This component can be exported to later be instantiated in the markup of your application.
When exported using the or functions, the component, is wrapped with a component which provides standard components access to the latest version of the page model or a precise location in that page model.
For more information see the SPA Blueprint document.
NOTE
By default you receive the entire model of the component when using the function.
Next Steps
- Getting Started with SPAs in AEM using Angular shows how a basic SPA is built to work with the SPA Editor in AEM using Angular.
- SPA Editor Overview goes into more depth into the communication model between AEM and the SPA.
- WKND SPA Project is a step-by step tutorial implementing a simple SPA project in AEM.
- Dynamic Model to Component Mapping for SPAs explains the dynamic model to component mapping and how it works within SPAs in AEM.
- SPA Blueprint offers a deep dive into how the SPA SDK for AEM works in case you wish to implement SPAs in AEM for a framework other than React or Angular or simply would like a deeper understanding.
Create the project
There are a couple options for creating a Maven Multi-module project for AEM. This tutorial will leverage the Maven AEM Project Archetype 26. Cloud Manager also provides a UI wizard to initiate the creation of an AEM application project. The underlying project generated by the Cloud Manager UI results in the same structure as using the archetype directly.
NOTE
This tutorial uses version 26 of the archetype. It is always a best practice to use the latest version of the archetype to generate a new project.
The next series of steps will take place using a UNIX based command line terminal, but should be similar if using a Windows terminal.
-
Open up a command line terminal. Verify that Maven is installed:
-
Verify that the adobe-public profile is active by running the following command:
If you do not see the adobe-public it is an indication that the Adobe repo is not properly referenced in your file. Please revisit the steps to install and configure Apache Maven in .
-
Navigate to a directory in which you want to generate the AEM project. This can be any directory in which you want to maintain your project’s source code. For example a directory named beneath the user’s home directory:
-
Paste the following into the command line to generate the project in batch mode:
NOTE
If targeting AEM 6.5.5+ replace with . If targeting 6.4.8+, use .
A full list of available properties for configuring a project .
-
The following folder and file structure will be generated by the Maven archetype on your local file system:
Set up local development environment for Document of Record (DoR)
AEM Forms as a Cloud Services provides a docker-based SDK environment for easier development of Document of Record and for using other microservices. It frees you from manually configuring platform specific binaries and adaptations. To setup the environment:
-
Install and Configure Docker:
-
(For Microsoft Windows) Install Docker Desktop. It configures Docker Engine and docker-compose on your machine.
-
(Apple macOS) Install Docker Desktop for Mac. It includes Docker Engine, Docker CLI client, Docker Compose, Docker Content Trust, Kubernetes, and Credential Helper.
-
(For Linux) Install and Docker Compose on your machine.
NOTE
-
For Apple macOS, whitelist folders containing local AEM Author instances.
-
Docker Desktop for Windows supports two backends, Hyper-V
(legacy) and WSL2 (modern). File sharing is automatically
managed by Docker when using WSL2 (modern). You have to
explicitly configure file sharing while using Hyper-V (legacy).
-
-
Create a folder, say aem-sdk, in parallel to your author and publish instances. For example C:\aem-sdk.
-
Extract the file.
-
Create an environment variable AEM_HOME and point to local AEM Author installation. For example C:\aem\author.
-
Open sdk.bat or sdk.sh for editing. Set the AEM_HOME to point to local AEM Author installation. For example C:\aem\author.
-
Open command prompt and navigate to the folder.
-
Ensure that your local AEM Author instance is up and running. Run the following command to start the SDK:
- (on Microsoft Windows)
- (on Linux or Apple Mac OS)
NOTE
If you have defined the environment variable in the sdk.sh file, specifying it at the command line is optional. The option to define the environment variable at the command line is provided to execute the command without updating the shell script.
You can now use the local development environment to render Document of Record. To test, upload an XDP file to your environment and render it. for example, http://localhost:4502/libs/xfaforms/profiles/default.print.pdf?template=crx:///content/dam/formsanddocuments/cheque-request.xdp converts the XDP file to the PDF document.
How to install a documentation package
In order to Install a legacy documentation package you must have Experience Manager installed and running on your local drive or network drive.
Download the documentation package
-
From the table above, select the link for the Experience Manager documentation version to download. For example, AEM 5.6.1.
-
Login using your Adobe ID. If you don’t have an ID, create one.
-
Select the the Download button.
-
Here is an example of what you will see:
![]()
Install the package on your local instance
NOTE
For AEM 6.2, you might need to start your local instance with an increased maximum heap size, by using this command for example:
-
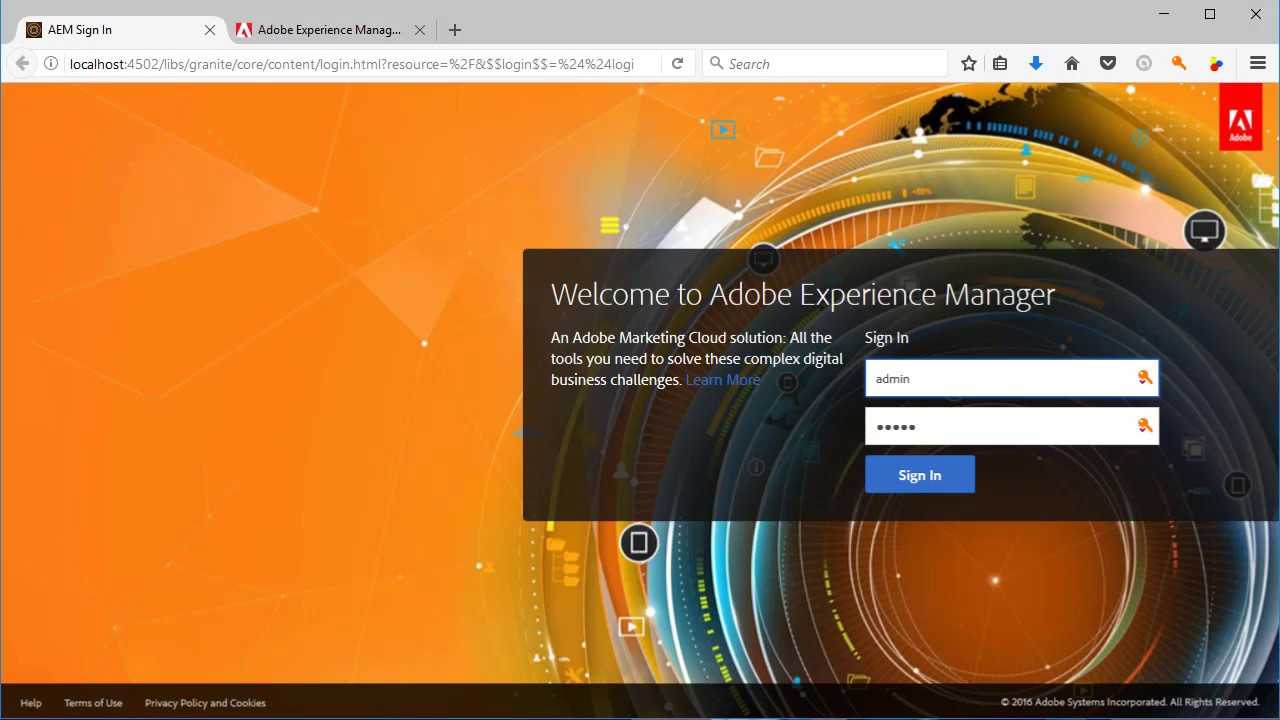
Open the Experience Manager user interface. In a web browser enter: . Login as an Administrator.
-
-
Select Tools > Deployment > Packages.
-
From the Package Manager UI, select Upload Package.
-
Browse to the location where you downloaded the AEM package.
-
Select the package and click OK.
-
Once the package has been uploaded you will need to install it.
-
In Package Manager UI, locate the package and select Install.
-
On the confirmation dialog select Install again. Note: the installation will take a few minutes.
-
In a web browser, launch the documentation page. Using the AEM 5.6.1 example, the URL would be: http://localhost:4502/libs/aem-docs/content/en/cq/5-6-1.html.


Установка и подключение модуля AEM диспетчера.
Скачайте соответствующий модуль диспетчера с этой страницы.
Далее считаем, что мы скачали архив dispatcher-apache2.2-windows-x86-4.2.0.zip.
Распакуйте архив и скопируйте disp_apache2.2.dll из него в папку C:\Apache22\modules.
Добавьте следующие настройки в конец файла конфигурации httpd-сервера C:\Apache22\conf\httpd.conf:
Первая строка включает модуль диспетчера
Важно указать правильное имя dll-файла вашего диспетчера, например, в нашем случае modules\disp_apache2.2.dll
Следующий 2-ой «ifmodule» блок настраивает некоторые начальные параметры диспетчера:
- DispatcherConfig — устанавливает полное имя файла настроек диспетчера. В нашем случае это conf/dispatcher.any. Вы можете скопировать настройки по умолчанию из файла dispatcher.any, лежащего внутри ранее распакованного архива диспетчера.
- DispatcherLog — задает полное имя файла логирования диспетчера. В нашем случае это logs/dispatcher.log.
- DispatcherLogLevel — степень подробности информации в файле логирования, начиная от самой краткой 0 (записывать только ошибки) до наиболее полной 3 (отладочная информация). В нашей примере установлен уровень подробности для отладки.
- DispatcherUseProcessedURL — определяет, использовать или нет предварительную обработку адресов URL перед последующей обработкой диспетчером:
- 0 — использовать исходные адреса URL, переданные веб-серверу.
- 1 — диспетчер использует адреса URL, прошедшие предварительную обработку различными обработчиками до диспетчера (например, обработка модулем mod_rewrite) вместо того, чтобы использовать исходные адреса URL, переданные веб-серверу.
Следующий 3-ий блок «directory» настраивает обработку входящих запросов с помощью диспетчера для полного дерева сайта.
Наконец-то установка httpd-сервера и диспетчера завершена. Перезапустите ваш httpd-сервер, потому что изменения настроек не действуют в процессе работы httpd-сервера и активируются только при запуске сервера. Если вы видите, что появился файл logs/dispatcher.log, значит у вас httpd-сервер работает правильно, и модуль диспетчера подключен тоже должным образом.
Setup PWA Studio
Follow the Adobe Commerce PWA Studio documentation to setup your PWA Studio app.
To connect PWA Studio with the GraphQL endpoint of AEM, you can use the AEM Extension for PWA Studio.
-
Check out the repository
-
In your PWA Studio application, add the extension as a development dependency.
-
Add the Apollo Link wrapper to your PWA Studio application. In pwa-root/src/index.js, make the following changes:
You can find more details on the Apollo Client customisation in linkWrapper.js.
-
To extend the navigation component with a Blog entry, add the following adaptions to pwa-root/local-intercept.js:
You can find more details on the customization of the Navigation component in addBlogToNavigation.js and in the Extensibility Framework documentation of PWA Studio.
-
The Apollo client will expect the AEM GraphQL endpoint at https://pwa-studio/endpoint.js. To map the endpoint to this location, you will need to customise the UPWARD configuration of your PWA Studio application:
a. Add the AEM_CFM_GRAPHQL variable to pwa-root/.env and adapt it to point to your AEM Content Fragments GraphQL endpoint.Example: AEM_CFM_GRAPHQL=http://localhost:4503/content/graphql/global
b. Add a proxy resolver to your UPWARD configuration. A sample UPWARD configuration could look like this:
How to Use
This extension is considered an example implementation of how to connect a PWA Studio application with AEM to retrieve and render content via GraphQL.
Depending on your use case, you want to create your own custom Content Fragment models which result in a custom GraphQL schema which can then be consumed by your own React components.
Production setups can vary in multiple aspects.
- You can have a single federated GraphQL endpoint which combines AEM and Magento GraphQL data instead of customising Apollo client.
- Your PWA Studio application could use the AEM GraphQL endpoint URL directly, without a proxy with UPWARD. The proxy could also be moved to a different layer (e.g. CDN).
- Which approach fits best for you also heavily depends on how you deliver the PWA Studio application to the end user.
This extension comes with two examples.
Blog
Display blog posts based on some Content Fragment models. In addition it contains examples of how to configure the Apollo client to work with the AEM GraphQL endpoint and how to extend the navigation component in PWA Studio. See GitHub for more details.
PDP Enrichment
Enables marketers to easily enrich PDPs with additional content that is managed as Content Fragments. See GitHub for more details.
Inspect the project
The generated AEM project is made up of individual Maven modules, each with a different role. This tutorial and a majority of development focus on these modules:
-
core — Java Code, primarily back-end developers.
-
ui.frontend — Contains source code for CSS, JavaScript, Sass, Type Script, primarily for front-end developers.
-
ui.apps — Contains component and dialog definitions, embeds compiled CSS and JavaScript as client libraries.
-
ui.content — contains structural content and configurations like editable templates, metadata schemas (/content,%20/conf?lang=en).
-
all — this is an empty Maven module that combines the above modules into a single package that can be deployed to an AEM environment.
![]()
See the AEM Project Archetype documentation to learn more details of all the Maven modules.
Inclusion of Core Components
AEM Core Components are a set of standardized Web Content Management (WCM) components for AEM. These components provide a baseline set of a functionality and are designed to be styled, customized and extended for individual projects.
AEM as a Cloud Service environments include the latest version of AEM Core Components. Therefore projects generated for AEM as a Cloud Service do not include an embed of AEM Core Components.
For AEM 6.5/6.4 generated projects, the archetype automatically embeds AEM Core Components in the project. It is a best practice for AEM 6.5/6.4 to embed AEM Core Components to ensure the latest version gets deployed with your project. More information about how Core Components are .
Congratulations!
Congratulations, the Article Page now has some consistent styles that match the WKND brand and you have become familiar with the ui.frontend module!
Next Steps
Learn how to implement individual styles and re-use Core Components using Experience Manager’s Style System. Developing with the Style System covers using the Style System to extend Core Components with brand-specific CSS and advanced policy configurations of the Template Editor.
View the finished code on GitHub or review and deploy the code locally at on the Git brach .
- Clone the github.com/adobe/aem-wknd-guides repository.
- Check out the branch.
Webpack DevServer — Static Markup
In the previous couple of exercises we were able to update several Sass files in the ui.frontend module and through a build process, ultimately see these changes reflected in AEM. Next we will look at a techniques that leverage a webpack-dev-server to rapidly develop our front-end styles against static HTML.
This technique is handy if the majority of the styles and front-end code will be performed by a dedicated Front End developer who may not have easy access to an AEM environment. This technique also allows the FED to make modifications directly to the HTML, which can then be handed off to an AEM developer to implement as components.
-
Copy the page source of the LA skatepark article page at http://localhost:4502/content/wknd/us/en/magazine/guide-la-skateparks.html?wcmmode=disabled.
-
Re-open your IDE. Paste the copied markup from AEM into the in the ui.frontend module beneath .
-
Edit the copied markup and remove any references to clientlib-site and clientlib-dependencies:
We can remove those references because the webpack dev server will generate these artifacts automatically.
-
Start the webpack dev server from a new terminal by running the following command from within the ui.frontend module:
-
This should open a new browser window at http://localhost:8080/ with static markup.
-
Edit the file file. Replace the rule with the following:
Save the changes.
-
You should automatically see the changes automatically reflected in the browser on http://localhost:8080.
-
Review the file. This contains the webpack configuration used to start the webpack-dev-server. Note that it proxies the paths and from a locally running instance of AEM. This is how the images, and other clientlibs (not managed by the ui.frontend code) are made available.
CAUTION
The image src of the static markup points to a live image component on a local AEM instance. Images will appear broken if the path to the image changes, if AEM is not started, or if the browser has not logged into the local AEM instance. If handing off to an external resource it’s also possible to replace the images with static references.
-
-
You can stop the webpack server from the command line by typing .

Additional Resources
Documentation journeys show you how AEM solves a business problem by providing a narrative that guides you through complex, interrelated processes and features. A journey illustrates how multiple features work together to serve a single business need.
As such journeys are designed to stand on their own. However a number of them can be related to each other. Check out these additional journeys for more information on how AEM’s powerful features work together.
- AEM Headless tutorials — If you prefer to learn by doing and are technically inclined, take our hands-on tutorials organized by API and framework, that explore creating and using applications built on AEM Headless.
- AEM Headless Translation Journey — This documentation journey gives you a broad understanding of headless technology, how AEM serves headless content, and how you can translate it.
- Headless Authoring Journey — Start here for a guided journey through the powerful and flexible headless features of AEM, their capabilities, and how to model your content on your first headless project.
- Headless Architect Journey — Start here for an introduction to the powerful, and flexible, headless features of Adobe Experience Manager, and how to model content for your project.
- AEM technical documentation — If you already have a firm understanding of AEM and headless technologies, you may want to directly consult our in-depth technical docs.
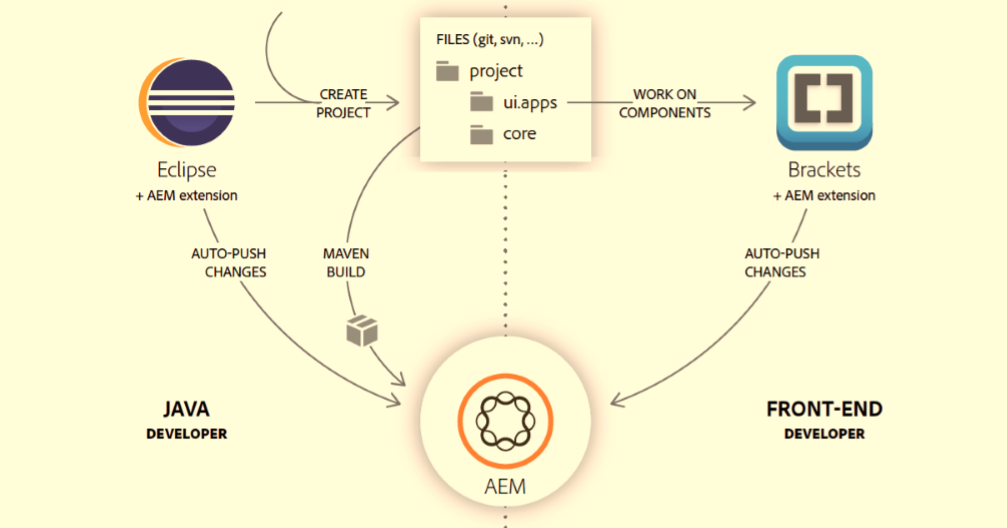
Set up the development IDE
AEM development primarily consists of Java and Front-end (JavaScript, CSS, etc) development and XML management. The following are the most popular IDEs for AEM development.
IntelliJ IDEA
IntelliJ IDEA is a powerful IDE for Java development. IntelliJ IDEA comes in two flavors, a free Community edition and a commercial (paid) Ultimate version. The free Community version is sufficient for AEM development, however the Ultimate expands its capability set.
- Download IntelliJ IDEA
Microsoft Visual Studio Code
Visual Studio Code (VS Code) is a free, open-source tool for front-end developers. Visual Studio Code can be set up to integrate content sync with AEM with the help of an Adobe tool, .
Visual Studio Code is the ideal choice for front-end developers primarily creating front-end code; JavaScript, CSS and HTML. While VS Code has Java support via extensions, it may lack some of the advanced features provided by more Java-specific.
- Download Visual Studio Code
- Download aemfed VS Code extension
- Download AEM Sync VS Code extension
Eclipse
Eclipse IDE is a popular IDEs for Java development, and supports the AEM Developer Tools plug-in provided by Adobe, providing an in-IDE GUI for authoring and to synchronize JCR content with a local AEM instance.
- Download Eclipse
- Download Eclipse Dev Tools


