vCenter 6.7 High Availability Configuration
Now, we’ll look at how to perform the vCenter HA configuration in automatic mode with an embedded Platform Services Controller in vCenter Server 6.7.
Prerequisites
- vCenter Server Appliance which is Active node must have a static IP address and SHH is enabled
- Verify that your environment meets one of the following requirements
- The vCenter Server Appliance that will become the Active node is managing its own ESXi host and its own virtual machine. This configuration is sometimes called a self-managed vCenter Server.
- The vCenter Server Appliance is managed by another vCenter Server. They both use an external Platform Services Controller, and both are running vSphere 6.5 or later.
vCenter HA network should be available on all the three ESXi nodes where you are going to deploy Active, Passive and Witness node
vCenter HA with an External Platform Services Controller
To configure vCenter HA with an external Platform Services Controller, you must set up an external load balancer to protect the Platform Services Controller. If one Platform Services Controller becomes unavailable, the load balancer directs the vCenter Server Appliance to a different Platform Services Controller.
To configure this, you must use at least two external Platform Services Controller instances and these instances replicate vCenter Single Sign-On information and other Platform Services Controller information. While deploying you must select the external Platform Services Controller and vCenter Server Appliance will point to a load balancer that provides high availability for Platform Services Controller.
Once the vCenter HA deployment starts, the vCenter Server Appliance will clone a Passive node and later Witness node. Also, as part of the cloning process, the information about the external Platform Services Controller and the load balancer is cloned as well.
If the Platform Services Controller instance becomes unavailable, the load balancer redirects requests for authentication or other services to the second Platform Services Controller instance.
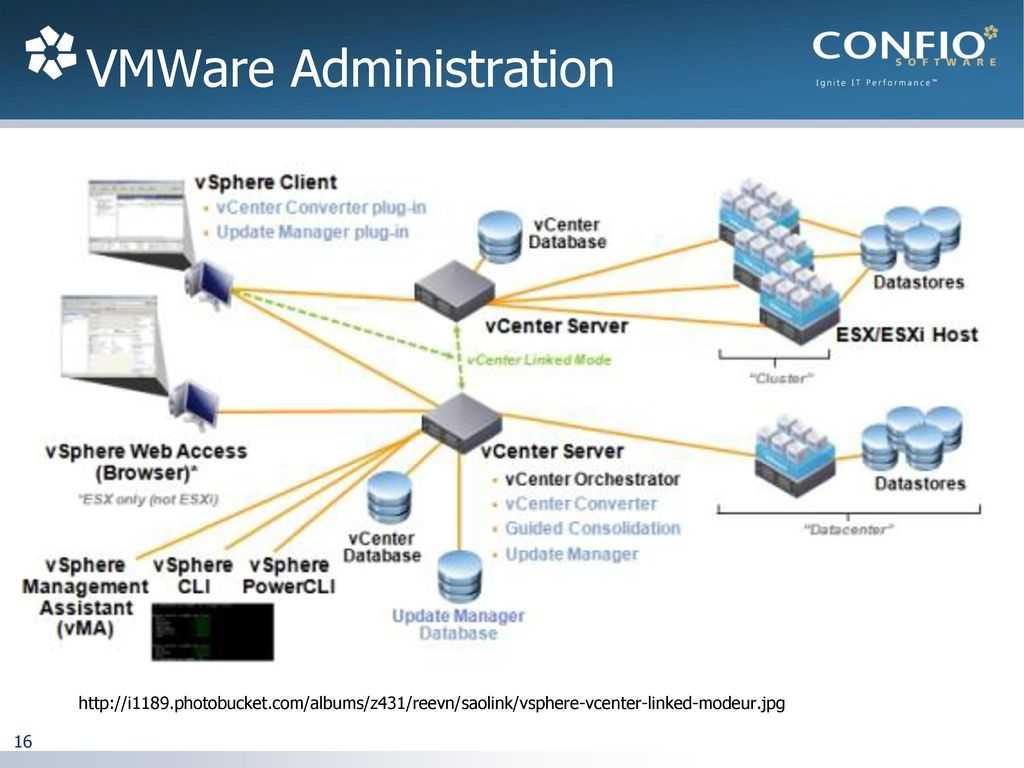
vCenter Architecture Overview
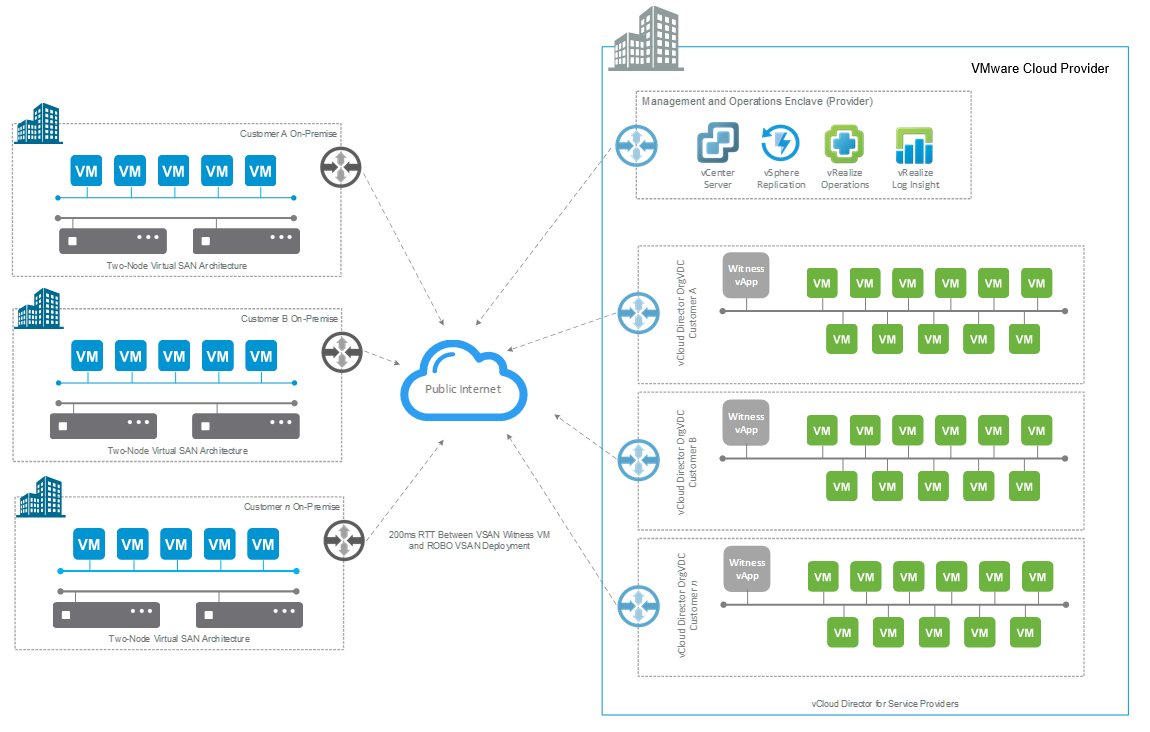
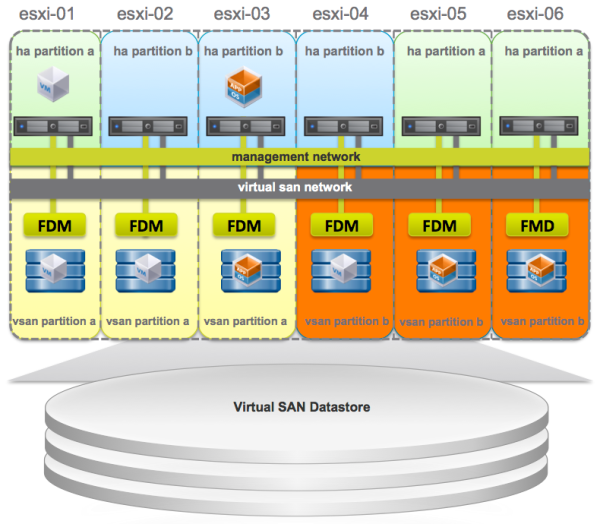
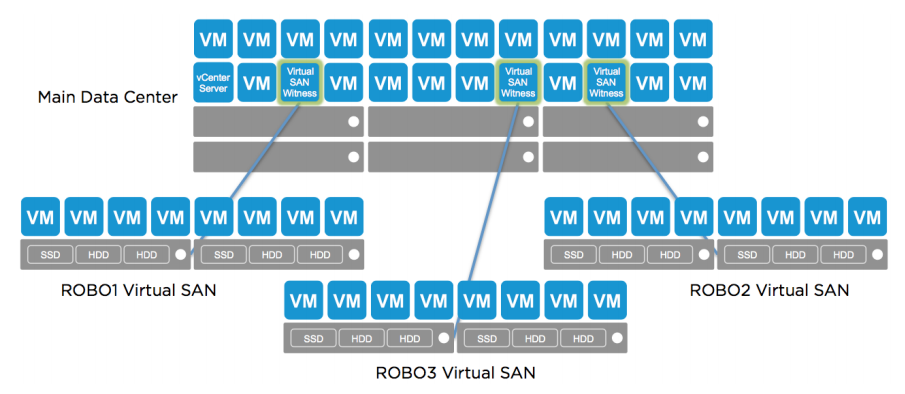
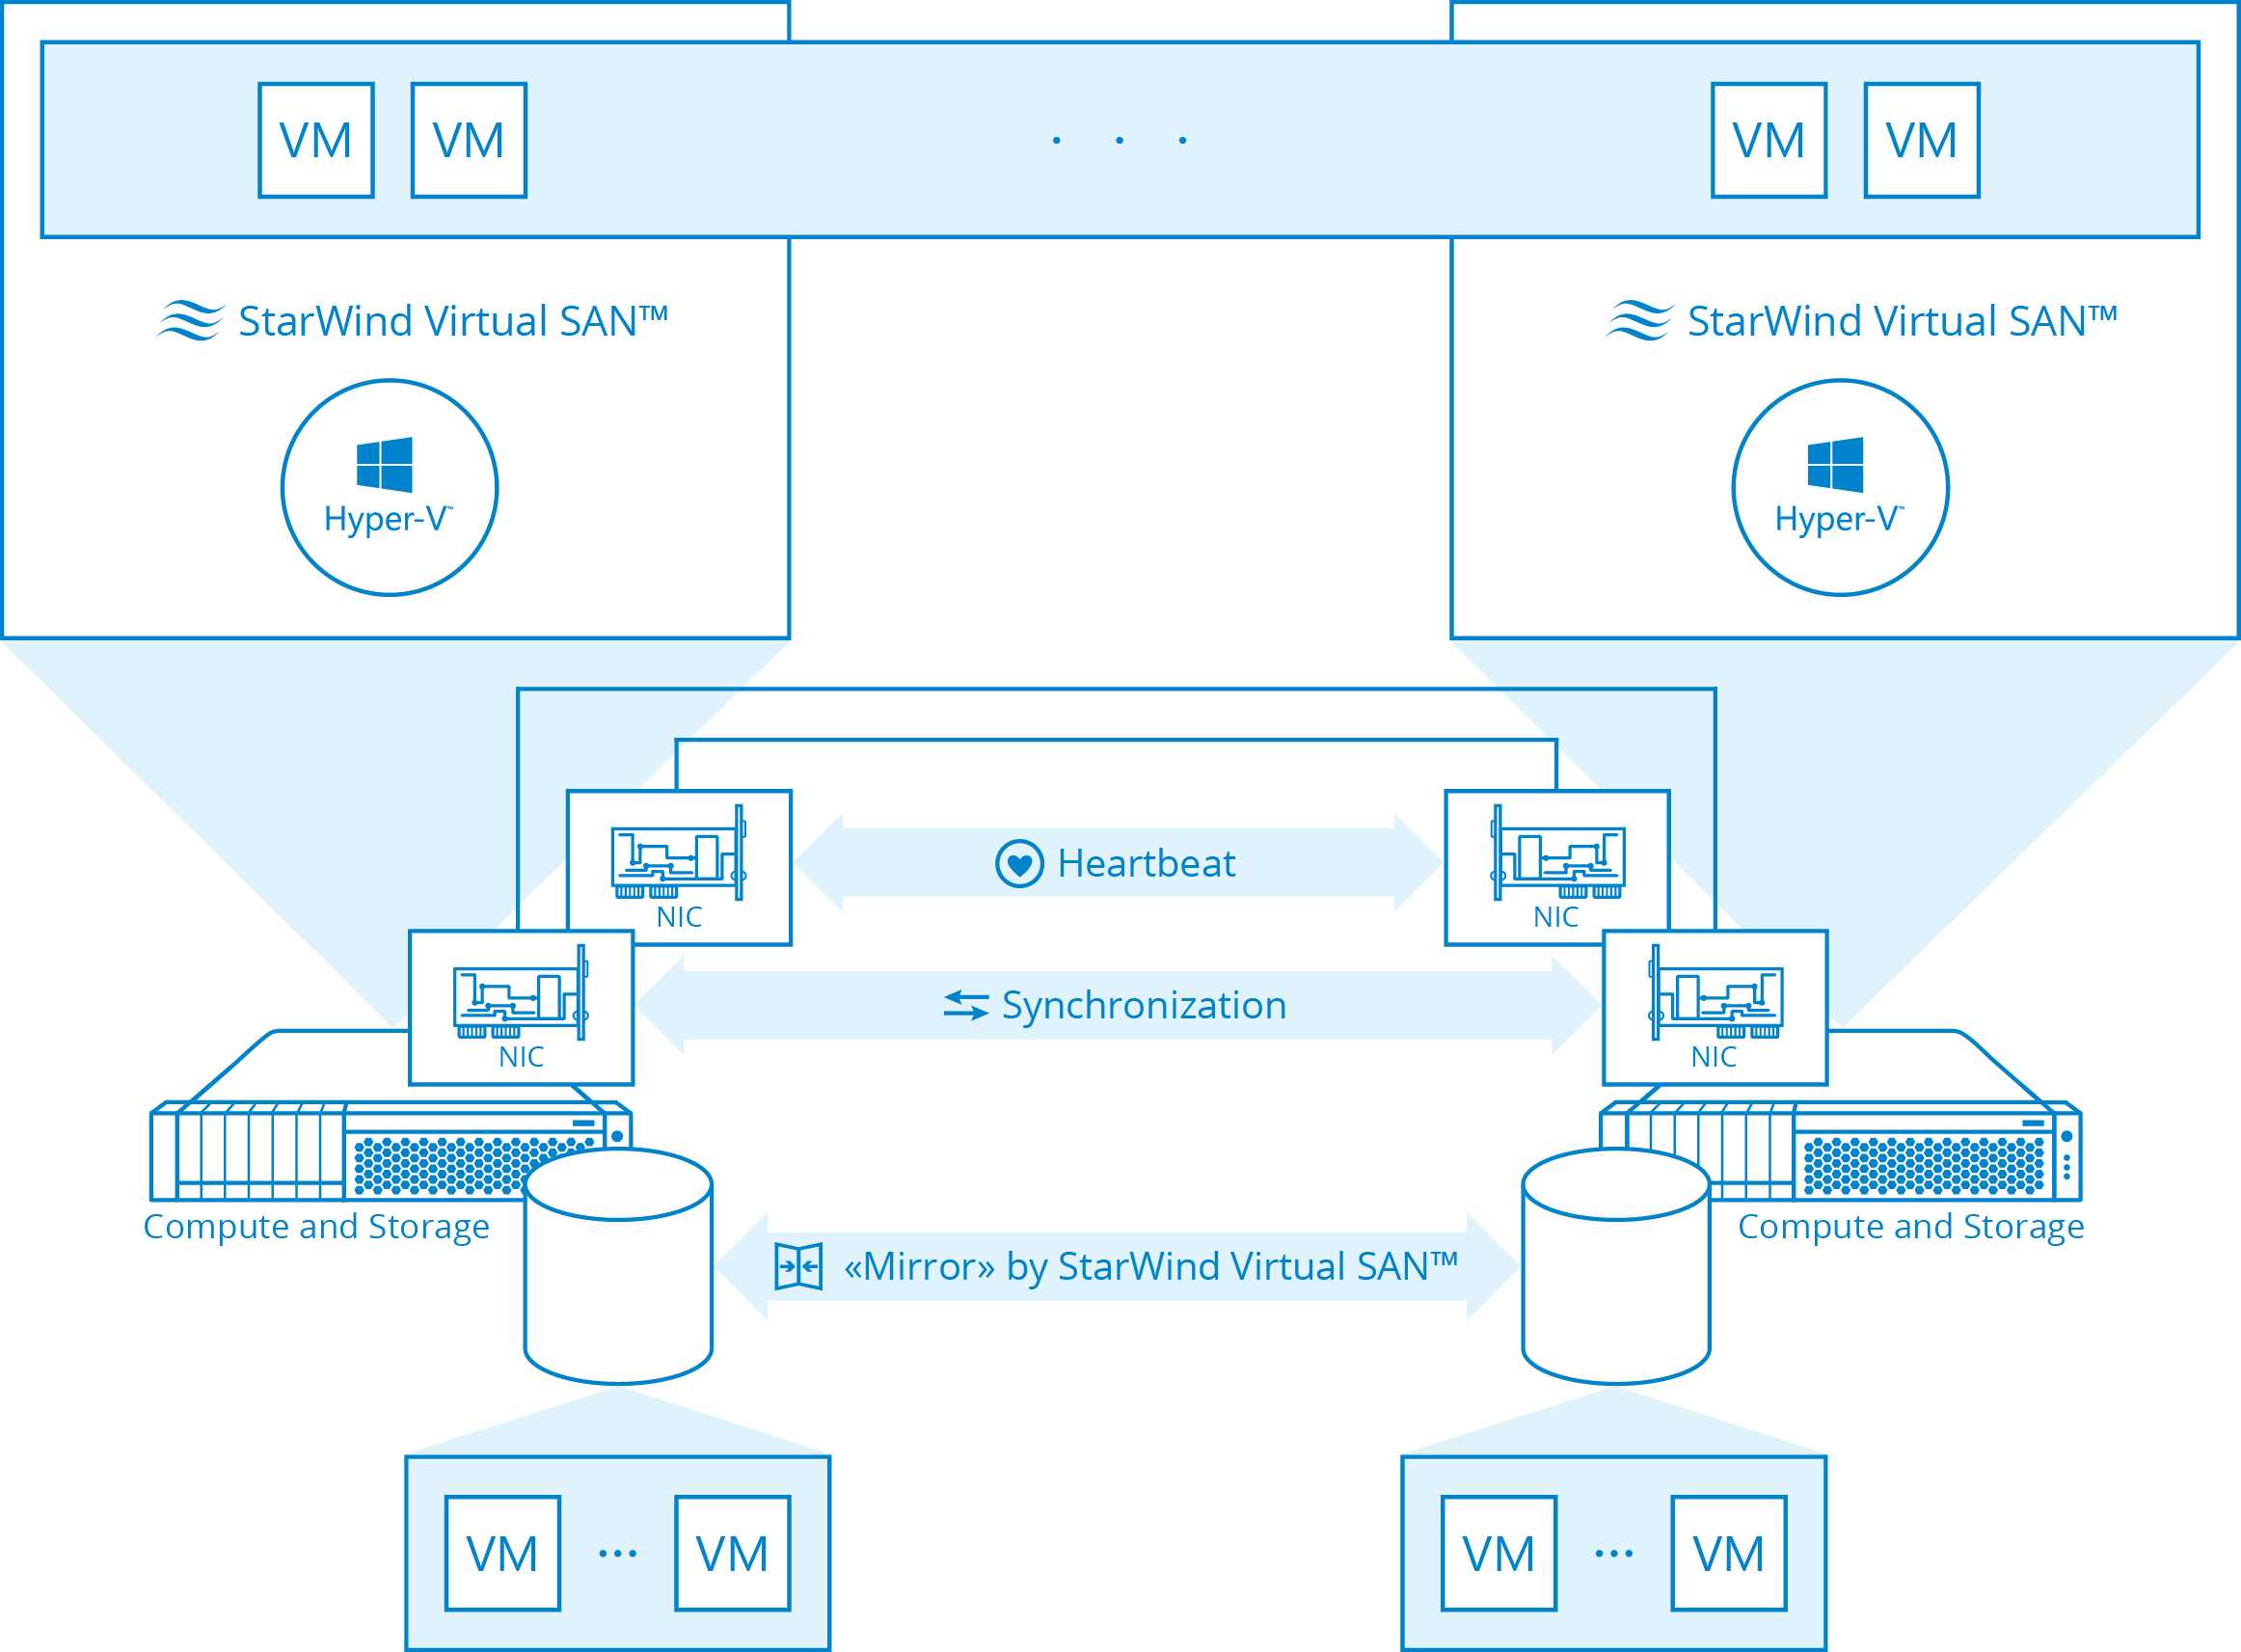
A vCenter HA cluster consists of three VCSA instances.
![]()
The first instance is initially used as the Active node and is cloned twice to a Passive node and to a Witness node. And together these three nodes provide an active-passive failover solution.
Deploying each of the nodes on a different ESXi instance protects against hardware failure. Adding the three ESXi hosts to a DRS cluster can further protect your environment. Upon the completion of the vCenter HA configuration, only the Active node has an active management interface (public IP). The three nodes communicate over a private network called the vCenter HA network that is set up as part of the configuration. The Active node continuously replicates data to the Passive node.
Active Node: Active node is the vCenter Server Appliance instance that is currently running. The active node replicates data to the Passive node using the HA network to communicate with the Passive & Witness Node.
Passive Node: Passive Node is the clone of the Active node which is created while configuring the HA for vCenter. It continuously receives updates from and synchronizes state with the Active node over the vCenter HA network. And the Passive Node takes over the role of the Active Node once the failover occurs.
Witness Node: Witness Node is a lightweight clone of the Active node and it serves as a quorum to protect against a split-brain situation.
vCenter HA Network: To configure vCenter HA there is HA network required. You can use the HA network by creating a new Port group or a new virtual switch with different subnet.
Manual Configuration
With the manual configuration mode, you must manually clone the Active node to create the Passive and Witness nodes. Also, to remove the vCenter HA configuration later, you have to manually delete the nodes that you created.
Workflow for Manual Configuration
- Deploy the vCenter Server Appliance and configure the second network (port group) for vCenter HA traffic on each ESXi host.
- The user must add a second network adapter (NIC) to the Active node if the credentials of the Active management vCenter Server are unknown.
- Start the vCenter HA configuration by selecting the checkbox to manually configure and supply IP address and subnet information for the Passive and Witness nodes. Optionally, the user can override the failover management IP addresses.
- The user logs in to the Management vCenter Server and creates two clones of the vCenter Server Appliance (Active node).
- vCenter HA network will be configured on the three ESXi nodes to exchange heartbeats and replication information.
- And finally, the vCenter Server Appliance is protected by vCenter HA
Configure the vCenter HA Network
As mentioned, the HA network is very important for vCenter HA configuration, this is mandatory for both types of deployment models.
You must set up the HA network before starting the HA configuration. You can set up a port to an existing virtual switch or, for improved network isolation. You can create a new virtual switch and configure the HA network on that and note that it must be different from the management network. The vCenter HA network connects the Active, Passive, and Witness nodes and replicates the appliance stat and it monitors heartbeats also.
vCenter HA network IP addresses for the Active, Passive, and Witness nodes must be static one and the network must be on a different subnet than the management network. The three nodes can be on the same subnet or on different subnets. Additionally, make sure that Network latency between the Active, Passive, and Witness nodes must be less than 10 milliseconds and should not add a default gateway entry for the cluster network.
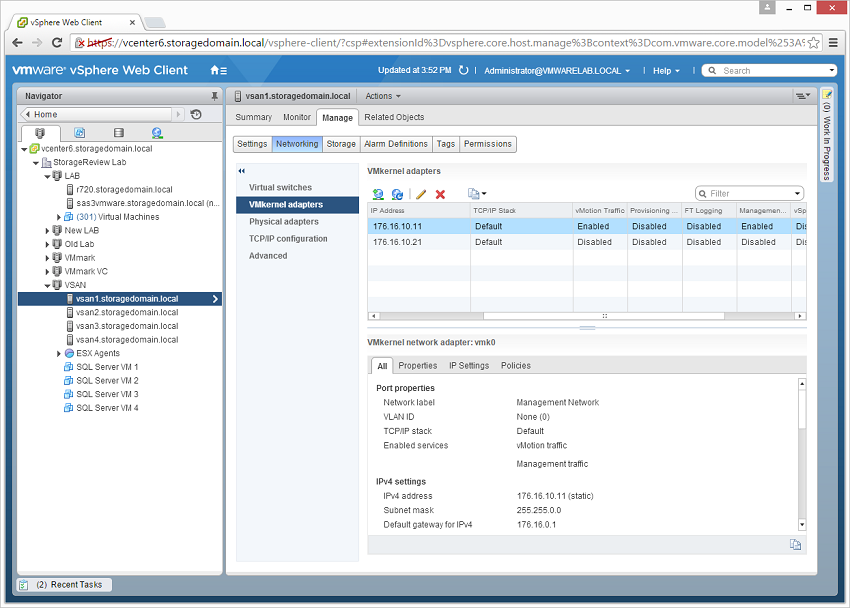
Log in to the vCenter Server and navigate virtual switches on the ESXi host where the Active node is running.
Select the Virtual Switch on the ESXi host and Add a port group from Add Networking option
Select Virtual Machine Port Group for a Standard Switch and Click Next
Verify whether the virtual switch you have selected is correct or you can select using the browse option there. Click Next
Provide a Network Label and add the VLAN ID. Click Next
- Follow the same procedure for other ESXi nodes where Passive and Witness nodes will be cloned.
- In addition to this, make sure the management network also available on all the ESXi nodes.
Free vSphere Hypervisor: Технические требования, ограничения и совместимость
VMware vSphere Hypervisor можно установить на сервер, соответствующий следующим техническим требованиям:
| Технический минимум | Рекомендуемый минимум | |
| CPU | 1 процессор, 2 ядра | два процессора, четыре и более ядер на ЦП |
| Память | 4 ГБ | 8 Гбайт или более |
| Сеть | один сетевой адаптер 1 Гбит/с | два сетевых адаптера 1 Гбит/с |
| Локальное хранилище данных (SATA/SAS) | один диск емкостью 4 Гбайт | RAID 1 из 2=х дисков по 4 Гб. |
Файл дистрибутива VMware vSphere Hypervisor имеет небольшой размер (311 МБ) и содержит только самые необходимые драйверы, в основном для серверов брендовых производителей. Но иногда и на серверы известных брендов не получается установить гипервизор. Часто производители серверов выпускают собственные дистрибутивы гипервизора со своими драйверами.
Проверить совместимость VMware vSphere Hypervisor с вашим сервером можно на странице: https://www.vmware.com/resources/compatibility/search.php
Список оборудования, которое не поддерживается в ESXi 6.7: https://kb.vmware.com/s/article/52583
Рассмотрим основные ограничения бесплатного гипервизора vSphere Hypervisor в сравнении с полноценным VMWare ESXi:
Отличия между vSphere Hypervisor и VMWare ESXi только в примененной лицензии. Установочный ISO образ один и тот же.
- Не оказывается официальная техподержка VMWare;
- Одной ВМ можно выделить не более 8 виртуальных процессоров/ядер (vCPU) (в бесплатном Hyper-V 2019 кстати ограничения по vCPU для gen1 поколения ВМ — 64);
- Хост нельзя подключать к vCenter;
- Не доступна vStorage API (не получится настроить нормальное резервное копирование, тот же Veeam не сможет забрать ВМ с хоста);
- Максимум 2 физических процессора (сокета) в сервере (ограничений по кол-ву ядер нет);
- Все APi доступны в режиме только чтения (т.е. вы не сможете изменить ни один из параметров сервера или ВМ через тот же PowerCLI).
Однако бесплатная реакция Sphere Hypervisor позволяет без ограничений использовать все ядра и оперативную память физического сервера. Нет ограничений на общее количество RAM, процессоров, ядер или время работы хоста или ВМ. Работает PCI VMDirectPath/ USB redirection.
Подготовка к установке.
Что такое VCenter Server Appliance? Это виртуальная машина VMware, предварительно сконфигурированная, которая может работать на одном из хостов, которыми управляет. Есть VCenter, который устанавливается на физический или виртуальный сервер с Windows, но это требует лицензирования windows(доп. расходы), да и по функционалу Virtual Appliance сейчас не уступает виндовому собрату. Поэтому ставим Appliance.))
Первым делом нужно скачать образ VCenter Server Appliance. Если у вас есть учетная запись VMware, сделать это можно на их официальном сайте https://my.vmware.com/web/vmware/details?downloadGroup=VC65U2D&productId=614&rPId=31353 или
Если учетной записи нет, можете зарегистрироваться(бесплатно) или посмотреть здесь.
Вкратце:
| Размер инфраструктуры | Процессор | ОЗУ |
| Tiny environment (up to 10 hosts or 100 virtual machines) | 2 | 10 GB |
| Small environment (up to 100 hosts or 1,000 virtual machines) | 4 | 16 GB |
| Medium environment (up to 400 hosts or 4,000 virtual machine) | 8 | 24 GB |
| Large environment (up to 1,000 hosts or 10,000 virtual machines) | 16 | 32 GB |
| X-Large environment (up to 2,000 hosts or 35,000 virtual machines) | 24 | 48 GB |
По месту на диске: от 250 ГБ.
Хост ESXi, на который ставится VCSA, должен быть доступен с компьютера, на котором запущен установщик.
Host Options.
Во вкладке Host Options задаются настройки для управления электропитанием хоста для Distributed Power Management (DPM). DPM — это функция vSphere DRS, задача которой снизить энергопотребление на основе анализа потребляемых ресурсов. DPM мониторит потребляемое количество ресурсов процессора и памяти, сравнивая с общим количеством ресурсов в кластере. Если будут найдено достаточно ресурсов для перемещения ВМ, то они будут перенесены, а хост переводится в режим ожидания. И наоборот, как только в кластере становится недостаточно ресурсов, хост выводится из режима ожидания.
DPM использует для управления три протокола: Intelligent Platform Management Interface (IPMI), Hewlett-Packard Integrated Lights-Out (iLO), или Wake-On-LAN (WOL). Если хост не поддерживает ни один из этих протоколов, то он не может быть переведен с помощью DPM, а если хост поддерживает несколько протоколов — они используются в следующем порядке: IPMI, ILO, WOL.
IPMI является аппаратной спецификацией, а iLO — встроенной технологией по управлению сервером. Обе технологии обеспечивают интерфейс для удаленного мониторинга и управления компьютером. IPMI и iLO требуют наличия Baseboard Management Controller (BMC), который обеспечивает шлюз для доступа к аппаратному управлению, позволяя управлять питанием удаленно через LAN-порт.
Если вы планируете использовать iLO, или IPMI для управления питанием хоста, вам необходимо настроить BMC. Шаги по настройке iLO различны в зависимости от выбранной модели, тогда как IMPI требует дополнительных настроек в BIOS (убедитесь, что BMC LAN включен, сконфигурирован и доступен для управления). VMware DPM поддерживает только IMPI c MD5- и plaintext-based аутентификацией. vCenter Server использует MD5, если BMC дает ответ, что MD5 поддерживается и доступна для роли оператора (Operator role). В противном случае, используется plaintext-based аутентификация, если, опять же, включена и доступна. Если MD5 и plaintext-based аутентификации отключены, то IPMI не может использоваться и vCenter Server попытается использовать Wake-on-LAN.
Для работы Wake-On-Lan необходимо выделить vMotion в отдельную IP-сеть и использовать гипервизоры ESX(i) 3.5, или выше. Каждый интерфейс сети vMotion должен поддерживать Wake-On-Lan. Проверить, поддерживают ли сетевые интерфейсы хоста Wake-on-LAN можно перейдя в vSphere Client к настройкам хоста:
Configuration -> Network Adapters
Порт коммутатора (switch) должен быть выставлен в автоматическое согласование скорости (Auto Negatiate), а не принудительное (например, 1Гб/с):
Некоторые сетевые интерфейсы поддерживают Wake-On-Lan только, если они могут переключаться на 100Мб/с (или менее), когда хост выключен.
Теперь для того, чтобы настроить BMC для каждого из хостов открываем в веб-клиенте vSphere:
Hosts and Clusters -> {Host} -> Manage -> Power Management
Вводим настройки BMC. Оставляем дефолтную схему менеджмента питания, или выбираем для подключаемого хоста один из трех вариантов: Disabled, Manual, или Automatic. Вводим логин и пароль для роли оператора BMC (Operator role), IP- и MAC-адрес интерфейса.
Теперь можно протестировать управление питанием хоста. В веб-клиенте vSphere, или vSphere Client открываем контекстное меню для выбранного хоста и переходим:
Power -> Enter Standby Mode
По окончании миграции ВМ хост будет выключен (точней, перейдет в “режим ожидания”, но при этом будет доступен для BMC). Аналогично можно проверить его включение, раскрыв контекстное меню хоста:
Power -> Power On
Питанием хостов можно так же управлять с помощью VMware vSphere PowerCLI. Для перевода в Standby Mode:
Get-VMHost -Name <Hostname> | Suspend-VMHost -Confirm:$false
Для Power On:
Get-VMHost -Name <Hostname> | Start-VMHost -Confirm:$false
После того, как BMC/WOL протестированы, можно приступить к настройке DPM для vSphere DRS (см. выше описание параметров vSphere DRS). Как только DPM будет активирован, вы можете просмотреть статус для каждого хоста в поле “Last Time Exited Standby”:
Это поле отображает время, когда vCenter Server пытался перевести хосты в режим “ожидания”, а так же статус успешного выполнения — Succeeded, Failed, или Never, если не было ни одной попытки.
Второй этап — настройка VCSA.
Жмем Next.
![]()
Определяем настройки синхронизации времени, с хостом или с серверами точного времени в Интернете.
В случае синхронизации с серверами в Интернете, укажите имена серверов через запятую.
![]()
Также, можно включить или отключить SSH доступ
![]()
Дальше идут настройки SSO-домена(Single Sign On). Можно создать новый SSO-domain или присоединиться к существующему.
![]()
Задаем имя домена, сайта и пароль администратора.
![]()
На следующем экране снимаем галку, если не хотим присоединяться к программе VMware Customer Experience Improvement Program.
![]()
Ну и на завершающем этапе, проверяем настройки и жмем Finish.
![]()
Начнется настройка VCSA.
![]()
После ее завершения вы увидите сообщение об успешной установке и ссылку для перехода в интерфейс управления VCenter. https://<FQDN or IP>:443
![]()
![]()
Жмакнув на ссылку vSphere Web Client откроется страница входа, где, разрешив использование флэш-плеера
![]()
и введя учетные данные administrator@vsphere.local,
![]()
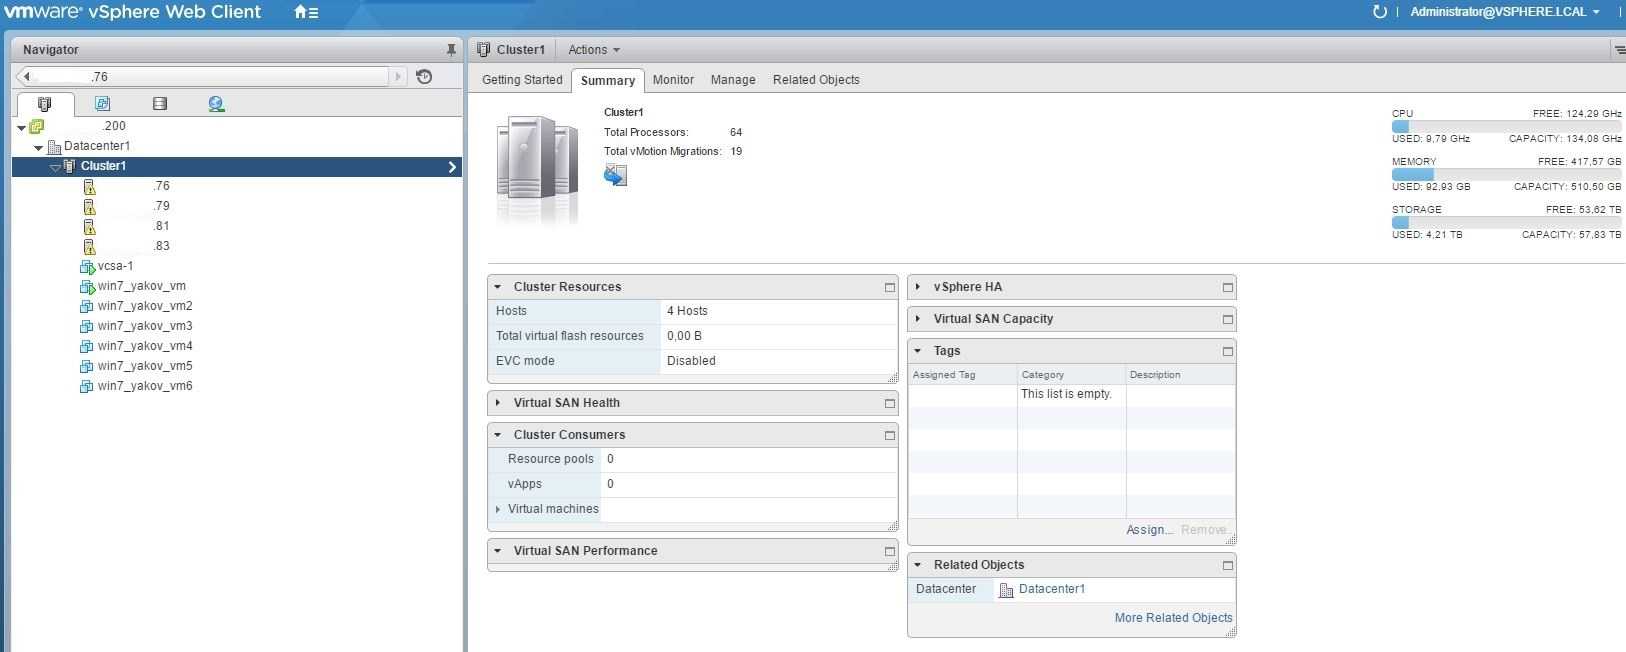
вы сможете попасть в интерфейс управления VCenter.
![]()
Если после установки VCSA вы получите сообщение «The configured guest OS (Other 3.x or later Linux (64-bit)) for this virtual machine does not match the guest that is currently running (VMware Photon OS (64-bit)). You should specify the correct guest OS to allow for guest-specific optimizations», значит виртуальное оборудование нужно обновить до версии 6.5(VM Version 13).

![]()
Выключаем ВМ VCSA, кликаем по ней правой кнопкой мыши и выбираем пункт Upgrade VM Compatibility
Выбираем совместимость с ESXi 6.5 и жмем Upgrade
![]()
Подтверждаем согласие с обновлением ВМ, нажав Yes
![]()
После этого заходим в настройки ВМ, выбираем VM Options->General Options и выбираем версию ОС VMware Photon OS(64 bit)
![]()
После этого сообщение о несовпадении версий ОС исчезнет.
Вот так происходит установка VCenter Server Appliance 6.5. О его настройке постараюсь написать позже, если кому-то интересно.
Пишите комментарии, дополнения, исправления и т.д.))
P.S. Первоначальная настройка VCenter описана в статье.
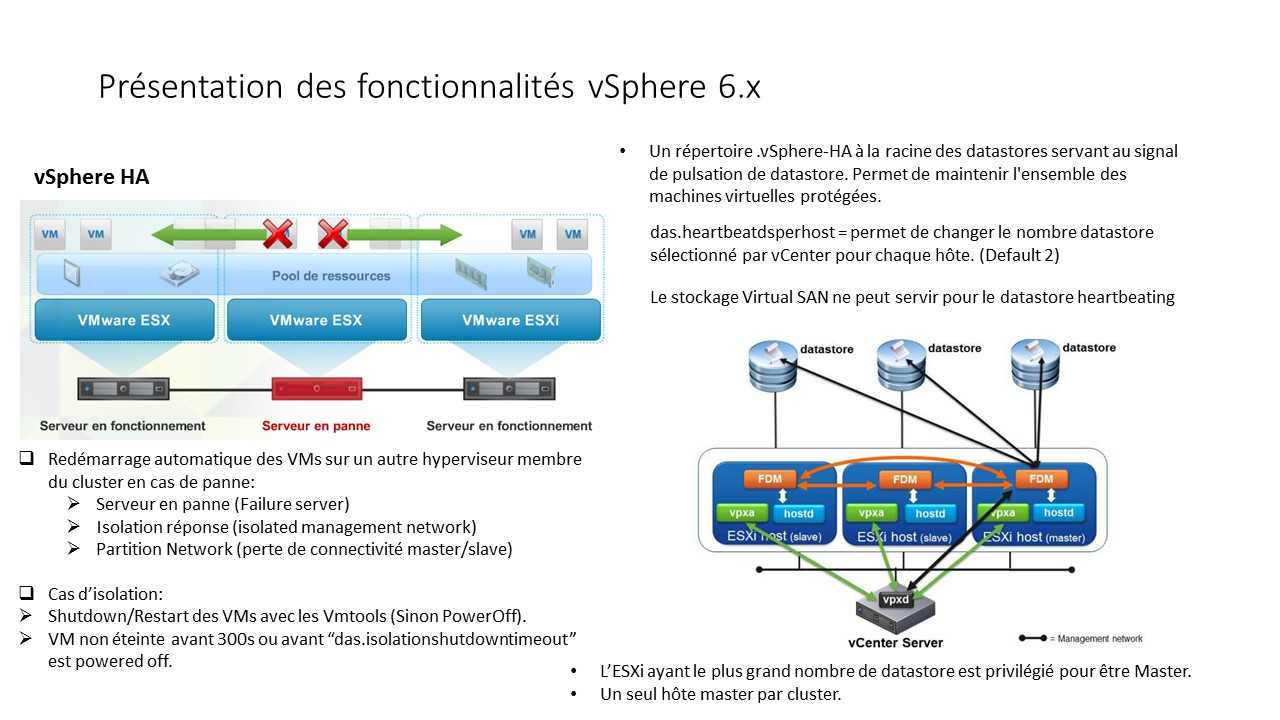
Настройка высокой доступности vCenter
Настройку HA для vCenter следует начать с создания новой отдельной HA сети. В нашем примере мы добавим группу портов HA в существующий виртуальный коммутатор. Т.к. мы используем стандартные виртуальные коммутаторы, группа портов HA добавится на 3 хостах.
После создания сети, щелкните ПКМ по серверу vCenter Server в разделе навигации клиента vSphere Web Client. В меню выберите vCenter HA Settings.
В меню vCenter HA нажмите на кнопку Configure в правом верхнем углу.
Есть два варианта настройка HA.
- Basic – автоматическое клонирование сервера и настройка всех трех узлов
- Advanced – настраиваемый вариант развёртывания, клонирование сервера и настройка узлов кластера выполняется в ручном режиме.
Мы остановился на самом простом — автоматическом варианте Basic.
Укажем IP адрес и подсеть для HA интерфейса на активной ноде. В качестве сети нужно выбрать созданную ранее выделенную сеть HA.
Укажите IP адрес пассивной (Passive) ноды и свидетеля (Witness).
Проверьте предложенный вариант развертывания. Внесите необходимые изменения, выбрав хост, кластер и VMFS хранилище.
Если все ОК, нажмите кнопку Finish для начала развертывания.
Запустите процесс клонирования и автоматической настройки трех узлов. Процесс выполнения развертывания можно отслеживать в разделе Recent Tasks.
После завершения развертывания в иерархии vCenter появятся два новых узла. Как вы видите, для пассивной копии vCenter добавлена постфикс –peer , а для свидетеля –witness.
Configure vCenter HA
Log in to the Active vCenter Node
Select the vCenter Server and navigate to Configure -> vCenter HA
Click on the Set Up vCenter HA to start the configuration wizard
Resource setting page will appear where you can fill up the details of network, hosts, storage, etc
In the Resource settings section, select the vCenter HA network for the active node from the drop-down menu. Then, select the checkbox for automatic configuration mode.
Note: If you do not select the checkbox, you must manually create clones for Passive and Witness nodes
From the Passive node, click Edit
Specify a unique name and target location, by default you will have “vCenter Name–Passive”, click Next
Select the destination compute resource (ESXi Host) for the operation and click Next
Select the datastore in which you want to store the configuration and disk files and Click next
Note: vCenter HA Configuration support NFS, VSAN, and VMFS datastores
Select virtual machine Management (NIC 0) and vCenter HA (NIC 1) networks and Click Next
Review the settings and click Finish.
From Witness node, click Edit
Specify a unique name and target location, by default it is “vCenter Name–Witness”, click Next
Select the destination compute resource (ESXi Host) for the operation and Click Next
Select the datastore in which you want to store the configuration and disk files and Click next
Select vCenter HA (NIC 1) network and Click Next
Review the settings and click finish
Now we have completed the Step 1 of the vCenter HA configuration Click on Next
In step 2, we have to add the IP address for vCenter HA network
Enter the IPv4 address (NIC 1) and Subnet mask or prefix length information for the Active, Passive and Witness nodes and Click Finish
Note: You have the option to Edit management network settings for the Passive Node. Customizing these settings are optional. By default, the management network settings of the Active node are applied.
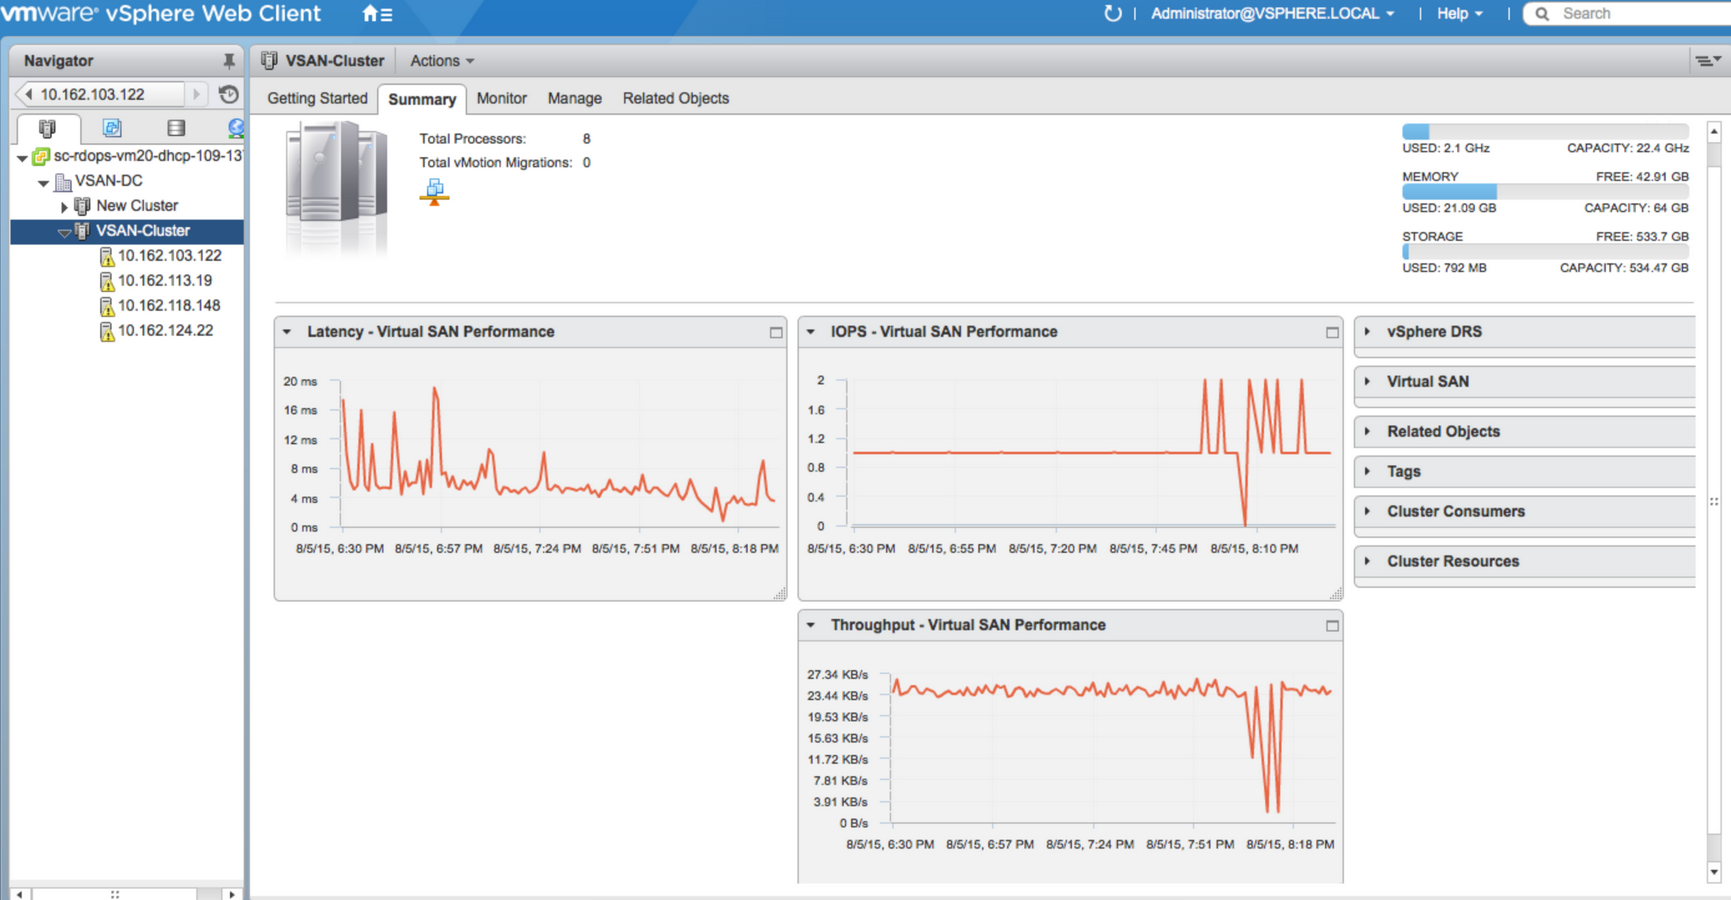
You can monitor the status of the nodes from the vCenter HA configuration page – Cluster Nodes
As part of vCenter HA deployment, the Passive node will be cloned first from the active node and later witness node will be cloned from the active one.
On completing the Set Up vCenter HA process, the vCenter Server Appliance has high availability protection.
After vCenter HA is enabled, you can click Edit to enter Maintenance Mode, Enable or Disable vCenter HA. There are separate buttons to remove vCenter HA or initiate vCenter HA failover.
Follow our and feeds for new releases, updates, insightful posts and more.
Архитектура высокой доступности сервера VMWare vCenter 6.5
Архитектура отказоустойчивого VCHA состоит из 3 узлов: активного, пассивного экземпляра vCenter Server Appliance и хоста-свидетеля. Активный экземпляр vCenter Appliance имеет два сетевых интерфейса: стандартный интерфейс управления (eth0) и специальный интерфейс HA (eth1). VCHA реплицирует данные с активной ноды на пассивную по HA сети. База данных активной копии vCenter реплицируется в синхронном режиме, а файловая система – в асинхронном. У пассивной копии также 2 сетевых интерфейса, однако основной его интерфейс eth0 с теми же FQDN, IP и MAC неактивен. Интерфейс активируется в случае сбоя основного экземпляра сервера vCenter. Свидетель является последним элементом архитектуры VCHA. Он используется для предоставления ресурса-кворума, информируя кластер о том, какой из узлов является активным в текущий момент времени. В нормальном режиме работы все три компонента кластера должны быть доступны.
При сбое, на пассивной ноде активируется интерфейса eth0. С помощью механизма Gratuitous ARP выполняется оповещение устройств в широковещательном домене о появлении новой привязки IP и MAC. Если оригинальная нода после сбоя опять появляется в сети, она снова становится активной и репликация восстанавливается. В том случае, если он полностью утрачена, ее можно удалить из конфигурации и пересоздать кластер VCHA.
Что потребуется для организации высокодоступного сервера vCenter
- vCenter Server Appliance версии 6.5
- Лицензия vCenter Standard
- Размер развертывания vCSA: Small, Medium или Large (но не tiny)
- Встроенный или внешний Platform Services Controller (PSC)
- ESXi 5.5 и выше
- Сеть vCenter HA
- Отдельная HA сеть, отделенная от сети управления
- Сетевая задержка между двумя узлами не более 10мс
- Статические IP адреса на нодах
Automatic Configuration
With automatic configuration mode, vCenter HA wizard automatically creates the Passive and Witness nodes. You must meet one of the following requirements to perform automatic configuration.
- The vCenter Server Appliance that will become the Active node is managing its own ESXi host and its own virtual machine. This configuration is sometimes called a self-managed vCenter Server.
- The vCenter Server Appliance is managed by another vCenter Server. They both use an external Platform Services Controller, and both are running vSphere 6.5 or later.
Workflow for Automatic Configuration
- Deploy the vCenter Server Appliance, which will become the Active node.
- Configure a network port group for vCenter HA traffic on all the ESXi hosts.
- Start the vCenter HA configuration – This supplies the IP addresses, the target ESXi host or cluster, and the datastore for each clone.
- The deployment process will clone the Active node and creates a Passive node with precisely the same settings, including the same hostname.
- Once the Passive node is created, the system will clone the Active node again and creates a more light-weight Witness node.
- The system sets up the vCenter HA network on the three nodes to communicate with each other to exchange information and replication
vCenter HA with an Embedded Platform Services Controller
Configuring vCenter HA with an embedded Platform Services Controller is easy and straightforward.
Deploy vCenter Server Appliance with an embedded Platform Services Controller and configure vCenter HA with the help of a separate HA network. Once the vCenter HA deployment starts, cloning of the vCenter Server Appliance to a Passive and later to a witness node occurs. As part of the cloning process, Platform Services Controller and all its services are cloned as well.
Once the vCenter HA configuration is complete, vCenter HA performs replication to ensure that the Passive node is synchronized with the Active node. The Active node to Passive node replication includes Platform Services Controller data.


