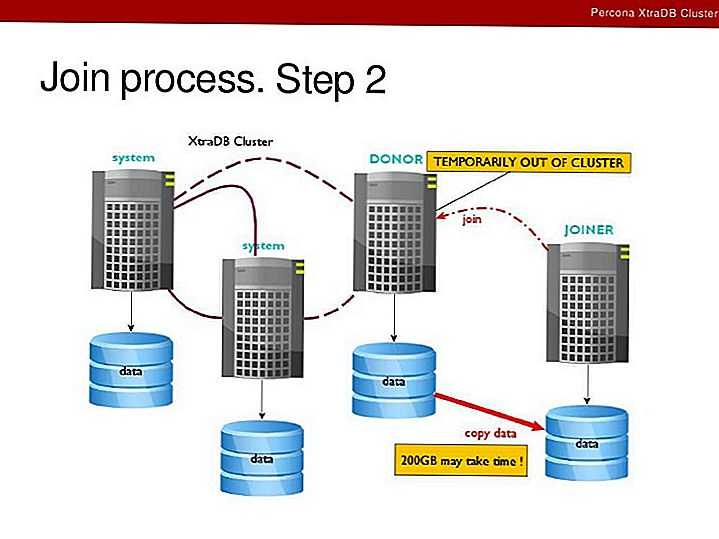
Dealing with IST/SST synchronization while upgrading
It is important that on rejoining, the node should synchronize using
. For this, it is best not to leave the cluster node being
upgraded offline for an extended period. More on this below.
When performing any upgrade (major or minor), could
be initiated by the joiner node after the upgrade if the server
was offline for some time. After completes, the data
directory structure needs to be upgraded (using mysql_upgrade)
once more time to ensure compatibility with the newer version
of binaries.
The following additional steps should be made to upgrade the data
directory structure after (after the normal major or
minor upgrade steps):
-
shutdown the node that rejoined the cluster using :
$ sudo service mysql stop
-
restart the node in standalone mode by setting the
variable to , e.g.:sudo mysqld --skip-grant-tables --user=mysql --wsrep-provider='none'
-
run
-
restart the node in cluster mode (e.g by executing and make sure the cluster joins back using .
Step 2. Configuring the first node
Individual nodes should be configured to be able to bootstrap the cluster.
For more information about bootstrapping the cluster, see .
-
Make sure that the configuration file
on the first node () contains the following:mysqld datadir=/varlibmysql user=mysql # Path to Galera library wsrep_provider=/usrlib64libgalera_smm.so # Cluster connection URL contains the IPs of node#1, node#2 and node#3 wsrep_cluster_address=gcomm//192.168.70.71,192.168.70.72,192.168.70.73 # In order for Galera to work correctly binlog format should be ROW binlog_format=ROW # MyISAM storage engine has only experimental support default_storage_engine=InnoDB # This InnoDB autoincrement locking mode is a requirement for Galera innodb_autoinc_lock_mode=2 # Node 1 address wsrep_node_address=192.168.70.71 # SST method wsrep_sst_method=xtrabackup-v2 # Cluster name wsrep_cluster_name=my_centos_cluster # Authentication for SST method wsrep_sst_auth="sstuser:s3cret"
-
Start the first node with the following command:
root@percona1 ~# /etc/init.d/mysql bootstrap-pxc
Note
In case you’re running CentOS 7,
the bootstrap service should be used instead:root@percona1 ~# systemctl start
The previous command will start the cluster
with initial variable
set to .
If the node or MySQL are restarted later,
there will be no need to change the configuration file. -
After the first node has been started,
cluster status can be checked with the following command:mysql> show status like 'wsrep%'; +----------------------------+--------------------------------------+ | Variable_name | Value | +----------------------------+--------------------------------------+ | wsrep_local_state_uuid | c2883338-834d-11e2-0800-03c9c68e41ec | ... | wsrep_local_state | 4 | | wsrep_local_state_comment | Synced | ... | wsrep_cluster_size | 1 | | wsrep_cluster_status | Primary | | wsrep_connected | ON | ... | wsrep_ready | ON | +----------------------------+--------------------------------------+ 40 rows in set (.01 sec)
This output shows that the cluster has been successfully bootstrapped.
Note
It is not recommended to leave an empty password
for the root account. Password can be changed as follows:
mysql@percona1> UPDATE mysql.user SET password=PASSWORD("Passw0rd") where user='root';
mysql@percona1> FLUSH PRIVILEGES;
To perform using XtraBackup,
set up a new user with proper privileges:
mysql@percona1> CREATE USER 'sstuser'@'localhost' IDENTIFIED BY 's3cret';
mysql@percona1> GRANT PROCESS, RELOAD, LOCK TABLES, REPLICATION CLIENT ON *.* TO 'sstuser'@'localhost';
mysql@percona1> FLUSH PRIVILEGES;
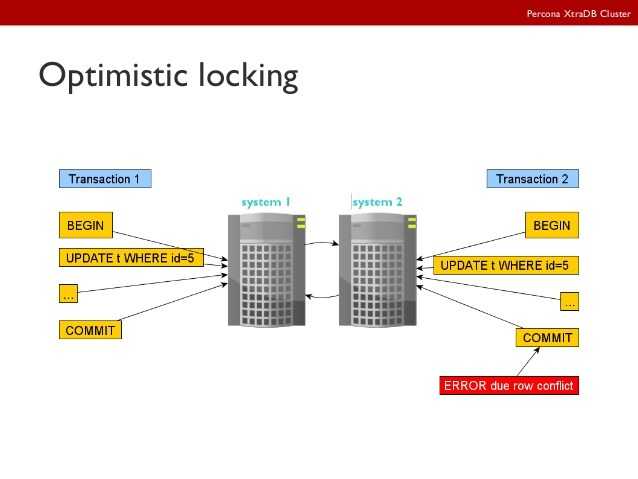
Case 1 – Upgrade From PXC 5.7 No SSL
As mentioned previously, the difference between PXC 5.7 and 8 here is that the encryption is enabled by default.
If you try to have a PXC8 node join with defaults, you will get this error:
Shell
2020-05-01T13:49:21.864627Z 0 handshake with remote endpoint ssl://10.0.0.5:4567 failed: asio.ssl:336031996: ‘unknown protocol’ ( 336031996: ‘error:140770FC:SSL routines:SSL23_GET_SERVER_HELLO:unknown protocol’)
| 1 | 2020-05-01T134921.864627ZERRORMY-000000Galerahandshake with remote endpoint ssl//10.0.0.54567failedasio.ssl336031996’unknown protocol'(336031996’error:140770FC:SSL routines:SSL23_GET_SERVER_HELLO:unknown protocol’) |
Indeed, an SSL issue because our 5.7 cluster IS NOT using SSL. We need to change the defaults for our PXC8, modifying the pxc-encrypt-cluster-traffic settings to:
Shell
pxc-encrypt-cluster-traffic = OFF
| 1 | pxc-encrypt-cluster-traffic=OFF |
Doing so, our new PXC8 node will join and perform SST:
Shell
2020-05-01T13:52:34.489148Z 0 Proceeding with SST………
2020-05-01T13:52:41.571224Z 0 …………Waiting for SST streaming to complete!
2020-05-01T13:52:45.399411Z 1 Flushing memory map to disk…
2020-05-01T13:53:17.771422Z 0 3.1 (node2): State transfer to 0.2 (node4) complete.
2020-05-01T13:53:17.774292Z 0 Member 3.1 (node2) synced with group.
2020-05-01T13:53:17.785772Z 0 Preparing the backup at /opt/mysql_instances/gal8/data//sst-xb-tmpdir
2020-05-01T13:53:24.424885Z 0 Moving the backup to /opt/mysql_instances/gal8/data/
2020-05-01T13:53:24.550030Z 0 Running post-processing………..
2020-05-01T13:53:24.563099Z 0 Opting for mysql_upgrade (sst): local version (8.0.18) != donor version (5.7.28)
|
1 |
2020-05-01T135234.489148ZNoteMY-000000WSREP-SSTProceeding with SST……… 2020-05-01T135241.571224ZNoteMY-000000WSREP-SST…………WaitingforSST streaming tocomplete! 2020-05-01T135245.399411Z1NoteMY-000000GaleraFlushing memory map todisk… 2020-05-01T135317.771422ZNoteMY-000000Galera3.1(node2)State transfer to0.2(node4)complete. 2020-05-01T135317.774292ZNoteMY-000000GaleraMember3.1(node2)synced with group. 2020-05-01T135317.785772ZNoteMY-000000WSREP-SSTPreparing the backup at/opt/mysql_instances/gal8/data//sst-xb-tmpdir 2020-05-01T135324.424885ZNoteMY-000000WSREP-SSTMoving the backup to/opt/mysql_instances/gal8/data/ 2020-05-01T135324.550030ZNoteMY-000000WSREP-SSTRunning post-processing……….. 2020-05-01T135324.563099ZNoteMY-000000WSREP-SSTOpting formysql_upgrade(sst)local version(8.0.18)!=donor version(5.7.28) |
It will also identify that the source is a 5.7 node and will perform an internal upgrade.
Установка Percona
Из репозиториев
Precona предоставляет репозитории для yum (Red Hat, CentOS, …) и apt (Debian, Ubuntu, …) для всех продуктов Percona: Percona Server, XtraDB, XtraBackup и Percona Toolkit. Таким образом, программное обеспечение легко устанавливать и обновлять с помощью пакетного менеджера вашей операционной системы. Именно из репозиториев рекомендуется устанавливать Percona.
После настройки репозитория, используйте следующую команду:
$ yum install Percona-XtraDB-Cluster-55
С помощью apt
После настройки репозитория, используйте следующую команду:
$ sudo apt-get install percona-xtradb-cluster-55
Для корректной работы Percona XtraDB Cluster необходимо настроить межсетевой экран и разрешить соединения по следующим портам: 3306, 4444, 4567 и 4568. Percona XtraDB Cluster в настоящее время не работает с SELinux или apparmor, так что их необходимо отключить, иначе отдельные ноды не смогут общаться и образовывать кластер.
Конфигурация
Для начала использования Percona XtraDB Cluster необходимо добавить следующие опции в файл my.cnf:
 wsrep_provider — a path to Galera library.
 wsrep_cluster_address — Cluster connection URL containing the IPs of other nodes in the cluster
 wsrep_sst_method - method used for the state snapshot transfer
 binlog_format=ROW - In order for Galera to work correctly binlog format should be ROW
 default_storage_engine=InnoDB - MyISAM storage engine has only experimental support
 innodb_autoinc_lock_mode=2 - This changes how InnoDB autoincrement locks are managed</tt>
Дополнительные параметры:
wsrep_sst_auth=user:password
Установка на Ubuntu
https://youtube.com/watch?v=604FgTguDfE
Если ранее MySQL был установлен на сервере, то может быть профиль AppArmor, который предотвратит узлы кластера Percona XtraDB от общения друг с другом. Наилучшим решением является удаление пакета AppArmor полностью:
sudo apt-get remove apparmor
Fetch пакет для конфигурирования Percona репозитория программного обеспечения:
wget https://repo.percona.com/apt/percona-release_0.1-4.$(lsb_release -sc)_all.deb
Установите загруженный пакет с dpkg:
sudo dpkg -i percona-release_0.1-4.$(lsb_release -sc)_all.deb
После того как вы установите этот пакет, хранилище Percona должно быть добавлено. Вы можете проверить конфигурацию хранилища в /etc/apt/sources.list.d/percona-release.list file.
vi /etc/apt/sources.list.d/percona-release.list
Обновление локального кэша:
sudo apt-get update
Установите пакет сервера Cluster Percona XtraDB:
sudo apt-get install percona-xtradb-cluster-57
Остановите mysql сервис:
sudo service mysql stop
Добавьте следующие переменные конфигурации в /etc/mysql/my.cnf on the first node:
wsrep_provider=/usr/lib/libgalera_smm.so

wsrep_cluster_name=pxc-cluster
wsrep_cluster_address=gcomm://192.168.70.61,192.168.70.62,192.168.70.63

wsrep_node_name=pxc1
wsrep_node_address=192.168.70.61

wsrep_sst_method=xtrabackup-v2
wsrep_sst_auth=sstuser:passw0rd

pxc_strict_mode=ENFORCING

binlog_format=ROW
defaul_storage_engine=InnoDB
innodb_autoinc_lock_mode=2
Для второго нода:
wsrep_node_name=pxc2
wsrep_node_address=192.168.70.62
Для третьего нода:
wsrep_node_name=pxc3
wsrep_node_address=192.168.70.63
Запустить первый узел с помощью следующей команды:
sudo /etc/init.d/mysql bootstrap-pxc
Чтобы убедиться в том, что кластер был инициализирован, выполните следующие действия:
mysql -uroot -p
show status like 'wsrep%';
Перед тем как добавлять другие узлы к новому кластеру, создать пользователя для SST и предоставить необходимые привилегии для него.
mysql -uroot -p
CREATE USER 'sstuser'@'localhost' IDENTIFIED BY 'passw0rd';
GRANT RELOAD, LOCK TABLES, PROCESS, REPLICATION CLIENT ON *.* TO 'sstuser'@'localhost';
FLUSH PRIVILEGES;
Запустите второй и третий ноды используя следующте команды:
/etc/init.d/mysql start
Case 2 – Upgrade From 5.7 With pxc-encrypt-cluster-traffic
So, you have SSL already active in your 5.7 cluster, and you want to upgrade to 8.
If your *.pem files are in the data directory, given you are migrating, this is the right moment to do the right thing and place them out of it in the new nodes.
In the new nodes, move them for best practice and define the path in the MySQL config file.
Steps:
- Create a safe place for the file like /etc/mysql/cert
- Copy file over from the donor
-
Add the following to the my.cnf
Shell
ssl-ca=/etc/mysql/certs/ca.pem
ssl-cert=/etc/mysql/certs/server-cert.pem
ssl-key=/etc/mysql/certs/server-key.pemOR
ssl_capath = /etc/mysql/certs/ssl-ca=/etc/mysql/certs/ca.pem
ssl-cert=/etc/mysql/certs/client-cert.pem
ssl-key=/etc/mysql/certs/client-key.pem1
2
3
4
5
6
7
8
9
10
11
12mysqld
ssl-ca=/etc/mysql/certs/ca.pem
ssl-cert=/etc/mysql/certs/server-cert.pem
ssl-key=/etc/mysql/certs/server-key.pem
ORssl_capath=/etc/mysql/certs/
client
ssl-ca=/etc/mysql/certs/ca.pem
ssl-cert=/etc/mysql/certs/client-cert.pem
ssl-key=/etc/mysql/certs/client-key.pem
- grant mysql user only read/write access
- Start your PXC8 node
At this point, the node will do SST, then the internal upgrade, and will join the 5.7 cluster.
Major upgrade
To upgrade the cluster, follow these steps for each node:
-
Make sure that all nodes are synchronized.
-
Stop the service:
$ sudo service mysql stop
-
Remove existing Percona XtraDB Cluster and Percona XtraBackup packages,
then install Percona XtraDB Cluster version 5.7 packages.
For more information, see .For example, if you have Percona software repositories configured,
you might use the following commands:-
On CentOS or RHEL:
$ sudo yum remove percona-xtrabackup* Percona-XtraDB-Cluster*
$ sudo yum install Percona-XtraDB-Cluster-57
-
On Debian or Ubuntu:
$ sudo apt remove percona-xtrabackup* percona-xtradb-cluster*
$ sudo apt install percona-xtradb-cluster-57
-
-
In case of Debian or Ubuntu,
the service starts automatically after install.
Stop the service:$ sudo service mysql stop
-
Back up , so that you can restore it
if it is corrupted or zeroed out due to network issue. -
Start the node outside the cluster (in standalone mode)
by setting the variable to .
For example:sudo mysqld --skip-grant-tables --user=mysql --wsrep-provider='none'
Note
As of Percona XtraDB Cluster 5.7.6, the option
is not required.Note
To prevent any users from accessing this node while performing
work on it, you may add
to the startup options and use a local socket to connect, or
alternatively you may want to divert any incoming traffic from your
application to other operational nodes. -
Open another session and run .
-
When the upgrade is done, stop the process.
You can either run on the process ID,
or with the MySQL root user credentials.Note
On CentOS, the configuration file
is renamed to .
Make sure to rename it back
before joining the upgraded node back to the cluster. -
Now you can join the upgraded node back to the cluster.
In most cases, starting the service
should run the node with your previous configuration:$ sudo service mysql start
For more information, see .
Note
As of version 5.7,
Percona XtraDB Cluster runs with enabled by default.
This will deny any unsupported operations and may halt the server
upon encountering a failed validation.If you are not sure, it is recommended to first start the node
with the variable set to
in the in the MySQL configuration file, .After you check the log for any experimental or unsupported features
and fix any encountered incompatibilities,
you can set the variable back to at run time:mysql> SET pxc_strict_mode=ENFORCING;
Also switch back to may be done by restarting the node
with updated . -
Repeat this procedure for the next node in the cluster
until you upgrade all nodes.
It is important that on rejoining, the node should synchronize using
. For this, it is best not to leave the cluster node being
upgraded offline for an extended period. More on this below.
When performing any upgrade (major or minor), could
be initiated by the joiner node after the upgrade if the server
was offline for some time. After completes, the data
directory structure needs to be upgraded (using mysql_upgrade)
once more time to ensure compatibility with the newer version
of binaries.
Create Virtual Machine Nodes
So, we will begin with creating a new virtual machine on Hetzner or Digital Ocean. Choose the smallest, least expensive node, with 2GM of RAM memory and a single vCPU, pick Debian 10 as operating system, and add your private key for authentication (this is very important, password authentication poses a great security risk today, which can be easily avoided by using private keys).
If you don’t have a private key, you can create one with the ssh-kegen application, built-in into every Linux box. Key will be automatically saved to the /home/your-account/.ssh directory, print it on the screen with cat command, and paste it/add it to the Hetzner account backend.
When creating a new virtual machine, do not forget to add an extra private network interface, which Digital Ocean or Hetzner will automatically add on the 10.0.0.0/24 subnet.
Once the virtual machine is up and running, log into it and install the nano editor, which is simplest to use for beginners, so let’s begin with:
Step 2. Configuring the first node
Individual nodes should be configured to be able to bootstrap the cluster.
For more information about bootstrapping the cluster, see .
-
Make sure that the configuration file
for the first node () contains the following:mysqld datadir=/varlibmysql user=mysql # Path to Galera library wsrep_provider=/usrliblibgalera_smm.so # Cluster connection URL contains the IPs of node#1, node#2 and node#3 wsrep_cluster_address=gcomm//192.168.70.61,192.168.70.62,192.168.70.63 # In order for Galera to work correctly binlog format should be ROW binlog_format=ROW # Using the MyISAM storage engine is not recommended default_storage_engine=InnoDB # This InnoDB autoincrement locking mode is a requirement for Galera innodb_autoinc_lock_mode=2 # Node #1 address wsrep_node_address=192.168.70.61 # SST method wsrep_sst_method=xtrabackup-v2 # Cluster name wsrep_cluster_name=my_ubuntu_cluster
-
Start the first node with the following command:
~# systemctl start
This command will start the first node and bootstrap the cluster.
-
After the first node has been started,
cluster status can be checked with the following command:mysql> show status like 'wsrep%'; +----------------------------+--------------------------------------+ | Variable_name | Value | +----------------------------+--------------------------------------+ | wsrep_local_state_uuid | b598af3e-ace3-11e2-0800-3e90eb9cd5d3 | ... | wsrep_local_state | 4 | | wsrep_local_state_comment | Synced | ... | wsrep_cluster_size | 1 | | wsrep_cluster_status | Primary | | wsrep_connected | ON | ... | wsrep_ready | ON | +----------------------------+--------------------------------------+ 75 rows in set (.00 sec)
To perform using XtraBackup,
set up a new user with proper :
mysql@pxc1> CREATE USER 'sstuser'@'localhost' IDENTIFIED BY 's3cretPass';
mysql@pxc1> GRANT PROCESS, RELOAD, LOCK TABLES, REPLICATION CLIENT ON *.* TO 'sstuser'@'localhost';
mysql@pxc1> FLUSH PRIVILEGES;
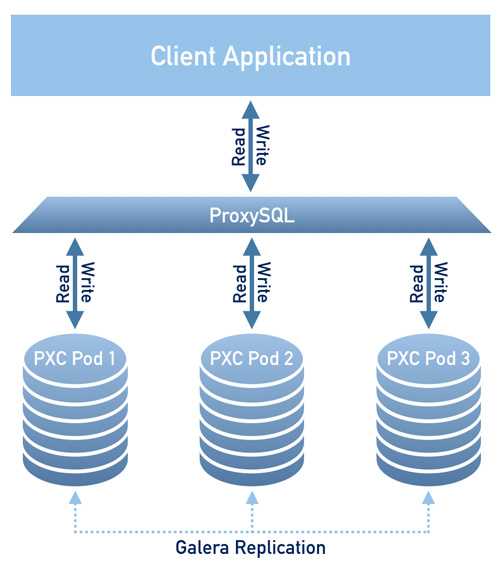
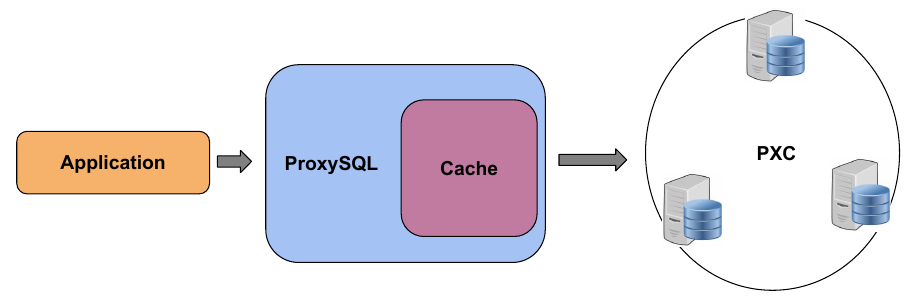
Assisted Maintenance Mode
Usually, to take a node down for maintenance, you need to identify that node,
update its status in ProxySQL to ,
wait for ProxySQL to divert traffic from this node,
and then initiate the shutdown or perform maintenance tasks.
Percona XtraDB Cluster includes a special maintenance mode for nodes
that enables you to take a node down without adjusting ProxySQL manually.
The mode is controlled using the variable,
which is monitored by ProxySQL and can be set to one of the following values:


-
: This is the default state
that tells ProxySQL to route traffic to the node as usual. -
: This state is set automatically
when you initiate node shutdown.You may need to shut down a node when upgrading the OS, adding resources,
changing hardware parts, relocating the server, etc.When you initiate node shutdown, Percona XtraDB Cluster does not send the signal immediately.
Intead, it changes the state to
and waits for a predefined period (10 seconds by default).
When ProxySQL detects that the mode is set to ,
it changes the status of this node to ,
which stops creation of new connections for the node.
After the transition period,
any long-running transactions that are still active are aborted. -
: You can change to this state
if you need to perform maintenace on a node without shutting it down.You may need to isolate the node for some time,
so that it does not receive traffic from ProxySQL
while you resize the buffer pool, truncate the undo log,
defragment or check disks, etc.To do this, manually set .
Control is not returned to the user for a predefined period
(10 seconds by default).
When ProxySQL detects that the mode is set to ,
it stops routing traffic to the node.
Once control is returned, you can perform maintenance activity.Note
Any data changes will still be replicated across the cluster.
After you finish maintenance, set the mode back to .
When ProxySQL detects this, it starts routing traffic to the node again.
You can increase the transition period
using the variable
to accomodate for long-running transactions.
If the period is long enough for all transactions to finish,
there should hardly be any disruption in cluster workload.
During the transition period,
the node continues to receive existing write-set replication traffic,
ProxySQL avoids openning new connections and starting transactions,
but the user can still open conenctions to monitor status.
Note
If you increase the transition period,
the packaging script may determine it as a server stall.
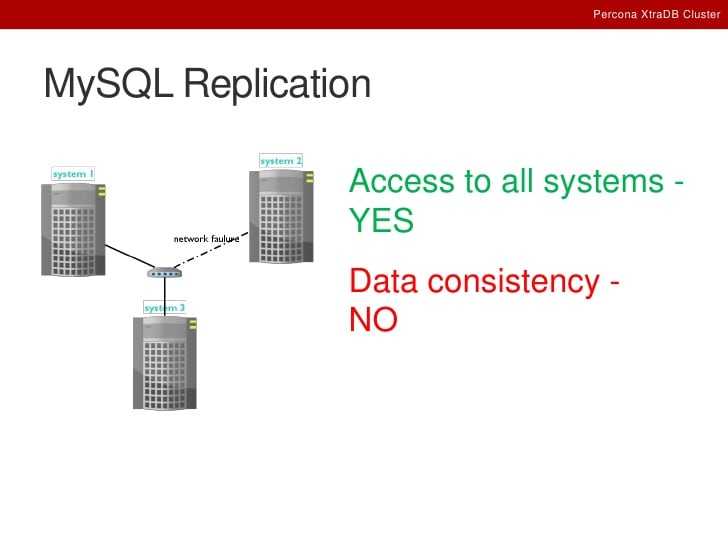
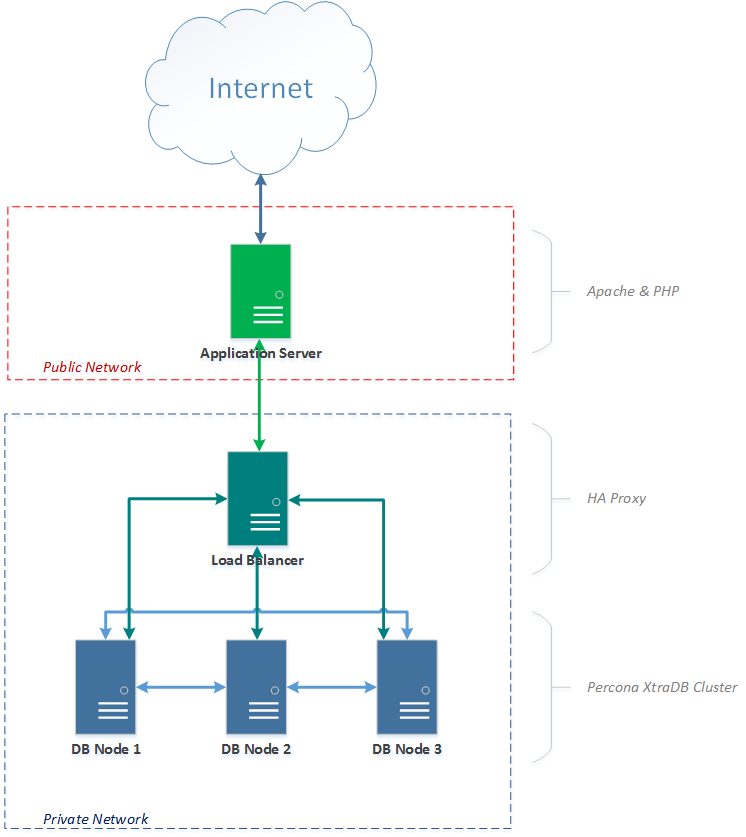
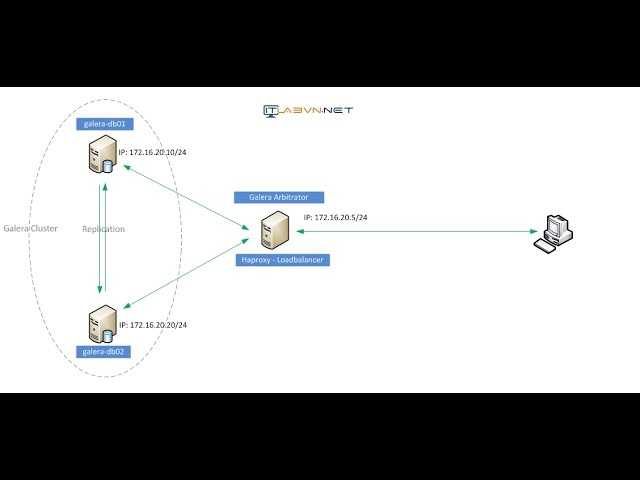
failover-доступ
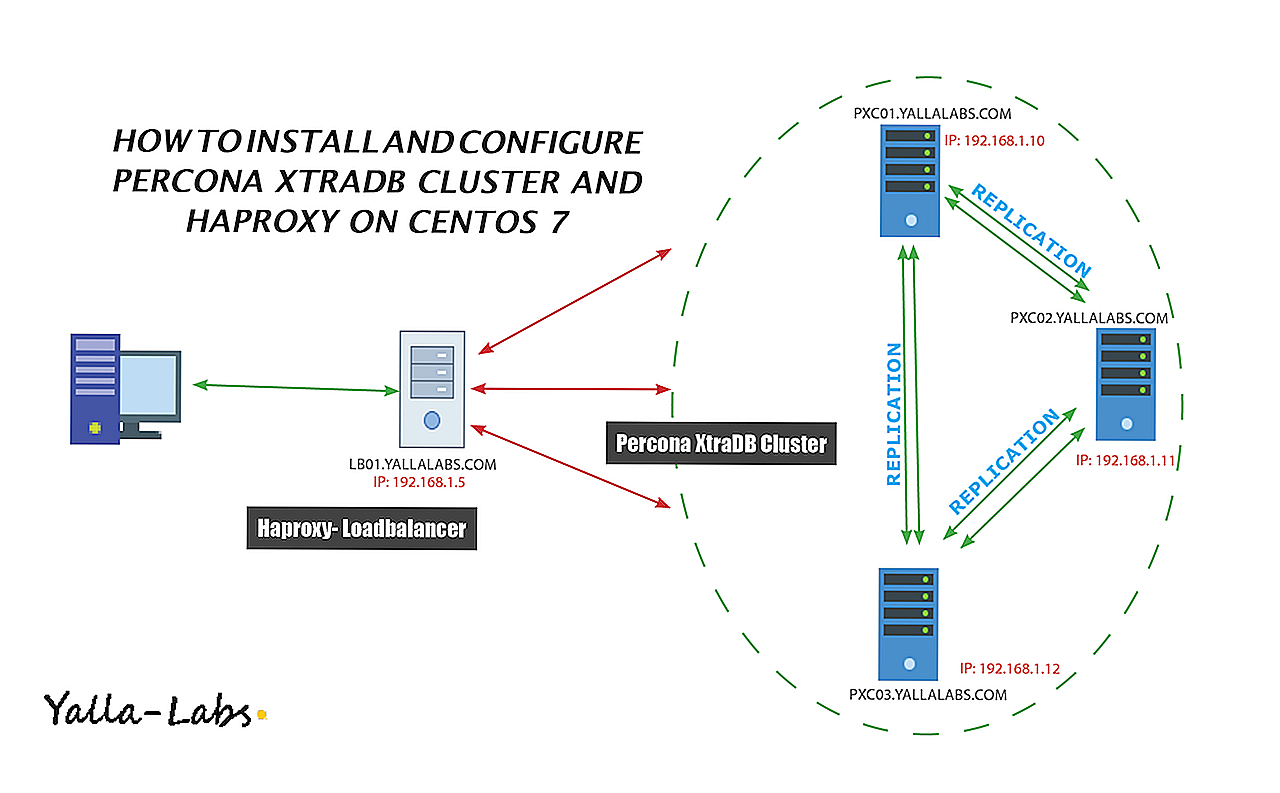
Большая часть современного ПО, работающая с MySQL, не может нормально обрабатывать несколько серверов. По этому мы будем использовать haproxy для распределения нагрузки. В этом примере haproxy ставится на каждый сервер, который использует mysql. HAProxy есть в базовом репозитории любого современного дистрибутива, так что просто ставим пакет:
Теперь настраиваем его. Пишем в конфигурацию /etc/haproxy/haproxy.cfg:
Порт 9199 haproxy будет использовать, чтобы убедится, что член кластера работоспособен и функционирует, как нужно. Сам XtraDB кластер не ждет соединений на 9199 порту. Нам потребуется специальный сервис, который будет локально проверять работу xtradb-cluster сервера для HAProxy. Сервис проверки очень прост, это не демон, так что его будет запускать супердемон xinetd. Вернемся на db1. Для начала — установим xinetd:
Создадим там файл /etc/xinetd.d/mysqlchk со следующим содержимым:
Немного подробностей о том, что тут написано. Главные настройки — это server_args. Они позиционные, так что очередность путать нельзя:
- имя пользователя для проверки. Нужны права CONNECT и REPLICATION CLIENT
- пароль
- отвечать, что сервер доступен, если он — донор (то есть остальные сервера в данный момент синхронизируются с него)
- путь к файлу журнала
- отвечать, что сервер не доступен, если он сейчас readonly (синхронизируется или заблокирован). Если поставить 1 — haproxy будет считать сервер в статусе readonly доступным
- путь к my.cnf. В некоторых версиях debian он находится в /etc/mysql/my.cnf
пользователь и пароль в директиве server_args — из конфигурации mysql (выше)
Обратите внимание на путь к my.cnf, в некоторых версиях debian он находится в /etc/mysql/my.cnf. Так же нужно добавить следующую строку в /etc/services:
Так же нужно добавить следующую строку в /etc/services:
После этого можно перезапустить xinetd. Проверим, что сервис проверки работает, как задумано:
Эту последовательность действий надо повторить на всех машинах — членах кластера.
Теперь можно спокойно перезапустить haproxy, зайти на страницу статистики (в данном примере — http://:8086/) и убедится, что haproxy видит все сервера кластера. После этого можно спокойно прописывать на сервере-пользователе БД локальный адрес 127.0.0.1, порт и все остальные настройки — без изменений — и теперь у вас есть отказоустойчивый кластер баз mysql
Following is the upgrade process on CentOS 6.4
Step #1 Make sure all the nodes in cluster are upgraded to the latest 5.5 version and are in synced state.
Stage I
Assuming we are going to upgrade node A, (and other nodes B and C are on 5.5)
Step #2 On node A stop the mysql process and remove the old packages:
# service mysql stop
# yum remove 'Percona*'
Step #3 Install the new packages:
# yum install Percona-XtraDB-Cluster-56
Note
For more details on installation, refer to guide. You may also want to install Percona-XtraDB-Cluster-full-56 which installs other ancillary packages like ‘-shared-56’, ‘-test-56’, debuginfos and so on.
Step #4 Fix the variables in the MySQL configuration file which are not compatible with Percona Server for MySQL 5.6. Detailed list can be checked in Changed in Percona Server 5.6 documentation. In case you are not sure after this, you can also do following:
# mysqld --user=mysql --wsrep-provider='none'
If there are any invalid variables, it will print it there without affect galera grastate or any other things.
Note
It may also be worthwhile to backup the grastate.dat to use it if it gets zeroed (or sequence number to -1) accidentally (or due to network issues) since this can avoid SST.
Step #5 Add the following to for compatibility with 5.5 replication for the duration of upgrade, and set the following options:
# Required for compatibility with galera-2
# Append socket.checksum=1 to other options if others are in wsrep_provider_options. Eg.: "gmcast.listen_addr=tcp://127.0.0.1:15010; socket.checksum=1"
wsrep_provider_options="socket.checksum=1"
# Required for replication compatibility
log_bin_use_v1_row_events=1
avoid_temporal_upgrade=ON   # Available in 5.6.24 and up

gtid_mode=
binlog_checksum=NONE
# Required under certain conditions
read_only=ON
Step #5.1 “read_only=ON” is required only when the tables you have contain timestamp/datetime/time data types as those data types are incompatible across replication from higher version to lower. This is currently a limitation of mysql itself. Also, refer to Replication compatibility guide. Any DDLs during migration are not recommended for the same reason.
Note
does not apply to root connections (as per mysql specifications).
Step #5.2 To ensure 5.6 read-only nodes are not written to during migration, clustercheck (usually used with xinetd and HAProxy) distributed with PXC has been modified to return 503 when the node is read-only so that HAProxy doesn’t send writes to it. Refer to clustercheck script for more details. Instead, you can also opt for read-write splitting at load-balancer/proxy level or at application level.
Note
On the last 5.5 node to upgrade to 5.6, the compatibility options of Step #5 are not required since all other nodes will already be upgrade and their compat. options are compatible with a 5.6 node without them.
Step #6 Next, start the node with the variable set to :
# mysqld --skip-grant-tables --user=mysql --wsrep-provider='none'
This is to ensure that other hosts are not affected by this upgrade (hence provider is none here).
Step #7 While Step #5 is running, in the background or in another session run:
# mysql_upgrade

Other options like socket, user, pass may need to provided here if not defined in my.cnf.
Step #8 Step #7 must complete successfully, upon which, process started in Step #6 can be stopped/killed.
Step #9 If all the steps above have completed successfully node can be started with:
# service mysql start
Note
If this is the first node of cluster, then replace start with . This shouldn’t apply to rolling upgrade in general (since other nodes are up during this) but only for downtime-based upgrades (where you bring up nodes one by one).
Step #10 At this point, other nodes (B, C) should acknowledge that this node is up and synced!
2 Installation Procedure – процедура установки
Итак, приступим к установке. Кстати, официальная документация по установке на debian системы наЗаранее убедитесь что у Вас не установлено никаких пакетов mysql в системе:
sudo apt-get purge mysql* -y
2.1.Установка percona 5.6 на debian 8 jessie
echo "deb https://repo.percona.com/apt jessie testing" >> sudo nano /etc/apt/sources.list
echo "deb-src https://repo.percona.com/apt jessie testing" >> sudo nano /etc/apt/sources.list
sudo apt-key adv --keyserver keys.gnupg.net --recv-keys 1C4CBDCDCD2EFD2A
sudo apt-get update
sudo apt-get install percona-xtradb-cluster-full-56 -y
Во время устаноки устанавливаем пароли для Mysql
3. Настройка НОД
Открываем порты на всех нодах. Для этого я устанавливаю пакет.
apt-get install iptables-persistent -y
/sbin/iptables -A INPUT -i eth0 -p tcp --destination-port 4567:4568 -j ACCEPT
/sbin/iptables -A INPUT -i eth0 -p udp --destination-port 4567:4568 -j ACCEPT
/sbin/iptables -A INPUT -i eth0 -p tcp --destination-port 3306 -j ACCEPT
/sbin/iptables -A INPUT -i eth0 -p udp --destination-port 3306 -j ACCEPT
/sbin/iptables -A INPUT -i eth0 -p tcp --destination-port 4444-j ACCEPT
/sbin/iptables -A INPUT -i eth0 -p udp --destination-port 4444 -j ACCEPT
Сохраним их
iptables-save > /etc/iptables/rules.v4
Проверяем наличие пакета NTP для того, чтобы время на серверах было синхронно настроено apt-get install ntp -y Добавляем строку server ntp.mobatime.ru
echo "server ntp.mobatime.ru" >> /etc/ntp.conf
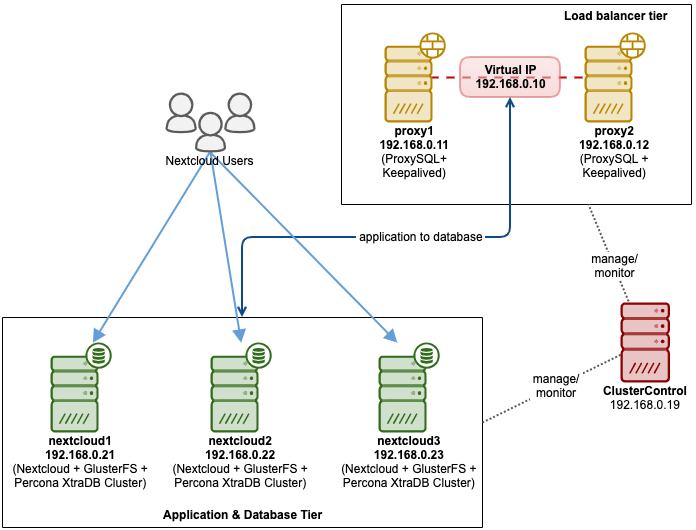
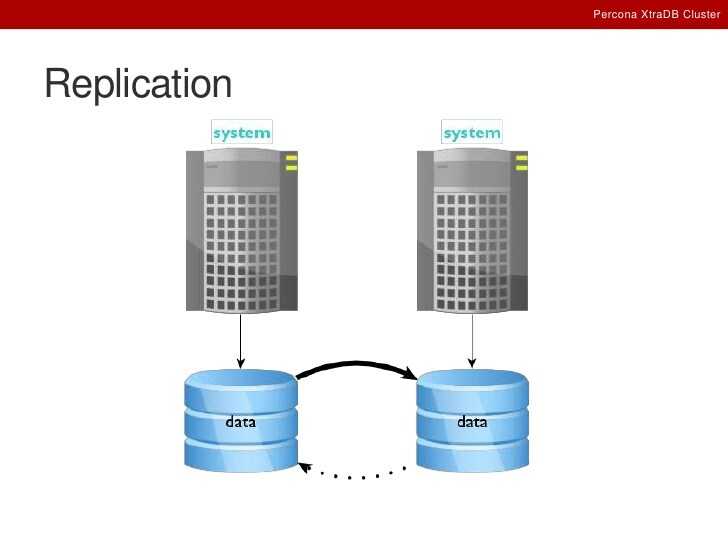
Procedure
When installing Gerrit with Percona XTRADB using an ‘n-nodes’ configuration, you need to:
- Create the database only on one node (the other nodes will replicate this).
- Install vanilla gerrit on that node or on a node that connects to that database node.
- Proceed with the standard installation of GerritMS.
- Usually in a GerritMS-Percona configuration, each Gerrit node connects to an individual Percona XtraDB node, sitting maybe on the same host as Gerrit. So in the file, in the dabase section, you will find localhost as the hostname to connect to.
- Then, if you want, you can maximise the database access speed from Gerrit to Percona XtraDB by using connection pooling. For this you need to:
- edit the file and
- add or replace this piece of configuration in the database section:
Depending on the load of the machine you can raise or lower the or the properties. Just keep in mind that, since, as usual, the default max number of connections for a MySQL server database is , you need to raise that number if you need to set the poolLimit to a value close or higher than . If you need to raise the max number of connection to MySQL (Percona) server, the you have to modify the my.cnf file and add something like:
- The last step is to modify the Git MultiSite configuration file (/opt/wandisco/git-multisite/replicator/properties/application.properties) for each node that will access a local master Percona database. Replace the following properties, or add them to the bottom of the file:
Note: Since Percona XtraDB cluster is based on MySQL server, the configuration is the same as the one for MySQL server.

![Папка продолжает возвращаться только для чтения [решено]](http://myeditor.ru/wp-content/uploads/4/f/a/4fa8f5d73b677bcf70f4efdfdf675688.gif)


