Иконки
Выбор иконок влияет в первую очередь на визуализацию каталогов и файлов в приложениях, которые позволяют просматривать содержимое файловой системы (обратите внимание, что это относится не только к файловым менеджерам, ведь многие GUI-программы позволяют сохранять и загружать файлы). К тому же, тема иконок может влиять на значки в панели задач и трее
Довольно популярная тема — . Активировать ее также можно через :
![]()
Можете оценить внешний вид файлового менеджера с установленной темой :
![]()
Сразу отмечу еще один набор иконок: . В следующем разделе мы обсудим, почему он может пригодиться.
Подробнее об иконках смотрите .
Панель задач
При желании вы можете настроить для Openbox панель в стиле MacOS X, но от нее больше вреда, чем пользы. Она будет тормозить вашу работу, создавая соблазн лишний раз воспользоваться мышью при запуске приложений.
Для меня хорошо подошла панель задач —
tint2. Она легко устанавливается и просто настраивается с помощью вспомогательной утилиты
tint2conf. К тому же, имеются предустановленные темы оформления. Я рекомендую взять за основу одну из таких стандартных тем, а затем настроить ее под свои нужды.
Если хотите, то в качестве отправной точки можете взять мою конфигурацию:
|
1 |
# Tint2 config file rounded= border_width=1 background_color=#000000 100 border_color=#464646 100 rounded= border_width=1 background_color=#000000 100 border_color=#333333 100 rounded= border_width= background_color=#46567C 100 border_color=#FFFFFF 0 rounded= border_width=1 background_color=#1F1F1F 100 border_color=#484848 100 rounded= border_width= background_color=#4B4B4B 100 border_color=#FFFFFF 20 panel_monitor=all panel_position=top center horizontal panel_size=100%35 panel_margin= panel_padding= panel_dock= wm_menu= panel_layer=top panel_background_id= autohide= autohide_show_timeout=0.3 autohide_hide_timeout=2 autohide_height=2 strut_policy=follow_size taskbar_mode=multi_desktop taskbar_padding=2 taskbar_background_id=1 taskbar_active_background_id=4 urgent_nb_of_blink=8 task_icon=1 task_text=1 task_centered= task_maximum_size=14035 task_padding=1 task_background_id=2 task_active_background_id=3 task_urgent_background_id=3 task_iconified_background_id=5 task_icon_asb=70 task_active_icon_asb=100 task_urgent_icon_asb=100 task_iconified_icon_asb=70 task_font=Droid Sans Bold9 task_font_color=#FFFFFF 60 task_active_font_color=#FFFFFF 80 task_urgent_font_color=#FFFFFF 80 task_iconified_font_color=#CCC1C1 100 font_shadow= systray=1 systray_padding=112 systray_sort=ascending systray_background_id=1 systray_icon_size=20 systray_icon_asb=70 tooltip= tooltip_padding=22 tooltip_show_timeout=0.7 tooltip_hide_timeout=0.3 tooltip_background_id=1 tooltip_font=sans10 tooltip_font_color=#000000 80 mouse_middle=none mouse_right=close mouse_scroll_up=toggle mouse_scroll_down=iconify battery= battery_low_status=10 battery_low_cmd=notify-send»battery low» battery_hide=98 bat1_font=sans8 bat2_font=sans6 battery_font_color=#FFFFFF 60 battery_padding=1 battery_background_id= |
Runtime customization
This article or section needs expansion.
Runtime configuration options can be passed to and certain hooks via the kernel command line. Kernel command-line parameters are often supplied by the bootloader. The options discussed below can be appended to the kernel command line to alter default behavior. See Kernel parameters and Arch boot process for more information.
init from base hook
- This is the most important parameter specified on the kernel command line, as it determines what device will be mounted as your proper root device. mkinitcpio is flexible enough to allow a wide variety of formats, for example:
root=/dev/sda1                                                # /dev node
root=LABEL=CorsairF80                                         # label
root=UUID=ea1c4959-406c-45d0-a144-912f4e86b207                # UUID
root=PARTUUID=14420948-2cea-4de7-b042-40f67c618660            # GPT partition UUID
Note: The following boot parameters alter the default behavior of in the initramfs environment. See for details. They will not work when hook is being used since the from hook is replaced.
- If or is specified, pauses the boot process (after loading hooks, but before mounting the root file system) and launches an interactive shell which can be used for troubleshooting purposes. This shell can be launched after the root has been mounted by specifying . Normal boot continues after exiting from the shell.
- Disable hooks at runtime by adding . For example:
disablehooks=resume
- Alter the order in which modules are loaded by specifying modules to load early via . (This may be used, for example, to ensure the correct ordering of multiple network interfaces.)
See Boot debugging and for other parameters.
Using net
Required packages
requires the package.
Kernel parameters
ip=
This parameter tells the kernel how to configure IP addresses of devices and also how to set up the IP routing table. It can take up to nine arguments separated by colons: .
The parameter can appear alone as the value to the parameter (without all the characters before). If the value is or , no autoconfiguration will take place, otherwise autoconfiguration will take place. The most common way to use this is .
Examples:
ip=127.0.0.1:::::lo:none  --> Enable the loopback interface.
ip=192.168.1.1:::::eth2:none --> Enable static eth2 interface.
ip=:::::eth0:dhcp --> Enable dhcp protocol for eth0 configuration.
Note: Make sure to use kernel device names (e.g. ) for the parameter, the persistent names (e.g. ) will not work. See for details.
BOOTIF=
If you have multiple network cards, this parameter can include the MAC address of the interface you are booting from. This is often useful as interface numbering may change, or in conjunction with pxelinux IPAPPEND 2 or IPAPPEND 3 option. If not given, will be used.
Example:
BOOTIF=01-A1-B2-C3-D4-E5-F6 # Note the prepended "01-" and capital letters.
nfsroot=
If the parameter is NOT given on the command line, the default will be used.
nfsroot=<root-dir>
Run for parameter explanation.
/usr as a separate partition
If you keep as a separate partition, you must adhere to the following requirements:
- Add the hook, mark with a of in to run the check on the partition at startup. While recommended for everyone, it is mandatory if you want your partition to be fsck’ed at boot-up. Without this hook, will never be fsck’d.
- If not using the systemd hook, add the hook. This will mount the partition after root is mounted.
Compositor
A compositor is an optional component of an open box setup, it can give a few niceties that such as transparency, and fading by buffering the input off screen before displaying it. Openbox does not have a built-in compositor but there are a that work nicely with it. The one I’ve been using, and have been quite happy with is . It has sane defaults that will work with little or no manual configuration, but at the same time it has lots of different configuration options if you decide to customize the setup.
Compton can be tested by simply running in an active openbox session. If the defaults are acceptable it can be started in the openbox autostart file.
Run Compton in the background with shadows.
Run with a configuration file.
Window Manager
Following the normal Arch Linux install procedure the first thing we will do is install the window manager . I experimented with a few window managers such as awesome, i3 and other tiling window managers, however I happen to prefer the floating window paradigm and thus ended up on openbox.
The other possible contender that would be interesting to try would be fluxbox which is another floating window manager option. I chose openbox over fluxbox partly due to the fact that openbox is used everywhere and thus there is a plethora of information out there about customizing it. I also didn’t like the dock that fluxbox started with and I really wanted to piece together all of the different parts of the desktop myself. While my choice was openbox, a lot of the customizations used apply to fluxbox in the same way.
For our window manager to show up it needs to be added to either a login manager or a user’s “~/.xinitrc” file. There is a default version of the script that contains some code we want to retain, so rather than making it from scratch it is advised to copy the default script to the user’s home directory.
Copy default xinitrc to users home folder.
After adding the command to the end of the “~/.xinitrc” file, an openbox session should be able to be started by entering the command .
Openbox can also be automatically started upon login by the shell’s startup script.
Add to shell’s startup script: “~/.bash_profile” for bash, or “~/.zlogin” for zsh.
AUTOFS
Монтирует в точки монтирования при обращении к ним, демонтирует при отсутствии обращения по таймауту
- wajig install autofs cifs-utils
/etc/auto.master
- …
- # корневая директория для монтирования по правилам из auto.misc
- /mnt/shares /etc/auto.misc
- …
/etc/auto.misc
- # пример nfs-шары
- public -fstype=nfs,rw,async,soft,udp,nolock 192.168.1.2:/share/MD0_DATA/Public
- # пример cifs-шары с авторизацией доменного юзера
- psopen -fstype=cifs,rw,noperm,credentials=/etc/domain.cred ://192.168.122.3/open
Файл с доменной учеткой:
/etc/domain.cred
- username=MyName
- password=MyPassw0rd
- domain=MYDOMAIN
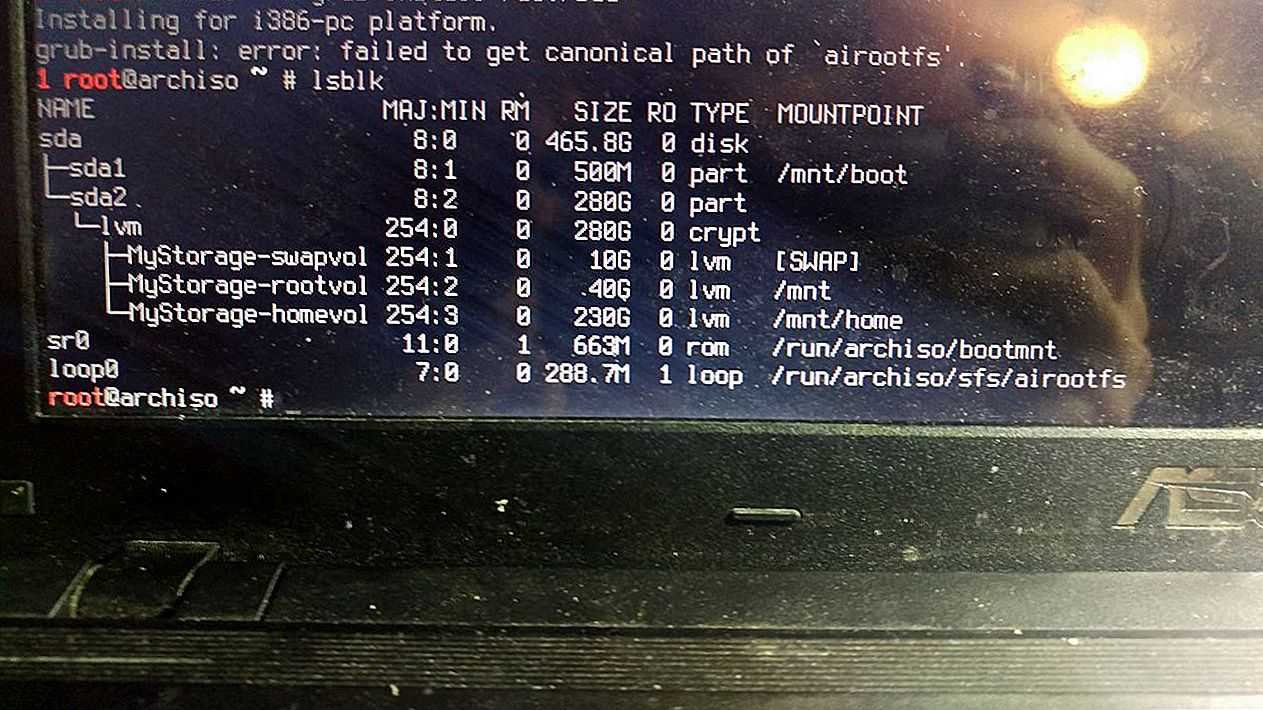
Создание разделов
Рассмотрим пример создания томов из дисков sdb и sdc с помощью LVM.
1. Инициализация
Помечаем диски, что они будут использоваться для LVM:
pvcreate /dev/sdb /dev/sdc
* напомним, что в качестве примера нами используются диски sdb и sdc.
Посмотреть, что диск может использоваться LMV можно командой:
pvdisplay
В нашем случае мы должны увидеть что-то на подобие:
«/dev/sdb» is a new physical volume of «1,00 GiB»
— NEW Physical volume —
PV Name /dev/sdb
VG Name
PV Size 1,00 GiB
Allocatable NO
PE Size 0
Total PE 0
Free PE 0
Allocated PE 0
PV UUID rR8qya-eJes-7AC5-wuxv-CT7a-o30m-bnUrWa
«/dev/sdc» is a new physical volume of «1,00 GiB»
— NEW Physical volume —
PV Name /dev/sdc
VG Name
PV Size 1,00 GiB
Allocatable NO
PE Size 0
Total PE 0
Free PE 0
Allocated PE 0
PV UUID 2jIgFd-gQvH-cYkf-9K7N-M7cB-WWGE-9dzHIY
* где
- PV Name — имя диска.
- VG Name — группа томов, в которую входит данный диск (в нашем случае пусто, так как мы еще не добавили его в группу).
- PV Size — размер диска.
- Allocatable — распределение по группам. Если NO, то диск еще не задействован и его необходимо для использования включить в группу.
- PE Size — размер физического фрагмента (экстента). Пока диск не добавлен в группу, значение будет 0.
- Total PE — количество физических экстентов.
- Free PE — количество свободных физических экстентов.
- Allocated PE — распределенные экстенты.
- PV UUID — идентификатор физического раздела.
2. Создание групп томов
Инициализированные на первом этапе диски должны быть объединены в группы.
Группа может быть создана:
vgcreate vg01 /dev/sdb /dev/sdc
* где vg01 — произвольное имя создаваемой группы; /dev/sdb, /dev/sdc — наши диски.
Просмотреть информацию о созданных группах можно командой:
vgdisplay
На что мы получим, примерно, следующее:
— Volume group —
VG Name vg01
System ID
Format lvm2
Metadata Areas 2
Metadata Sequence No 1
VG Access read/write
VG Status resizable
MAX LV 0
Cur LV 0
Open LV 0
Max PV 0
Cur PV 2
Act PV 2
VG Size 1,99 GiB
PE Size 4,00 MiB
Total PE 510
Alloc PE / Size 0 / 0
Free PE / Size 510 / 1,99 GiB
VG UUID b0FAUz-wlXt-Hzqz-Sxs4-oEgZ-aquZ-jLzfKz
* где:
- VG Name — имя группы.
- Format — версия подсистемы, используемая для создания группы.
- Metadata Areas — область размещения метаданных. Увеличивается на единицу с созданием каждой группы.
- VG Access — уровень доступа к группе томов.
- VG Size — суммарный объем всех дисков, которые входят в группу.
- PE Size — размер физического фрагмента (экстента).
- Total PE — количество физических экстентов.
- Alloc PE / Size — распределенное пространство: колическтво экстентов / объем.
- Free PE / Size — свободное пространство: колическтво экстентов / объем.
- VG UUID — идентификатор группы.
3. Создание логических томов
Последний этап — создание логического раздела их группы томов командой lvcreate. Ее синтаксис:
lvcreate <имя группы томов>
Примеры создания логических томов:
lvcreate -L 1G vg01
* создание тома на 1 Гб из группы vg01.
lvcreate -L50 -n lv01 vg01
* создание тома с именем lv01 на 50 Мб из группы vg01.
lvcreate -l 40%VG vg01
* при создании тома используется 40% от дискового пространства группы vg01.
lvcreate -l 100%FREE -n lv01 vg01
* использовать все свободное пространство группы vg01 при создании логического тома.
* также можно использовать %PVS — процент места от физического тома (PV); %ORIGIN — размер оригинального тома (применяется для снапшотов).


Посмотрим информацию о созданном томе:
lvdisplay
— Logical volume —
LV Path /dev/vg01/lv01
LV Name lv01
VG Name vg01
LV UUID 4nQ2rp-7AcZ-ePEQ-AdUr-qcR7-i4rq-vDISfD
LV Write Access read/write
LV Creation host, time vln.dmosk.local, 2019-03-18 20:01:14 +0300
LV Status available
# open 0
LV Size 52,00 MiB
Current LE 13
Segments 1
Allocation inherit
Read ahead sectors auto
— currently set to 8192
Block device 253:2
* где:
- LV Path — путь к устройству логического тома.
- LV Name — имя логического тома.
- VG Name — имя группы томов.
- LV UUID — идентификатор.
- LV Write Access — уровень доступа.
- LV Creation host, time — имя компьютера и дата, когда был создан том.
- LV Size — объем дискового пространства, доступный для использования.
- Current LE — количество логических экстентов.
Настройка устанавливаемой системы
Переключение
Переключаемся в устанавливаемую систему:
chroot /mnt bash
Дальнейшие действия производятся в устанавливаемой системе. Выходить из нужно будет только после завершения настройки — для перезагрузки.
В дальнейшем, если какого-либо конфигурационного файла нет, и не написано, что он генерируется определенной командой, то его нужно создать.
Локаль
Открываем файл и стираем решетку перед локалью .
Запускаем генератор локалей:
locale-gen
Теперь открываем файл и пишем туда следующее:
LANG=ru_RU.UTF-8
Не пугайтесь, если введя после этого команду вы не увидите изменений. Так и должно быть.
Открываем файл и пишем туда:
KEYMAP=us
FONT=UniCyr_8x16
Часы
Переводим аппаратные часы на «локальное» время и отображаем это в конфигурационном файле :
hwclock -w --localtime
указывается для совместимости с Windows.
Указываем свой часовой пояс:
ln -sf /usr/share/zoneinfo/Europe/Moscow /etc/localtime
Если у вас другой часовой пояс, то ищите свой файл в и командуйте аналогичным образом.
Автомонтирование
Теперь открываем файл и прописываем туда наш корневой раздел. Есть несколько способов указания нужного раздела, самый простой — использовать для указания имя устройства:
/dev/sda1 / ext4 defaults 1
Напомню, что разделителем в служит табуляция.
Установка загрузчика
Ставим загрузчик:
grub-install /dev/sda
Если вы хотите видеть как проходит процесс загрузки, то откройте файл и закомментируйте из параметров ядра.
Запускаем автоматическую настройку:
grub-mkconfig -o /boot/grub/grub.cfg
может ругаться на lvmetad. Это предупреждение можно проигнорировать, а можно удалить пакет и перегенерировать конфиг.
Инициализация хранилища ключей
Установка практически выполнена, но прежде чем перезагружать систему, инициализируем и «населим» хранилище ключей для :
pacman-key --init
pacman-key --populate archlinux
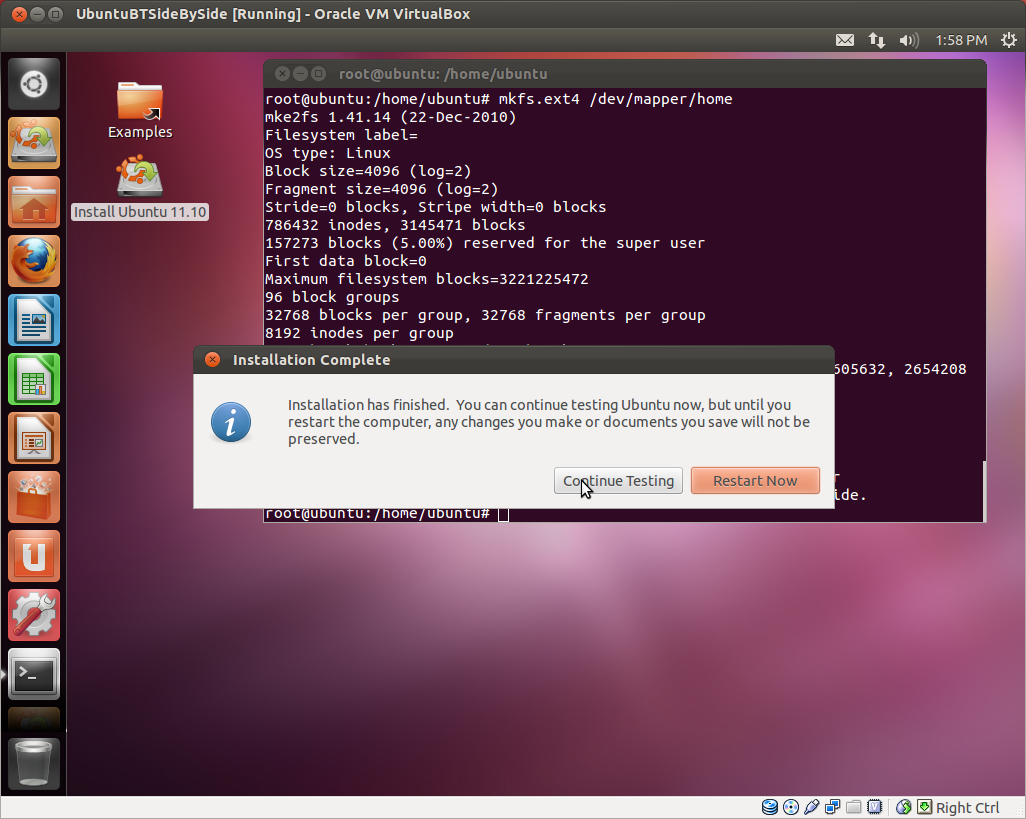
Перезагрузка
После этого нужно ещё раз проверить правильность всех настроек, выйти из устанавливаемой системы и перезагрузиться:
exit
reboot
При установке в VirtualBox новая система иногда ведёт себя странным образом: сначала вроде бы нормально загружается, а потом на экране появляется ругань вида и приглашение консоли не появляется. В этом случае нужно просто перейти в другую консоль, нажав HOST + F2. Хост-клавишей обычно выступает правый Ctrl.
Настроить Tint2
Процесс настройки Tint2 довольно прост. Чтобы сделать его максимально простым для понимания, следуйте пошаговым инструкциям ниже.
Шаг 1. В среде рабочего стола XFCE4 мы должны отключить загрузку панели среды рабочего стола по умолчанию. Для этого вам необходимо получить доступ к настройкам сеанса XFCE4.
Нажмите Alt + F2 на клавиатуре. Затем введите команду в панели запуска ниже, чтобы получить доступ к настройкам сеанса.
xfce4-session-settings
Шаг 2: В окне настроек сеанса найдите вкладку «Автозапуск приложения» и щелкните по ней мышью. Затем найдите кнопку «+ Добавить» и щелкните ее, чтобы создать новую запись запуска.
В поле имени напишите:
XFCE Panel killer.
Затем в поле команды напишите:
killall xfce4-panel
Когда оба поля будут заполнены, нажмите кнопку «ОК», чтобы создать новую запись сеанса.
Шаг 3: Вернитесь в окно настроек сеанса и нажмите кнопку «+ Добавить», чтобы сделать вторую запись.
![]()
В поле имени напишите:
Tint2 launcher.
Затем в поле команды напишите:
tint2
Шаг 4: Нажмите «ОК», чтобы создать новую запись сеанса.
Шаг 5: После создания обеих записей сеанса щелкните правой кнопкой мыши на рабочем столе, наведите указатель мыши на раздел «Приложения» в контекстном меню и выберите «Выход», чтобы открыть окно выхода.
Шаг 6: В окне выхода найдите поле с надписью «Сохранить сеанс для будущих входов в систему» и снимите его.
![]()
Шаг 7: Снова войдите в сеанс рабочего стола XFCE4. Когда вы это сделаете, вы заметите, что панель Tint2 заменила панель XFCE4 по умолчанию!
![]()
Вам нужно открыть приложения в новом сеансе XFCE4 на базе Tint2? Щелкните правой кнопкой мыши на рабочем столе и выберите меню «Приложения». Или нажмите Alt + F3.
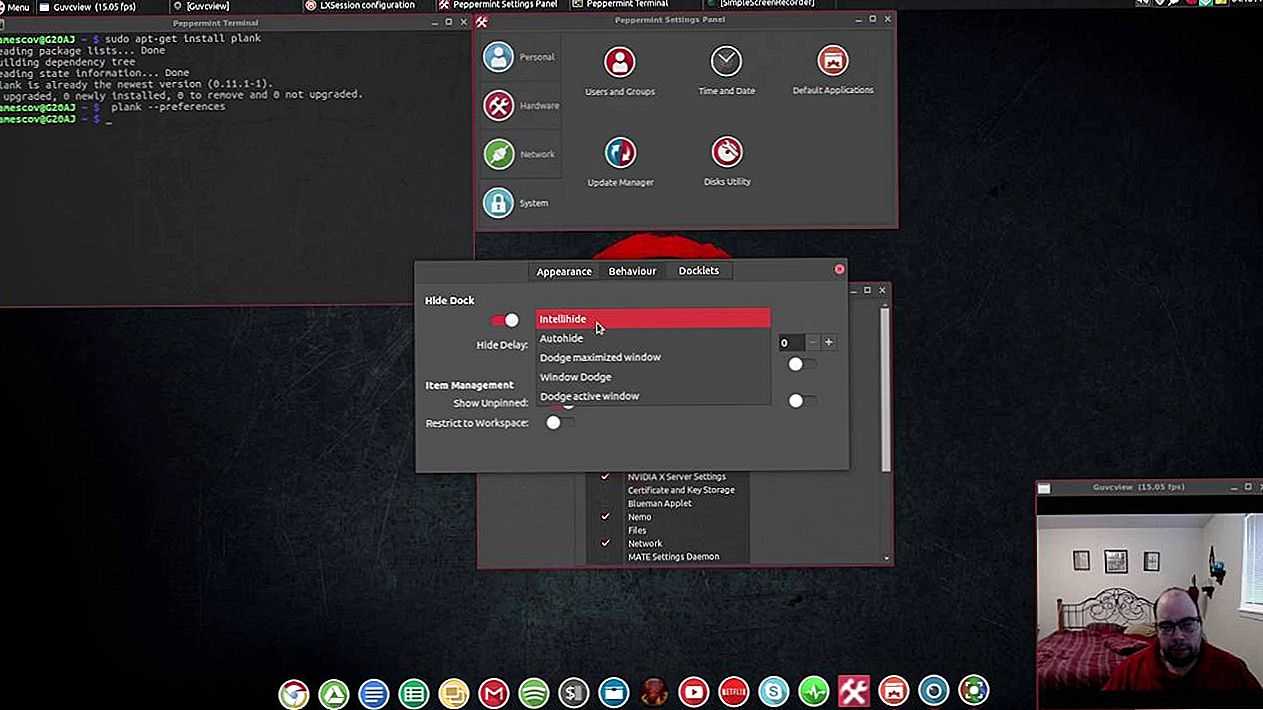
Настроить панель Tint2
Панель Tint2 невероятно настраиваема. Если вы не большой поклонник внешнего вида по умолчанию, сделайте следующее, чтобы изменить тему.
Шаг 1: Щелкните значок меню рядом с полем «рабочая область» на панели Tint2. При выборе этого значка откроется приложение мастера Tint2.
Шаг 2. В приложении мастера Tint2 просмотрите список доступных тем панелей. Затем, когда вы найдете тот, который вам нравится, щелкните по нему, чтобы выбрать его с помощью мыши.
Шаг 3: Выбрав понравившуюся тему Tint2 из списка, нажмите зеленую кнопку с галочкой, чтобы применить ее.
![]()
Как только будет выбрана зеленая кнопка с галочкой, панель переключится на новую тему.
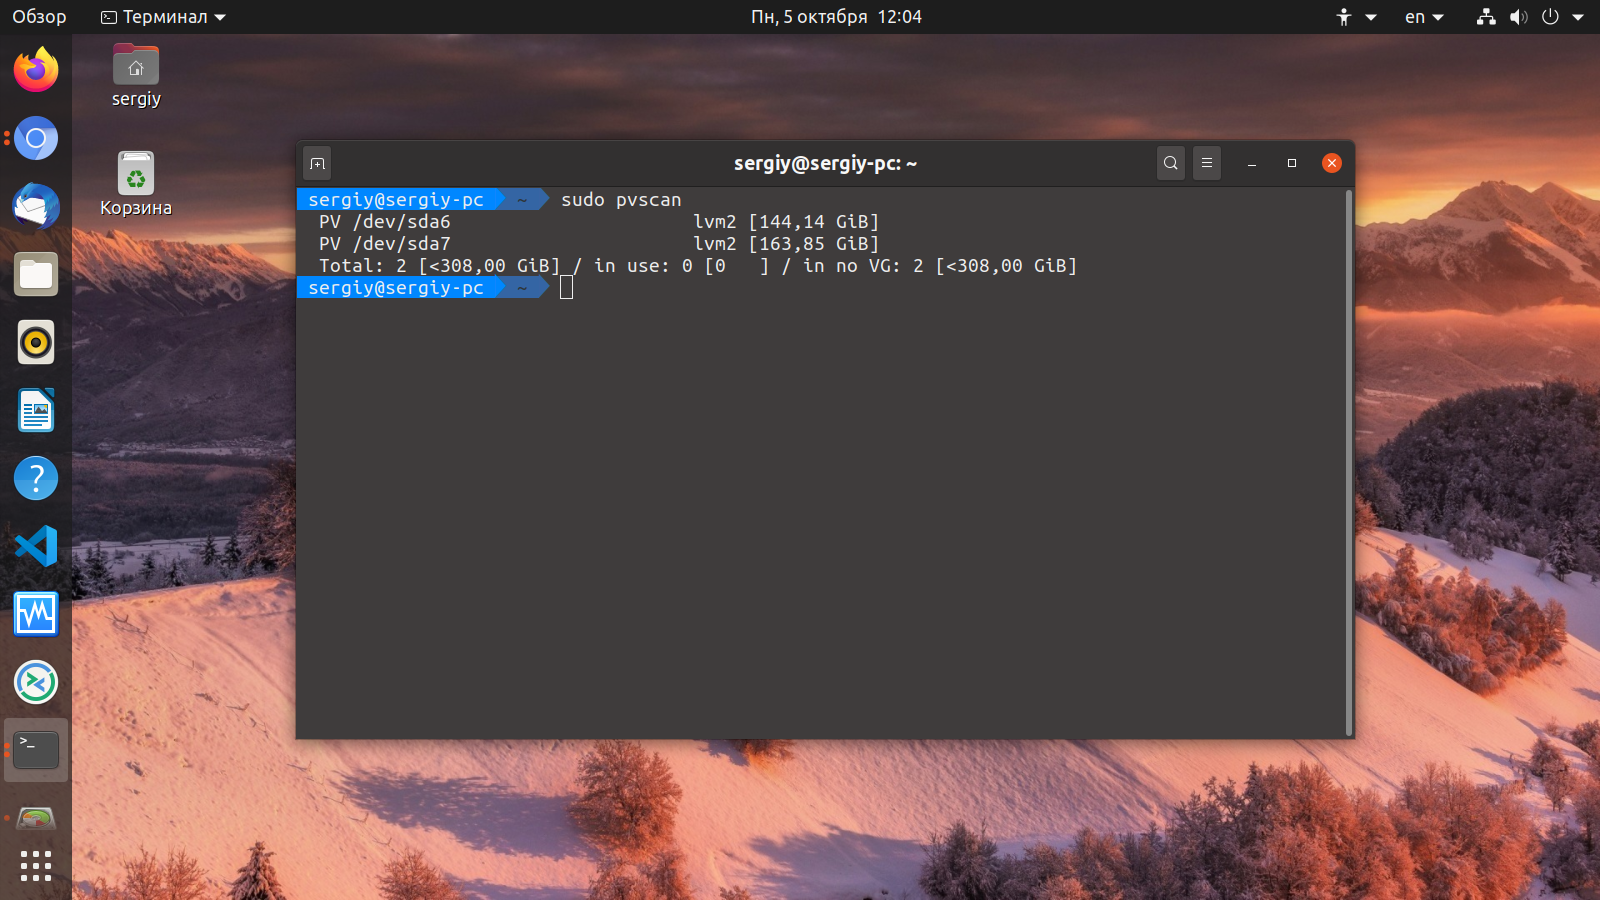
Просмотр информации
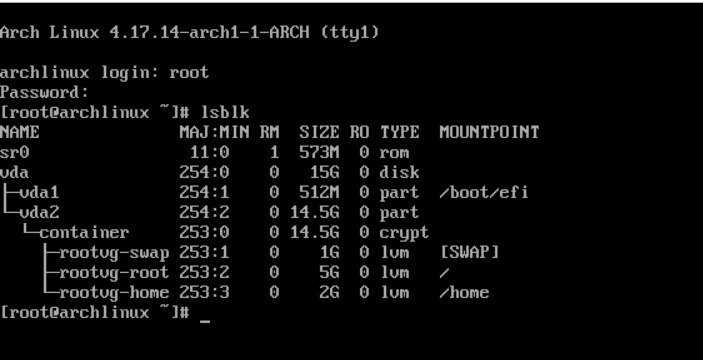
Разберемся, как получить информацию о дисковых накопителях в системе.
1. Для общего представления дисков, разделов и томов вводим:
lsblk
Мы получим что-то на подобие:
NAME MAJ:MIN RM SIZE RO TYPE MOUNTPOINT
sda 8:0 0 30G 0 disk
sda1 8:1 0 1G 0 part /boot
sda2 8:2 0 29G 0 part
sys-root 253:0 0 27G 0 lvm /
sys-swap 253:1 0 2G 0 lvm
sdb 8:16 0 1G 0 disk
vg01-lv01-real 253:3 0 1G 0 lvm
vg01-lv01 253:2 0 1G 0 lvm /mnt
vg01-sn01 253:5 0 1G 0 lvm
sdc 8:32 0 1G 0 disk
vg01-lv01-real 253:3 0 1G 0 lvm
vg01-lv01 253:2 0 1G 0 lvm /mnt
vg01-sn01 253:5 0 1G 0 lvm
vg01-sn01-cow 253:4 0 500M 0 lvm
vg01-sn01 253:5 0 1G 0 lvm
sdd 8:48 0 1G 0 disk
* как видим, команда отображает корневое блочное устройство, какие разделы из него сделаны и в какие логические тома организованы из некоторых из разделов.
2. Получить информацию о проинициализированных для LVM дисков:
Кратко:
pvs
Подробно:
pvdisplay
pvdisplay /dev/sdb
3. Посмотреть информацию о группах LVM.

Кратко:
vgs
Подробно:
vgdisplay
vgdisplay vg01
4. Посмотреть информацию о логических томах можно также двумя способами — краткая информация:
lvs
* команда покажет все логические разделы.
Для более подробной информации о логических томах вводим:
lvdisplay
lvdisplay /dev/vg01/lv01
5. Для поиска всех устройств, имеющих отношение к LVM, вводим:
lvmdiskscan
Терминал
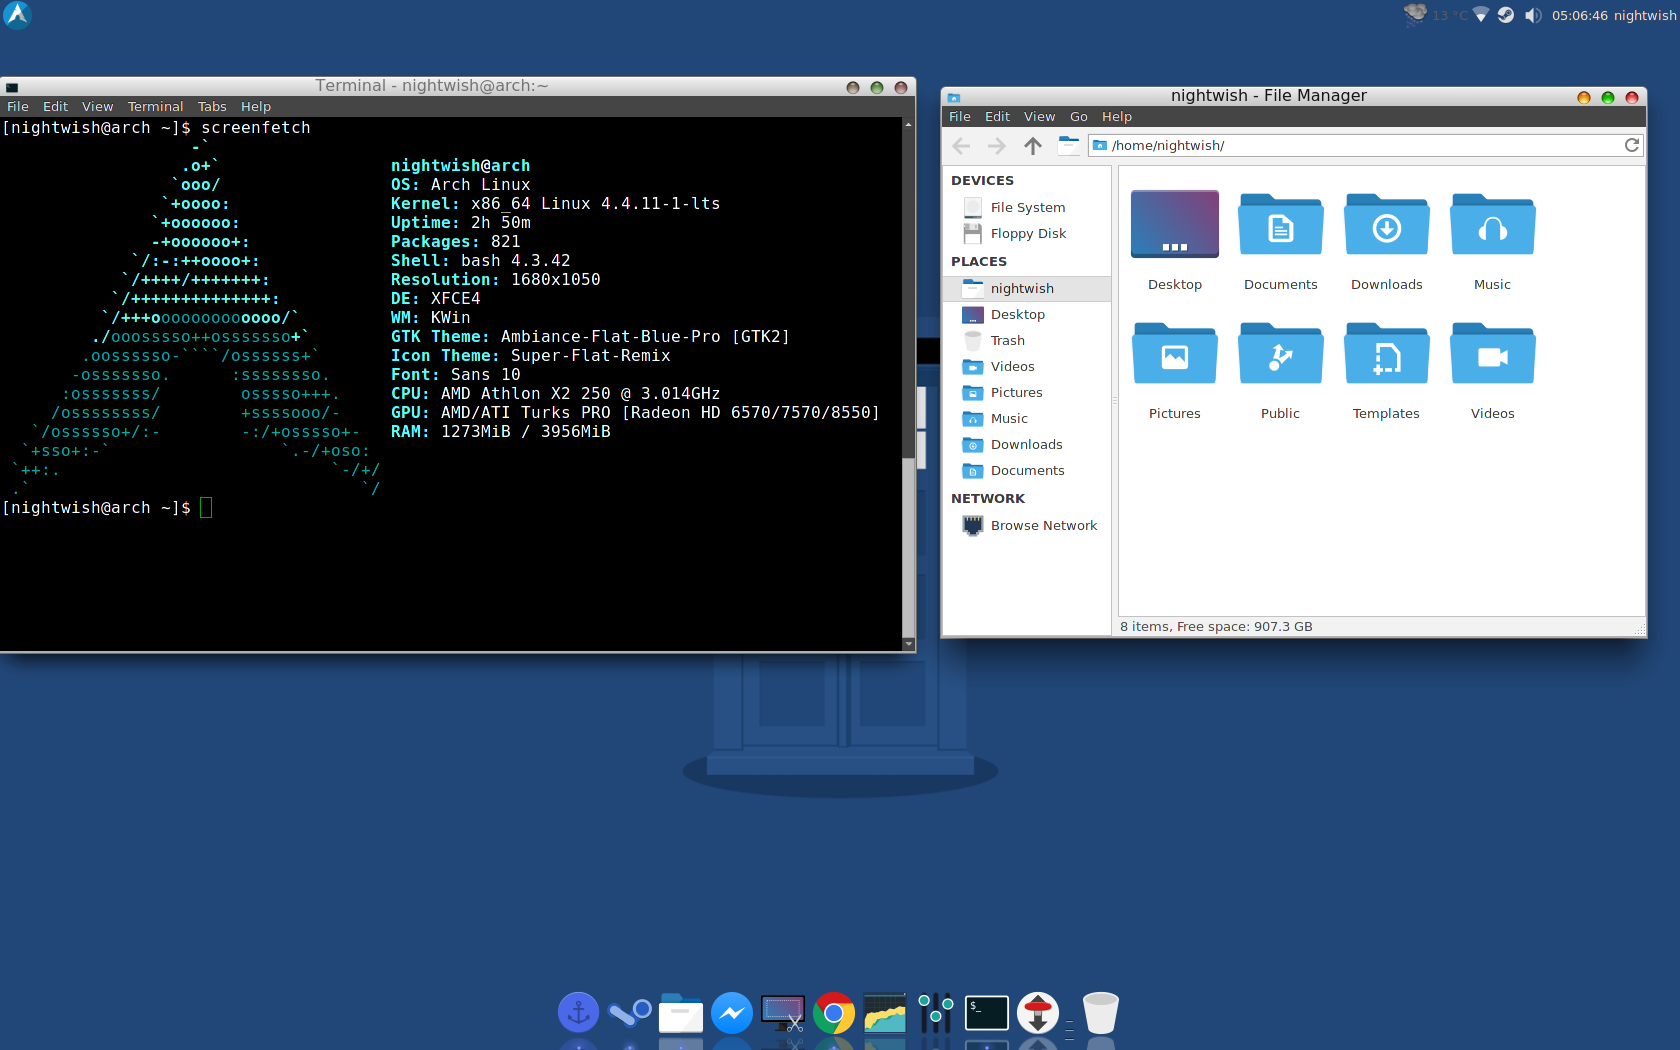
Linux без терминала — не Linux. В качестве GUI-терминала под Openbox я уже давно использую приложение
sakura. Можете тоже попробовать его, но это дело вкуса и привычки — подойдет любой терминал.
Удобнее всего настроить запуск Openbox таким образом, чтобы терминал стартовал автоматически. Первым делом скопируйте конфигурационные файлы Openbox в свой домашний каталог:
|
1 |
mkdir-p~/.config/openbox/ cp/etc/xdg/openbox/*~/.config/openbox/ |
Затем откройте конфигурационный файл
~/.config/openbox/autostart и добавьте в конец следующее:
|
1 |
APPS=’sakura’ (forXin$APPS;do($X&) ;done)& |
Этот простой скрипт обеспечивает запуск списка (который пока что состоит из одного элемента) приложений.
Далее сделаем так, чтобы
sakura появлялась именно там, где нужно. Откройте файл
~/.config/openbox/rc.xml и найдите в нем раздел
<applications>. Ближе к концу раздела (и файла) должен располагаться комментарий:
|
1 |
# end of the example |
Вставьте сразу после этого комментария следующий фрагмент xml-кода:
|
1 |
<application name=»sakura»type=»normal»> <desktop>1</desktop> <maximized>yes</maximized> <focus>yes</focus> <layer>below</layer> </application> |
В теге
<desktop> указано, что терминал должен появляться на первом виртуальном рабочем столе. С помощью
<maximized> говорим, что терминал должен быть развернут на весь экран. Тег
<focus> переводит фокус ввода на терминал после его запуска. А
<layer> закрепляет окно терминала на нижнем
Z-уровне так, что все остальные окна будут его перекрывать.
После ребута системы на первом рабочем столе должен появиться терминал.
GTK+ и Qt
Помимо GTK+ существует еще и Qt. Не вдаваясь в подробности сформулирую суть проблемы: приложения на GTK+ и Qt визуализируются независимо, то есть могут выглядеть совершенно по разному. Для кого-то это становится принципиальной проблемой, если приходится использовать и те, и другие программы одновременно. Решений может быть несколько. Одно из них заключается в использовании программных прослоек, которые помогут программам одного вида выглядеть в точности как программы другого. Это решение вполне приемлемо, но лично мне оно не нравится. В связи с этим появляется альтернативный выход из ситуации: установка одинаковых тем оформления. В качестве примера можно взять: , , . Тему для меняем так же, как и обычно (с помощью ). Для Qt используйте :
![]()
Вот как выглядят приложения (GTK+) и (Qt) с установленной темой :
![]()
Разница все равно есть. Но она заключается в том, что по какой-то причине гамма для Qt более желтая. Я не стал особо на этом останавливаться, но понятно, что подобрать нужную гамму можно без проблем (настраивается с помощью ). При этом элементы управления выглядят одинаково (сравните полосы прокрутки), а это то, что нам нужно.
Небольшое замечание: в качестве темы иконок с лучше использовать (или аналоги), поскольку та же у меня с ней конфликтует.
Подробности и другие варианты решений описанной проблемы ищите здесь.
Configuration
Application launchers
With version 0.12, it has become possible to add application launchers to tint2. It is necessary to add the following configuration options to your tint2 config file:
Under :
# Panel
panel_items = LTSBC
And under the new section :
# Launchers
launcher_icon_theme = LinuxLex-8
launcher_padding = 5 0 10
launcher_background_id = 9
launcher_icon_size = 85
launcher_item_app = /some/where/application.desktop
launcher_item_app = /some/where/anotherapplication.desktop
is a new configuration option which defines which items tint2 shows and in what order:
- L
- shows the Launcher
- T
- shows the Taskbar
- S
- shows the Systray (also called notification area)
- B
- shows the Battery status
- C
- shows the Clock
- F
- adds an extensible spacer (freespace). You can specify more than one. Has no effect if `T` is also present. (since 0.12)
- E
- adds an executor plugin. You can specify more than one. (since 0.12.4)
- P
- adds a push button. You can specify more than one. (since 0.14)
- adds a separator. You can specify more than one. (since 0.13.0)
Applications menu in Openbox
Since version 0.12, you have the ability to create launchers. Unfortunately, tint2 does not support nested menus yet, so there is no native function to enable an applications menu. This section describes a way to create a launcher for Openbox.
Besides tint2 and Openbox, install the package. Next, create a keybinding for opening the Openbox menu. For Openbox, this would require the following entry between the <keyboard> and </keyboard> tags in :
 <keybind key="C-A-space">
   <action name="ShowMenu"><menu>root-menu</menu></action>
 </keybind>
This will set to open the root-menu (this is the menu that opens when you right-click the desktop). You can change to any menu-id that you have defined in . Next we need to make that keybinding into a file with . First test that your keybind works with:
$ xdotool key ctrl+alt+space
If the menu you chose pops up under your mouse cursor, you have done it right! Now create a file inside the directory. Add the line where are your chosen key combinations. Open your new file from your file manager and, once again, you should see the menu appear under your cursor. Now just add this to tint2 as a launcher, and you have your Openbox Applications Menu as a launcher for tint2. If you need to place the menu at a fixed position, you can use . You can create a script and reference it in since it involves two commands.
Since version 0.14, you have the ability to create buttons. Just add «xdotool key ctrl+alt+space» string from example above to button key action you want to be start menu action.
Установка Tint2
Tint2 есть в штатных репозиториях большинства популярных Linux дистрибутивов.
Название пакета: tint2 Название пакета утилиты настройки: tint2conf (обычно автоматически устанавливается вместе с пакетом tint2).
Самостоятельная компиляция из исходных кодов
Для сборки требуется: Git, CMake, build-essential.
В Ubuntu (Debian) эти компоненты можно установить командой:
Tint2 зависит от cairo, pango, glib2, imlib2>=1.4.2, libgtk2.0-dev, xinerama, libXrender, libXcomposite, libXdamage, libx11, libXrandr>=1.3, librsvg2, libstartup-notification.
Установка зависимостей в Ubuntu (Debian):
Установка зависимостей в Gentoo:
Клонирование репозитория и сборка:
Установка после компиляции (устанавливается в /usr/local/bin/tint2):
или
Openbox reconfiguration
Tip: where not already present, it would be worthwhile adding this command to a menu and/or as a keybind for convenience.
Openbox will not always automatically reflect any changes made to its configuration files within a session. As a consequence, it will be necessary to manually reload those files after they have been edited. To do so, enter the following command:
$ openbox --reconfigure
Where intending to add this command as a keybind to , it will only be necessary to list the command as . An example has been provided below, using the + keybind:
<keybind key="W-F11">
  <action name="Reconfigure"/>
</keybind>
Running tint2
Openbox
You can run tint2 by simply typing the command:
$ tint2
If you want to run tint2 when starting Openbox, you will need to edit and add the following line:
tint2 &
GNOME 3
In GNOME3, the Activities view has replaced the bottom panel and taskbar. To use tint2 in its place, run
$ gnome-session-properties
and add as an application to run on start-up. The next time GNOME starts, tint2 will run automatically.
i3
In i3, to use tint2 as a replacement for , append the following line to end of the i3 configuration file:
~/.config/i3/config
exec --no-startup-id tint2
and comment out or remove any section like } from the same file.
Multiple panels
Multiple tint2 panels can be simultaneously running by executing tint2 with different configuration files:
tint2 -c <path_to_first_config_file>
tint2 -c <path_to_second_config_file>
Tips
Icons in the Openbox menu
Since version 3.5.0, Openbox is able to have icons next to menu entries.
-
To emerge Openbox with imlib support add USE flag to x11-wm/openbox in /etc/portage/package.use
-
Re-emerge Openbox so that support for the USE flag is considered:
- Add a <showIcons>yes</showIcons> line to the <menu> section of the rc.xml file.
-
Add in menu.xml icon=»<path>» like this:
FILE Manually add icons to Openbox example<menu label="Shells" icon="/usr/share/icons/shell.png"> <item label="xterm" icon="/usr/share/icons/xterm.png"> <action name="Execute"> <execute>xterm</execute> </action> </item>
Keybinds
Keybinds can be added to the configuration file using the following syntax:
<keybind key="my-key-combination">
  <action name="my-action">
    ...
  </action>
</keybind>
The action name for running an external command is Execute. Use the following syntax to define an external command to execute:
<action name="Execute">
  <command>my-command</command>
</action>
Tip: The AUR utility provides a graphical interface for configuring key bindings. Before using obkey, you should use obconf to create .
While the use of standard alpha-numeric keys for keybindings is self-explanatory, special names are assigned to other types of keys, such as , and .
Modifiers
keys play an important role in keybindings (e.g. holding down the or key in combination with another key to undertake an action). Using modifiers helps to prevent conflicting keybinds, whereby two or more actions are linked to the same key or combination of keys. The syntax to use a modifier with another key is:
"<modifier>-<key>"
The modifier codes are as follows:
- : Shift
- : Control / CTRL
- : Alt
- : Super / Windows
- : Meta
- : Hyper (If it is bound to something)
Multimedia keys
Where available, it is possible to set the appropriate keys to perform their intended functions, such as to control the volume and/or the screen brightness. These will usually be integrated into the keys, and are identified by their appropriate symbols. See Extra keyboard keys for details.
The volume and brightness multimedia codes are as follows (note that commands will still have to be assigned to them to actually function):
- : Increase volume
- : Decrease volume
- : Mute / unmute volume
- : Increase screen brightness
- : Decrease screen brightness
For a full list of XF86 multimedia keys, see LQWiki:XF86 keyboard symbols.
Volume control
What commands should be used for controlling the volume will depend on whether ALSA, PulseAudio, or OSS is used for sound.
- ALSA: see .
- PulseAudio: see
- OSS: see .
Navigation keys
These are the directional / arrow keys, usually used to move the cursor up, down, left, or right. The (self-explanatory) navigation codes are as follows:
- : Up
- : Down
- : Left
- : Right
Image creation and activation
Automated generation
Every time a kernel is installed or upgraded, a pacman hook automatically generates a .preset file saved in . For example for the official stable kernel package. A preset is simply a list of information required to create initial ramdisk images, instead of manually specifying the various parameters and the location of the output files.
By default, it contains the instructions to create two images:
- the default ramdisk image created following the directives specified in the mkinitcpio , and
- the fallback ramdisk image, same as above except that the autodetect hook is skipped during creation, thus including a full range of modules which supports most systems.
After creating the preset, the pacman hook calls the mkinitcpio script which generates the two images, using the information provided in the preset.
Note: .preset files are used to automatically regenerate the initramfs after a kernel update; be careful when editing them.
Manual generation
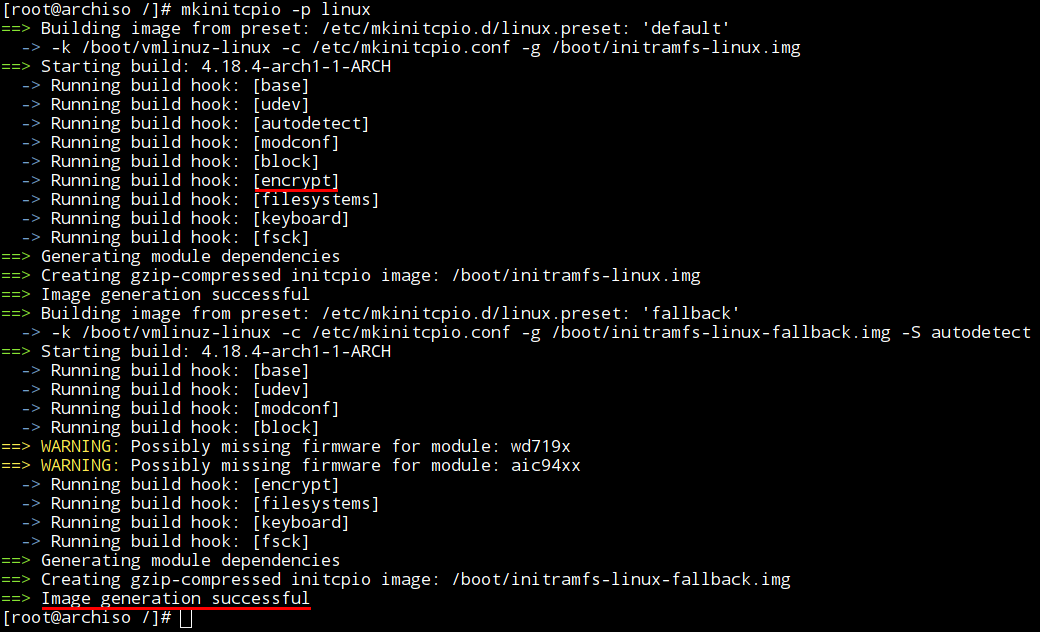
To run the script manually, refer to the manual page for instructions. In particular, to (re-)generate the preset provided by a kernel package, use the / option followed by the preset to utilize. For example, for the package, use the command:
# mkinitcpio -p linux
To (re-)generate all existing presets, use the / switch. This is typically used to regenerate all the initramfs images after a change of the global :
# mkinitcpio -P
Users may create any number of initramfs images with a variety of different configurations. The desired image must be specified in the respective boot loader configuration file.
Customized generation
Users can generate an image using an alternative configuration file. For example, the following will generate an initial ramdisk image according to the directions in and save it as .
# mkinitcpio --config /etc/mkinitcpio-custom.conf --generate /boot/initramfs-custom.img
If generating an image for a kernel other than the one currently running, add the kernel release version to the command line. The installed kernel releases can be found in , the syntax is consistent with the output of the command for each kernel.
# mkinitcpio --generate /boot/initramfs-custom2.img --kernel 5.7.12-arch1-1