Before you begin
-
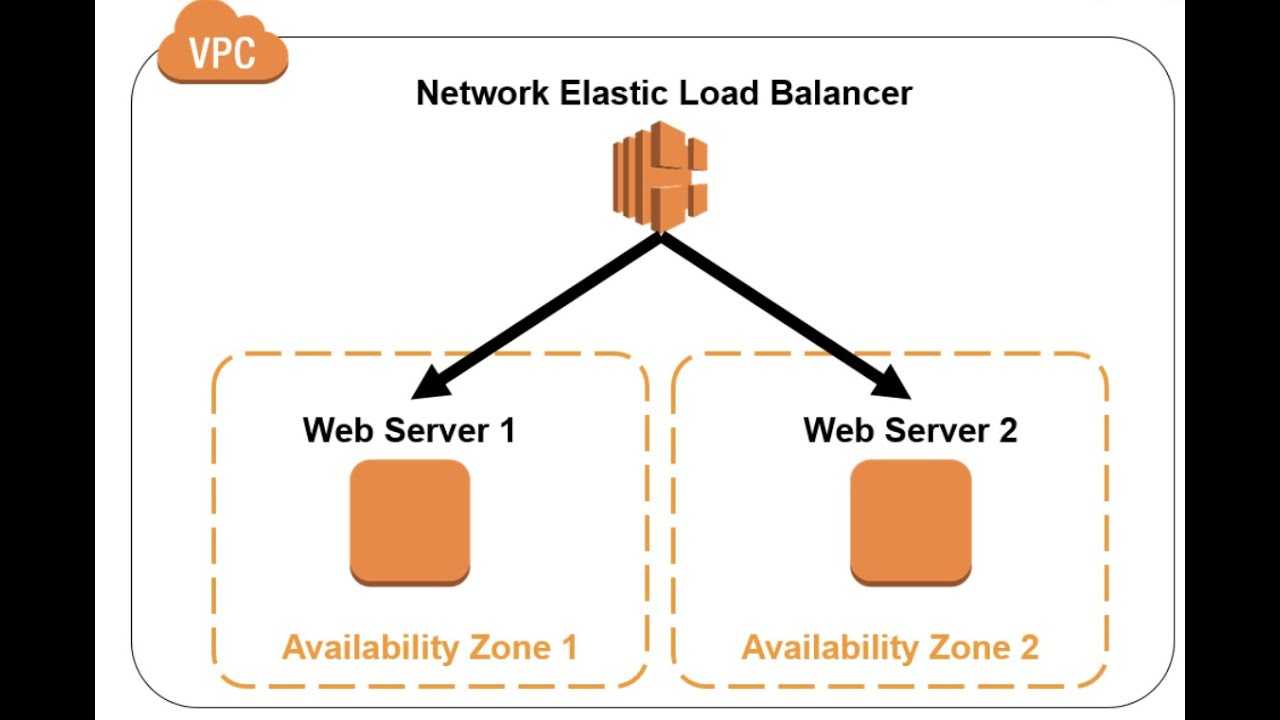
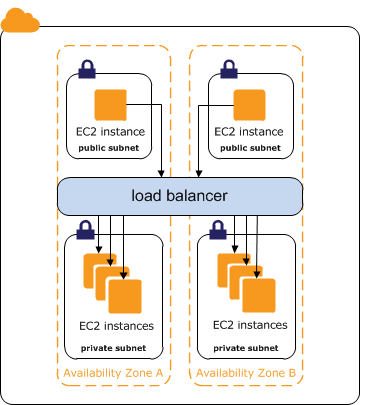
Decide which two Availability Zones you will use for your EC2 instances.
Configure your virtual private cloud (VPC) with at least one public subnet in
each of these Availability Zones. These public subnets are used to configure the
load balancer. You can launch your EC2 instances in other subnets of these
Availability Zones instead. For more information, see VPCs and
subnets in the Amazon VPC User Guide. -
Launch at least one EC2 instance in each Availability Zone. Be sure to install
a web server, such as Apache or Internet Information Services (IIS), on each EC2
instance. Ensure that the security groups for these instances allow HTTP access
on port 80. For more information, see in the
Amazon VPC User Guide.
Примеры использования
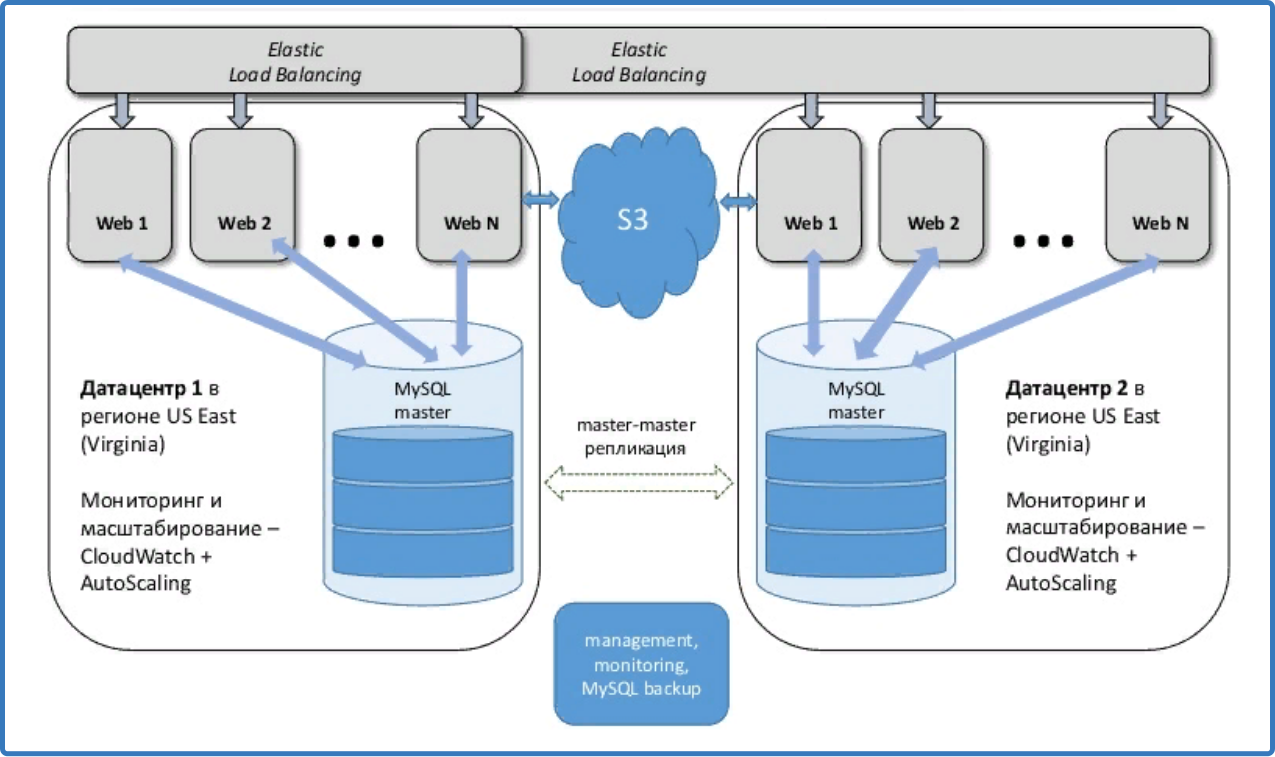
Более высокая отказоустойчивость для приложений
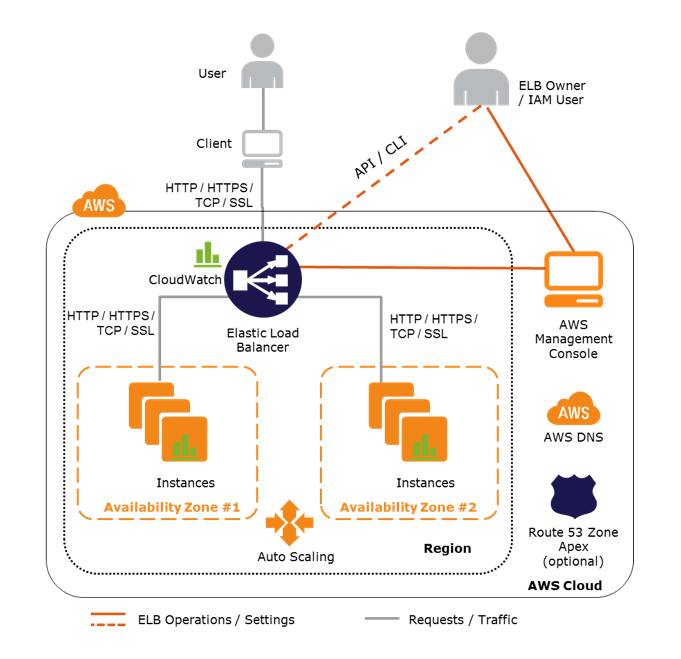
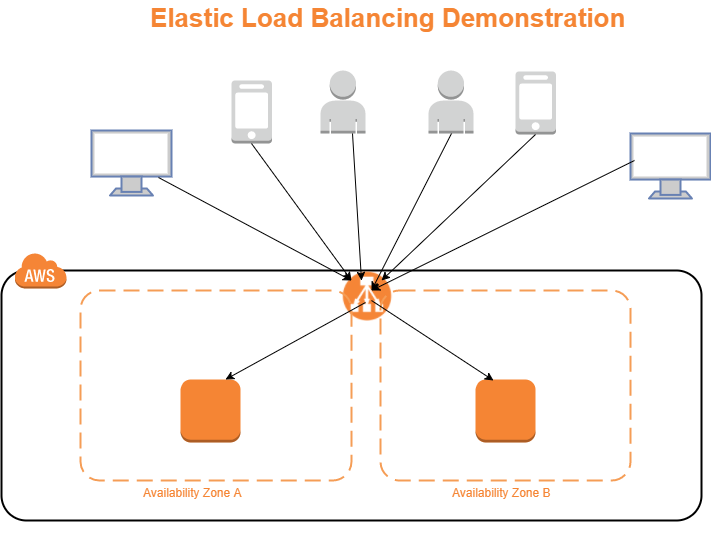
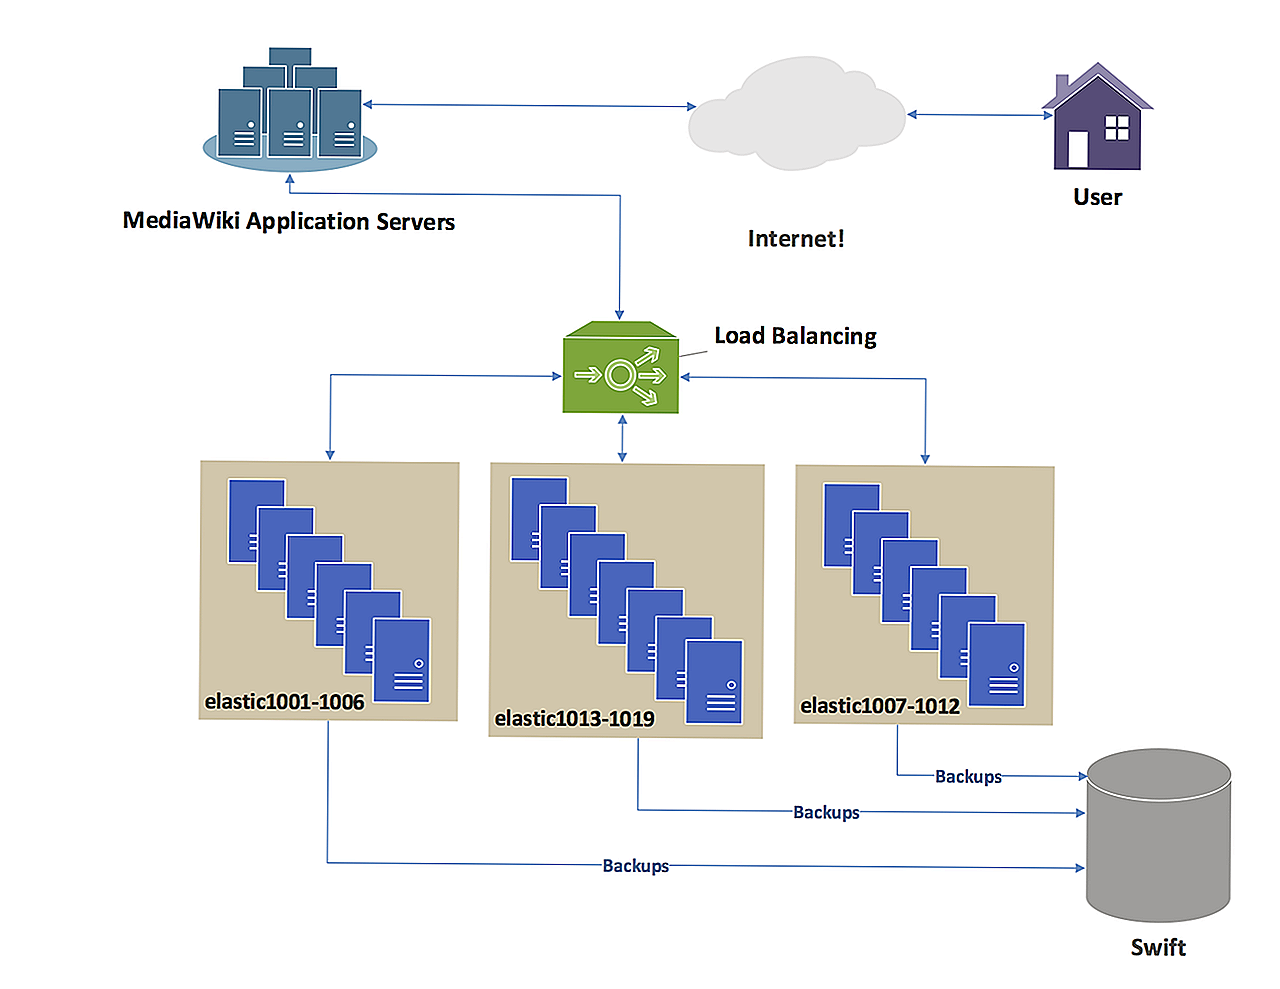
Разделение инстансов Amazon EC2 по разным зонам доступности еще больше повышает надежность приложений. Функция Elastic Load Balancing еще больше повышает отказоустойчивость и снижает необходимость человеческого вмешательства. Отказоустойчивость можно повысить путем расположения инстансов EC2 за балансировщиком нагрузки, так как он автоматически распределяет трафик между несколькими инстансами EC2 и несколькими зонами доступности и следит за тем, чтобы нагрузка попадала только на здоровые инстансы Amazon EC2. Elastic Load Balancer позволяет перераспределять входящий трафик приложений между инстансами Amazon EC2 в одной или нескольких зонах доступности. Elastic Load Balancing следит за состоянием каждого подключенного инстанса Amazon EC2. При ухудшении состояния инстанса Amazon EC2 подача трафика к нему прекращается, а его трафик перенаправляется на более свободные инстансы. Если в одной зоне доступности нет ни одного здорового инстанса EC2 и у вас есть инстансы в других зонах доступности, то Elastic Load Balancing выполнит маршрутизацию трафика на них. По восстановлении состояния этого инстанса на него снова будет направлен трафик.
Переброс сервиса DNS в системе Elastic Load Balancing
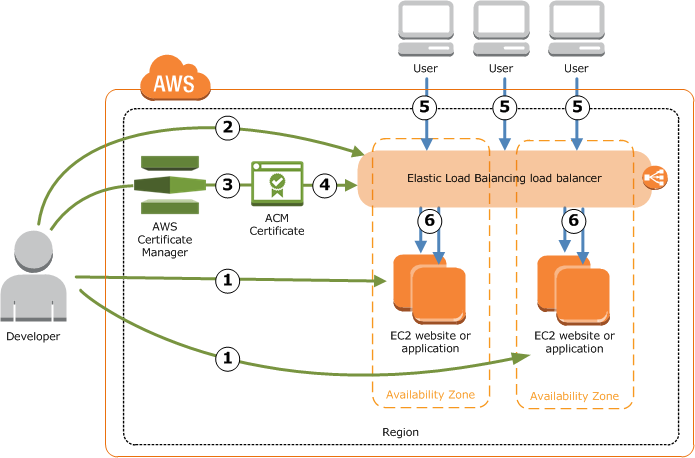
Возможности переброса сервиса DNS и мониторинга состояния системы Amazon Route 53 еще больше повышают доступность приложений, работающих за балансировщиками нагрузки. Route 53 перехватит работу балансировщика нагрузки, если в наличии не осталось здоровых инстансов EC2 или если состояние самого балансировщика упало.
Переброс сервиса DNS при помощи Route 53 позволяет поддерживать работу приложений в разных регионах AWS и назначать альтернативные балансировщики для переброса сервиса в другие регионы. В случае отказа приложения Route 53 перенаправит запросы с упавшего балансировщика нагрузки на альтернативный в другом регионе.
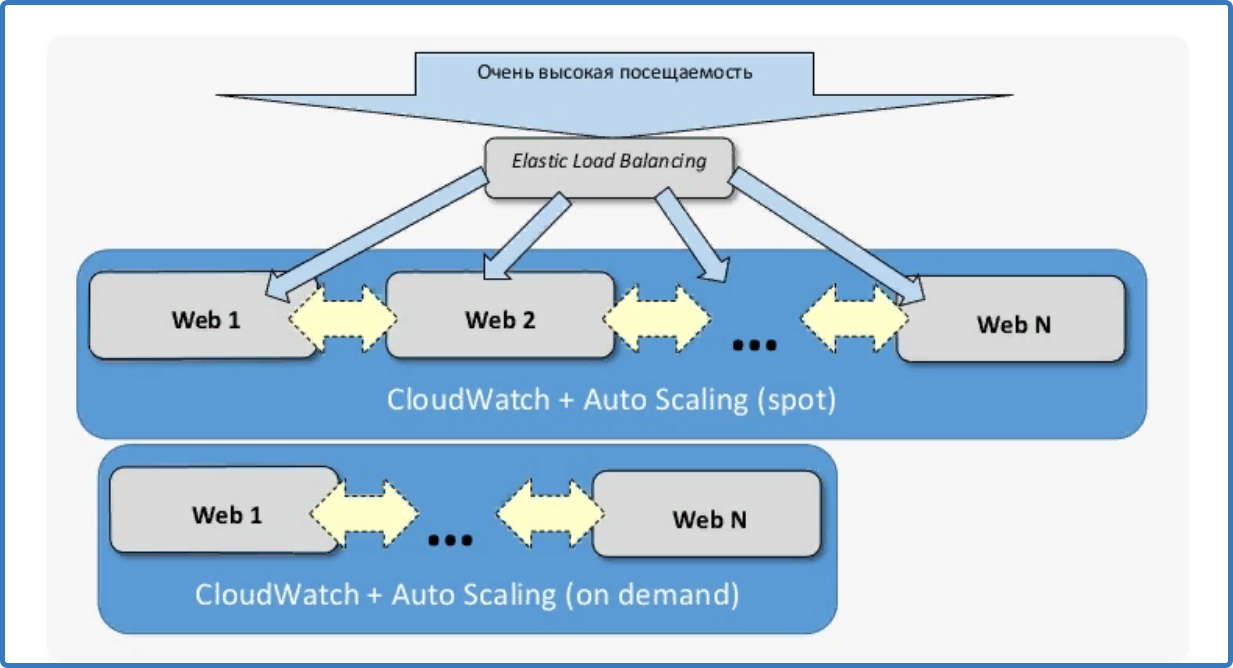
Auto Scaling в системе Elastic Load Balancing
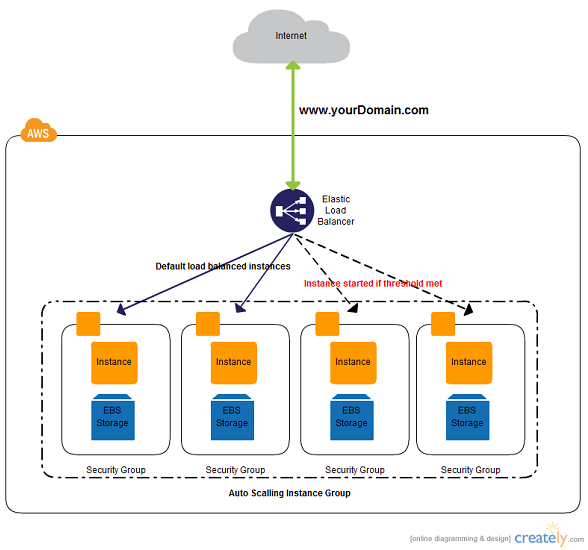
Представим, что необходимо постоянно иметь как минимум два здоровых инстанса Amazon EC2 под управлением Elastic Load Balancer. Выставим эти условия в системе Auto Scaling, и при невыполнении условий необходимое количество инстансов Amazon EC2 будет автоматически добавлено в вашу группу Auto Scaling. Или же, если необходимо, чтобы при превышении любым из инстансов Amazon EC2 задержки в 4 секунды в течение 15 минут добавлялся новый – достаточно установить это условие в настройках, и система Auto Scaling сделает все остальное. Auto Scaling работает одинаково хорошо с инстансами Amazon EC2, независимо от того, используется ли Elastic Load Balancing или нет.
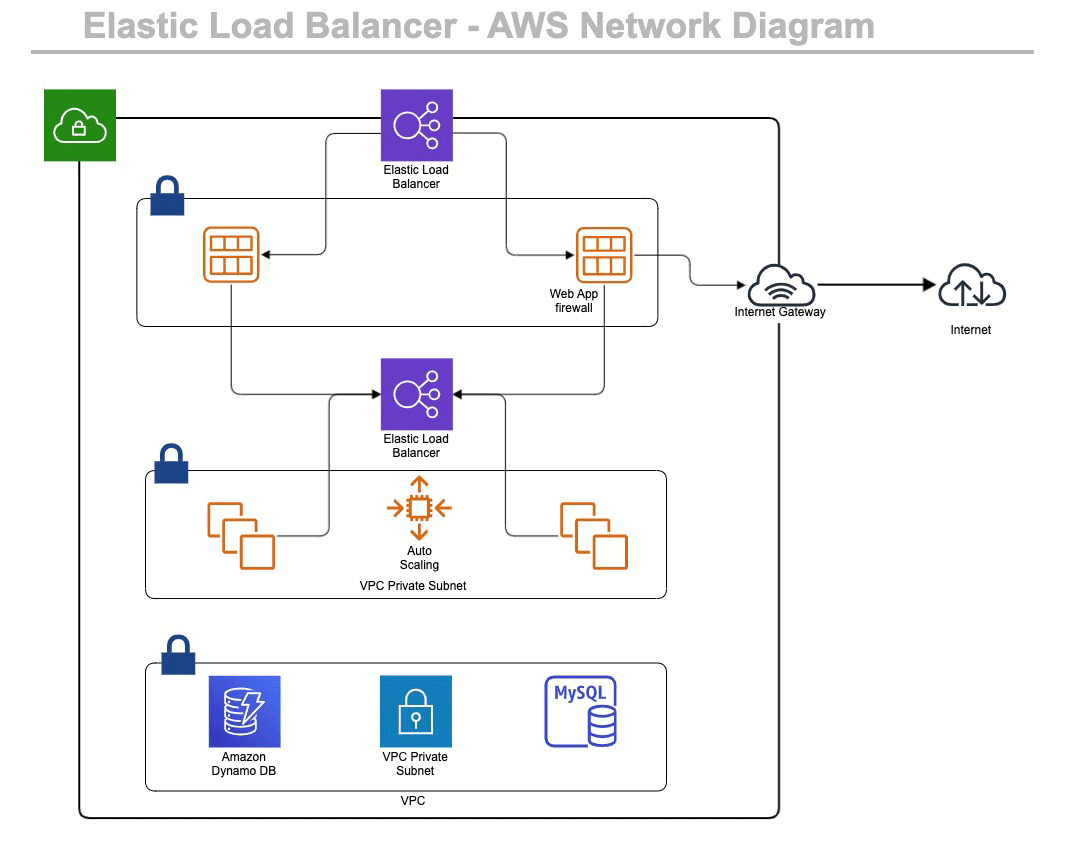
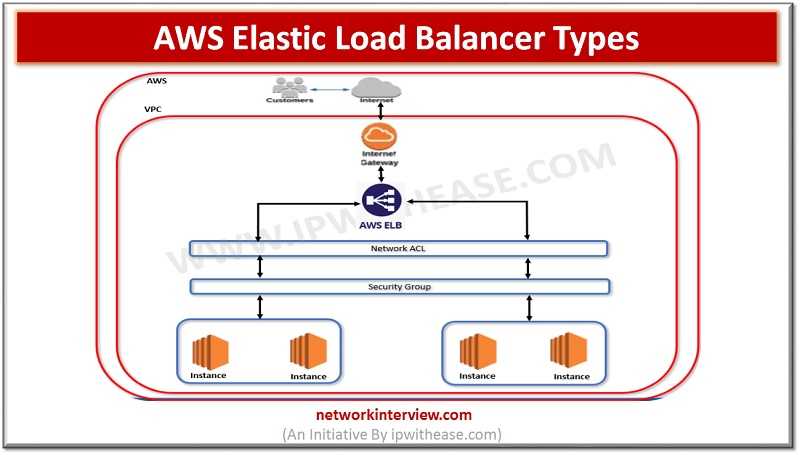
Использование Elastic Load Balancing в Amazon VPC
Elastic Load Balancing упрощает процесс создания точки входа в VPC из сети Интернет для балансировки нагрузки между уровнями приложений. Можно определить группы безопасности на ELB и контролировать порты и доступ к ним с разрешенных ресурсов. Так как Elastic Load Balancing подключен к VPC, все имеющиеся сетевые списки контроля доступа (ACL) и таблицы маршрутизации продолжают предоставлять дополнительные возможности управления сетью.
При создании балансировщика нагрузки в VPC можно выбрать его тип: внешний (по умолчанию) или внутренний. При выборе внутреннего доступ к нему будет осуществляться без интернет-шлюза, а в соответствующей записи DNS будет использоваться его частный IP.
Create your IPv4 load balancer
To create your first load balancer, complete the following steps.
To create a IPv4 load balancer
-
Use the create-load-balancer command to create an IPv4 load balancer,
specifying a public subnet for each Availability Zone in which you launched
instances. You can specify only one subnet per Availability Zone.The output includes the Amazon Resource Name (ARN) of the load balancer, with
the following format: -
Use the create-target-group command to create an IPv4 target group,
specifying the same VPC that you used for your EC2 instances. IPv4 target groups
support IP and instance type targets.The output includes the ARN of the target group, with this format:
-
Use the register-targets command to register your instances with your
target group: -
Use the create-listener command to create a listener for your load balancer
with a default rule that forwards requests to your target group:The output contains the ARN of the listener, with the following format:
-
(Optional) You can verify the health of the registered targets for your target
group using this describe-target-health command:
Create your dualstack load balancer
To create your first load balancer, complete the following steps.
To create a dualstack load balancer
-
Use the create-load-balancer command to create a dualstack load balancer,
specifying a public subnet for each Availability Zone in which you launched
instances. You can specify only one subnet per Availability Zone.The output includes the Amazon Resource Name (ARN) of the load balancer, with
the following format: -
Use the create-target-group command to create a target group, specifying
the same VPC that you used for your EC2 instances.You must use either a TCP or TLS target group with your dualstack load
balancer.You can create IPv4 and IPv6 target groups to associate with dualstack load
balancers. The target group’s IP address type determines the IP version that the
load balancer will use to both communicate with, and check the health of, your
backend targets.IPv4 target groups support IP and instance type targets. IPv6 targets only
support IP targets.The output includes the ARN of the target group, with this format:
-
Use the register-targets command to register your instances with your
target group: -
Use the create-listener command to create a listener for your load balancer
with a default rule that forwards requests to your target group. Dualstack load
balancers must have TCP or TLS listeners.The output contains the ARN of the listener, with the following format:
-
(Optional) You can verify the health of the registered targets for your target
group using this describe-target-health command:
Delete a rule
You can delete the nondefault rules for a listener at any time. You cannot delete
the default rule for a listener. When you delete a listener, all its rules are
deleted.
To delete a rule using the console
-
Open the Amazon EC2 console at
https://console.aws.amazon.com/ec2/. -
On the navigation pane, under LOAD BALANCING, choose
Load Balancers. -
Select the load balancer and choose Listeners.
-
For the listener to update, choose View/edit
rules. -
Choose the Delete rules icon (the minus sign) in the
menu bar. -
Select the check box for the rule and choose Delete.
You can’t delete the default rule for the listener. -
To leave this screen, choose the Back to the load
balancer icon (the back button) in the menu bar.
To delete a rule using the AWS CLI
Use the delete-rule
command.
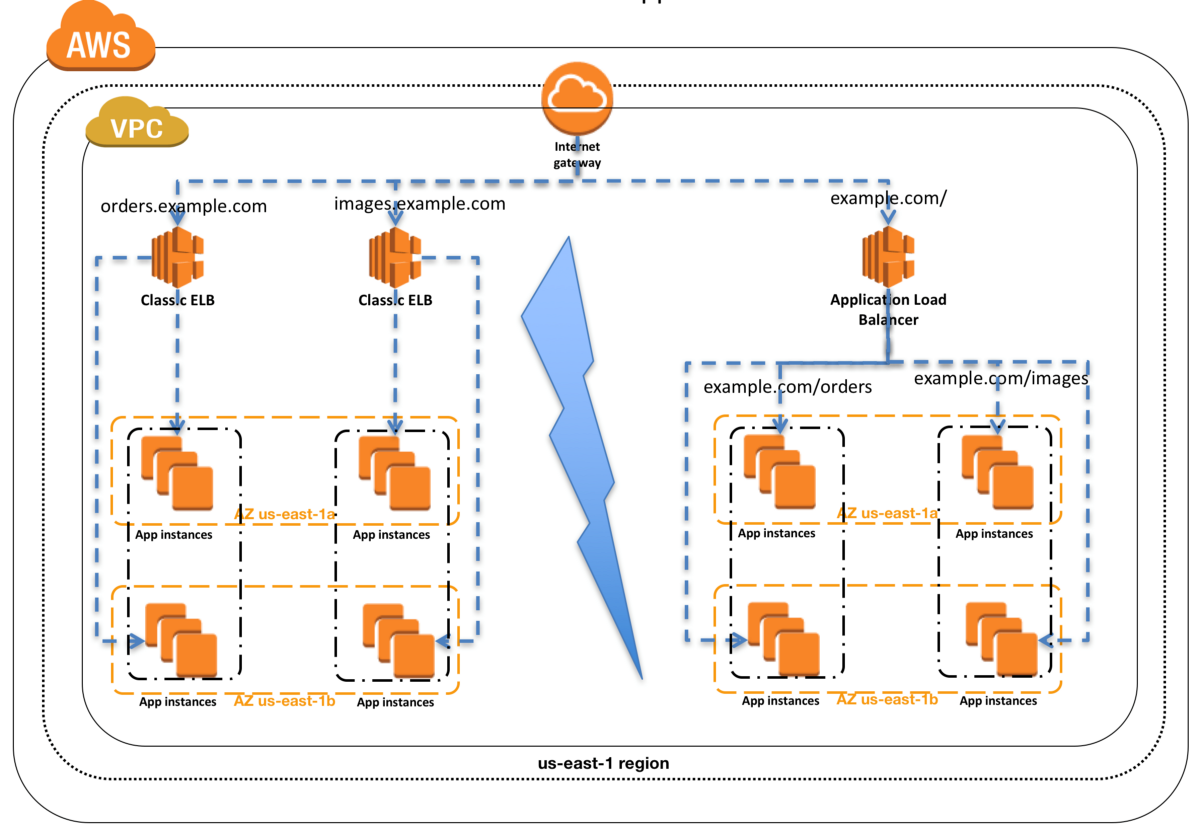
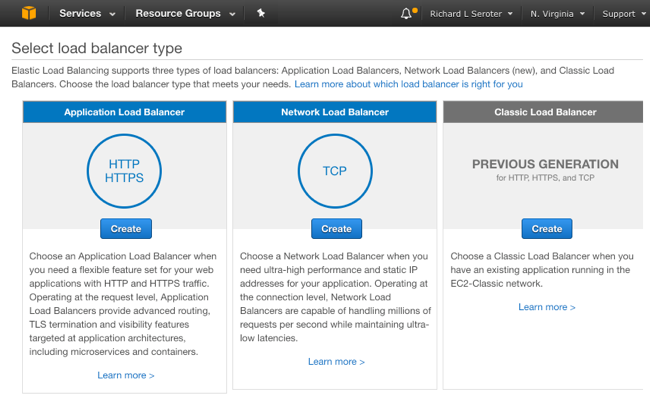
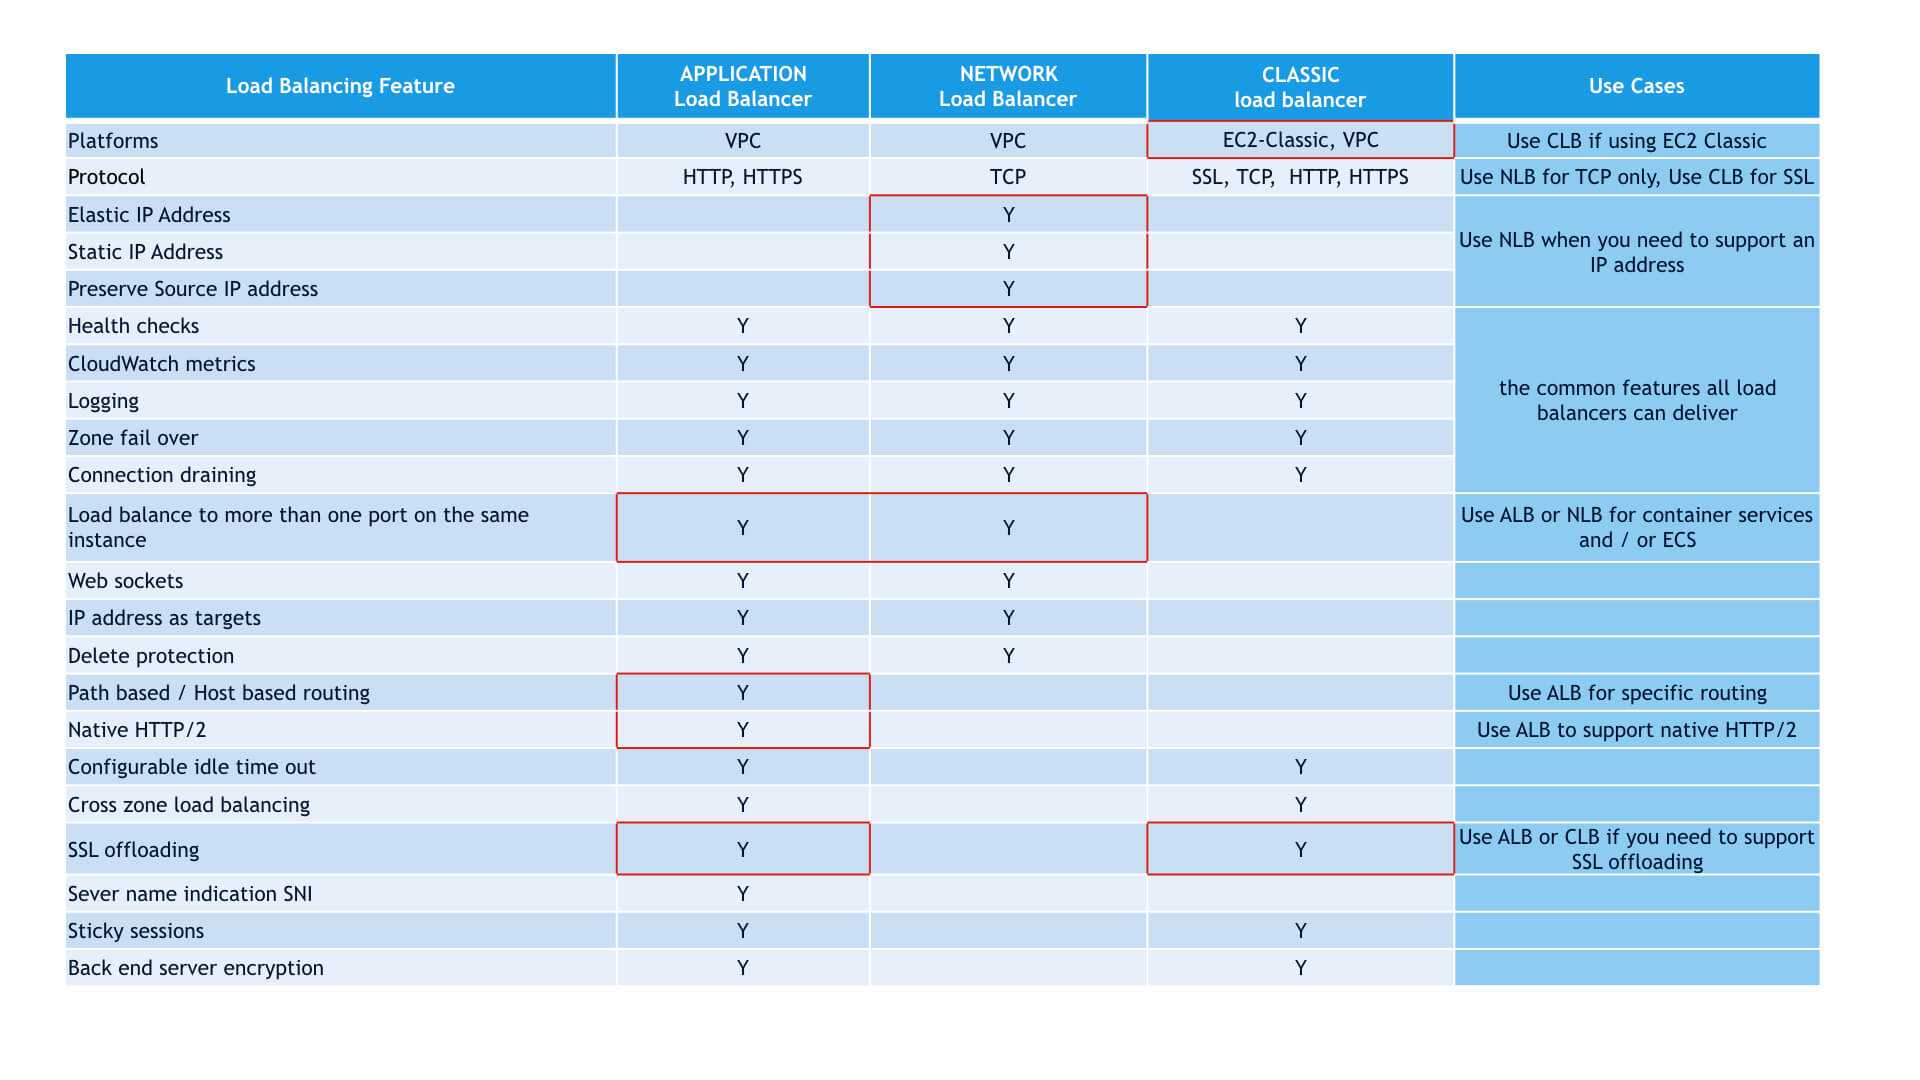
-The Application Load Balancer-
Supports IPV6.
Instances are called targets and groups of instances that are part of the same load balancing scheme are part of a target group.
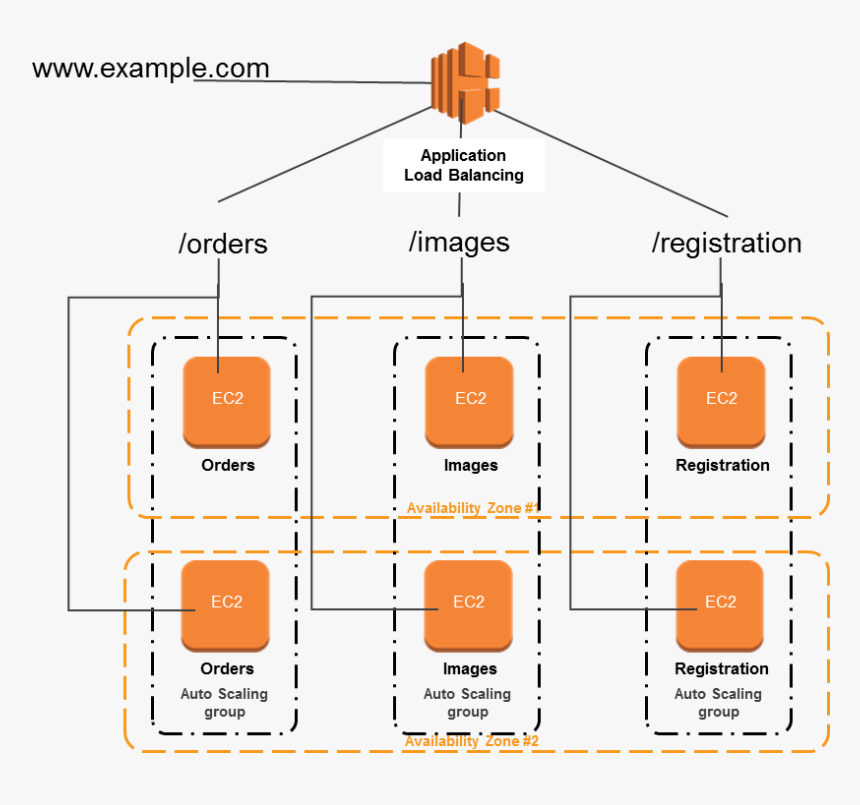
Rules are associated with a listener. They tell the Load Balancer how to route requests to the targets in one or more target groups. Each rule consists of:
- Priority (lowest to highest) (default rule has lowest)
- Action (only “forward”)
- Optional host condition (multiple domains for single Load Balancer)
- Optional path condition
Support for container-based applications using Amazon ECS (EC2 Container Service). Containers are like having multiple servers on an instance. Each container runs applications independently of other containers. When launching a container, it is automatically registered with the Load Balancer. The Application Load Balancer support dynamic host port mapping. Understanding container-based applications is out-of-scope of this article.
Access logs are stored in compressed format.
The Application Load Balancer outperforms the Classic Load Balancer.
Conclusion
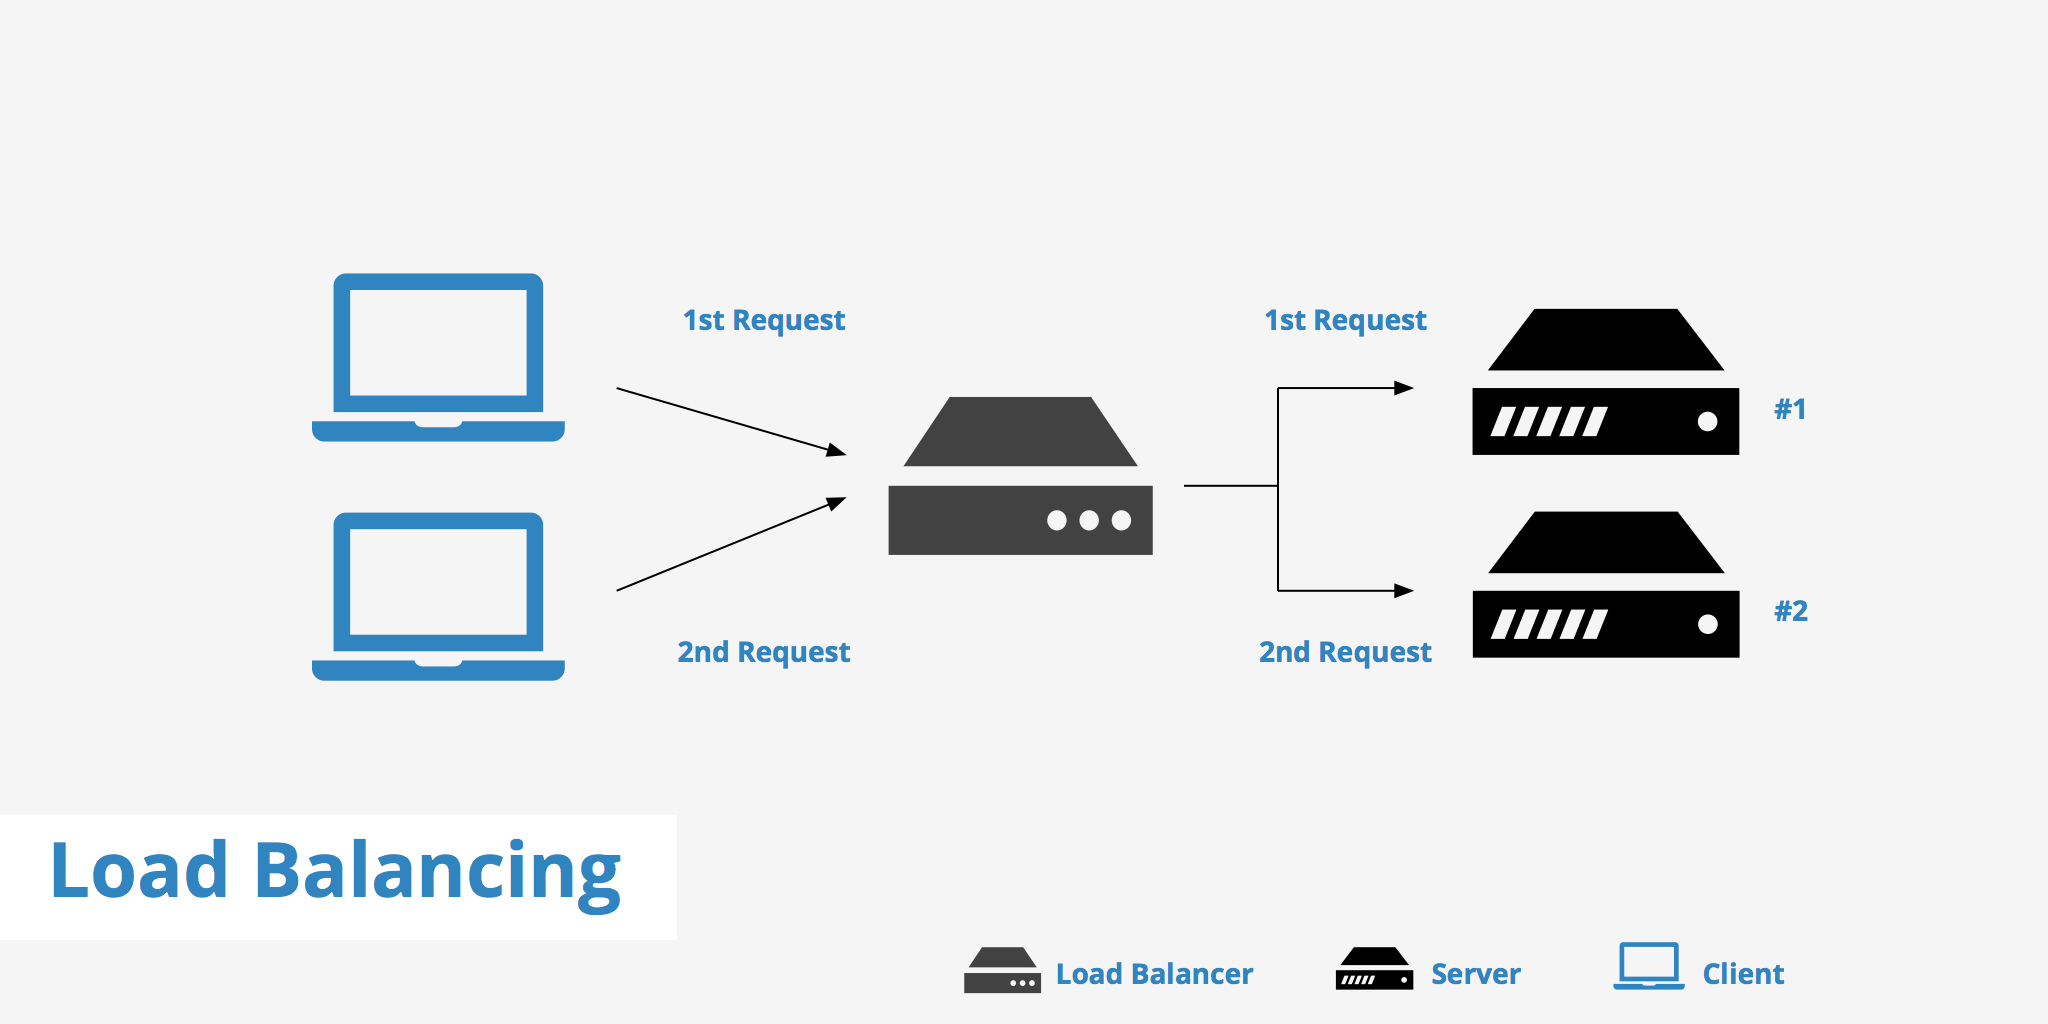
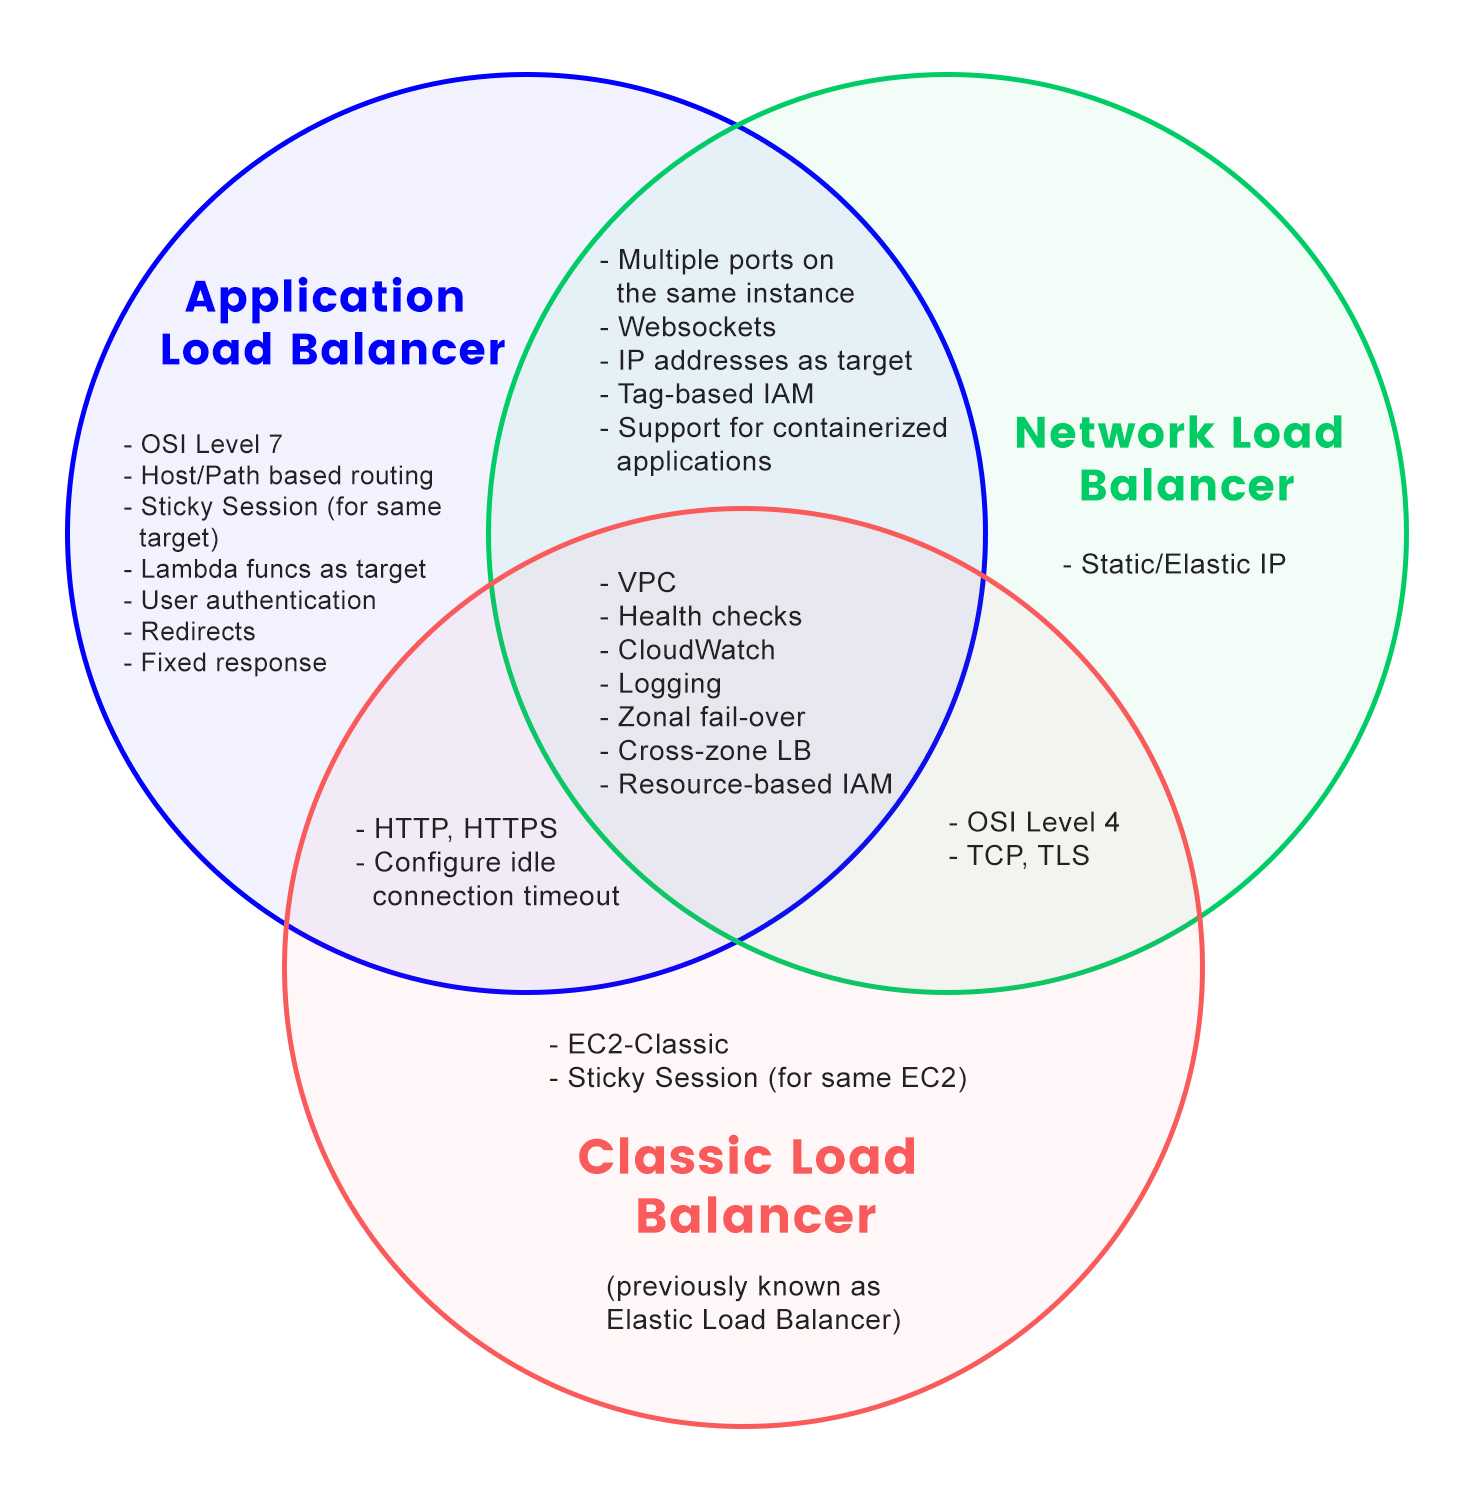
So now you know how great the AWS Elastic Load Balancing service is. You know how load balancing works and what is the difference between the Classic Load Balancer and the Application Load Balancer.

Where to get more information?
Start with AWS website which contains pretty much all you need to know:
A more in depth view:
Videos, labs and quizzes, perfect to learn more. Do note this is not free but well worth the money:
A useful YouTube video:
https://www.youtube.com/watch?v=qy7zNaDTYGQ
Before we say goodbye
I hope this article helped you better understand AWS Elastic Load Balancing and you now have enough knowledge to move forward. I am in no way a professional writer so your feedback would be greatly appreciated. I hope you enjoyed your reading, or at least got what you wanted from it. More articles will come, I just need time to write them J. If you need an AWS Solutions Architect, don’t hesitate to contact me.
Veronique Robitaille
Certified AWS Solutions Architect
+34 963 684 585
Cross-zone load balancing
By default, each load balancer node distributes traffic across the registered targets
in its Availability Zone only. If you enable cross-zone load balancing, each load
balancer node distributes traffic across the registered targets in all enabled
Availability Zones. For more information, see in the
Elastic Load Balancing User Guide.
To enable cross-zone load balancing using the console
-
Open the Amazon EC2 console at
https://console.aws.amazon.com/ec2/. -
In the navigation pane, under LOAD BALANCING, choose
Load Balancers. -
Select the load balancer.
-
Choose Description, Edit
attributes. -
In the Edit load balancer attributes dialog, select
Enable for Cross-zone load
balancing, and choose Save.
To disable cross-zone load balancing using the console
Use the steps above from step 1 to step 4. Then, in the Edit load
balancer attributes dialog, clear Enable from
Cross-zone load balancing, and choose
Save.
To enable or disable cross-zone load balancing using the AWS CLI
Use the modify-load-balancer-attributes command with the
attribute, where the possible
values are (to enable cross-zone load balancing), and
(to disable cross-zone load balancing). The default is
.
Steps
Create an AWS Application Load Balancer by going to EC2 management console.
![]()
Select Load Balancers from EC2 Console
![]()
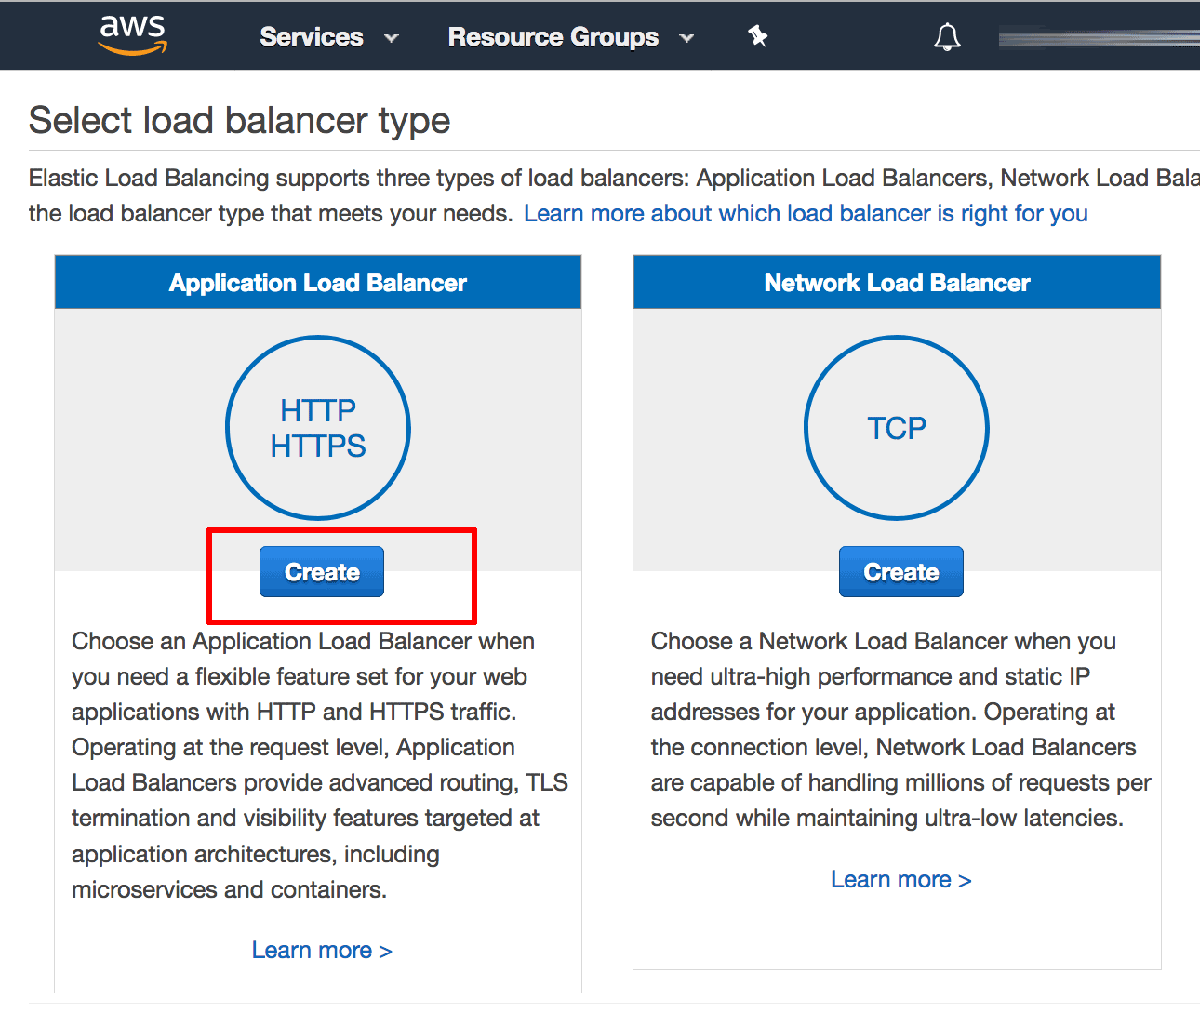
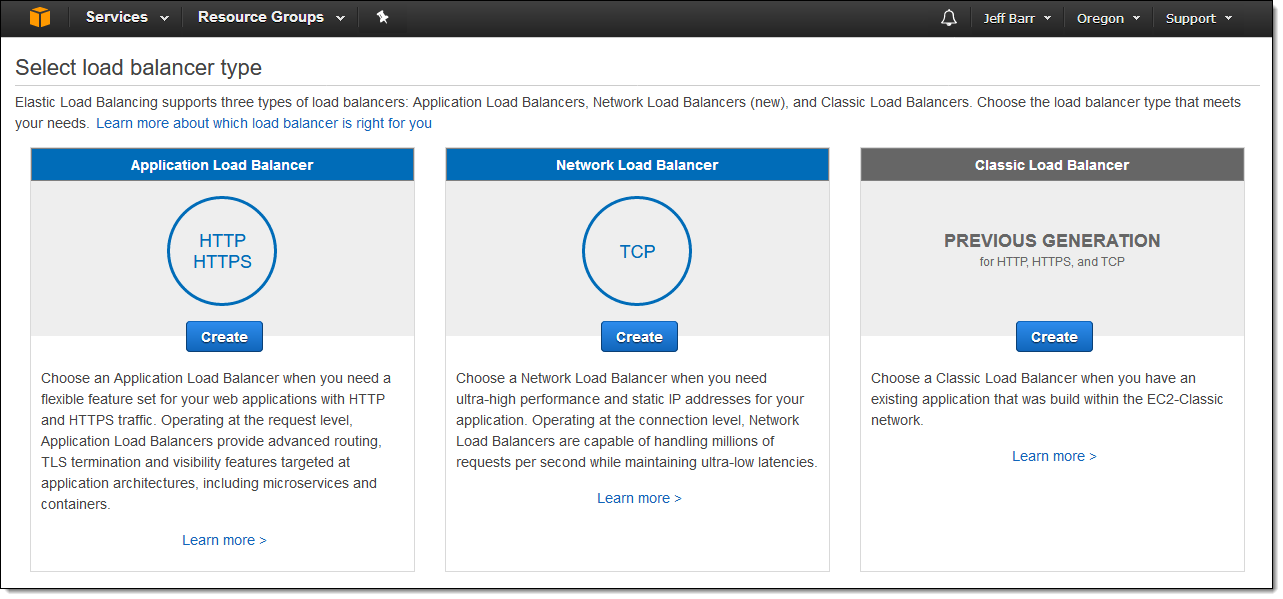
Click on Create Load Balancer
![]()
Click on Create in Application Load Balancer panel
![]()
Choose internet-facing
You want HTTPS site redirection also then you can add HTTPS listener by clicking on Add listener. You also need to have an ACM certificate in the same region else you can’t create ALB with HTTPS listener.
![]()
Only required incase you want to redirect a HTTPS website
![]()
Select at least 2 subnets
![]()
Select a certificate matching to the site domain names
You can create single certificate with multiple site domains from the AWS console. But if you use AWS CLI or API you can create and attach multiple certificates to HTTPS listener of the ALB . Please note: there is no option to attach multiple certificates to an ALB listener in AWS console.
I have chosen default VPC here but you can use a custom VPC also but make sure that it has at lease 2 subnets.
![]()
Click on Create a new security group
If you want HTTPS site redirection also then you can add HTTPS port: 443 whitelisting by clicking on Add Rule.
![]()
Only required incase you want to redirect a HTTPS website
![]()
Create a Target and Click Next
We won’t be using it but we need to give at least one target to create an ALB.
![]()
Click on Next to Review
We don’t need to register any instances to the target for site redirection. So go to the Review page and then Click on Create.
![]()
Navigate to Listeners Tab and Click on View/edit rules
![]()
Click on Insert Rule
Click on + icon next Rules (top-left) then click on Insert Rule.
![]()
Click on Add condition and then on Host is…
![]()
Enter your old domain in IF section and select Redirect to… in THEN section
![]()
Enter details of the new domain in THEN section
Here we are setting up redirection for http://www.myolddomain.com to https://www.mynewdomain.com, if you want setup direction to a HTTP site then change it appropriately.
We can also use the above procedure for following commonly used redirects:
http://mynewdomain.com to http://www.mynewdomain.com or https://www.mynewdomain.com
http://www.mynewdomain.com to https://www.mynewdomain.com
![]()
Path based redirection
We can also redirect particular path of one domain to other using Path condition as show in the above picture.
You can follow above steps to add more site redirection rules to HTTP listener.
![]()
Click on HTTP : 443-View/edit rules to add HTTPS site redirections
To add HTTPS site redirection rules, click on View/edit rules for HTTP : 443 (HTTPS) listener in ALB Listeners tab and follow the same steps as HTTP listener.
![]()
Use CNAME of the ALB to configure your site(s) DNS settings
Use the DNS (CNAME) of the ALB to configure the DNS settings of the sites for which you want the redirection to happen.
Before you begin
-
Use the following command to verify that you are running a version of the
AWS CLI that supports Application Load Balancers.If you get an error message that elbv2 is not a valid choice, update your
AWS CLI. For more information, see Installing the AWS Command Line Interface in the
AWS Command Line Interface User Guide. -
Launch your EC2 instances in a virtual private cloud (VPC). Ensure that the
security groups for these instances allow access on the listener port and the
health check port. For more information, see . -
-
Decide if you will create an IPv4 or dualstack load balancer. Use IPv4 if you
want clients to communicate with the load balancer using IPv4 addresses only.
Use dualstack if you want clients to communicate with the load balancer using
IPv4 and IPv6 addresses. You can also use dualstack to communicate with backend
targets, such as IPv6 applications or dualstack subnets, using IPv6.
Reorder rules
Rules are evaluated in priority order, from the lowest value to the highest value.
The default rule is evaluated last. You can change the priority of a nondefault rule
at any time. You cannot change the priority of the default rule.
Note
The console displays a relative sequence number for each rule, not the rule
priority. When you reorder rules using the console, they get new rule priorities
based on the existing rule priorities. To set the priority of a rule to a
specific value, use the AWS CLI or the Elastic Load Balancing API.
To reorder rules using the console
-
Open the Amazon EC2 console at
https://console.aws.amazon.com/ec2/. -
On the navigation pane, under LOAD BALANCING, choose
Load Balancers. -
Select the load balancer and choose Listeners.
-
For the listener to update, choose View/edit
rules. -
Choose the Reorder rules icon (the arrows) in the
menu bar. -
Select the check box next to a rule, and then use the arrows to give the
rule a new priority. The default rule always has the last priority. -
When you have finished reordering rules, choose
Save. -
To leave this screen, choose the Back to the load
balancer icon (the back button) in the menu bar.
To update rule priorities using the AWS CLI
Use the set-rule-priorities command.
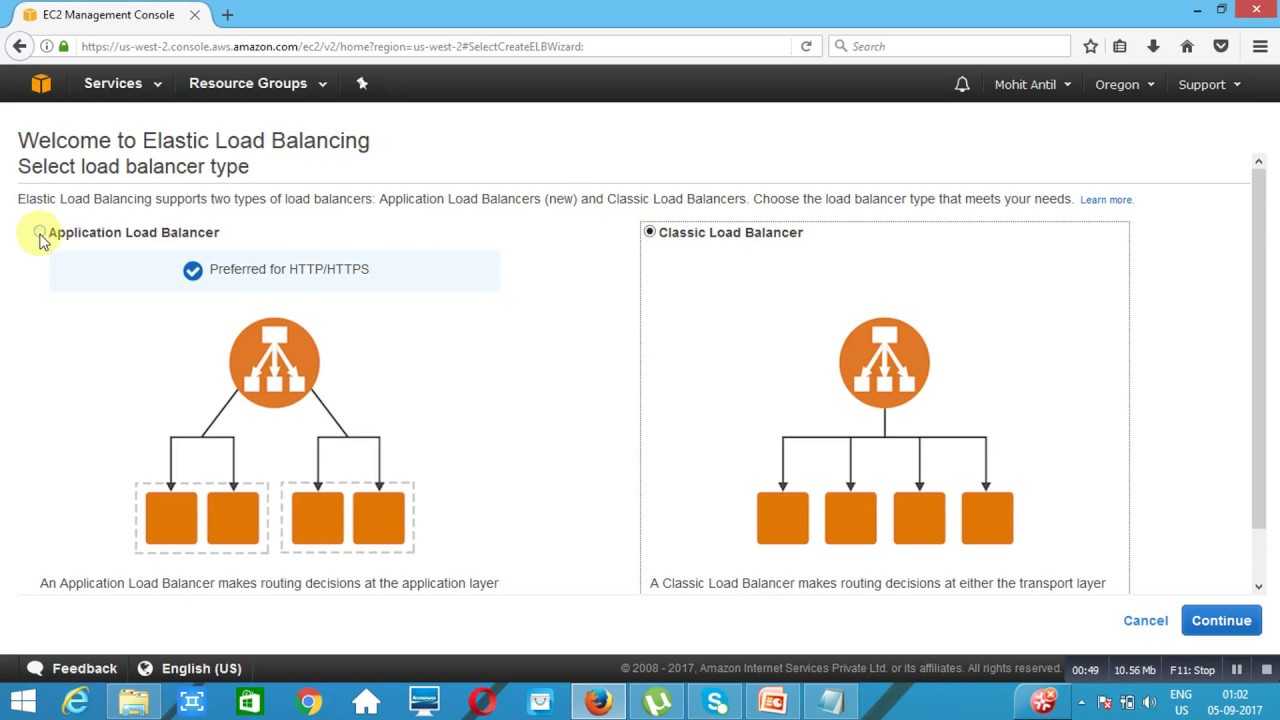
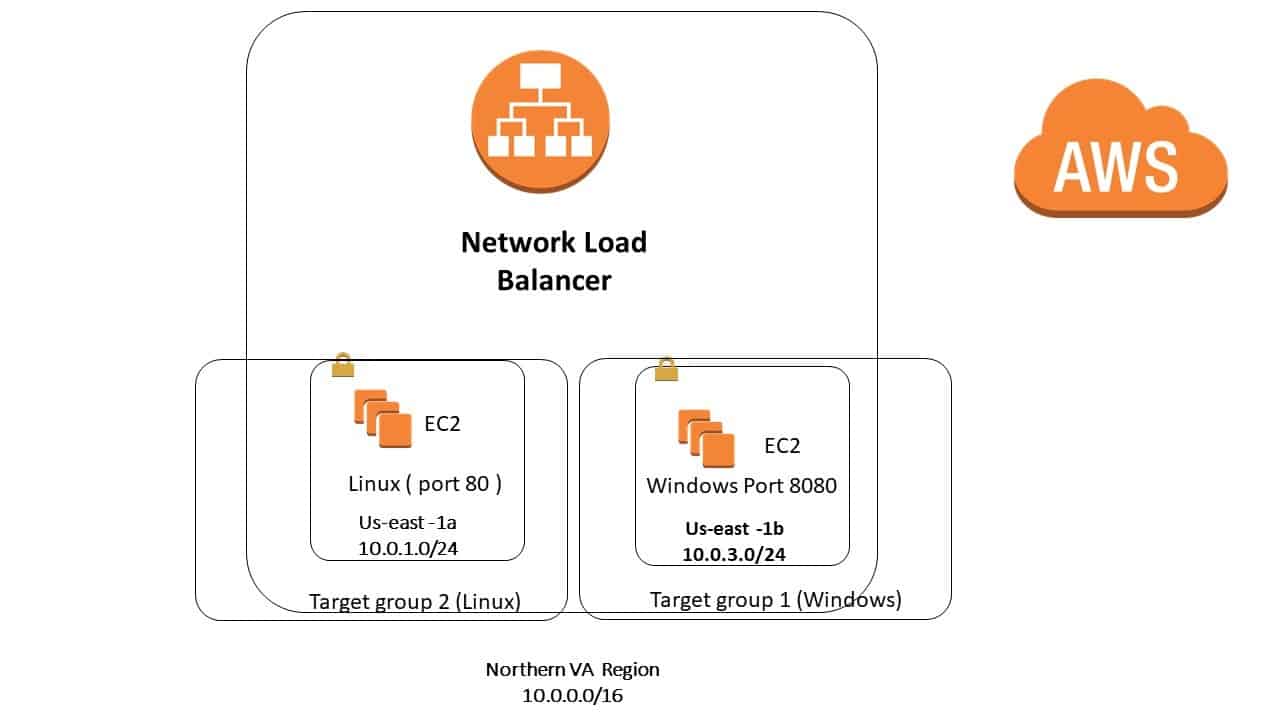
Application Load Balancer
An Application Load Balancer makes routing decisions at the application layer (HTTP/HTTPS),
supports path-based routing, and can route requests to one or more ports on each
container instance in your cluster. Application Load Balancers support dynamic host
port mapping.
For example, if your task’s container definition specifies port 80 for an NGINX
container port, and port 0 for the host port, then the host port is dynamically
chosen from the ephemeral port range of the container instance (such as 32768 to
61000 on the latest Amazon ECS-optimized AMI). When the task is launched, the NGINX
container is registered with the Application Load Balancer as an instance ID and port
combination,
and traffic is distributed to the instance ID and port corresponding to that
container. This dynamic mapping allows you to have multiple tasks from a single
service on the same container instance. For more information, see the
User Guide for Application Load Balancers.
![]()
Connection idle timeout
For each TCP request that a client makes through a Network Load Balancer, the state
of that connection
is tracked. If no data is sent through the connection by either the client or target
for
longer than the idle timeout, the connection is closed. If a client or a target sends
data after the idle timeout period elapses, it receives a TCP RST packet to indicate
that the connection is no longer valid.
Elastic Load Balancing sets the idle timeout value for TCP flows to 350 seconds. You
cannot modify this
value. Clients or targets can use TCP keepalive packets to reset the idle timeout.
Keepalive packets sent to maintain TLS connections cannot contain data or
payload.
While UDP is connectionless, the load balancer maintains UDP flow state based on the
source and destination IP addresses and ports, ensuring that packets that belong to
the
same flow are consistently sent to the same target. After the idle timeout period
elapses, the load balancer considers the incoming UDP packet as a new flow and routes
it
to a new target. Elastic Load Balancing sets the idle timeout value for UDP flows
to 120 seconds.
EC2 instances must respond to a new request within 30 seconds in order to establish
a
return path.
IP address type
When creating a new target group, you can select the IP address type of your target
group. This controls the IP version used to communicate with targets and check their
health status.
Network Load Balancers support both IPv4 and IPv6 target groups. The default selection
is IPv4. IPv6
target groups can only be associated with dualstack Network Load Balancers.
Considerations
-
All IP addresses within a target group must have the same IP address type. For
example, you can’t register an IPv4 target with an IPv6 target group. -
IPv6 target groups can only be used with load balancers
with TCP or a TLS listeners. -
IPv6 target groups only support IP type targets.
Bucket permissions
When you enable access logging, you must specify an S3 bucket for the access logs.
The bucket must meet the following requirements.
Requirements
-
The bucket must be located in the same Region as the load balancer.
-
The bucket must have a bucket policy that grants Elastic Load Balancing permission
to write
the access logs to your bucket. Bucket policies are a collection of JSON
statements written in the access policy language to define access
permissions for your bucket. Each statement includes information about a
single permission and contains a series of elements.
You can enable server-side encryption for your Amazon S3 access log bucket using Amazon
S3-Managed Encryption Keys (SSE-S3).
For more information, see Protecting data using server-side encryption with Amazon S3-managed encryption keys
(SSE-S3) and in the Amazon Simple Storage Service User Guide.
Options
Use one of the following options to prepare an S3 bucket for access
logging.
-
To create a bucket and enable access logging using the Elastic Load Balancing console,
skip
to and select the option to have
the console create the bucket and bucket policy for you. -
To use an existing bucket and add the required bucket policy using the
Amazon S3 console, use the following procedure but skip the steps marked «». -
To create a bucket and add the required bucket policy using the Amazon S3
console (for example, if you are using the AWS CLI or an API to enable access
logging), use the following procedure.
To prepare an Amazon S3 bucket for access logging
-
Open the Amazon S3 console at
https://console.aws.amazon.com/s3/. -
Choose Create
bucket. -
On the Create bucket
page, do the following:-
For Bucket name, enter a name for your
bucket. This name must be unique across all existing bucket names in
Amazon S3. In some Regions, there might be additional restrictions on
bucket names. For more information, see Bucket restrictions
and limitations in the
Amazon Simple Storage Service User Guide. -
For Region, select the Region where you
created your load balancer. -
Choose Create.
-
-
Select the bucket. Choose Permissions and then choose
Bucket Policy. -
If you are creating a new bucket policy, copy the entire policy document
to the policy editor, then replace the placeholders with the corresponding
information. If you are editing an existing bucket policy, copy only the new
statement from the policy document (the text between the of the
element).Use the following policy. Update the
placeholders for the name and prefix for your bucket, the ID of the AWS
account for Elastic Load Balancing (based on the Region for your load balancer), and
the ID
of your AWS account.The following table contains the account IDs to use in place of
in your bucket policy.Region Region name Elastic Load Balancing account ID US East (N. Virginia) 127311923021 US East (Ohio) 033677994240 US West (N. California) 027434742980 US West (Oregon) 797873946194 Africa (Cape Town) 098369216593 Canada (Central) 985666609251 Europe (Frankfurt) 054676820928 Europe (Ireland) 156460612806 Europe (London) 652711504416 Europe (Milan) 635631232127 Europe (Paris) 009996457667 Europe (Stockholm) 897822967062 Asia Pacific (Hong Kong) 754344448648 Asia Pacific (Tokyo) 582318560864 Asia Pacific (Seoul) 600734575887 Asia Pacific (Osaka) 383597477331 Asia Pacific (Singapore) 114774131450 Asia Pacific (Sydney) 783225319266 Asia Pacific (Mumbai) 718504428378 Middle East (Bahrain) 076674570225 South America (São Paulo) 507241528517 * AWS GovCloud (US-West) 048591011584 * AWS GovCloud (US-East) 190560391635 * China (Beijing) 638102146993 * China (Ningxia) 037604701340 * These Regions requires a separate account. For more information, see
AWS GovCloud (US-West) and
China (Beijing).Use the following policy. Update the placeholders for the name
and prefix for your bucket and the ID of your AWS account. -
-
Choose Save.

IP address type
You can set the types of IP addresses that clients can use to access your
internet-facing and internal load balancers.
The following are the IP address types:
-
Clients must connect to the load balancer using IPv4 addresses (for
example, 192.0.2.1) -
Clients can connect to the load balancer using both IPv4 addresses (for
example, 192.0.2.1) and IPv6 addresses (for example,
2001:0db8:85a3:0:0:8a2e:0370:7334).
Dualstack load balancer considerations
-
The load balancer communicates with targets based on the IP address type of
the target group. -
When you enable dualstack mode for the load balancer, Elastic Load Balancing provides
an AAAA
DNS record for the load balancer. Clients that communicate with the load
balancer using IPv4 addresses resolve the A DNS record. Clients that communicate
with the load balancer using IPv6 addresses resolve the AAAA DNS record. -
Access to your internal dualstack load balancers through the internet gateway
is blocked to prevent unintended internet access. However, this does not prevent
non-IWG internet access (such as, through peering, Transit Gateway, AWS Direct Connect,
or
AWS VPN).
Edit a rule
You can edit the action and conditions for a rule at any time. Rule updates do not
take effect immediately, so requests could be routed using the previous rule
configuration for a short time after you update a rule. Any in-flight requests are
completed.
To edit a rule using the console
-
Open the Amazon EC2 console at
https://console.aws.amazon.com/ec2/. -
On the navigation pane, under LOAD BALANCING, choose
Load Balancers. -
Select the load balancer and choose Listeners.
-
For the listener to update, choose View/edit
rules. -
Choose the Edit rules icon (the pencil) in the menu
bar. -
For the rule to edit, choose the Edit rules icon (the
pencil). -
(Optional) Modify the conditions and actions as needed. For example, you
can edit a condition or action (pencil icon), add a condition, add an
authenticate action to a rule for an HTTPS listener, or delete a condition
or action (trash can icon). You can’t add conditions to the default
rule. -
Choose Update.
-
To leave this screen, choose the Back to the load
balancer icon (the back button) in the menu bar.
To edit a rule using the AWS CLI
Use the modify-rule
command.
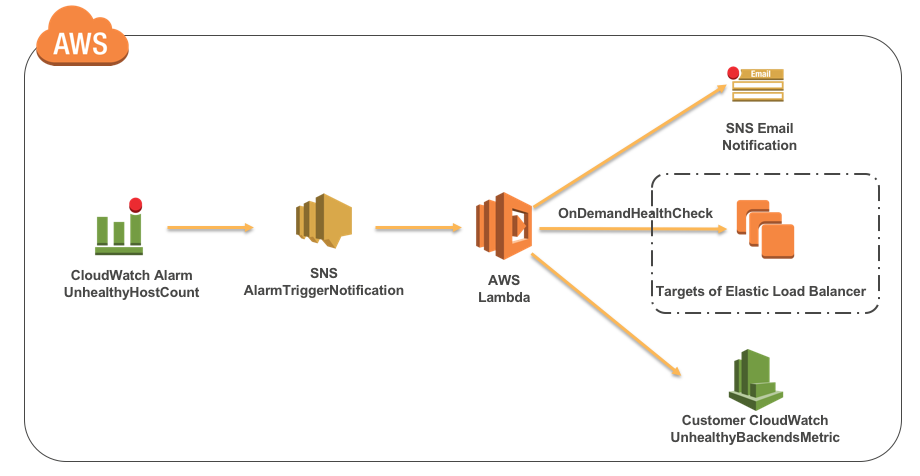
Step 4: Configure health checks for your EC2 instances
Elastic Load Balancing automatically checks the health of the EC2 instances for your
load balancer.
If Elastic Load Balancing finds an unhealthy instance, it stops sending traffic
to the instance and
reroutes traffic to healthy instances. In this step, you customize the health checks
for your load balancer.
To configure health checks for your instances
-
On the Configure Health Check page, leave
Ping Protocol set to HTTP and Ping Port
set to 80. -
For Ping Path, replace the default value with a single forward
slash («/»). This tells Elastic Load Balancing to send health check queries to
the
default home page for your web server, such as . -
For Advanced Details, leave the default values.
-
Choose Next: Add EC2 Instances.


